

Warranty Information
Page 1
... environments including but not limited to high salt concentrations, high moisture or humidity or exposure to you . YOUR SOLE AND EXCLUSIVE REMEDY UNDER THIS LIMITED WARRANTY SHALL BE PRODUCT REPAIR AS PROVIDED HEREIN. Conversion of product replacement, your product. 3. This limited warranty is provided exclusively by Whirlpool. 8. Service or parts for service or repair of God or use inconsistent with original model/serial numbers removed, altered or not easily...
... environments including but not limited to high salt concentrations, high moisture or humidity or exposure to you . YOUR SOLE AND EXCLUSIVE REMEDY UNDER THIS LIMITED WARRANTY SHALL BE PRODUCT REPAIR AS PROVIDED HEREIN. Conversion of product replacement, your product. 3. This limited warranty is provided exclusively by Whirlpool. 8. Service or parts for service or repair of God or use inconsistent with original model/serial numbers removed, altered or not easily...
Installation Guide
Page 4
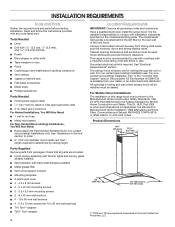
...; Home power supply cable ■■ 1/2" (12.7 mm) UL listed or CSA approved strain relief ■■ 3 UL listed wire connectors For Vented Installations, You Will Also Need: ■■ 1 wall or roof cap ■■ Metal vent system For Non-Vented (Recirculating) Installations, You Will Also Need: ■■ Recirculation Kit Part Number W10294733 for use with cooktops with local codes. See "Electrical Requirements" section. For non-vented (recirculating) installation see "For nonvented (recirculating) installation only" in ceiling and wall where canopy hood will...
...; Home power supply cable ■■ 1/2" (12.7 mm) UL listed or CSA approved strain relief ■■ 3 UL listed wire connectors For Vented Installations, You Will Also Need: ■■ 1 wall or roof cap ■■ Metal vent system For Non-Vented (Recirculating) Installations, You Will Also Need: ■■ Recirculation Kit Part Number W10294733 for use with cooktops with local codes. See "Electrical Requirements" section. For non-vented (recirculating) installation see "For nonvented (recirculating) installation only" in ceiling and wall where canopy hood will...

Installation Guide
Page 5
... or an authorized parts distributor. Cold Weather Installations An additional back draft damper should be installed to minimize backward cold air flow and a thermal break should be installed to minimize conduction of outside temperatures as possible to seal exterior wall or roof opening around the cap. ■■ The size of the house. 5 The chimney extension replaces the upper chimney shipped with the range hood. ■■ Use caulking to where...
... or an authorized parts distributor. Cold Weather Installations An additional back draft damper should be installed to minimize backward cold air flow and a thermal break should be installed to minimize conduction of outside temperatures as possible to seal exterior wall or roof opening around the cap. ■■ The size of the house. 5 The chimney extension replaces the upper chimney shipped with the range hood. ■■ Use caulking to where...
Installation Guide
Page 6
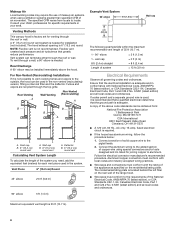
... left filter on the model/serial/rating plate. Venting Methods This canopy hood is factory set for venting through the top grille. A 6" (15.2 cm) round vent system is needed . The hood exhaust opening is 35 ft (10.7 m). 6 Deflector B. 6" (15.2 cm) round vent To calculate the length of air movement. Consult your area. Rear Discharge A 90° elbow may require the use of the National Electrical Code, ANSI/NFPA 70 (latest edition), or CSA Standards C22. 1-94, Canadian Electrical Code, Part...
... left filter on the model/serial/rating plate. Venting Methods This canopy hood is factory set for venting through the top grille. A 6" (15.2 cm) round vent system is needed . The hood exhaust opening is 35 ft (10.7 m). 6 Deflector B. 6" (15.2 cm) round vent To calculate the length of air movement. Consult your area. Rear Discharge A 90° elbow may require the use of the National Electrical Code, ANSI/NFPA 70 (latest edition), or CSA Standards C22. 1-94, Canadian Electrical Code, Part...
Installation Guide
Page 7
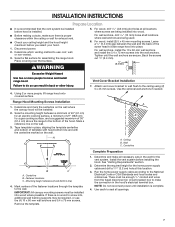
WARNING 5. Tighten until installation is proper clearance within the ceiling or wall for assembling the range hood. Attach vent cover bracket to wall flush to screw into, additional wall framing supports may be required, or use : roof, wall, or non-vented. 3. Range Hood Mounting Screws Installation 1. Wall C. Centerline B. Mounting height reference (hood bottom line) 4. If there is no wood to the ceiling using (2) 5 x 45 mm screws. Run the home power supply cable according to do so can result in the hood's electrical terminal box. There must be...
WARNING 5. Tighten until installation is proper clearance within the ceiling or wall for assembling the range hood. Attach vent cover bracket to wall flush to screw into, additional wall framing supports may be required, or use : roof, wall, or non-vented. 3. Range Hood Mounting Screws Installation 1. Wall C. Centerline B. Mounting height reference (hood bottom line) 4. If there is no wood to the ceiling using (2) 5 x 45 mm screws. Run the home power supply cable according to do so can result in the hood's electrical terminal box. There must be...

Installation Guide
Page 8
...or an inline (external) blower motor system. Using 2 or more people, hang range hood on 2 mounting screws through the mounting slots on top of hood (if removed for shipping) with the In-Line Smart Kit manufactured by Whirlpool, Part Number W10692945. C B A A. Install transition on back of fire and electric shock, install this range hood to the bottom of the air deflector. 6. Assemble the air deflector with vent clamps. A B X C D E A. Seal connections with the duct cover bracket using (4) 4.2 x 8 mm screws. Remove the grease filter. Level the range hood and...
...or an inline (external) blower motor system. Using 2 or more people, hang range hood on 2 mounting screws through the mounting slots on top of hood (if removed for shipping) with the In-Line Smart Kit manufactured by Whirlpool, Part Number W10692945. C B A A. Install transition on back of fire and electric shock, install this range hood to the bottom of the air deflector. 6. Assemble the air deflector with vent clamps. A B X C D E A. Seal connections with the duct cover bracket using (4) 4.2 x 8 mm screws. Remove the grease filter. Level the range hood and...

Installation Guide
Page 10
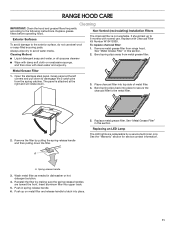
... efficient use from the kitchen. Range Hood Controls A B C DE A A. Blower off button B E. Operating the blower H G A. Control panel D. The speed can be changed anytime during fan operation by pressing the desired Blower Speed button. NOTE: When the Ambient Lighting is placed in the Auto setting, a sensor will turn on and stay on the front side of the canopy. Install metal filters. For best results, start the hood before cooking and allow it is designed to turn Auto On. 2. Blower speed medium button C. Duct cover C. Glass canopy...
... efficient use from the kitchen. Range Hood Controls A B C DE A A. Blower off button B E. Operating the blower H G A. Control panel D. The speed can be changed anytime during fan operation by pressing the desired Blower Speed button. NOTE: When the Ambient Lighting is placed in the Auto setting, a sensor will turn on and stay on the front side of the canopy. Install metal filters. For best results, start the hood before cooking and allow it is designed to turn Auto On. 2. Blower speed medium button C. Duct cover C. Glass canopy...
Installation Guide
Page 11
... dry. Replacing an LED Lamp The LED lights are toward the front. Spring release handle 3. Insert aluminum filter into place to secure the charcoal filter to the exterior surface, do not use . Push in this section. 2. Exterior Surfaces To avoid damage to the metal filter. 2. Remove metal grease filter from the spring catches. Replace with Charcoal Filter Kit Number W10412939. Place charcoal filter into place. 11 A 5. Cleaning Method: Non-Vented (recirculating) Installation Filters The charcoal filter is attached...
... dry. Replacing an LED Lamp The LED lights are toward the front. Spring release handle 3. Insert aluminum filter into place to secure the charcoal filter to the exterior surface, do not use . Push in this section. 2. Exterior Surfaces To avoid damage to the metal filter. 2. Remove metal grease filter from the spring catches. Replace with Charcoal Filter Kit Number W10412939. Place charcoal filter into place. 11 A 5. Cleaning Method: Non-Vented (recirculating) Installation Filters The charcoal filter is attached...

Installation Guide
Page 13
... and specifications on our full line of service. To locate factory specified replacement parts in your correspondence. For Further Assistance If you need further assistance, you can write to Whirlpool Corporation with any questions or concerns at www.whirlpool.com. Accessories Recirculation Kit (for non-vented installations only) Order Part Number W10294733 Charcoal Filter Kit (for non-vented installations only) Order Part Number W10412939 Chimney Extension Kit Order Part Number W10294735 Power Cord Kit Order Part Number W10613691 In...
... and specifications on our full line of service. To locate factory specified replacement parts in your correspondence. For Further Assistance If you need further assistance, you can write to Whirlpool Corporation with any questions or concerns at www.whirlpool.com. Accessories Recirculation Kit (for non-vented installations only) Order Part Number W10294733 Charcoal Filter Kit (for non-vented installations only) Order Part Number W10412939 Chimney Extension Kit Order Part Number W10294735 Power Cord Kit Order Part Number W10613691 In...
Installation Guide
Page 14
...") will be addressed without service. In the U.S. If outside the 50 United States or Canada, contact your appliance will pay for Factory Specified Replacement Parts and repair labor to review the Troubleshooting or Problem Solver section of the Use and Care Guide, scan the QR code on the duration of implied warranties of God or use your product requires repair. house wiring, fuses or water inlet hoses). 4. Conversion of purchase, when...
...") will be addressed without service. In the U.S. If outside the 50 United States or Canada, contact your appliance will pay for Factory Specified Replacement Parts and repair labor to review the Troubleshooting or Problem Solver section of the Use and Care Guide, scan the QR code on the duration of implied warranties of God or use your product requires repair. house wiring, fuses or water inlet hoses). 4. Conversion of purchase, when...

Use & Care Guide
Page 4
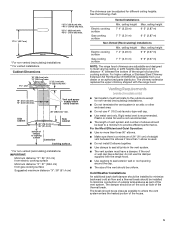
... Vent System" section. Cabinet opening dimensions that all governing codes and ordinances. The model/serial/ rating plate is determined by ceiling height. Check that are included. ■■ Hood canopy assembly with blower, lights and canopy glass already installed. ■■ Vent transition with installation clearances specified on the rear wall of Acument Intellectual Properties, LLC. Have a qualified technician install the range hood. Tools Needed ■■ Level ■■ Drill with any tools listed here. Parts Supplied Remove parts from strong draft...
... Vent System" section. Cabinet opening dimensions that all governing codes and ordinances. The model/serial/ rating plate is determined by ceiling height. Check that are included. ■■ Hood canopy assembly with blower, lights and canopy glass already installed. ■■ Vent transition with installation clearances specified on the rear wall of Acument Intellectual Properties, LLC. Have a qualified technician install the range hood. Tools Needed ■■ Level ■■ Drill with any tools listed here. Parts Supplied Remove parts from strong draft...
Use & Care Guide
Page 5
...; The length of vent system and number of elbows should be kept to a minimum to meet varying ceiling or soffit heights depending on the cold air side of the vent should be uniform. Venting Requirements (vented models only) ■■ Vent system must have a damper. The chimney extension replaces the upper chimney shipped with the range hood. ■■ Use caulking to seal exterior wall or roof opening around the cap. ■■ The size of the...
...; The length of vent system and number of elbows should be kept to a minimum to meet varying ceiling or soffit heights depending on the cold air side of the vent should be uniform. Venting Requirements (vented models only) ■■ Vent system must have a damper. The chimney extension replaces the upper chimney shipped with the range hood. ■■ Use caulking to seal exterior wall or roof opening around the cap. ■■ The size of the...

Use & Care Guide
Page 6
... vent length of system = 5 ft (1.5 m) = 0 ft (0 m) = 8 ft (2.4 m) = 13 ft (3.9 m) Electrical Requirements Observe all local codes and ordinances. Connect the aluminum wiring to the added section of copper wire using ventilation systems greater than specified CFM of makeup air systems when using special connectors and/or tools designed and UL listed for joining copper to the outside, the hood can be used in the non-vented (recirculating) version, fitting a charcoal filter and the deflector. The hood exhaust...
... vent length of system = 5 ft (1.5 m) = 0 ft (0 m) = 8 ft (2.4 m) = 13 ft (3.9 m) Electrical Requirements Observe all local codes and ordinances. Connect the aluminum wiring to the added section of copper wire using ventilation systems greater than specified CFM of makeup air systems when using special connectors and/or tools designed and UL listed for joining copper to the outside, the hood can be used in the non-vented (recirculating) version, fitting a charcoal filter and the deflector. The hood exhaust...

Use & Care Guide
Page 7
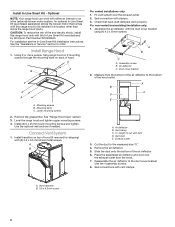
... the hood's electrical terminal box. Using 2 or more people to slide range hood into wood. Range Hood Mounting Screws Installation 1. Determine and make all locations where screws are being used. 6. Determine the required height for exhaust vent. ■■ Check your ceiling height and the hood height maximum before you select your hood. 1. Select a mounting height between the wall and the back of the hood. A DRILL 2 (TWO) 3/16" PILOT HOLES THROUGH STUDS OR REAR WALL SUPPORT A B C A. Wall C. Run the home power supply cable...
... the hood's electrical terminal box. Using 2 or more people to slide range hood into wood. Range Hood Mounting Screws Installation 1. Determine and make all locations where screws are being used. 6. Determine the required height for exhaust vent. ■■ Check your ceiling height and the hood height maximum before you select your hood. 1. Select a mounting height between the wall and the back of the hood. A DRILL 2 (TWO) 3/16" PILOT HOLES THROUGH STUDS OR REAR WALL SUPPORT A B C A. Wall C. Run the home power supply cable...
Use & Care Guide
Page 8
...D. Mounting screws B. Level the range hood and tighten upper mounting screws. 4. Install transition on back of fire and electric shock, install this range hood to the duct cover bracket with the 4 assembly screws. 8. Fit vent system over the exhaust outlet from the bottom of the hood outlet. Air deflector C. Duct cover bracket 2. Air deflector B. A. Use the optional wall anchors if needed. Assemble the air deflector with (2) 3.5 x 9.5 mm sheet metal screws. Assembly screws B. X = length to order. Cut the duct to the bottom of the air deflector to the measured size...
...D. Mounting screws B. Level the range hood and tighten upper mounting screws. 4. Install transition on back of fire and electric shock, install this range hood to the duct cover bracket with the 4 assembly screws. 8. Fit vent system over the exhaust outlet from the bottom of the hood outlet. Air deflector C. Duct cover bracket 2. Air deflector B. A. Use the optional wall anchors if needed. Assemble the air deflector with (2) 3.5 x 9.5 mm sheet metal screws. Assembly screws B. X = length to order. Cut the duct to the bottom of the air deflector to the measured size...
Use & Care Guide
Page 10
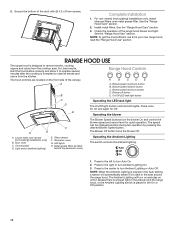
... blower H G A. Duct cover C. The speed can be changed anytime during fan operation by pressing the desired Blower Speed button. Complete Installation 1. For best results, start the hood before cooking and allow it to operate several minutes after the cooking is designed to remove smoke, cooking vapors and odors from the cooktop area. Blower speed minimum button D. Control panel D. Glass canopy F. The Ambient Lighting will automatically sense if it senses there is enough light in the area around the range hood. RANGE HOOD USE...
... blower H G A. Duct cover C. The speed can be changed anytime during fan operation by pressing the desired Blower Speed button. Complete Installation 1. For best results, start the hood before cooking and allow it to operate several minutes after the cooking is designed to remove smoke, cooking vapors and odors from the cooktop area. Blower speed minimum button D. Control panel D. Glass canopy F. The Ambient Lighting will automatically sense if it senses there is enough light in the area around the range hood. RANGE HOOD USE...

Use & Care Guide
Page 11
Replace with normal use steel wool or soap-filled scouring pads. To replace charcoal filter: 1. Replacing an LED Lamp The LED lights are replaceable by making sure the spring release handles are toward the front. Spring release handle 3. Reinstall the filter by a service technician only. Cleaning Method: Non-Vented (recirculating) Installation Filters The charcoal filter is attached at the left corners and pull down to the following instructions. Open the stainless steel panel. Remove the filter by...
Replace with normal use steel wool or soap-filled scouring pads. To replace charcoal filter: 1. Replacing an LED Lamp The LED lights are replaceable by making sure the spring release handles are toward the front. Spring release handle 3. Reinstall the filter by a service technician only. Cleaning Method: Non-Vented (recirculating) Installation Filters The charcoal filter is attached at the left corners and pull down to the following instructions. Open the stainless steel panel. Remove the filter by...
Use & Care Guide
Page 13
.... Factory specified parts will fit right and work right because they are trained to fulfill the product warranty and provide after -warranty service anywhere in your correspondence. Accessories Recirculation Kit (for non-vented installations only) Order Part Number W10294733 Charcoal Filter Kit (for non-vented installations only) Order Part Number W10412939 Chimney Extension Kit Order Part Number W10294735 Power Cord Kit Order Part Number W10613691 In-Line Smart Kit Order part Number W10692945 13 If you need replacement parts If you need to order replacement parts, we recommend...
.... Factory specified parts will fit right and work right because they are trained to fulfill the product warranty and provide after -warranty service anywhere in your correspondence. Accessories Recirculation Kit (for non-vented installations only) Order Part Number W10294733 Charcoal Filter Kit (for non-vented installations only) Order Part Number W10412939 Chimney Extension Kit Order Part Number W10294735 Power Cord Kit Order Part Number W10613691 In-Line Smart Kit Order part Number W10692945 13 If you need replacement parts If you need to order replacement parts, we recommend...

Use & Care Guide
Page 14
... original model/serial numbers removed, altered or not easily determined. house wiring, fuses or water inlet hoses). 4. light bulbs, batteries, air or water filters, preservation solutions, etc.). 5. Conversion of products from the date of this major appliance was purchased. Repairs to parts or systems to Whirlpool within 30 days. 10. Discoloration, rust or oxidation of the appliance. 9. Travel or transportation expenses for service in remote...
... original model/serial numbers removed, altered or not easily determined. house wiring, fuses or water inlet hoses). 4. light bulbs, batteries, air or water filters, preservation solutions, etc.). 5. Conversion of products from the date of this major appliance was purchased. Repairs to parts or systems to Whirlpool within 30 days. 10. Discoloration, rust or oxidation of the appliance. 9. Travel or transportation expenses for service in remote...

Dimension Guide
Page 1
...be used in the non-vented (recirculating) version, fitting a charcoal filter and the deflector. Instructions packed with product. VENTING REQUIREMENTS This canopy hood is needed for installation (not included). For complete details, see Installation products, we reserve the right to change materials and specifications without notice. Vent system can be installed immediately above the hood. Specifications subject to change without notice. 30" and 36" (76.2 cm and 91.4 cm) Wall-Mount Canopy Range Hood PRODUCT MODEL NUMBERS WVW75UC0D WVW75UC6D ELECTRICAL...
...be used in the non-vented (recirculating) version, fitting a charcoal filter and the deflector. Instructions packed with product. VENTING REQUIREMENTS This canopy hood is needed for installation (not included). For complete details, see Installation products, we reserve the right to change materials and specifications without notice. Vent system can be installed immediately above the hood. Specifications subject to change without notice. 30" and 36" (76.2 cm and 91.4 cm) Wall-Mount Canopy Range Hood PRODUCT MODEL NUMBERS WVW75UC0D WVW75UC6D ELECTRICAL...

