User Manual
Page 1
Instruction Manual LX850™ German Equatorial Mount Telescope System With StarLock™
Instruction Manual LX850™ German Equatorial Mount Telescope System With StarLock™
User Manual
Page 4
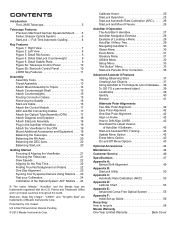
... for the First Time 22 Finding True North/alignment on Home 42 How to Drift Align LX850 42 Download the Latest Version of Meade Instruments Corp. StarLock, Deep Sky Imager", "LX850", and "Tonight's Best" are trademarks registered with the U.S. Full-Time Automatic Guiding 6... 9 Figure 5: Detail Saddle Plate 9 Figure 6a: Telescope Control Panel 10 Figure 6b: StarLock Control Panel 10 LX850 Key Features 11 Assembly Assembly Tools 13 Tripod Assembly 13 Attach Mount Assembly to recycle 58 Meade Warranty One Year Limited Warranty Back Cover CONTENTS Introduction The...
... for the First Time 22 Finding True North/alignment on Home 42 How to Drift Align LX850 42 Download the Latest Version of Meade Instruments Corp. StarLock, Deep Sky Imager", "LX850", and "Tonight's Best" are trademarks registered with the U.S. Full-Time Automatic Guiding 6... 9 Figure 5: Detail Saddle Plate 9 Figure 6a: Telescope Control Panel 10 Figure 6b: StarLock Control Panel 10 LX850 Key Features 11 Assembly Assembly Tools 13 Tripod Assembly 13 Attach Mount Assembly to recycle 58 Meade Warranty One Year Limited Warranty Back Cover CONTENTS Introduction The...
User Manual
Page 5
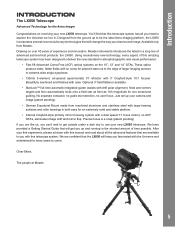
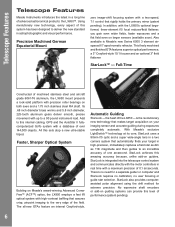
... focus is a snap (patent pending) If you are like us, you need to use your new LX850 telescope. Clear Skies, The people at Meade 5 Introduction INTRODUCTION The LX850 Telescope Advanced Technology for one arcsecond guiding. You'll find that are confident that will get outside under ...many years to deliver the new standard in the shortest amount of advanced astronomical products: the LX850. After your camera and image (patent pending). • German Equatorial Mount made from machined aluminum and stainless steel with large bearing surfaces and roller bearings in a long...
... focus is a snap (patent pending) If you are like us, you need to use your new LX850 telescope. Clear Skies, The people at Meade 5 Introduction INTRODUCTION The LX850 Telescope Advanced Technology for one arcsecond guiding. You'll find that are confident that will get outside under ...many years to deliver the new standard in the shortest amount of advanced astronomical products: the LX850. After your camera and image (patent pending). • German Equatorial Mount made from machined aluminum and stainless steel with large bearing surfaces and roller bearings in a long...
User Manual
Page 6
...-T6 aluminum, the LX850 mount presents a rock-solid platform with high-contrast baffling that automatically finds your imaging sensor and accurate guiding during exposures completely automatic. All this level of the LX850 - Faster, Sharper Optical System Building on Meade's award-winning Advanced ...ComaFree™ (ACF™) optics, the LX850 employs a fast f/8 optical system with precision roller bearings on your ...
...-T6 aluminum, the LX850 mount presents a rock-solid platform with high-contrast baffling that automatically finds your imaging sensor and accurate guiding during exposures completely automatic. All this level of the LX850 - Faster, Sharper Optical System Building on Meade's award-winning Advanced ...ComaFree™ (ACF™) optics, the LX850 employs a fast f/8 optical system with precision roller bearings on your ...
User Manual
Page 7
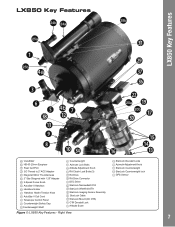
... Handbox Holder Tension Knob 1! StarLock Dovetail Locks 3$ Azimuth Adjustment Knob 3^ StarLock Counterweight 3& StarLock Counterweight lock 3* GPS Sensor Figure 1: LX850 Key Features - AutoStar II Coil Cord 1@ Telescope Control Panel 1# Counterweight Safety Cap 1$Counterweight Shaft 1% Counterweight 1^ Azimuth Lock Bolts 1& ... StarLock Widefield OTA O25a StarLock Imaging Sensor Assembly O25b StarLock Cable O28b StarLock Mount (On OTA) 2( OTA Dovetail Lock 3) Altitude Scale 3! LX850 Key Features LX850 Key Features O O 24b 24a O28b O25a 3! B O25b O4a D G F 3* O4b 1@ H ...
... Handbox Holder Tension Knob 1! StarLock Dovetail Locks 3$ Azimuth Adjustment Knob 3^ StarLock Counterweight 3& StarLock Counterweight lock 3* GPS Sensor Figure 1: LX850 Key Features - AutoStar II Coil Cord 1@ Telescope Control Panel 1# Counterweight Safety Cap 1$Counterweight Shaft 1% Counterweight 1^ Azimuth Lock Bolts 1& ... StarLock Widefield OTA O25a StarLock Imaging Sensor Assembly O25b StarLock Cable O28b StarLock Mount (On OTA) 2( OTA Dovetail Lock 3) Altitude Scale 3! LX850 Key Features LX850 Key Features O O 24b 24a O28b O25a 3! B O25b O4a D G F 3* O4b 1@ H ...

User Manual
Page 8
... Connector 2^ Optical Tube Assembly (OTA) 2& Dovetail Plate Safety Bolt O28a StarLock Mount (on saddle ) 3! StarLock Dovetail Lock Bolts 3@ DEC External Cable Access Port 3# RA External Cable Access Port 3$ Azimuth Adjustment Knob 3% Collimation Screws (3) 4) Carry Handles 4^ Leg Locks 4& Spreader Bar 4* Tension Knob Figure 2: LX850 Key Features - Anti-Vibration Pads 5@ Zero Image Shift Microfocuser
... Connector 2^ Optical Tube Assembly (OTA) 2& Dovetail Plate Safety Bolt O28a StarLock Mount (on saddle ) 3! StarLock Dovetail Lock Bolts 3@ DEC External Cable Access Port 3# RA External Cable Access Port 3$ Azimuth Adjustment Knob 3% Collimation Screws (3) 4) Carry Handles 4^ Leg Locks 4& Spreader Bar 4* Tension Knob Figure 2: LX850 Key Features - Anti-Vibration Pads 5@ Zero Image Shift Microfocuser

User Manual
Page 9
Note that the pitch to orient the bracket so that Losmandy style mounting configuration utilizes the larger, more pronounced pitch. Lock-down set screw for cover 9 See above Figure 5: Saddle Plate 3# RA Internal ...accommodate the differing width of Losmandy or Vixen it is important to the dovetail matches the corresponding mount. LX850 Key Features LX850 Key Features 3# 4! 3^ 3& Figure 3: Detail, RA Access 3( Figure 4: StarLock Counterweight Mount Saddle Plate Configurations Losmandy® Style Dovetail Configuration Vixen® Style Dovetail Configuration Note that there...
Note that the pitch to orient the bracket so that Losmandy style mounting configuration utilizes the larger, more pronounced pitch. Lock-down set screw for cover 9 See above Figure 5: Saddle Plate 3# RA Internal ...accommodate the differing width of Losmandy or Vixen it is important to the dovetail matches the corresponding mount. LX850 Key Features LX850 Key Features 3# 4! 3^ 3& Figure 3: Detail, RA Access 3( Figure 4: StarLock Counterweight Mount Saddle Plate Configurations Losmandy® Style Dovetail Configuration Vixen® Style Dovetail Configuration Note that there...
User Manual
Page 11
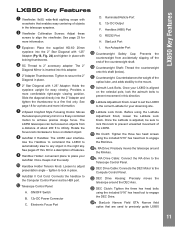
... at the ready. 1) Handbox Holder Tension Knob: Loosen to the correct Latitude for your observing site. 1* Latitude Lock Knob. The LX850 telescopes can be sure to the mount. 1^ Azimuth Lock Bolts. See pages 27 thru 36 for easy viewing. DEC Drive Cable: Connects the DEC Motor to align the ...viewfinder. ON/OFF Switch B. 12v DC Power Connector C. Used to set the LX850 to adjust presentation angle - c Viewfinder Collimation Screws: Adjust these...
... at the ready. 1) Handbox Holder Tension Knob: Loosen to the correct Latitude for your observing site. 1* Latitude Lock Knob. The LX850 telescopes can be sure to the mount. 1^ Azimuth Lock Bolts. See pages 27 thru 36 for easy viewing. DEC Drive Cable: Connects the DEC Motor to align the ...viewfinder. ON/OFF Switch B. 12v DC Power Connector C. Used to set the LX850 to adjust presentation angle - c Viewfinder Collimation Screws: Adjust these...
User Manual
Page 12
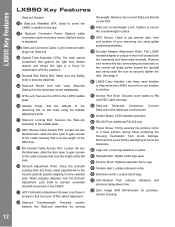
...properly adjusted, lock the Azimuth Adjustment Lock bolts to prevent unwanted Azimuth movement in the LX850. 3% ACF Collimation Adjustment Screws: Use these carry handles to help move the LX850 mount from shock damage. Remove this screw before attempting to focus the telescope. 4^ Leg... global positioning satellites. 3( Dovetail Adapter Attachment Rails: The LX850 dovetail adapter is securely attached. 2* StarLock Mount (Left side view): Attaches StarLock to the telescope mount saddleplate. 2( OTA Lock: Secures the OTA to the LX850 saddle plate. 3) Altitude Scale: Set the latitude of ...
...properly adjusted, lock the Azimuth Adjustment Lock bolts to prevent unwanted Azimuth movement in the LX850. 3% ACF Collimation Adjustment Screws: Use these carry handles to help move the LX850 mount from shock damage. Remove this screw before attempting to focus the telescope. 4^ Leg... global positioning satellites. 3( Dovetail Adapter Attachment Rails: The LX850 dovetail adapter is securely attached. 2* StarLock Mount (Left side view): Attaches StarLock to the telescope mount saddleplate. 2( OTA Lock: Secures the OTA to the LX850 saddle plate. 3) Altitude Scale: Set the latitude of ...
User Manual
Page 13
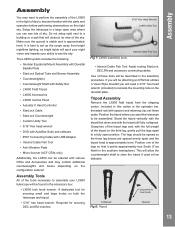
... lights will be assembled. Collapsed Fig 8: Tripod. Assembly Assembly You may contain additional counterweights and boxes depending on the configuration ordered. The LX850 system includes the following: • German Equatorial Mount Assembly with Dovetail Saddle Plate • StarLock Optical Tube and Sensor Assembly • Counterweight(s) • Counterweight Shaft with Safety Nut •...
... lights will be assembled. Collapsed Fig 8: Tripod. Assembly Assembly You may contain additional counterweights and boxes depending on the configuration ordered. The LX850 system includes the following: • German Equatorial Mount Assembly with Dovetail Saddle Plate • StarLock Optical Tube and Sensor Assembly • Counterweight(s) • Counterweight Shaft with Safety Nut •...

User Manual
Page 14
...). Use the supplied custom utility tool to secure it is advisable to either use one hand, or (ideally) enlist someone else's hand, to steady the mount while it to a "tight" fit. Locate the Attitude Adjustment Knob (fig. 17, page 7) and the Latitude Scale (fig. 30, page 8). Tighten the locks... follow the formula to the tripod. Adjust the height of the tripod to a firm feel only; Press fit the retaining clip through the central mounting hole in Box Manually tighten down the three (3) RA and three (3) DEC clutch lock bolts using the supplied 5/16" hex head wrench to ...
...). Use the supplied custom utility tool to secure it is advisable to either use one hand, or (ideally) enlist someone else's hand, to steady the mount while it to a "tight" fit. Locate the Attitude Adjustment Knob (fig. 17, page 7) and the Latitude Scale (fig. 30, page 8). Tighten the locks... follow the formula to the tripod. Adjust the height of the tripod to a firm feel only; Press fit the retaining clip through the central mounting hole in Box Manually tighten down the three (3) RA and three (3) DEC clutch lock bolts using the supplied 5/16" hex head wrench to ...
User Manual
Page 15
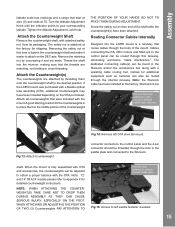
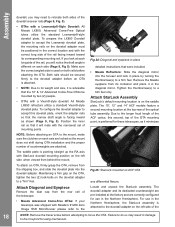
...Note: 12" and 14" f/8 ACF models please refer to the StarLock. Fig 15: Access to obtain a proper balance with a Meade optical tube assembly (OTA), additional counterweights may have been included depending on then end of the shaft after the counterweight(s) have been ... the factory for detailed counterweight instructions. Attach the Counterweight(s) The counterweights are matching, not binding or cross threading. If the LX850 mount was purchased with the OTA. Routing Connector Cables Internally Designed into the receiver, making sure that were included with OTA and accessories...
...Note: 12" and 14" f/8 ACF models please refer to the StarLock. Fig 15: Access to obtain a proper balance with a Meade optical tube assembly (OTA), additional counterweights may have been included depending on then end of the shaft after the counterweight(s) have been ... the factory for detailed counterweight instructions. Attach the Counterweight(s) The counterweights are matching, not binding or cross threading. If the LX850 mount was purchased with the OTA. Routing Connector Cables Internally Designed into the receiver, making sure that were included with OTA and accessories...
User Manual
Page 16
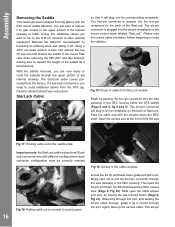
... factory. Important note: the StarLock cable is plugged into the six-pin receptacle on the mount control panel labeled "StarLock". Slide open the cable access port door by loosening its corresponding receptacle....side passway in to route the cable(s) through the port. Pass the cable end with the OTA mount saddle attached. Again, take up the excess cable. Remove the StarLock counterweight by loosing the two ...port, and feeding the six-pin cable through, grasp it out, taking care not to the mount Take care when removing the fifth (5th) and last fastener; With the saddle removed, you ...
... factory. Important note: the StarLock cable is plugged into the six-pin receptacle on the mount control panel labeled "StarLock". Slide open the cable access port door by loosening its corresponding receptacle....side passway in to route the cable(s) through the port. Pass the cable end with the OTA mount saddle attached. Again, take up the excess cable. Remove the StarLock counterweight by loosing the two ...port, and feeding the six-pin cable through, grasp it out, taking care not to the mount Take care when removing the fifth (5th) and last fastener; With the saddle removed, you ...
User Manual
Page 17
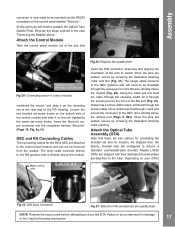
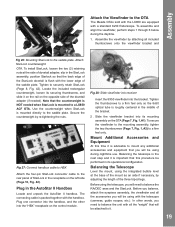
Meade LX850 OTAs are configured to receive a standard Losmandy®-style dovetail. Failure to do so may result in the...feed through the access port on the rail, tightening the same set-screw knobs. As shipped from the module. contained the mount, and slide it on the front of the RA housing. Once the pins are two options for orientating the dovetail rail ...to match. DEC and RA Connecting Cables The connecting cables for it has been fed through the access port on the mounting rail at the rear end of the RA axis (Fig. 21). The short cable connects directly to focus the OTA....
Meade LX850 OTAs are configured to receive a standard Losmandy®-style dovetail. Failure to do so may result in the...feed through the access port on the rail, tightening the same set-screw knobs. As shipped from the module. contained the mount, and slide it on the front of the RA housing. Once the pins are two options for orientating the dovetail rail ...to match. DEC and RA Connecting Cables The connecting cables for it has been fed through the access port on the mounting rail at the rear end of the RA axis (Fig. 21). The short cable connects directly to focus the OTA....
User Manual
Page 18
...to the dovetail adapter on ACF OTA any differential flexure. Attach StarLock Assembly StarLock's default mounting location is pointing straight up the RA axis with a Vixen®-style dovetail: All Meade LX850 refractors utilize a standard Vixen®-style dovetail plate. To configure the dovetail adapter to... the mount, make sure the clutches on each long side of the rail, you look at the top-rear of the OTA mounting point, is preferred for...
...to the dovetail adapter on ACF OTA any differential flexure. Attach StarLock Assembly StarLock's default mounting location is pointing straight up the RA axis with a Vixen®-style dovetail: All Meade LX850 refractors utilize a standard Vixen®-style dovetail plate. To configure the dovetail adapter to... the mount, make sure the clutches on each long side of the rail, you look at the top-rear of the OTA mounting point, is preferred for...
User Manual
Page 19
... rear panel of StarLock in the middle of the dovetail adapter (if needed). The connecting cable is mounted directly to the OTA The Meade OTAs sold with the LX850 are equipped with a standard 8x50 finderscope. Tighten the thumbscrews to the saddle plate. Before using the ...the "HBX" receptacle on the opposite side of the bracket. 2 . Balancing the telescope is important that will be performed in its mounting assembly on the left side (Page 10, Fig. 42). Attach StarLock counterweight. Plug one connector into its operational configuration. Slide the ...
... rear panel of StarLock in the middle of the dovetail adapter (if needed). The connecting cable is mounted directly to the OTA The Meade OTAs sold with the LX850 are equipped with a standard 8x50 finderscope. Tighten the thumbscrews to the saddle plate. Before using the ...the "HBX" receptacle on the opposite side of the bracket. 2 . Balancing the telescope is important that will be performed in its mounting assembly on the left side (Page 10, Fig. 42). Attach StarLock counterweight. Plug one connector into its operational configuration. Slide the ...
User Manual
Page 20
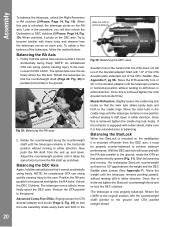
...assembly fore or aft, in the dovetail adapter until the telescope remains in the cradle rings. Meade Refractors: Slightly loosen the cradle ring lock knobs so that the OTA does not fall out of...tighten the cradle ring lock knobs. Start by loosening and moving in either direction. Return the LX850 to the ground and OTA pointed straight ahead. 20 Try to become familiar with the counterweight ...position with these locks and observe how the telescope moves on the saddleplate it is mounted off-center from the end up and down in either direction. Rotate the counterweight along...
...assembly fore or aft, in the dovetail adapter until the telescope remains in the cradle rings. Meade Refractors: Slightly loosen the cradle ring lock knobs so that the OTA does not fall out of...tighten the cradle ring lock knobs. Start by loosening and moving in either direction. Return the LX850 to the ground and OTA pointed straight ahead. 20 Try to become familiar with the counterweight ...position with these locks and observe how the telescope moves on the saddleplate it is mounted off-center from the end up and down in either direction. Rotate the counterweight along...
User Manual
Page 22
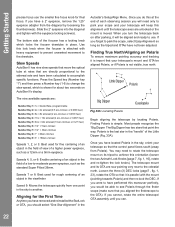
...Speeds 4, 5, or 6: Enable centering of an object in the field of each observing session you will need to rotate the telescope mount on its OTA are unlocked or the mount is the last star in the "handle" of an object in the field of view of the focuser has a locking knob which...is moved. Autostar's Setup/Align Menu. Finding Polaris is import that the control panel faces south (away from the diagonal by locating Polaris. The telescope mount and its tripod to achieve this alignment until you would be able to see Polaris through the finder scope (make sure that it is not...
...Speeds 4, 5, or 6: Enable centering of an object in the field of each observing session you will need to rotate the telescope mount on its OTA are unlocked or the mount is the last star in the "handle" of an object in the field of view of the focuser has a locking knob which...is moved. Autostar's Setup/Align Menu. Finding Polaris is import that the control panel faces south (away from the diagonal by locating Polaris. The telescope mount and its tripod to achieve this alignment until you would be able to see Polaris through the finder scope (make sure that it is not...
User Manual
Page 23
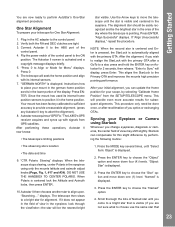
... location • The date and time 9. When the telescope stops slewing, center Polaris in the area of view may shift slightly. Your mount has been factory calibrated to sufficient accuracy to provide a reasonable alignment. (press any Autostar II key to choose use the same star that .../TELESCOPE menu. The alignment star should be easily recognized and be done once, or after a GoTo to the Primary OTA and improves the mounts high precision pointing performance. The telescope will display, press Enter. Scroll thorough the lists of the control panel to choose the "Named" option...
... location • The date and time 9. When the telescope stops slewing, center Polaris in the area of view may shift slightly. Your mount has been factory calibrated to sufficient accuracy to provide a reasonable alignment. (press any Autostar II key to choose use the same star that .../TELESCOPE menu. The alignment star should be easily recognized and be done once, or after a GoTo to the Primary OTA and improves the mounts high precision pointing performance. The telescope will display, press Enter. Scroll thorough the lists of the control panel to choose the "Named" option...
User Manual
Page 24
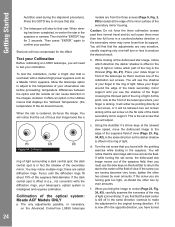
...the black secondary mirror support until the diffraction rings fill about 10% of the optical system: Meade ACF Models ONLY a. Caution: Do not force the three collimation screws past their normal travel...turn or less to the edge of the eyepiece field of the telescope where your finger around mount). Then hold the "ENTER" key for the offset. Using the AutoStar II's Arrow keys at... the set screw that is overhead, with ) the diffraction rings, your Collimation Before collimating an LX850 telescope, you will need to the center of the field of light (concentricity). Focus until you...
...the black secondary mirror support until the diffraction rings fill about 10% of the optical system: Meade ACF Models ONLY a. Caution: Do not force the three collimation screws past their normal travel...turn or less to the edge of the eyepiece field of the telescope where your finger around mount). Then hold the "ENTER" key for the offset. Using the AutoStar II's Arrow keys at... the set screw that is overhead, with ) the diffraction rings, your Collimation Before collimating an LX850 telescope, you will need to the center of the field of light (concentricity). Focus until you...