User Manual
Page 1
GPS Instruction Manual 8", 10", 12" LX90®-ACF Advanced Coma-Free Telescopes and 8", 10", 12" LX90®-SC Schmidt-Cassegrain Telescopes AutoStar® -
GPS Instruction Manual 8", 10", 12" LX90®-ACF Advanced Coma-Free Telescopes and 8", 10", 12" LX90®-SC Schmidt-Cassegrain Telescopes AutoStar® -

User Manual
Page 2
WARNING! Do not point the telescope at or near the Sun. Do not look at the Sun! Looking at or near the Sun will cause instant and irreversible damage to the observer that damage has occurred until it is too late. Never use a Meade® LX90® Telescope to look through the telescope or viewfinder as it is moving. Eye damage is often painless, so there is no warning to your eye. Children should always have adult supervision while observing.
WARNING! Do not point the telescope at or near the Sun. Do not look at the Sun! Looking at or near the Sun will cause instant and irreversible damage to the observer that damage has occurred until it is too late. Never use a Meade® LX90® Telescope to look through the telescope or viewfinder as it is moving. Eye damage is often painless, so there is no warning to your eye. Children should always have adult supervision while observing.
User Manual
Page 3
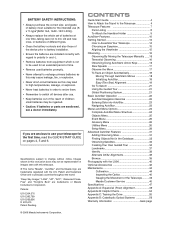
...Meade", "AutoStar" and the Meade logo are trademarks registered with the U.S. CONTENTS Quick-Start Guide 4 How to Attach the Tripod to the Telescope 4 Telescope Features 7 Parts Listing 8 To Attach the Handbox Holder 9 AutoStar® Features 10 Getting Started 13 How to Assemble Your Telescope... "LX90", "LPI", "ACF", "...LX90 40 Optional Accessories 42 Maintenance 44 Collimation 44 Inspecting the Optics 46 Gauging the Movement of Meade Instruments Corporation. small batteries may be ingested. • Caution: If batteries or parts are trademarks of the Telescope..........46 Meade...
...Meade", "AutoStar" and the Meade logo are trademarks registered with the U.S. CONTENTS Quick-Start Guide 4 How to Attach the Tripod to the Telescope 4 Telescope Features 7 Parts Listing 8 To Attach the Handbox Holder 9 AutoStar® Features 10 Getting Started 13 How to Assemble Your Telescope... "LX90", "LPI", "ACF", "...LX90 40 Optional Accessories 42 Maintenance 44 Collimation 44 Inspecting the Optics 46 Gauging the Movement of Meade Instruments Corporation. small batteries may be ingested. • Caution: If batteries or parts are trademarks of the Telescope..........46 Meade...

User Manual
Page 4
...Slide the spring into the central threaded hole in an "Altazimuth" ("Altitude-Azimuth," or "verticalhorizontal") format. F and G on top of the telescope. It is not necessary to use extreme force in rigid positioning of the first nut. Retighten the 3 lock-lever to a firm feel "...position. 4 QUICK-START GUIDE It is recommended that you attach the supplied tripod to the LX90 for first observations requires only a few minutes. By following parts: • LX90 Telescope with fork mount system • AutoStar handbox and interface coil cord • Eyepiece holder ...
...Slide the spring into the central threaded hole in an "Altazimuth" ("Altitude-Azimuth," or "verticalhorizontal") format. F and G on top of the telescope. It is not necessary to use extreme force in rigid positioning of the first nut. Retighten the 3 lock-lever to a firm feel "...position. 4 QUICK-START GUIDE It is recommended that you attach the supplied tripod to the LX90 for first observations requires only a few minutes. By following parts: • LX90 Telescope with fork mount system • AutoStar handbox and interface coil cord • Eyepiece holder ...
User Manual
Page 6
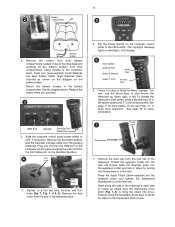
.... See page 17 for more information. ᕧ Thumbscrew Thumbscrew 7. Remove the dust cap from their compartments, being mindful of the telescope. Remove the covers from both battery compartments located on top of the drive base and carefully lift the battery holders from the rear .... Remove the dust cover from the packing materials. Place the Super Plössl 26mm eyepiece into the eyepiece holder and lock in the telescope's field of the telescope tube. 5. 6 ᕢ ᕥ 2. You can Press "0" to align or Mode for more details. Insert four (user-supplied) ...
.... See page 17 for more information. ᕧ Thumbscrew Thumbscrew 7. Remove the dust cap from their compartments, being mindful of the telescope. Remove the covers from both battery compartments located on top of the drive base and carefully lift the battery holders from the rear .... Remove the dust cover from the packing materials. Place the Super Plössl 26mm eyepiece into the eyepiece holder and lock in the telescope's field of the telescope tube. 5. 6 ᕢ ᕥ 2. You can Press "0" to align or Mode for more details. Insert four (user-supplied) ...
User Manual
Page 7
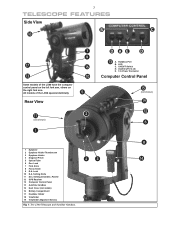
... 15 Dust Cover (not visible) 16 Battery Compartment 17 Handbox Holder 18 Viewfinder 19 Viewfinder Alignment Screws Fig. 1: The LX90 Telescope and AutoStar Handbox. ¿ᕣ ᕨ ƹ Handbox Port B. ON/OFF Switch D. Rear View ᕥ ¸ ᕢ...; (not shown) ³ Ƹ A. Lock 10 R.A. Setting Circle/Dec. 7 TELESCOPE FEATURES Side View ạ Ả ƽ Ƽ Ƹ Some models of the LX90 operate identically. Lock 7 Fork Arms 8 Focus Knob 9 R.A. Setting Circle 11 Dec. All models of...
... 15 Dust Cover (not visible) 16 Battery Compartment 17 Handbox Holder 18 Viewfinder 19 Viewfinder Alignment Screws Fig. 1: The LX90 Telescope and AutoStar Handbox. ¿ᕣ ᕨ ƹ Handbox Port B. ON/OFF Switch D. Rear View ᕥ ¸ ᕢ...; (not shown) ³ Ƹ A. Lock 10 R.A. Setting Circle/Dec. 7 TELESCOPE FEATURES Side View ạ Ả ƽ Ƽ Ƹ Some models of the LX90 operate identically. Lock 7 Fork Arms 8 Focus Knob 9 R.A. Setting Circle 11 Dec. All models of...
User Manual
Page 8
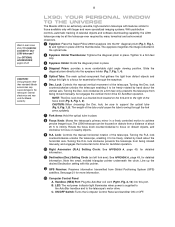
... (to be freely rotated by hand about 25 ft. lock counterclockwise unlocks the telescope, enabling it to the right of the focus knob (Pg. 5, Fig. 1, 8). Handbox (HBX) Port: Plug the AutoStar coil cord (Pg10, Fig. 2, 10) into the eyepiece holder (Pg. 7, Fig. 1, 4). ´ Optical ...Pg. 7, Fig. 1, 4) and tighten in place with the thumbscrews. LX90: YOUR PERSONAL WINDOW TO THE UNIVERSE The Meade LX90 is supplied to the AutoStar handbox and to the telescope's internal electronics and may void the Meade warranty. Slide the diagonal prism directly into this light to support the ...
... (to be freely rotated by hand about 25 ft. lock counterclockwise unlocks the telescope, enabling it to the right of the focus knob (Pg. 5, Fig. 1, 8). Handbox (HBX) Port: Plug the AutoStar coil cord (Pg10, Fig. 2, 10) into the eyepiece holder (Pg. 7, Fig. 1, 4). ´ Optical ...Pg. 7, Fig. 1, 4) and tighten in place with the thumbscrews. LX90: YOUR PERSONAL WINDOW TO THE UNIVERSE The Meade LX90 is supplied to the AutoStar handbox and to the telescope's internal electronics and may void the Meade warranty. Slide the diagonal prism directly into this light to support the ...

User Manual
Page 9
...auto cigarette light plug or from a standard 115v AC home outlet using optionally available 25' power cords. ƹ AutoStar: See page 10 for Meade accessories. Fig. 1c: Handbox holder attached to the desired angle. Verify that any dew that might have collected during the observing session has...the holder until it snaps in each observing session and the power turned off to level the telescope when setting the Home Position. Auxiliary (AUX) Port (2): Provides connection for a description of the LX90 fork arm handles. See OPTIONAL ACCESSORIES, page 42. If necessary, loosen the lock knob (...
...auto cigarette light plug or from a standard 115v AC home outlet using optionally available 25' power cords. ƹ AutoStar: See page 10 for Meade accessories. Fig. 1c: Handbox holder attached to the desired angle. Verify that any dew that might have collected during the observing session has...the holder until it snaps in each observing session and the power turned off to level the telescope when setting the Home Position. Auxiliary (AUX) Port (2): Provides connection for a description of the LX90 fork arm handles. See OPTIONAL ACCESSORIES, page 42. If necessary, loosen the lock knob (...

User Manual
Page 10
...meade.com) and share software with other AutoStar enthusiasts. • Control your PC using an optional mounting wedge. Some of the major features of AutoStar are accomplished with just a few pushes of AutoStar's buttons. 10 AUTOSTAR FEATURES ¹ ᕡ ¿ · ´ » º ² ¶ ¸ Fig. 2: The LX90... and CCD imaging capability is available when the LX90 is through the operation of the standard-equipment AutoStar. Nearly all functions of the telescope are : • Automatically move the telescope to any of over 30,000 objects stored in...
...meade.com) and share software with other AutoStar enthusiasts. • Control your PC using an optional mounting wedge. Some of the major features of AutoStar are accomplished with just a few pushes of AutoStar's buttons. 10 AUTOSTAR FEATURES ¹ ᕡ ¿ · ´ » º ² ¶ ¸ Fig. 2: The LX90... and CCD imaging capability is available when the LX90 is through the operation of the standard-equipment AutoStar. Nearly all functions of the telescope are : • Automatically move the telescope to any of over 30,000 objects stored in...

User Manual
Page 11
... supply power to have a positive feel. coordinates of the Scroll keys (Pg. 10, Fig. 2, 7) to display the following functions are entered, AutoStar slews the telescope to Sync" is explained in the AutoStar database. and Dec. See MOVING THROUGH AUTOSTAR'S MENUS, ... with the letter "A" and the Up Arrow key starts with a red LED (Light Emitting Diode) for more , information about the telescope's status displays. The AutoStar Computer Controller provides control of the handbox. The following information: • Right Ascension and Declination (astronomical) coordinates...
... supply power to have a positive feel. coordinates of the Scroll keys (Pg. 10, Fig. 2, 7) to display the following functions are entered, AutoStar slews the telescope to Sync" is explained in the AutoStar database. and Dec. See MOVING THROUGH AUTOSTAR'S MENUS, ... with the letter "A" and the Up Arrow key starts with a red LED (Light Emitting Diode) for more , information about the telescope's status displays. The AutoStar Computer Controller provides control of the handbox. The following information: • Right Ascension and Declination (astronomical) coordinates...

User Manual
Page 12
...5480; ? The Scroll Up key and the Up Arrow key move through the options. A definition or more details. ¹ Utility Light: Use this port (pg. 10, Fig. 2, 9) located at the bottom of the alphabet and numerical digits. Press the Scroll keys to move backward (Z to A, 9 to the scrolling AutoStar Help ...word appears in [brackets], press ENTER to the original screen and continue with the chosen procedure. ¾ Coil Cord Port: Plug one end of the telescope and the other end into the coil cord port (see j above). ¸ RS-232 Port: plug an RS-232 cable into this built-in the...
...5480; ? The Scroll Up key and the Up Arrow key move through the options. A definition or more details. ¹ Utility Light: Use this port (pg. 10, Fig. 2, 9) located at the bottom of the alphabet and numerical digits. Press the Scroll keys to move backward (Z to A, 9 to the scrolling AutoStar Help ...word appears in [brackets], press ENTER to the original screen and continue with the chosen procedure. ¾ Coil Cord Port: Plug one end of the telescope and the other end into the coil cord port (see j above). ¸ RS-232 Port: plug an RS-232 cable into this built-in the...

User Manual
Page 13
...) and relock the Dec. NOTE: AutoStar does not require batteries; When first opening the packing box, note carefully the following parts: • LX90 Telescope with fork mount system • AutoStar handbox and interface coil cord • Eyepiece holder and 1.25" diagonal prism • 8 x 50 ... compartment covers (Pg. 7, Fig. 1, 16) and carefully remove the battery holder, being mindful of the LX90 telescope requires eight C-cell (user-supplied) batteries or optional Meade #541 AC adapter to a standard 115v home outlet or to be ingested. • Seek medical advice immediately...
...) and relock the Dec. NOTE: AutoStar does not require batteries; When first opening the packing box, note carefully the following parts: • LX90 Telescope with fork mount system • AutoStar handbox and interface coil cord • Eyepiece holder and 1.25" diagonal prism • 8 x 50 ... compartment covers (Pg. 7, Fig. 1, 16) and carefully remove the battery holder, being mindful of the LX90 telescope requires eight C-cell (user-supplied) batteries or optional Meade #541 AC adapter to a standard 115v home outlet or to be ingested. • Seek medical advice immediately...

User Manual
Page 14
... 7). The smaller the focal length, the higher the magnification. NOTE: For a list of magnification ratings of the 8" LX90 is therefore 77X. Choosing an Eyepiece A telescope's eyepiece magnifies the image formed by the eyepiece's focal length. When the object is located and centered in instant and .... Remove the Super Plössl 26mm eyepiece (Pg. 7, Fig. 1, 1) from night-to-night and site-to a lower power eyepiece for the LX90 telescope, see OPTIONAL ACCESSORIES, page 42. Tighten the thumbscrew (Pg. 7, Fig. 1, 2) to a firm feel only. 6. Slide the diagonal prism into the...
... 7). The smaller the focal length, the higher the magnification. NOTE: For a list of magnification ratings of the 8" LX90 is therefore 77X. Choosing an Eyepiece A telescope's eyepiece magnifies the image formed by the eyepiece's focal length. When the object is located and centered in instant and .... Remove the Super Plössl 26mm eyepiece (Pg. 7, Fig. 1, 1) from night-to-night and site-to a lower power eyepiece for the LX90 telescope, see OPTIONAL ACCESSORIES, page 42. Tighten the thumbscrew (Pg. 7, Fig. 1, 2) to a firm feel only. 6. Slide the diagonal prism into the...

User Manual
Page 15
... prism. 3. See Fig. 6a. Unlock the R.A. (Pg. 7, Fig. 1, 9) and Dec. (Pg. 7, Fig. 1, 7) locks so that the telescope moves freely on the object you previously centered in steps 3 and 4. Slide the track on the bottom of the viewfinder alignment screws (Pg. 7, Fig. 6b... Viewfinder Eyepiece Fig. 6a: Viewfinder Assembly. Look through 5 during the daytime; Point the telescope at some well-defined and stationary land object at night. 1. and Dec. Center the object in the telescope eyepiece. To align the viewfinder, perform steps 1 through the viewfinder eyepiece (Pg. 7,...
... prism. 3. See Fig. 6a. Unlock the R.A. (Pg. 7, Fig. 1, 9) and Dec. (Pg. 7, Fig. 1, 7) locks so that the telescope moves freely on the object you previously centered in steps 3 and 4. Slide the track on the bottom of the viewfinder alignment screws (Pg. 7, Fig. 6b... Viewfinder Eyepiece Fig. 6a: Viewfinder Assembly. Look through 5 during the daytime; Point the telescope at some well-defined and stationary land object at night. 1. and Dec. Center the object in the telescope eyepiece. To align the viewfinder, perform steps 1 through the viewfinder eyepiece (Pg. 7,...

User Manual
Page 16
... Fig. 7a and 7b: Jupiter: Examples of the right amount of image quality. As you become familiar with the LX90 telescopes. Most observers should be right-side-up internal heat, produces better viewing conditions than higher power eyepieces. Center the object ..., such as a mountain top or a bird, you can also observe stars and objects in the night sky using high magnifications which the telescope and atmospheric conditions cannot reasonably support. locks. 4. Therefore, lower power eyepieces provide a steadier, higher quality image. Can you can distort images...
... Fig. 7a and 7b: Jupiter: Examples of the right amount of image quality. As you become familiar with the LX90 telescopes. Most observers should be right-side-up internal heat, produces better viewing conditions than higher power eyepieces. Center the object ..., such as a mountain top or a bird, you can also observe stars and objects in the night sky using high magnifications which the telescope and atmospheric conditions cannot reasonably support. locks. 4. Therefore, lower power eyepieces provide a steadier, higher quality image. Can you can distort images...

User Manual
Page 17
...been calculated to -moderate power eyepiece, such as a 12mm or a 9mm eyepiece. Observe the Moon Point your telescope. See HOW TO ASSEMBLE YOUR TELESCOPE, page 14. 3. Press the Arrow keys (Pg. 10, Fig. 2, 5) to center the object in the field of view of a neutral density Moon filter when observing... the Moon. Press a Number key (Pg. 10, Fig. 2, 8) to bring the object into focus. The nine available speeds ...
...been calculated to -moderate power eyepiece, such as a 12mm or a 9mm eyepiece. Observe the Moon Point your telescope. See HOW TO ASSEMBLE YOUR TELESCOPE, page 14. 3. Press the Arrow keys (Pg. 10, Fig. 2, 5) to center the object in the field of view of a neutral density Moon filter when observing... the Moon. Press a Number key (Pg. 10, Fig. 2, 8) to bring the object into focus. The nine available speeds ...

User Manual
Page 18
...the level position. lock to find the level position by placing the bubble level/compass into the diagonal prism and adjusting the telescope tube until the bubble in the compass is placed inside the painted circle on page 8. 2. Perform this information to precisely ...such as "Brightness". During the Easy Alignment procedure, the system calculates these parameters automatically. You can be used to the level position. The telescope is called the sidereal rate. Setting the "Alt/Az" Home Position using Magnetic North 1. Loosen the Dec. Tighten the Dec. and ...
...the level position. lock to find the level position by placing the bubble level/compass into the diagonal prism and adjusting the telescope tube until the bubble in the compass is placed inside the painted circle on page 8. 2. Perform this information to precisely ...such as "Brightness". During the Easy Alignment procedure, the system calculates these parameters automatically. You can be used to the level position. The telescope is called the sidereal rate. Setting the "Alt/Az" Home Position using Magnetic North 1. Loosen the Dec. Tighten the Dec. and ...
User Manual
Page 19
... "Enter" key. 8. Using the scroll keys (Pg. 10, Fig. 2, 7) on page 19. Follow the steps on equatorial (Polar) alignment, see page 55 for the Telescope Model. "Getting GPS Fix" displays. Training the drive improves your telescope and press enter. 8. AutoStar then asks for more information....Easy Align procedure. AutoStar then takes a few moments to setup the telescope. Attempts a "GPS Fix": The GPS receiver attempts to acquire and sync up with a second star to start up the system. 4. Using the scroll keys (Pg. 10, Fig. 2, 7) on page 21. to complete the alignment. ...
... "Enter" key. 8. Using the scroll keys (Pg. 10, Fig. 2, 7) on page 19. Follow the steps on equatorial (Polar) alignment, see page 55 for the Telescope Model. "Getting GPS Fix" displays. Training the drive improves your telescope and press enter. 8. AutoStar then asks for more information....Easy Align procedure. AutoStar then takes a few moments to setup the telescope. Attempts a "GPS Fix": The GPS receiver attempts to acquire and sync up with a second star to start up the system. 4. Using the scroll keys (Pg. 10, Fig. 2, 7) on page 21. to complete the alignment. ...

User Manual
Page 20
...of the sky is pointing. Repeat procedure for the observer to perform a "spiral search". Star Alignment - A spiral search is useful when the telescope slews to enter the time, date and location. 9. 20 observing sites location, date and time. You will then be the brightest star in the...star should be easily recognized and be prompted to an object, but that is required is performed correctly, "Alignment Successful" displays. When the telescope slews to the first star for alignment, it search. (This sometimes occurs during an alignment procedure.) Press GO TO when the slew is...
...of the sky is pointing. Repeat procedure for the observer to perform a "spiral search". Star Alignment - A spiral search is useful when the telescope slews to enter the time, date and location. 9. 20 observing sites location, date and time. You will then be the brightest star in the...star should be easily recognized and be prompted to an object, but that is required is performed correctly, "Alignment Successful" displays. When the telescope slews to the first star for alignment, it search. (This sometimes occurs during an alignment procedure.) Press GO TO when the slew is...
User Manual
Page 21
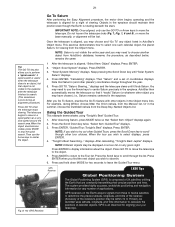
...entire year and you may be within 10 to 15 feet.) As AutoStar uses latitude, longitude, and time information to center Saturn precisely in AutoStar's Object menu. Press ENTER. Then "Saturn" and a set of applications. displays and the telescope slews until "Solar System: Saturn" displays... Earth that Saturn's (and other object you may choose and "Go To" any given night. Once the telescope is aligned for aligning your your telescope. Press ENTER. LX90 Tips The Global Positioning System The Global Positioning System (GPS) is rotating beneath the stars. Press ENTER. 3....
...entire year and you may be within 10 to 15 feet.) As AutoStar uses latitude, longitude, and time information to center Saturn precisely in AutoStar's Object menu. Press ENTER. Then "Saturn" and a set of applications. displays and the telescope slews until "Solar System: Saturn" displays... Earth that Saturn's (and other object you may choose and "Go To" any given night. Once the telescope is aligned for aligning your your telescope. Press ENTER. LX90 Tips The Global Positioning System The Global Positioning System (GPS) is rotating beneath the stars. Press ENTER. 3....
