
Instruction Manual
Page 5
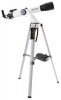
...12. Tighten the thumbscrews (F) to a firm feel only to centre an object in the diagonal prism (refractor models only; To change the telescope's slew speed, press a Number key. Practice using the Audiostar Arrow keys to secure. 7b. Slide the tube of view. See pages 15 and 16 for more... details. 11 8. Replace the cover. 11. Do not look through the telescope as shown on the diagram on the battery slots of the telescope's main tube to initialize Audiostar, see Fig. 7b). Speed 5: Medium . . . see page 16. Speed 1: Slow Arrow Keys Number...
...12. Tighten the thumbscrews (F) to a firm feel only to centre an object in the diagonal prism (refractor models only; To change the telescope's slew speed, press a Number key. Practice using the Audiostar Arrow keys to secure. 7b. Slide the tube of view. See pages 15 and 16 for more... details. 11 8. Replace the cover. 11. Do not look through the telescope as shown on the diagram on the battery slots of the telescope's main tube to initialize Audiostar, see Fig. 7b). Speed 5: Medium . . . see page 16. Speed 1: Slow Arrow Keys Number...
Instruction Manual
Page 9
... models only) or the 90° Diagonal Prism (refractor models only, 3, Fig. 1) and tighten in place with thumbscrew (4, Fig.1). ᕦ Focus Lock Knob: Designed to prevent the focuser drawtube from distant objects and brings this telescope at or near the Sun. See page 12 for Audiostar operation (F, Fig. Note: The dust cap should...
... models only) or the 90° Diagonal Prism (refractor models only, 3, Fig. 1) and tighten in place with thumbscrew (4, Fig.1). ᕦ Focus Lock Knob: Designed to prevent the focuser drawtube from distant objects and brings this telescope at or near the Sun. See page 12 for Audiostar operation (F, Fig. Note: The dust cap should...
Instruction Manual
Page 13
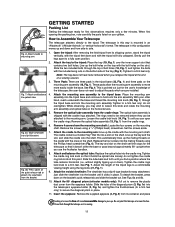
...the cradle with the mounting arm shaft. Attach the 90° diagonal prism (refractor models only): Pull out to your other hand, reach underneath the base and thread the mounting lock knob (26, Fig. 1) through the telescope as it clicks in this point. Open the tripod: After removing the field...(19, Fig. 1) over the inner support strut that it doesn't strike the base or pass beyond approximately 90° upright when you use the Audiostar handbox. 8. The cradle contains a molded "key" that it holds the optical tube loosely; Slide the tube back and forth until you collapse the ...
...the cradle with the mounting arm shaft. Attach the 90° diagonal prism (refractor models only): Pull out to your other hand, reach underneath the base and thread the mounting lock knob (26, Fig. 1) through the telescope as it clicks in this point. Open the tripod: After removing the field...(19, Fig. 1) over the inner support strut that it doesn't strike the base or pass beyond approximately 90° upright when you use the Audiostar handbox. 8. The cradle contains a molded "key" that it holds the optical tube loosely; Slide the tube back and forth until you collapse the ...
Instruction Manual
Page 14
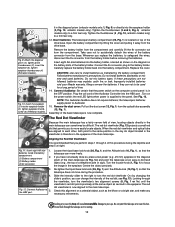
...pole or sign). Assembly of the basic telescope is now aligned to the HBX port. 5. Fig. 12: Connect Audiostar to the main telescope. 3 2 1 4 Fig. 9: Attach the diagonal prism (1), tighten prism thumbscrews (2), insert the eyepiece (3), tighten eyepiece thumbscrews (4) (Refractor models). 1 3 2 Fig. 10: ... to a firm feel only. 12. Insert batteries: The telescope's battery compartment (25, Fig. 1) is moving. 12 Open the battery compartment by changing the slider's position, you to your Meade warranty. Remove the battery holder from the compartment and carefully ...
...pole or sign). Assembly of the basic telescope is now aligned to the HBX port. 5. Fig. 12: Connect Audiostar to the main telescope. 3 2 1 4 Fig. 9: Attach the diagonal prism (1), tighten prism thumbscrews (2), insert the eyepiece (3), tighten eyepiece thumbscrews (4) (Refractor models). 1 3 2 Fig. 10: ... to a firm feel only. 12. Insert batteries: The telescope's battery compartment (25, Fig. 1) is moving. 12 Open the battery compartment by changing the slider's position, you to your Meade warranty. Remove the battery holder from the compartment and carefully ...
Instruction Manual
Page 34
... beginner to locate and identify objects to observe with any StarNavigator telescope model, Audiostar, and PC, for downloading of new software to monitors, VCRs, and camcorders. Eyepieces: For higher and lower magnifications, Meade Series 4000 Super Plössl (SP) yield high-resolution imaging with StarNavigator refractors results in contrast control adjustment for complete details on...
... beginner to locate and identify objects to observe with any StarNavigator telescope model, Audiostar, and PC, for downloading of new software to monitors, VCRs, and camcorders. Eyepieces: For higher and lower magnifications, Meade Series 4000 Super Plössl (SP) yield high-resolution imaging with StarNavigator refractors results in contrast control adjustment for complete details on...
Instruction Manual
Page 38
Do not point this telescope at or near the Sun. adjustable w/accessory tray Optical tube dimensions 3.5"/8.9 cm x 31"/78.7 cm Batteries (user-supplied 8 x AA Hand controller AudioStar StarNavigator102 Optical design Refractor Clear aperture 90 mm Focal length 800 mm Focal ratio f/7.7 ...adjustable w/accessory tray Optical tube dimensions 3.0"/7.6 cm x 27"/68.6 cm Batteries (user-supplied 8 x AA Hand controller AudioStar StarNavigator80 Optical design Refractor Clear aperture 80 mm Focal length 900 mm Focal ratio f/11.3 Resolving power 1.4 arc secs Max power 275X Mounting ...
Do not point this telescope at or near the Sun. adjustable w/accessory tray Optical tube dimensions 3.5"/8.9 cm x 31"/78.7 cm Batteries (user-supplied 8 x AA Hand controller AudioStar StarNavigator102 Optical design Refractor Clear aperture 90 mm Focal length 800 mm Focal ratio f/7.7 ...adjustable w/accessory tray Optical tube dimensions 3.0"/7.6 cm x 27"/68.6 cm Batteries (user-supplied 8 x AA Hand controller AudioStar StarNavigator80 Optical design Refractor Clear aperture 80 mm Focal length 900 mm Focal ratio f/11.3 Resolving power 1.4 arc secs Max power 275X Mounting ...
