
Operating Instructions
Page 1
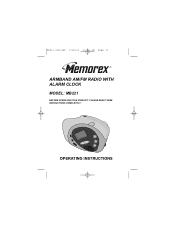
MB221.O/M.QXD 2/28/03 10:26 AM Page 11 ARMBAND AM/FM RADIO WITH ALARM CLOCK MODEL: MB221 BEFORE OPERATING THIS PRODUCT, PLEASE READ THESE INSTRUCTIONS COMPLETELY. OPERATING INSTRUCTIONS
MB221.O/M.QXD 2/28/03 10:26 AM Page 11 ARMBAND AM/FM RADIO WITH ALARM CLOCK MODEL: MB221 BEFORE OPERATING THIS PRODUCT, PLEASE READ THESE INSTRUCTIONS COMPLETELY. OPERATING INSTRUCTIONS
Operating Instructions
Page 2
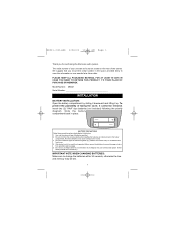
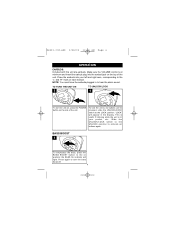
... used for purchasing the Memorex audio system. Slide the battery compartment back in place. - + - + BATTERY PRECAUTIONS Follow these precautions when using batteries in case this device: 1. If the device is ever needed at a future date. Do not try to recharge batteries not intended to prevent damage or injury from possible battery leakage. 5. MB221.O/M.QXD 2/28/03 10:26 AM Page 1 Thank you record the serial number...
... used for purchasing the Memorex audio system. Slide the battery compartment back in place. - + - + BATTERY PRECAUTIONS Follow these precautions when using batteries in case this device: 1. If the device is ever needed at a future date. Do not try to recharge batteries not intended to prevent damage or injury from possible battery leakage. 5. MB221.O/M.QXD 2/28/03 10:26 AM Page 1 Thank you record the serial number...
Operating Instructions
Page 3
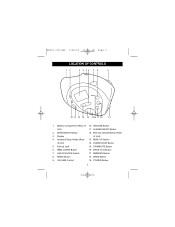
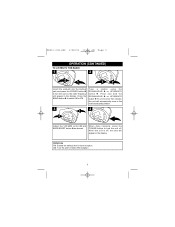
MEM. Earbud Jack 15. MEM. UNLOCK/LOCK Switch 17. BAND Button 9. Battery Compartment (Rear of Unit) 14. BASS BOOST Button 12. Belt Clip release Button (Rear 3. DOWN/HOUR Button 5. UP/MINUTE Button 6. VOLUME Control 19. BASS On Indicator 7. MEMORY Button 8. MODE Button 18. UP Button of 10. DOWN Button 16. MB221.O/M.QXD 2/28/03 10:26 AM Page 2 LOCATION OF CONTROLS 12 3 4 56 7 8 9 10 11 12 13 14 1516 17 18 19 1. SNOOZE Button Unit) 11. ALARM ON/OFF Button 2. Display of Unit) 4. Armband Strap Holder (Rear 13. POWER Button 2
MEM. Earbud Jack 15. MEM. UNLOCK/LOCK Switch 17. BAND Button 9. Battery Compartment (Rear of Unit) 14. BASS BOOST Button 12. Belt Clip release Button (Rear 3. DOWN/HOUR Button 5. UP/MINUTE Button 6. VOLUME Control 19. BASS On Indicator 7. MEMORY Button 8. MODE Button 18. UP Button of 10. DOWN Button 16. MB221.O/M.QXD 2/28/03 10:26 AM Page 2 LOCATION OF CONTROLS 12 3 4 56 7 8 9 10 11 12 13 14 1516 17 18 19 1. SNOOZE Button Unit) 11. ALARM ON/OFF Button 2. Display of Unit) 4. Armband Strap Holder (Rear 13. POWER Button 2
Operating Instructions
Page 4
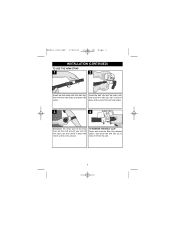
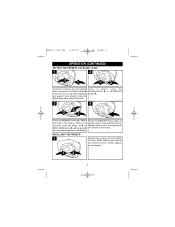
... arm itself). TO REMOVE THE BELT CLIP: Press and hold the Belt Clip release button, then push the belt clip out to remove it will rope your arm (it from the unit. 3 Fasten the velcro so the unit is secure. MB221.O/M.QXD 2/28/03 10:26 AM Page 3 INSTALLATION (CONTINUED) TO USE THE ARM STRAP 1... 2 Insert the belt strap into the belt clip, Insert the belt clip into the main unit, then fold the belt strap and fasten the then push the belt clip until it locks in velcro.
... arm itself). TO REMOVE THE BELT CLIP: Press and hold the Belt Clip release button, then push the belt clip out to remove it will rope your arm (it from the unit. 3 Fasten the velcro so the unit is secure. MB221.O/M.QXD 2/28/03 10:26 AM Page 3 INSTALLATION (CONTINUED) TO USE THE ARM STRAP 1... 2 Insert the belt strap into the belt clip, Insert the belt clip into the main unit, then fold the belt strap and fasten the then push the belt clip until it locks in velcro.
Operating Instructions
Page 5
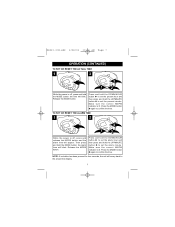
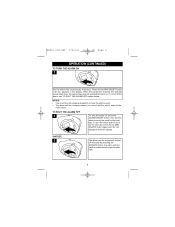
... alarm sound. Slide the UNLOCK/LOCK switch to the UNLOCK position to the LOCK position; To lock the unit so no buttons can be pressed, slide the UNLOCK/LOCK switch to activate all buttons again. Press again to the "L" and "R" mark on the top of the unit. Make sure the VOLUME control is in the display. TO TURN THE UNIT ON 1 TO UNLOCK/LOCK 1 To turn the bass boost off. 4 MB221...
... alarm sound. Slide the UNLOCK/LOCK switch to the UNLOCK position to the LOCK position; To lock the unit so no buttons can be pressed, slide the UNLOCK/LOCK switch to activate all buttons again. Press again to the "L" and "R" mark on the top of the unit. Make sure the VOLUME control is in the display. TO TURN THE UNIT ON 1 TO UNLOCK/LOCK 1 To turn the bass boost off. 4 MB221...
Operating Instructions
Page 6
... hold the DOWN/HOUR ❶ or UP/MINUTE button ❷ for better AM reception. 5 MB221.O/M.QXD 2/28/03 10:26 AM Page 5 OPERATION (CONTINUED) TO LISTEN TO THE RADIO 1 2 2 1 12 Insert the earbuds into the Earbud jack and press the POWER button ❶ to turn the unit off , the time will appear in the display. When done listening, press the POWER button...
... hold the DOWN/HOUR ❶ or UP/MINUTE button ❷ for better AM reception. 5 MB221.O/M.QXD 2/28/03 10:26 AM Page 5 OPERATION (CONTINUED) TO LISTEN TO THE RADIO 1 2 2 1 12 Insert the earbuds into the Earbud jack and press the POWER button ❶ to turn the unit off , the time will appear in the display. When done listening, press the POWER button...
Operating Instructions
Page 7
.... the radio frequency will blink in the display. RECALLING THE PRESETS 1 Repeat step 1 above. Press the MEM. DOWN button ❷ until the desired memory number appears on the display. 12 6 Press the BAND button ❷ to 10 stations in each band. Repeat steps 2 and 3 to program up to select AM or FM. MB221.O/M.QXD 2/28/03 10:26 AM Page 6 OPERATION (CONTINUED) SETTING THE PRESETS (10 FM AND...
.... the radio frequency will blink in the display. RECALLING THE PRESETS 1 Repeat step 1 above. Press the MEM. DOWN button ❷ until the desired memory number appears on the display. 12 6 Press the BAND button ❷ to 10 stations in each band. Repeat steps 2 and 3 to program up to select AM or FM. MB221.O/M.QXD 2/28/03 10:26 AM Page 6 OPERATION (CONTINUED) SETTING THE PRESETS (10 FM AND...
Operating Instructions
Page 8
... power is lit. Make sure the correct AM/PM indicator is off , press and release the MODE button and the alarm time will blink. Press the MODE button ❸ again to confirm the time. the time will appear. Release the MODE button. Press and hold the DOWN/HOUR button ❶ to the actual time display. 7 MB221.O/M.QXD 2/28/03 10:26 AM Page 7 OPERATION (CONTINUED) TO SET OR RESET...
... power is lit. Make sure the correct AM/PM indicator is off , press and release the MODE button and the alarm time will blink. Press the MODE button ❸ again to confirm the time. the time will appear. Release the MODE button. Press and hold the DOWN/HOUR button ❶ to the actual time display. 7 MB221.O/M.QXD 2/28/03 10:26 AM Page 7 OPERATION (CONTINUED) TO SET OR RESET...
Operating Instructions
Page 9
... hear the alarm sound. • The alarm will be reset for the next day, press the ALARM ON/OFF button again and "AL" will turn the alarm and not set it for the next day. MB221.O/M.QXD 2/28/03 10:26 AM Page 8 OPERATION (CONTINUED) TO TURN THE ALARM ON 1 Set the alarm time as previously instructed. To shut off the alarm...
... hear the alarm sound. • The alarm will be reset for the next day, press the ALARM ON/OFF button again and "AL" will turn the alarm and not set it for the next day. MB221.O/M.QXD 2/28/03 10:26 AM Page 8 OPERATION (CONTINUED) TO TURN THE ALARM ON 1 Set the alarm time as previously instructed. To shut off the alarm...
Operating Instructions
Page 10
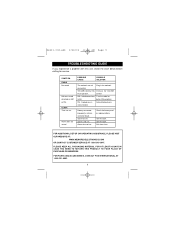
... not sound. connected. Alarm time not set . Set alarm time. Earbud wire is not set . control. Interference from Turn the radio for service. Clock not set . VOLUME control at min- Battery connected improperly, not connected or dead. AM - Set the clock. PLEASE KEEP ALL PACKAGING MATERIAL FOR AT LEAST 90 DAYS IN CASE YOU NEED TO RETURN THIS PRODUCT TO YOUR PLACE OF PURCHASE OR MEMOREX. MB221.O/M.QXD 2/28/03 10:26 AM Page 9 TROUBLESHOOTING GUIDE...
... not sound. connected. Alarm time not set . Set alarm time. Earbud wire is not set . control. Interference from Turn the radio for service. Clock not set . VOLUME control at min- Battery connected improperly, not connected or dead. AM - Set the clock. PLEASE KEEP ALL PACKAGING MATERIAL FOR AT LEAST 90 DAYS IN CASE YOU NEED TO RETURN THIS PRODUCT TO YOUR PLACE OF PURCHASE OR MEMOREX. MB221.O/M.QXD 2/28/03 10:26 AM Page 9 TROUBLESHOOTING GUIDE...
Operating Instructions
Page 11
MB221.O/M.QXD 2/28/03 10:26 AM Page 10 Memcorp, Inc. Weston, FL Printed in Hong Kong Visit our website at www.memorexelectronics.com
MB221.O/M.QXD 2/28/03 10:26 AM Page 10 Memcorp, Inc. Weston, FL Printed in Hong Kong Visit our website at www.memorexelectronics.com


