Operating Instructions
Page 1
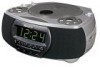
MC2862 O/M.QXD 9/27/02 10:35 AM Page 19 CD CLOCK RADIO WITH DUAL ALARM MODEL: MC2862 BEFORE OPERATING THIS PRODUCT, PLEASE READ THESE INSTRUCTIONS COMPLETELY. OPERATING INSTRUCTIONS
MC2862 O/M.QXD 9/27/02 10:35 AM Page 19 CD CLOCK RADIO WITH DUAL ALARM MODEL: MC2862 BEFORE OPERATING THIS PRODUCT, PLEASE READ THESE INSTRUCTIONS COMPLETELY. OPERATING INSTRUCTIONS
Operating Instructions
Page 2
... (servicing) instructions in the instruction manual. The lightning flash with arrowhead symbol, within an equilateral triangle is intended to alert the user to the presence of uninsulated 'dangerous voltage' within an equilateral triangle is made. The exclamation point within the product's enclosure that may generate or use radio frequency energy. Avoid direct exposure to possible eye injury. REFER SERVICING TO QUALIFIED SERVICE PERSONNEL. MC2862...
... (servicing) instructions in the instruction manual. The lightning flash with arrowhead symbol, within an equilateral triangle is intended to alert the user to the presence of uninsulated 'dangerous voltage' within an equilateral triangle is made. The exclamation point within the product's enclosure that may generate or use radio frequency energy. Avoid direct exposure to possible eye injury. REFER SERVICING TO QUALIFIED SERVICE PERSONNEL. MC2862...
Operating Instructions
Page 3
... product should follow the manufacturer's instructions, and should be connected to an outdoor antenna. 1. However, there is no guarantee that these are general precautions and may cause the appliance and cart combination to overturn. 9. For example, this unit may cause harmful interference to radio communications. READ INSTRUCTIONS All the safety and operating instructions should use a mounting accessory recommended by RETAC) stops...
... product should follow the manufacturer's instructions, and should be connected to an outdoor antenna. 1. However, there is no guarantee that these are general precautions and may cause the appliance and cart combination to overturn. 9. For example, this unit may cause harmful interference to radio communications. READ INSTRUCTIONS All the safety and operating instructions should use a mounting accessory recommended by RETAC) stops...
Operating Instructions
Page 4
... SAFETY INSTRUCTIONS (CONTINUED) type of power source indicated on the product. 17. If you to a wall or ceiling only as contact with a polarized alternating-current line plug (a plug having one way. LIGHTNING To protect your obsolete outlet. POWER LINES An outside antenna system, extreme care should not be sure the service technician uses replacement parts specified by the manufacturer or those controls that are...
... SAFETY INSTRUCTIONS (CONTINUED) type of power source indicated on the product. 17. If you to a wall or ceiling only as contact with a polarized alternating-current line plug (a plug having one way. LIGHTNING To protect your obsolete outlet. POWER LINES An outside antenna system, extreme care should not be sure the service technician uses replacement parts specified by the manufacturer or those controls that are...
Operating Instructions
Page 5
... musical enjoyment. Now it at a safe level. Over time your volume control at two feet THE FOLLOWING NOISES CAN BE DANGEROUS UNDER CONSTANT EXPOSURE: 90 Subway, motorcycle, truck traffic, lawn mower 100 Garbage truck, chain saw, pneumatic drill 120 Rock band concert in the future. To establish a safe level: • Start your hearing "comfort level" adapts...
... musical enjoyment. Now it at a safe level. Over time your volume control at two feet THE FOLLOWING NOISES CAN BE DANGEROUS UNDER CONSTANT EXPOSURE: 90 Subway, motorcycle, truck traffic, lawn mower 100 Garbage truck, chain saw, pneumatic drill 120 Rock band concert in the future. To establish a safe level: • Start your hearing "comfort level" adapts...
Operating Instructions
Page 6
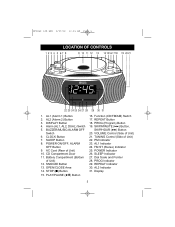
... (Alarm 1) Button 2. AC Cord (Rear of Unit) 21. VOLUME Control (Side of Unit) 10. POWER Indicator 26. REPEAT Indicator 30. POWER ON/OFF, ALARM OFF Button 9. PROG (Program) Button 19. FM ST (Stereo) Indicator 25. PROG Indicator 29. AL2 (Alarm 2) Button 3. Alarm (AL1, AL2, DUAL) Switch 5. Function (CD/FM/AM) Switch 17. TUNING Control (Side of Unit) 12. SLEEP Indicator 27. Display 5 Battery Compartment (Bottom of Unit) 22. CLOCK Button 7. SNOOZE Button 13. DISPLAY Button 4. STOP (s) Button 15. SKIP/MINUTE ( ) Button...
... (Alarm 1) Button 2. AC Cord (Rear of Unit) 21. VOLUME Control (Side of Unit) 10. POWER Indicator 26. REPEAT Indicator 30. POWER ON/OFF, ALARM OFF Button 9. PROG (Program) Button 19. FM ST (Stereo) Indicator 25. PROG Indicator 29. AL2 (Alarm 2) Button 3. Alarm (AL1, AL2, DUAL) Switch 5. Function (CD/FM/AM) Switch 17. TUNING Control (Side of Unit) 12. SLEEP Indicator 27. Display 5 Battery Compartment (Bottom of Unit) 22. CLOCK Button 7. SNOOZE Button 13. DISPLAY Button 4. STOP (s) Button 15. SKIP/MINUTE ( ) Button...
Operating Instructions
Page 7
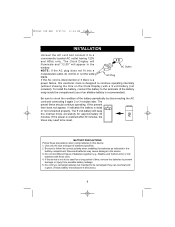
... Clock Display will illuminate and "12:00" will keep the internal times accurately for a long period of the battery periodically by disconnecting the AC cord and connecting it again 2 or 3 minutes later. AC Outlet NOTE: If the AC plug does not fit into a nonpolarized outlet, do not file or cut the wide blade. The preset times should continue operating. If the power...
... Clock Display will illuminate and "12:00" will keep the internal times accurately for a long period of the battery periodically by disconnecting the AC cord and connecting it again 2 or 3 minutes later. AC Outlet NOTE: If the AC plug does not fit into a nonpolarized outlet, do not file or cut the wide blade. The preset times should continue operating. If the power...
Operating Instructions
Page 8
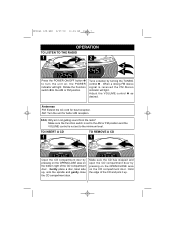
Make sure the Function switch is set to the AM or FM position and the VOLUME control is received the FM Stereo indicator will light. Tune a station by pressing on the OPEN/CLOSE area on the CD compartment door. Hold the edge of the CD compartment door. FAQ: Why am I not getting sound from the radio? Make sure the CD has stopped and...
Make sure the Function switch is set to the AM or FM position and the VOLUME control is received the FM Stereo indicator will light. Tune a station by pressing on the OPEN/CLOSE area on the CD compartment door. Hold the edge of the CD compartment door. FAQ: Why am I not getting sound from the radio? Make sure the CD has stopped and...

Operating Instructions
Page 9
... unit? Slide the Function switch ❷ to see page 7, "To Remove a CD" section. 8 the display will light and the total number of tracks on the disc, press the SKIP or button. No, simply insert the 3" single into the groove. MC2862 O/M.QXD 9/27/02 10:35 AM Page 8 OPERATION (CONTINUED) TO PLAY A CD 1 2 2 1 Insert a CD as desired. the POWER indicator will blink.
... unit? Slide the Function switch ❷ to see page 7, "To Remove a CD" section. 8 the display will light and the total number of tracks on the disc, press the SKIP or button. No, simply insert the 3" single into the groove. MC2862 O/M.QXD 9/27/02 10:35 AM Page 8 OPERATION (CONTINUED) TO PLAY A CD 1 2 2 1 Insert a CD as desired. the POWER indicator will blink.

Operating Instructions
Page 10
the REPEAT indicator will light. the POWER indicator will blink. Press the PLAY/PAUSE ( ) button ❶ to start playback and the unit will then play the same track over and over until the STOP (s) button ❸ is pressed. 9 Slide the Function switch ❷ to the CD position. TO REPEATEDLY PLAY BACK ALL TRACKS 1 1 23 2 2 1 Press the POWER button ❶ to turn the unit on; MC2862 O/M.QXD 9/27...
the REPEAT indicator will light. the POWER indicator will blink. Press the PLAY/PAUSE ( ) button ❶ to start playback and the unit will then play the same track over and over until the STOP (s) button ❸ is pressed. 9 Slide the Function switch ❷ to the CD position. TO REPEATEDLY PLAY BACK ALL TRACKS 1 1 23 2 2 1 Press the POWER button ❶ to turn the unit on; MC2862 O/M.QXD 9/27...

Operating Instructions
Page 11
... the Function switch. 10 Adjust the VOLUME control ❶ as desired. When the disc is finished. FAQS: How do I clear the memory? The unit will light. NOTES: • To skip forward or backward through playing, it is through the programs, press the SKIP or button. the POWER indicator will play all the tracks in the display and the PROGRAM indicator will blink. 3 Within...
... the Function switch. 10 Adjust the VOLUME control ❶ as desired. When the disc is finished. FAQS: How do I clear the memory? The unit will light. NOTES: • To skip forward or backward through playing, it is through the programs, press the SKIP or button. the POWER indicator will play all the tracks in the display and the PROGRAM indicator will blink. 3 Within...
Operating Instructions
Page 12
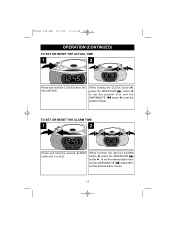
MC2862 O/M.QXD 9/27/02 10:35 AM Page 11 OPERATION (CONTINUED) TO SET OR RESET THE ACTUAL TIME 1 2 1 32 Press and hold the desired ALARM button (AL1 or AL2). While holding the desired ALARM button ❶, press the SKIP/HOUR button ❷ to set the desired alarm hour and the SKIP/MINUTE button ❸ to set the desired alarm minute. 11 the time will blink. While holding the CLOCK button ❶, press...
MC2862 O/M.QXD 9/27/02 10:35 AM Page 11 OPERATION (CONTINUED) TO SET OR RESET THE ACTUAL TIME 1 2 1 32 Press and hold the desired ALARM button (AL1 or AL2). While holding the desired ALARM button ❶, press the SKIP/HOUR button ❷ to set the desired alarm hour and the SKIP/MINUTE button ❸ to set the desired alarm minute. 11 the time will blink. While holding the CLOCK button ❶, press...
Operating Instructions
Page 13
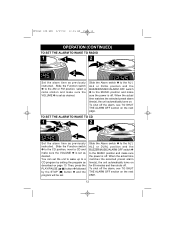
... or DUAL position and the BUZZER/MUSIC/ALARM OFF switch ❷ to the MUSIC position and make sure the power is set . When the actual time matches the selected preset alarm time(s), the unit automatically turns on the next page. Slide the Function switch ❶ to a CD program by the STOP (s) button ❹ and the program will be set as desired. You can set as desired. To shut off . TO SET THE ALARM TO WAKE...
... or DUAL position and the BUZZER/MUSIC/ALARM OFF switch ❷ to the MUSIC position and make sure the power is set . When the actual time matches the selected preset alarm time(s), the unit automatically turns on the next page. Slide the Function switch ❶ to a CD program by the STOP (s) button ❹ and the program will be set as desired. You can set as desired. To shut off . TO SET THE ALARM TO WAKE...
Operating Instructions
Page 14
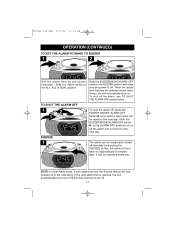
... selected preset alarm time(s), the unit automatically turns on for the next day. It can be temporarily turned off the alarm, see TO SHUT THE ALARM OFF section below. NOTE: In Dual Alarm mode, if both alarms are set it for 59 minutes and then shuts off. 13 MC2862 O/M.QXD 9/27/02 10:35 AM Page 13 OPERATION (CONTINUED) TO SET THE ALARM TO WAKE TO BUZZER 1 2 Set the alarm time as previously instructed. the alarm will turn...
... selected preset alarm time(s), the unit automatically turns on for the next day. It can be temporarily turned off the alarm, see TO SHUT THE ALARM OFF section below. NOTE: In Dual Alarm mode, if both alarms are set it for 59 minutes and then shuts off. 13 MC2862 O/M.QXD 9/27/02 10:35 AM Page 13 OPERATION (CONTINUED) TO SET THE ALARM TO WAKE TO BUZZER 1 2 Set the alarm time as previously instructed. the alarm will turn...
Operating Instructions
Page 15
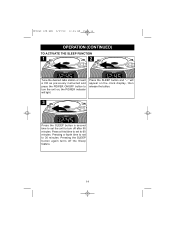
... clock display, then release the button. 3 Press the SLEEP button a second time to set the unit to turn the unit on; MC2862 O/M.QXD 9/27/02 10:35 AM Page 14 OPERATION (CONTINUED) TO ACTIVATE THE SLEEP FUNCTION 1 2 Tune the desired radio station or insert a CD as previously instructed and press the POWER ON/OFF button to turn off the Sleep feature. 14 Press the SLEEP button and "--" will light. Pressing the SLEEP button again turns...
... clock display, then release the button. 3 Press the SLEEP button a second time to set the unit to turn the unit on; MC2862 O/M.QXD 9/27/02 10:35 AM Page 14 OPERATION (CONTINUED) TO ACTIVATE THE SLEEP FUNCTION 1 2 Tune the desired radio station or insert a CD as previously instructed and press the POWER ON/OFF button to turn off the Sleep feature. 14 Press the SLEEP button and "--" will light. Pressing the SLEEP button again turns...

Operating Instructions
Page 16
... power source when cleaning. • The finish on a section of the disc, it is designed to play properly. • Discs should be stored in straight lines from the center of the disc. Other discs may not conform to the disc label. • Clean the disc periodically with a dust cloth and cared for Compact Discs • Treat the disc carefully. If necessary, use...
... power source when cleaning. • The finish on a section of the disc, it is designed to play properly. • Discs should be stored in straight lines from the center of the disc. Other discs may not conform to the disc label. • Clean the disc periodically with a dust cloth and cared for Compact Discs • Treat the disc carefully. If necessary, use...

Operating Instructions
Page 17
... sound. Defective disc. Dirty or defective disc. Clean or replace disc. Check the battery. MC2862 O/M.QXD 9/27/02 10:35 AM Page 16 TROUBLESHOOTING GUIDE If you experience a problem with soft cloth. Time reset to the desired alarm. Battery connected improperly, not connected or dead. VOLUME control set . Reinsert disc correctly. Try another disc. Wipe disc with this unit, check the chart below before calling for service. Set the clock. Set the clock. Increase volume. 16 Disc will not turn...
... sound. Defective disc. Dirty or defective disc. Clean or replace disc. Check the battery. MC2862 O/M.QXD 9/27/02 10:35 AM Page 16 TROUBLESHOOTING GUIDE If you experience a problem with soft cloth. Time reset to the desired alarm. Battery connected improperly, not connected or dead. VOLUME control set . Reinsert disc correctly. Try another disc. Wipe disc with this unit, check the chart below before calling for service. Set the clock. Set the clock. Increase volume. 16 Disc will not turn...
Operating Instructions
Page 18
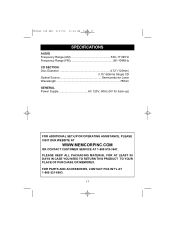
... Page 17 SPECIFICATIONS AUDIO Frequency Range (AM 530-1710KHz Frequency Range (FM 88-108MHz CD SECTION: Disc Diameter 4.72" (120mm) 3.15" (80mm) Single CD Optical Source Semiconductor Laser Wavelength 780nm GENERAL Power Supply AC 120V, 60Hz (9V for back-up) FOR ADDITIONAL SET-UP OR OPERATING ASSISTANCE, PLEASE VISIT OUR WEBSITE AT WWW.MEMCORPINC.COM OR CONTACT CUSTOMER SERVICE AT...
... Page 17 SPECIFICATIONS AUDIO Frequency Range (AM 530-1710KHz Frequency Range (FM 88-108MHz CD SECTION: Disc Diameter 4.72" (120mm) 3.15" (80mm) Single CD Optical Source Semiconductor Laser Wavelength 780nm GENERAL Power Supply AC 120V, 60Hz (9V for back-up) FOR ADDITIONAL SET-UP OR OPERATING ASSISTANCE, PLEASE VISIT OUR WEBSITE AT WWW.MEMCORPINC.COM OR CONTACT CUSTOMER SERVICE AT...
Operating Instructions
Page 19
MC2862 O/M.QXD 9/27/02 10:35 AM Page 18 Memcorp, Inc. Weston, FL Printed in Hong Kong Visit our website at www.memcorpinc.com
MC2862 O/M.QXD 9/27/02 10:35 AM Page 18 Memcorp, Inc. Weston, FL Printed in Hong Kong Visit our website at www.memcorpinc.com


