User Guide
Page 2
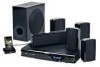
...; Connecting the DVD to a TV Using the HDMI Output Jack 13 • Connecting an External Unit 14 • Connecting the FM Antenna 14 About Discs 15 Setup Menu 17 • System Setup Menu 18 • Language Setup Menu 19 • Digital Setup Menu 20 • Video Setup Menu 20 • Speaker Setup Menu 21 • TVGuardian 22 • Setting the Clock 24 Basic Operation 25 • Volume 25 • Mute 25 • OSD/INFO 25 • EQ/BASS 25...
...; Connecting the DVD to a TV Using the HDMI Output Jack 13 • Connecting an External Unit 14 • Connecting the FM Antenna 14 About Discs 15 Setup Menu 17 • System Setup Menu 18 • Language Setup Menu 19 • Digital Setup Menu 20 • Video Setup Menu 20 • Speaker Setup Menu 21 • TVGuardian 22 • Setting the Clock 24 Basic Operation 25 • Volume 25 • Mute 25 • OSD/INFO 25 • EQ/BASS 25...

User Guide
Page 3
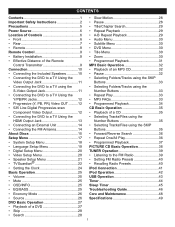
... relocate the receiving antenna. Cet appareil numérique de la classe B est conforme à la norme NMB-003 du Canada. NO USER-SERVICEABLE PARTS INSIDE. SURGE PROTECTORS: It is recommended to use only shielded cables when connecting to other countries. 2 The symbol for a Class B digital device, pursuant to part 15 of the FCC Rules. Avoid direct exposure to beam. "Dolby" and...
... relocate the receiving antenna. Cet appareil numérique de la classe B est conforme à la norme NMB-003 du Canada. NO USER-SERVICEABLE PARTS INSIDE. SURGE PROTECTORS: It is recommended to use only shielded cables when connecting to other countries. 2 The symbol for a Class B digital device, pursuant to part 15 of the FCC Rules. Avoid direct exposure to beam. "Dolby" and...

User Guide
Page 4
... wall outlet and disconnect the antenna or cable system. LIGHTNING To protect your unit. When installing an outside antenna system should still fail to fit, contact your electrician to overturn. 9. READ INSTRUCTIONS All the safety and operating instructions should never be read all operating instructions carefully. WATER AND MOISTURE Do not use this unit may cause the appliance and cart combination to replace...
... wall outlet and disconnect the antenna or cable system. LIGHTNING To protect your unit. When installing an outside antenna system should still fail to fit, contact your electrician to overturn. 9. READ INSTRUCTIONS All the safety and operating instructions should never be read all operating instructions carefully. WATER AND MOISTURE Do not use this unit may cause the appliance and cart combination to replace...
User Guide
Page 5
... hazards. 20. b. e. Refer all servicing to a wall or ceiling only as an adjustment of any service or repairs to this indicates a need for proper grounding and, in proper operating condition. 21. When the power-supply cord or plug is in particular, specifies that have fallen into the product. d. WALL OR CEILING MOUNTING The product should be connected to the grounding system of...
... hazards. 20. b. e. Refer all servicing to a wall or ceiling only as an adjustment of any service or repairs to this indicates a need for proper grounding and, in proper operating condition. 21. When the power-supply cord or plug is in particular, specifies that have fallen into the product. d. WALL OR CEILING MOUNTING The product should be connected to the grounding system of...
User Guide
Page 6
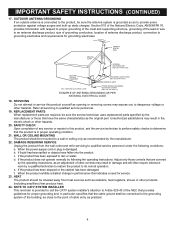
... disc, connect the power cord of the glass. This is normal and not a malfunction. • When the DVD player is a high technology, precision device. Warning: Cleaning and adjustment of lenses and/or other components of use a chemical-saturated cloth to wipe it "ON" for two or three hours. To obtain a clear picture, we recommend regular inspection and maintenance (cleaning or parts replacement...
... disc, connect the power cord of the glass. This is normal and not a malfunction. • When the DVD player is a high technology, precision device. Warning: Cleaning and adjustment of lenses and/or other components of use a chemical-saturated cloth to wipe it "ON" for two or three hours. To obtain a clear picture, we recommend regular inspection and maintenance (cleaning or parts replacement...
User Guide
Page 12
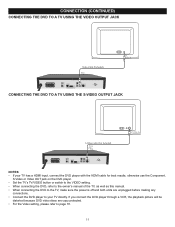
... a HDMI input, connect the DVD player with the HDMI cable for best results, otherwise use the Component, S-Video or Video OUT jack on the DVD player. • Set the TV's TV/VIDEO button or switch to the VIDEO setting. • When connecting the DVD, refer to the owner's manual of the TV, as well as this manual. • When connecting the DVD to the TV, make sure the power is off and both units are copy protected. • For the Video setting, please...
... a HDMI input, connect the DVD player with the HDMI cable for best results, otherwise use the Component, S-Video or Video OUT jack on the DVD player. • Set the TV's TV/VIDEO button or switch to the VIDEO setting. • When connecting the DVD, refer to the owner's manual of the TV, as well as this manual. • When connecting the DVD to the TV, make sure the power is off and both units are copy protected. • For the Video setting, please...
User Guide
Page 13
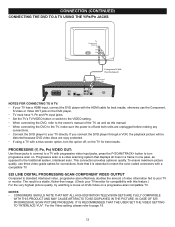
... input jacks. • Set the TV's TV/VIDEO button or switch to the VIDEO setting. • When connecting the DVD, refer to the owner's manual of video information fed to the traditional system, interlaced scan. CONNECTION (CONTINUED) CONNECTING THE DVD TO A TV USING THE Y/PB/PR JACKS To Component Video In Y PB PR Component Cable (Not Included) From Component Video Out NOTES FOR CONNECTING TO A TV: • If your TV has a HDMI input, connect the DVD player with the HDMI cable for best...
... input jacks. • Set the TV's TV/VIDEO button or switch to the VIDEO setting. • When connecting the DVD, refer to the owner's manual of video information fed to the traditional system, interlaced scan. CONNECTION (CONTINUED) CONNECTING THE DVD TO A TV USING THE Y/PB/PR JACKS To Component Video In Y PB PR Component Cable (Not Included) From Component Video Out NOTES FOR CONNECTING TO A TV: • If your TV has a HDMI input, connect the DVD player with the HDMI cable for best...
User Guide
Page 14
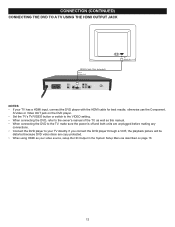
... because DVD video discs are unplugged before making any connections. • Connect the DVD player to your video source, setup the HD Output in the System Setup Menu as your TV directly. CONNECTION (CONTINUED) CONNECTING THE DVD TO A TV USING THE HDMI OUTPUT JACK HDMI Cable (Not Included) From HDMI OUT To HDMI IN NOTES: • If your TV has a HDMI input, connect the DVD player with the HDMI cable for best results, otherwise use the Component, S-Video or Video OUT jack on the DVD player. • Set the TV's TV/VIDEO button or switch...
... because DVD video discs are unplugged before making any connections. • Connect the DVD player to your video source, setup the HD Output in the System Setup Menu as your TV directly. CONNECTION (CONTINUED) CONNECTING THE DVD TO A TV USING THE HDMI OUTPUT JACK HDMI Cable (Not Included) From HDMI OUT To HDMI IN NOTES: • If your TV has a HDMI input, connect the DVD player with the HDMI cable for best results, otherwise use the Component, S-Video or Video OUT jack on the DVD player. • Set the TV's TV/VIDEO button or switch...
User Guide
Page 16
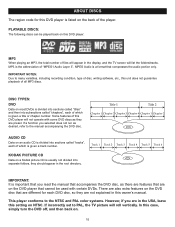
... be used with some DVD discs as desired, refer to many variables, including recording condition, type of "MPEG1 Audio Layer 3". This player conforms to PAL, the TV picture will list the folders/tracks. In this DVD player is listed on a Kodak picture CD is given a track number. ABOUT DISCS The region code for each of which is the abbreviation of disc, writing software, etc., this owner's manual.
... be used with some DVD discs as desired, refer to many variables, including recording condition, type of "MPEG1 Audio Layer 3". This player conforms to PAL, the TV picture will list the folders/tracks. In this DVD player is listed on a Kodak picture CD is given a track number. ABOUT DISCS The region code for each of which is the abbreviation of disc, writing software, etc., this owner's manual.
User Guide
Page 18
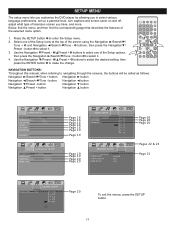
...;/Preset + button: Navigation π button SYSTEM SETUP TV SYSTEM SCREEN SAVER HD OUTPUT VIDEO TV TYPE PASSWORD NTSC PAL AUTO DEFAULT LANGUAGE SETUP OSD LANGUAGE AUDIO LANG SUBTITLE LANG MENU LANG ENGLISH FRENCH SPANISH VIDEO SETUP Page 18 BRIGHTNESS 12 Page 18 CONTRAST 10 Page 18 SATURATION 8 Page 18 6 Page 18 4 Page 19 2 0 Page 19 Page 19 Page 19 Page 20 Page 20 SPEAKER SETUP DOWNMIX SUBWOOFER CENTER DELAY REAR DELAY LT...
...;/Preset + button: Navigation π button SYSTEM SETUP TV SYSTEM SCREEN SAVER HD OUTPUT VIDEO TV TYPE PASSWORD NTSC PAL AUTO DEFAULT LANGUAGE SETUP OSD LANGUAGE AUDIO LANG SUBTITLE LANG MENU LANG ENGLISH FRENCH SPANISH VIDEO SETUP Page 18 BRIGHTNESS 12 Page 18 CONTRAST 10 Page 18 SATURATION 8 Page 18 6 Page 18 4 Page 19 2 0 Page 19 Page 19 Page 19 Page 20 Page 20 SPEAKER SETUP DOWNMIX SUBWOOFER CENTER DELAY REAR DELAY LT...
User Guide
Page 19
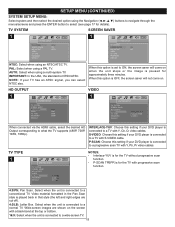
... 1080P VIDEO 1 S SYSTEM SETUP TV SYSTEM SCREEN SAVER HD OUTPUT VIDEO TV TYPE PASSWORD DEFAULT INTERLACE-YUV P-SCAN YPBPR S-VIDEO When connected via the HDMI cable, select the desired HD Output corresponding to a normal TV. TV TYPE 1 S SYSTEM SETUP TV SYSTEM SCREEN SAVER HD OUTPUT VIDEO TV TYPE PASSWORD DEFAULT 4:3PS 4:3LB 16:9 NOTES: • Interlace-YUV is for the TV without progressive scan function. • P-SCAN TPBPR is played back...
... 1080P VIDEO 1 S SYSTEM SETUP TV SYSTEM SCREEN SAVER HD OUTPUT VIDEO TV TYPE PASSWORD DEFAULT INTERLACE-YUV P-SCAN YPBPR S-VIDEO When connected via the HDMI cable, select the desired HD Output corresponding to a normal TV. TV TYPE 1 S SYSTEM SETUP TV SYSTEM SCREEN SAVER HD OUTPUT VIDEO TV TYPE PASSWORD DEFAULT 4:3PS 4:3LB 16:9 NOTES: • Interlace-YUV is for the TV without progressive scan function. • P-SCAN TPBPR is played back...

User Guide
Page 20
... the default language of the DVD will be changed. LANGUAGE SETUP MENU: Select system and then select the desired option using the Number buttons if this option to reset all the preferences (except PASSWORD) to confirm; Select the language the DVD will be opened . OSD LANGUAGE AUDIO LANGUAGE 1 1 Select the desired language (ENGLISH, FRENCH SPANISH) for details). the Lock icon will be locked again and the password will not be played...
... the default language of the DVD will be changed. LANGUAGE SETUP MENU: Select system and then select the desired option using the Number buttons if this option to reset all the preferences (except PASSWORD) to confirm; Select the language the DVD will be opened . OSD LANGUAGE AUDIO LANGUAGE 1 1 Select the desired language (ENGLISH, FRENCH SPANISH) for details). the Lock icon will be locked again and the password will not be played...

User Guide
Page 21
... RANGE 1 PICTURE SETTINGS 1 DYNAMIC RANGE DIGITAL SETUP FULL 6/8 4/8 2/8 OFF VIDEO SETUP BRIGHTNESS 12 CONTRAST 10 SATURATION 8 6 4 2 0 Use the slider to lighten or darken the picture. The DVD must be written in the selected language, otherwise the default language of the DVD will make high sounds quieter and soft sounds louder to turn Dynamic Range Off. Set to OFF to give an overall more acceptable sound output. The DVD's DISC MENU must be...
... RANGE 1 PICTURE SETTINGS 1 DYNAMIC RANGE DIGITAL SETUP FULL 6/8 4/8 2/8 OFF VIDEO SETUP BRIGHTNESS 12 CONTRAST 10 SATURATION 8 6 4 2 0 Use the slider to lighten or darken the picture. The DVD must be written in the selected language, otherwise the default language of the DVD will make high sounds quieter and soft sounds louder to turn Dynamic Range Off. Set to OFF to give an overall more acceptable sound output. The DVD's DISC MENU must be...

User Guide
Page 22
... Dolby Digital format. When listening to the speakers. When playing CD's, a stereo signal will be output from the listener to select (see page 17 for details). CENTER DELAY 1 SPEAKER SETUP DOWNMIX SUBWOOFER CENTER DELAY REAR DELAY + 4 MS 2MS 0 MS REAR DELAY 1 SPEAKER SETUP DOWNMIX SUBWOOFER CENTER DELAY REAR DELAY + 12 MS 6 MS 0 MS It is assumed that the sound will be heard simultaneously by the listener. If not, then set the Rear Delay. SETUP MENU (CONTINUED) SPEAKER SETUP MENU: Select Speaker and then select the desired option using the Navigation buttons...
... Dolby Digital format. When listening to the speakers. When playing CD's, a stereo signal will be output from the listener to select (see page 17 for details). CENTER DELAY 1 SPEAKER SETUP DOWNMIX SUBWOOFER CENTER DELAY REAR DELAY + 4 MS 2MS 0 MS REAR DELAY 1 SPEAKER SETUP DOWNMIX SUBWOOFER CENTER DELAY REAR DELAY + 12 MS 6 MS 0 MS It is assumed that the sound will be heard simultaneously by the listener. If not, then set the Rear Delay. SETUP MENU (CONTINUED) SPEAKER SETUP MENU: Select Speaker and then select the desired option using the Navigation buttons...
User Guide
Page 28
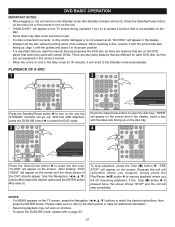
... and the ENTER button 3 to open the disc tray; "CLOSE" will appear on the screen and the menu screen of its proper position. • It is not present at all discs. • To select the DVD/USB mode, please refer to page 43. 27 Because the unit will appear on the screen. Insert a disc with certain DVDs. PLAYBACK OF A DVD 1 2 1 2 Press the Standby/Power button 1 to turn on the...
... and the ENTER button 3 to open the disc tray; "CLOSE" will appear on the screen and the menu screen of its proper position. • It is not present at all discs. • To select the DVD/USB mode, please refer to page 43. 27 Because the unit will appear on the screen. Insert a disc with certain DVDs. PLAYBACK OF A DVD 1 2 1 2 Press the Standby/Power button 1 to turn on the...
User Guide
Page 32
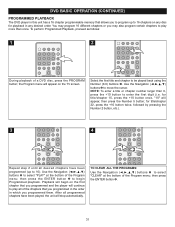
DVD BASIC OPERATION (CONTINUED) PROGRAMMED PLAYBACK The DVD player in this unit has a 16 chapter programmable memory that allows you to program up to be played back using the Number (0-9) buttons 1. To perform Programmed Playback, proceed as follows: 1 2 1 2 During playback of the Program menu; the Program menu will appear on any disc for playback in which you programmed them. Select the first title and chapter to 16). for title...
DVD BASIC OPERATION (CONTINUED) PROGRAMMED PLAYBACK The DVD player in this unit has a 16 chapter programmable memory that allows you to program up to be played back using the Number (0-9) buttons 1. To perform Programmed Playback, proceed as follows: 1 2 1 2 During playback of the Program menu; the Program menu will appear on any disc for playback in which you programmed them. Select the first title and chapter to 16). for title...

User Guide
Page 35
... OPERATION (CONTINUED) PROGRAMMED PLAYBACK The DVD player in this unit has a 16 chapter programmable memory that you programmed in the order in any desired order. You may program 16 different files or you may also program certain files to play all programmed chapters have been programmed (up to select "PLAY" at the bottom of an MP3 disc, press the PROGRAM button; After all of the Program menu...
... OPERATION (CONTINUED) PROGRAMMED PLAYBACK The DVD player in this unit has a 16 chapter programmable memory that you programmed in the order in any desired order. You may program 16 different files or you may also program certain files to play all programmed chapters have been programmed (up to select "PLAY" at the bottom of an MP3 disc, press the PROGRAM button; After all of the Program menu...
User Guide
Page 44
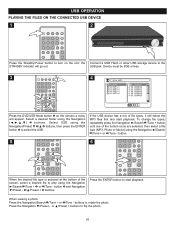
... is selected at the bottom of file types, it will go out. USB OPERATION PLAYING THE FILES ON THE CONNECTED USB DEVICE 1 2 Press the Standby/Power button to flip the photo. 43 the Connect a USB Flash or other USB storage device to the STANDBY indicator will select the MP3 files first and start playback. USB jack. a menu will appear. Press the Navigation †/Preset - or π/Preset + buttons to turn on the remote;
... is selected at the bottom of file types, it will go out. USB OPERATION PLAYING THE FILES ON THE CONNECTED USB DEVICE 1 2 Press the Standby/Power button to flip the photo. 43 the Connect a USB Flash or other USB storage device to the STANDBY indicator will select the MP3 files first and start playback. USB jack. a menu will appear. Press the Navigation †/Preset - or π/Preset + buttons to turn on the remote;

User Guide
Page 45
... clock setting mode. • The timer will turn on . When the actual time reaches the set time, the source you selected will be reset when the power cord is disconnected or if a power failure occurs. • To deactivate the timer function, press the TIMER button once. 44 "TUNER" will then be set to turn on to set the Timer Off time. Select the minutes using the Navigation/Preset π...
... clock setting mode. • The timer will turn on . When the actual time reaches the set time, the source you selected will be reset when the power cord is disconnected or if a power failure occurs. • To deactivate the timer function, press the TIMER button once. 44 "TUNER" will then be set to turn on to set the Timer Off time. Select the minutes using the Navigation/Preset π...
User Guide
Page 47
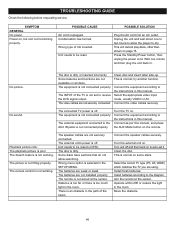
... to be reset to the AUX IN jacks is not working . Connect the video cables securely. Playback picture rolls. The speaker cables are weak or dead. Some discs have sections that do not allow the player to receive the DVD signal output. Wrong menu option is an obstacle in the room. There is selected in . Turn unit off and then back on some discs. Install batteries according to the instructions in the...
... to be reset to the AUX IN jacks is not working . Connect the video cables securely. Playback picture rolls. The speaker cables are weak or dead. Some discs have sections that do not allow the player to receive the DVD signal output. Wrong menu option is an obstacle in the room. There is selected in . Turn unit off and then back on some discs. Install batteries according to the instructions in the...


