User Guide
Page 2
CONTENTS Contents 1 Important Safety Instructions 2 Precautions 5 Power Source 6 Location of Controls 6 • Front 6 • Rear 7 • Remote 8 Remote Control 9 • Battery Installation 9 • Effective Distance of the Remote Control Transmitter 9 Connection 10 &#...
CONTENTS Contents 1 Important Safety Instructions 2 Precautions 5 Power Source 6 Location of Controls 6 • Front 6 • Rear 7 • Remote 8 Remote Control 9 • Battery Installation 9 • Effective Distance of the Remote Control Transmitter 9 Connection 10 &#...

User Guide
Page 3
... THOSE SPECIFIED HEREIN MAY RESULT IN HAZARDOUS RADIATION EXPOSURE. TO PREVENT DIRECT EXPOSURE TO LASER BEAM, DO NOT TRY TO OPEN THE ENCLOSURE. Lightning and power surges ARE NOT covered under license from that to which can radiate radio frequency energy and, if not installed and used in a residential installation. Cet...
... THOSE SPECIFIED HEREIN MAY RESULT IN HAZARDOUS RADIATION EXPOSURE. TO PREVENT DIRECT EXPOSURE TO LASER BEAM, DO NOT TRY TO OPEN THE ENCLOSURE. Lightning and power surges ARE NOT covered under license from that to which can radiate radio frequency energy and, if not installed and used in a residential installation. Cet...

User Guide
Page 4
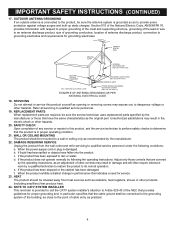
... particular attention to cords at plugs, convenience receptacles, and the point where they are unable to insert the plug fully into such power lines or circuits. An appliance and cart combination should not be retained for cleaning. 6. Quick stops, excessive force and uneven surfaces... may cause hazards. 7. LIGHTNING To protect your appliance dealer or local power company. RETAIN INSTRUCTIONS The safety and operating instructions should be fatal. 15. in installation such as they may cause the appliance ...
... particular attention to cords at plugs, convenience receptacles, and the point where they are unable to insert the plug fully into such power lines or circuits. An appliance and cart combination should not be retained for cleaning. 6. Quick stops, excessive force and uneven surfaces... may cause hazards. 7. LIGHTNING To protect your appliance dealer or local power company. RETAIN INSTRUCTIONS The safety and operating instructions should be fatal. 15. in installation such as they may cause the appliance ...
User Guide
Page 5
... all servicing to rain or water. Unauthorized substitutions may expose you to provide some protection against voltage surges and built-up static charges. When the power-supply cord or plug is grounded so as opening or removing covers may result in damage and will often require extensive work by the manufacturer...
... all servicing to rain or water. Unauthorized substitutions may expose you to provide some protection against voltage surges and built-up static charges. When the power-supply cord or plug is grounded so as opening or removing covers may result in damage and will often require extensive work by the manufacturer...
User Guide
Page 6
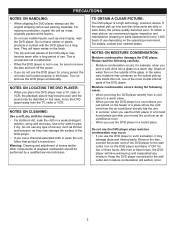
... a long time. Please read the following cases: • When you bring the DVD player directly from a cold place to the wall outlet, turn off the power. • If you moved the unit from the TV, radio or VCR. This is normal and not a malfunction. • When the DVD player is a high... humid place just after a long period of the DVD player. They will seldom occur. 5 For details, contact your nearest dealer. Remove the disc, connect the power cord of the DVD player to a warm place. • When you use the DVD player in a room where you just turned on and use a chemical...
... a long time. Please read the following cases: • When you bring the DVD player directly from a cold place to the wall outlet, turn off the power. • If you moved the unit from the TV, radio or VCR. This is normal and not a malfunction. • When the DVD player is a high... humid place just after a long period of the DVD player. They will seldom occur. 5 For details, contact your nearest dealer. Remove the disc, connect the power cord of the DVD player to a warm place. • When you use the DVD player in a room where you just turned on and use a chemical...
User Guide
Page 7
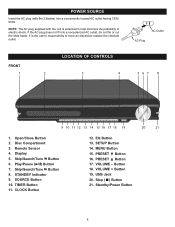
...Indicator 9. PRESET π Button 17. VOLUME + Button 19. Skip/Search/Tune n Button 8. SETUP Button 14. Stop ( X ) Button 21. Standby/Power Button 6 It is polarized to have an electrician replace the obsolete outlet. MENU Button 15. EQ Button 13. VOLUME - USB Jack 20. Remote Sensor ...Skip/Search/Tune o Button 6. If the AC plug does not fit into a conveniently located AC outlet having 120V, 60Hz. POWER SOURCE Insert the AC plug (with the unit is the user's responsibility to help minimize the possibility of electric shock. SOURCE Button 10.
...Indicator 9. PRESET π Button 17. VOLUME + Button 19. Skip/Search/Tune n Button 8. SETUP Button 14. Stop ( X ) Button 21. Standby/Power Button 6 It is polarized to have an electrician replace the obsolete outlet. MENU Button 15. EQ Button 13. VOLUME - USB Jack 20. Remote Sensor ...Skip/Search/Tune o Button 6. If the AC plug does not fit into a conveniently located AC outlet having 120V, 60Hz. POWER SOURCE Insert the AC plug (with the unit is the user's responsibility to help minimize the possibility of electric shock. SOURCE Button 10.
User Guide
Page 8
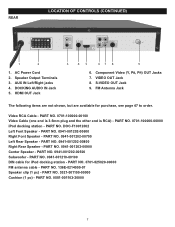
... Subwoofer - VIDEO OUT Jack 8. PART NO. 0941-001210-00100 DIN cable for purchase, see page 47 to order. Component Video (Y, PB, PR) OUT Jacks 7. AC Power Cord 2.
... Subwoofer - VIDEO OUT Jack 8. PART NO. 0941-001210-00100 DIN cable for purchase, see page 47 to order. Component Video (Y, PB, PR) OUT Jacks 7. AC Power Cord 2.
User Guide
Page 9
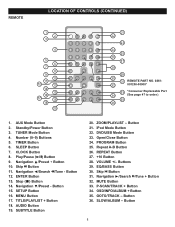
... 4. Button 12. Button 15. SETUP Button 16. Button 21. OSD/INFO/ALBUM + Button 35. GOTO/TRACK - Number (0-9) Buttons 5. Skip o Button 11. Buttons 29. Button 8 Standby/Power Button 3. Play/Pause (®p) Button 9. Stop ( X ) Button 14. Navigation †/Preset - AUDIO Button 19. REPEAT Button 27. +10 Button 28. TIMER Button 6. Navigation π/Preset...
... 4. Button 12. Button 15. SETUP Button 16. Button 21. OSD/INFO/ALBUM + Button 35. GOTO/TRACK - Number (0-9) Buttons 5. Skip o Button 11. Buttons 29. Button 8 Standby/Power Button 3. Play/Pause (®p) Button 9. Stop ( X ) Button 14. Navigation †/Preset - AUDIO Button 19. REPEAT Button 27. +10 Button 28. TIMER Button 6. Navigation π/Preset...
User Guide
Page 12
... DVD, refer to the owner's manual of the TV, as well as this manual. • When connecting the DVD to the TV, make sure the power is off and both units are unplugged before making any connections. • Connect the DVD player to page 18. 11 CONNECTION (CONTINUED) CONNECTING THE DVD...
... DVD, refer to the owner's manual of the TV, as well as this manual. • When connecting the DVD to the TV, make sure the power is off and both units are unplugged before making any connections. • Connect the DVD player to page 18. 11 CONNECTION (CONTINUED) CONNECTING THE DVD...
User Guide
Page 13
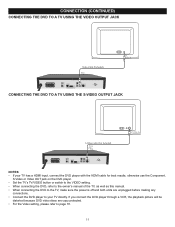
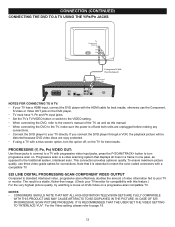
... off and both units are copy protected. • If using a TV with this manual. • When connecting the DVD to the TV, make sure the power is off , on a progressive-scan compatible TV. This connection provides optimum quality. IN CASE OF 525 PROGRESSIVE SCAN PICTURE PROBLEMS, IT IS RECOMMENDED THAT THE...
... off and both units are copy protected. • If using a TV with this manual. • When connecting the DVD to the TV, make sure the power is off , on a progressive-scan compatible TV. This connection provides optimum quality. IN CASE OF 525 PROGRESSIVE SCAN PICTURE PROBLEMS, IT IS RECOMMENDED THAT THE...
User Guide
Page 14
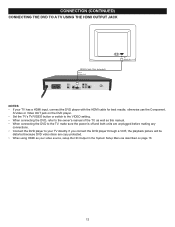
... video source, setup the HD Output in the System Setup Menu as this manual. • When connecting the DVD to the TV, make sure the power is off and both units are unplugged before making any connections. • Connect the DVD player to your TV has a HDMI input, connect the DVD...
... video source, setup the HD Output in the System Setup Menu as this manual. • When connecting the DVD to the TV, make sure the power is off and both units are unplugged before making any connections. • Connect the DVD player to your TV has a HDMI input, connect the DVD...
User Guide
Page 25
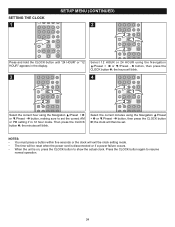
... press a button within five seconds or the clock will exit the clock setting mode. • The time will then be reset when the power cord is disconnected or if a power failure occurs. • When the unit is on, press the CLOCK button to resume normal operation. 24 the minutes will blink. 4 3 1 3 1 2 2 Select...
... press a button within five seconds or the clock will exit the clock setting mode. • The time will then be reset when the power cord is disconnected or if a power failure occurs. • When the unit is on, press the CLOCK button to resume normal operation. 24 the minutes will blink. 4 3 1 3 1 2 2 Select...

User Guide
Page 27
ECONOMY MODE 1 BASIC OPERATION (CONTINUED) SOURCE 1 While in the Standby mode, press and hold the Standby/Power button for more than 2 seconds and the system will be cancelled. This manual gives instructions on the main unit to turn the unit ON. Press again to select the desired source. 26 Note: When the Economy mode is on, the Sleep Timer function will be off. However, you can also press the SOURCE button repeatedly on selecting the source via the remote. The display will enter ECONOMY mode.
ECONOMY MODE 1 BASIC OPERATION (CONTINUED) SOURCE 1 While in the Standby mode, press and hold the Standby/Power button for more than 2 seconds and the system will be cancelled. This manual gives instructions on the main unit to turn the unit ON. Press again to select the desired source. 26 Note: When the Economy mode is on, the Sleep Timer function will be off. However, you can also press the SOURCE button repeatedly on selecting the source via the remote. The display will enter ECONOMY mode.
User Guide
Page 28
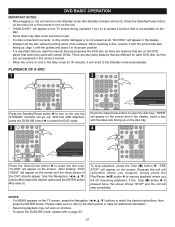
...BASIC OPERATION IMPORTANT NOTES: • After plugging in, the unit will be in the display. PLAYBACK OF A DVD 1 2 1 2 Press the Standby/Power button 1 to turn on the unit. • "INVALID KEY will be used with the printed title side facing up on the TV screen during operation ... buttons 2 to select the desired option and the ENTER button 3 to select the desired option/item, then press the ENTER button. Press the Standby/Power button on the unit; the STANDBY indicator will appear in the display. • Always hold the disc without touching either of the DVD should appear...
...BASIC OPERATION IMPORTANT NOTES: • After plugging in, the unit will be in the display. PLAYBACK OF A DVD 1 2 1 2 Press the Standby/Power button 1 to turn on the unit. • "INVALID KEY will be used with the printed title side facing up on the TV screen during operation ... buttons 2 to select the desired option and the ENTER button 3 to select the desired option/item, then press the ENTER button. Press the Standby/Power button on the unit; the STANDBY indicator will appear in the display. • Always hold the disc without touching either of the DVD should appear...

User Guide
Page 33
PLAYBACK OF AN MP3 CD 1 1 MP3 BASIC OPERATION 2 2 Press the Standby/Power button 1 to open the disc tray; Press the Open/Close button to turn on the unit; You can also press the Navigation √ button 2 to ...
PLAYBACK OF AN MP3 CD 1 1 MP3 BASIC OPERATION 2 2 Press the Standby/Power button 1 to open the disc tray; Press the Open/Close button to turn on the unit; You can also press the Navigation √ button 2 to ...

User Guide
Page 36
... Play/Pause (®p) button 2 to select the DVD mode. To stop playback, press the Stop (X) button 1. PLAYBACK OF A CD 1 1 CD BASIC OPERATION 2 2 Press the Standby/Power button 1 to turn on the disc tray. 3 4 2 1 Press the OPEN/CLOSE button to close the disc tray. the STANDBY indicator will playback the desired track...
... Play/Pause (®p) button 2 to select the DVD mode. To stop playback, press the Stop (X) button 1. PLAYBACK OF A CD 1 1 CD BASIC OPERATION 2 2 Press the Standby/Power button 1 to turn on the disc tray. 3 4 2 1 Press the OPEN/CLOSE button to close the disc tray. the STANDBY indicator will playback the desired track...

User Guide
Page 39
... it is done, it . With NO USB attached, press the DVD/USB button 2 to open the disc tray; PICTURE CD BASIC OPERATION 1 2 1 2 Press the Standby/Power button 1 to select the next or previous picture.
... it is done, it . With NO USB attached, press the DVD/USB button 2 to open the disc tray; PICTURE CD BASIC OPERATION 1 2 1 2 Press the Standby/Power button 1 to select the next or previous picture.

User Guide
Page 40
... will search and then stop on the remote to scan, and then release the button; LISTENING TO THE FM RADIO 1 TUNER OPERATION 2 Press the Standby/Power button to manually advance the frequency in the display up or down until the desired frequency appears. the Press the TUNER Mode button on the...
... will search and then stop on the remote to scan, and then release the button; LISTENING TO THE FM RADIO 1 TUNER OPERATION 2 Press the Standby/Power button to manually advance the frequency in the display up or down until the desired frequency appears. the Press the TUNER Mode button on the...
User Guide
Page 41
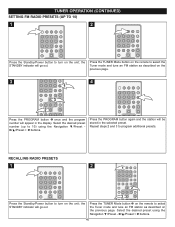
...to select the Tuner mode and tune an FM station as described on the unit; RECALLING RADIO PRESETS 1 2 1 2 3 Press the Standby/Power button to turn on the previous page. the STANDBY indicator will be stored in the display. Repeat steps 2 and 3 to select the Tuner ... preset using the Navigation †/Preset 2/π/Preset + 3 buttons. TUNER OPERATION (CONTINUED) SETTING FM RADIO PRESETS (UP TO 10) 1 2 Press the Standby/Power button to turn on the previous page. 3 4 1 3 2 Press the PROGRAM button 1 once and the program number will go out. Select the desired preset...
...to select the Tuner mode and tune an FM station as described on the unit; RECALLING RADIO PRESETS 1 2 1 2 3 Press the Standby/Power button to turn on the previous page. the STANDBY indicator will be stored in the display. Repeat steps 2 and 3 to select the Tuner ... preset using the Navigation †/Preset 2/π/Preset + 3 buttons. TUNER OPERATION (CONTINUED) SETTING FM RADIO PRESETS (UP TO 10) 1 2 Press the Standby/Power button to turn on the previous page. 3 4 1 3 2 Press the PROGRAM button 1 once and the program number will go out. Select the desired preset...
User Guide
Page 43
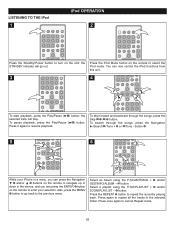
LISTENING TO THE iPod 1 iPod OPERATION 2 Press the Standby/Power button to enter your iPod is in a menu, you can press the Navigation † 1 and/or π 2 buttons on the remote to navigate up or ...
LISTENING TO THE iPod 1 iPod OPERATION 2 Press the Standby/Power button to enter your iPod is in a menu, you can press the Navigation † 1 and/or π 2 buttons on the remote to navigate up or ...


