
User Guide
Page 1
...UNIT °-REMOTE CONTROL 6.CONNECTIONS 7.PREPARATIONS BEFORE OPERATION °-USE REMOTE CONTROL °-PLAYABLE DISCS °-USING AC ADAPTOR 8.BASIC OPERATIONS °-BEFORE OPERATION °- LOAD DISC °-TFT PICTURE ADJUSTMENT °-PLAY DISC °PAUSE °-OSD °-DVD MENU PLAY °-SELECT WITH NUMBER BUTTONS 9.FUNCTION SETTING °-MENU SETTING 10.PLAY DISCS IN VARIOUS WAYS ("AUDIO MODE °-FAST PLAY °-SLOW PLAY °-REPEAT PLAY °-SELECT SUBTITLES °SELECT ANGLES °-TIME SEARCH °-BOOKMARK °-ZOOM PLAY °-PROGRAM PLAY °-SHUFFLE...
...UNIT °-REMOTE CONTROL 6.CONNECTIONS 7.PREPARATIONS BEFORE OPERATION °-USE REMOTE CONTROL °-PLAYABLE DISCS °-USING AC ADAPTOR 8.BASIC OPERATIONS °-BEFORE OPERATION °- LOAD DISC °-TFT PICTURE ADJUSTMENT °-PLAY DISC °PAUSE °-OSD °-DVD MENU PLAY °-SELECT WITH NUMBER BUTTONS 9.FUNCTION SETTING °-MENU SETTING 10.PLAY DISCS IN VARIOUS WAYS ("AUDIO MODE °-FAST PLAY °-SLOW PLAY °-REPEAT PLAY °-SELECT SUBTITLES °SELECT ANGLES °-TIME SEARCH °-BOOKMARK °-ZOOM PLAY °-PROGRAM PLAY °-SHUFFLE...

User Guide
Page 3
.... Keep the disc tray closed automobile, on a dashboard or a parcel shelf. Then adjust it to avoid traffic accidents. Excess heat may cause malfunction. Any service should not effect the unit ability to disconnect the AC adaptor. SAFETY PRECAUTIONS POWER SOURCES This unit operates on a supplied AC adaptor, car adaptor and chargeable batteries. • Make sure that the input voltage of the...
.... Keep the disc tray closed automobile, on a dashboard or a parcel shelf. Then adjust it to avoid traffic accidents. Excess heat may cause malfunction. Any service should not effect the unit ability to disconnect the AC adaptor. SAFETY PRECAUTIONS POWER SOURCES This unit operates on a supplied AC adaptor, car adaptor and chargeable batteries. • Make sure that the input voltage of the...

User Guide
Page 5
... objects of any service or repair to its normal operation. a) When the power - Adjust only those controls that are required, be fatal. (15) Overloading - Do not overload wall outlets, extension cords, or integral convenience receptacles as contact with them might be sure the service techmician has used replacement parts specified by qualified service personnel. (18) Damages Requiring Service - d) If the product does not operate normally by...
... objects of any service or repair to its normal operation. a) When the power - Adjust only those controls that are required, be fatal. (15) Overloading - Do not overload wall outlets, extension cords, or integral convenience receptacles as contact with them might be sure the service techmician has used replacement parts specified by qualified service personnel. (18) Damages Requiring Service - d) If the product does not operate normally by...

User Guide
Page 6
FEATURES MI 1. Parental lock makes it easy to enjoy high quality sound effects. 8.TFT color LCD, chargeable batteries, headphone output, convenient for enjoying great pictures and beautiful music on a disc. 6.CONTENT DISPLAY 7" TFT LCD and English OSD, makes the disc content clearer. 7.AUDIO OUTPUT Analog audio output, optical digital audio output can be connected with any amplifier to control the content of a DVD are broken down into units, among the units of several chapters, and each...
FEATURES MI 1. Parental lock makes it easy to enjoy high quality sound effects. 8.TFT color LCD, chargeable batteries, headphone output, convenient for enjoying great pictures and beautiful music on a disc. 6.CONTENT DISPLAY 7" TFT LCD and English OSD, makes the disc content clearer. 7.AUDIO OUTPUT Analog audio output, optical digital audio output can be connected with any amplifier to control the content of a DVD are broken down into units, among the units of several chapters, and each...
User Guide
Page 13
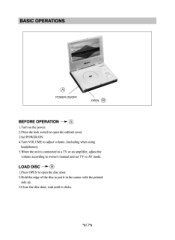
"L. LOAD DISC -0"- 1.Press OPEN to open the cabinet cover. 3.Set POWER ON. 4.Turn VOLUME to adjust volume. (including when using headphones). 5.When the unit is connected to a TV or an amplifier, adjust the volume according to owner's manual and set TV to put it in the center with the printed side up. 3.Close the disc door, wait until it clicks. °§13°S BASIC OPERATIONS 4,frooro "r- POWER ON/OFF OPEN BEFORE OPERATION -11' ® 1.Turn on the power. 2.Press the lock switch to open the disc door. 2.Hold the edge of the disc to AV mode.
"L. LOAD DISC -0"- 1.Press OPEN to open the cabinet cover. 3.Set POWER ON. 4.Turn VOLUME to adjust volume. (including when using headphones). 5.When the unit is connected to a TV or an amplifier, adjust the volume according to owner's manual and set TV to put it in the center with the printed side up. 3.Close the disc door, wait until it clicks. °§13°S BASIC OPERATIONS 4,frooro "r- POWER ON/OFF OPEN BEFORE OPERATION -11' ® 1.Turn on the power. 2.Press the lock switch to open the disc door. 2.Hold the edge of the disc to AV mode.

User Guide
Page 15
... the remote to move through the choices displayed in the Display. WHEN PLAYING DVD DVD discs have to press this " " button twice to stop the playback of the screen. Use the A or buttons on the screen when you 're playing a disc. Remember, you can only access the Display when you press a button that particular feature. If one frame. Press "'" (STOP). 3.Remove the disc and switch off the unit. To make playback pause. BASIC OPERATIONS PLAY DISCS...
... the remote to move through the choices displayed in the Display. WHEN PLAYING DVD DVD discs have to press this " " button twice to stop the playback of the screen. Use the A or buttons on the screen when you 're playing a disc. Remember, you can only access the Display when you press a button that particular feature. If one frame. Press "'" (STOP). 3.Remove the disc and switch off the unit. To make playback pause. BASIC OPERATIONS PLAY DISCS...
User Guide
Page 16
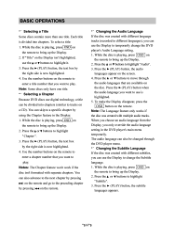
.... 5. Use the number buttons on the disc. Press the ► (PLAY) button when the audio language you want to bring up the Display. 2. Note: The Language feature only works if the disc was created with multiple audio tracks. Use the number buttons on the remote to play . Notes: The Chapter feature won't work if the disc isn't formatted with different language tracks (recorded in different languages), you want to use the A or y buttons to play . Changing the Subtitle Language If...
.... 5. Use the number buttons on the disc. Press the ► (PLAY) button when the audio language you want to bring up the Display. 2. Note: The Language feature only works if the disc was created with multiple audio tracks. Use the number buttons on the remote to play . Notes: The Chapter feature won't work if the disc isn't formatted with different language tracks (recorded in different languages), you want to use the A or y buttons to play . Changing the Subtitle Language If...
User Guide
Page 17
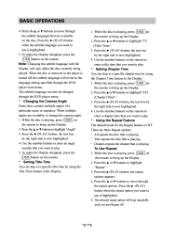
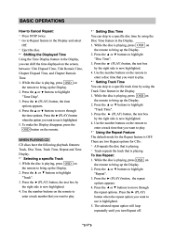
... box by using the Chapter Time feature in the Display. 1. To make the Display disappear, press the OSD button on the remote to play . °- Setting Title Time You can skip to play . 5. Press the ► (PLAY) button when the repeat option you want to a specific title time by the right side is turned off . Press the 0- (PLAY) button when the subtitle language you want to bring up the Display. 2. When the disc is removed...
... box by using the Chapter Time feature in the Display. 1. To make the Display disappear, press the OSD button on the remote to play . °- Setting Title Time You can skip to play . 5. Press the ► (PLAY) button when the repeat option you want to a specific title time by the right side is turned off . Press the 0- (PLAY) button when the subtitle language you want to bring up the Display. 2. When the disc is removed...
User Guide
Page 18
...; (PLAY) button, the text box by using the Disc Time feature in the Display and select Off. *6 Eject the disc. °- Press the ► (PLAY) button, the time options appears. 4. Setting Disc Time You can shift the time displayed on the remote to use is playing, press OSD on the remote to bring up the Display. 2. While the disc is now highlighted. 4. Using the Repeat Feature The default mode for CDs: *6 All-repeats the disc that is playing *6 Track-repeats the...
...; (PLAY) button, the text box by using the Disc Time feature in the Display and select Off. *6 Eject the disc. °- Press the ► (PLAY) button, the time options appears. 4. Setting Disc Time You can shift the time displayed on the remote to use is playing, press OSD on the remote to bring up the Display. 2. While the disc is now highlighted. 4. Using the Repeat Feature The default mode for CDs: *6 All-repeats the disc that is playing *6 Track-repeats the...
User Guide
Page 20
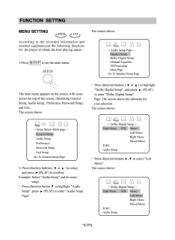
Setup Menu--Main page -General Setup Audio Setup Preferences Password Setup Exit Setup Go To General Setup Page 2. The screen shows the submenu for the player to obtain the best playing status. 1.Press SETUP to set the following functions for your selection. Press direction buttons ( V or A ) to select and press ► (PLAY) to enter "Audio Setup Page". -- Press direction button V to highlight "Audio Setup", press ► (PLAY) to confirm. Audio Setup Page -Speaker Setup Dolby Digital Setup Channel Equalizer 3D Processing Main...
Setup Menu--Main page -General Setup Audio Setup Preferences Password Setup Exit Setup Go To General Setup Page 2. The screen shows the submenu for the player to obtain the best playing status. 1.Press SETUP to set the following functions for your selection. Press direction buttons ( V or A ) to select and press ► (PLAY) to enter "Audio Setup Page". -- Press direction button V to highlight "Audio Setup", press ► (PLAY) to confirm. Audio Setup Page -Speaker Setup Dolby Digital Setup Channel Equalizer 3D Processing Main...
User Guide
Page 21
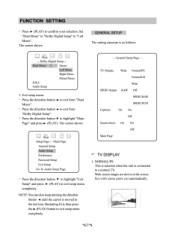
... exit setup menu completely. Main Page General Setup Audio Setup Preferences Password Setup Exit Setup Go To Audio Setup Page ' Press the direction button V to highlight "Exit Setup" and press ► (PLAY) to highlight "Main Page" and press ► (PLAY). Iv Display Wide Normal/PS Normal/LB Wide SPDIF Output RAW Off SPDIF/RAW SPDIF/PCM Captions On On Off Screen Saver On On Off Main Page TV DISPLAY 1. FUNCTION SETTING...
... exit setup menu completely. Main Page General Setup Audio Setup Preferences Password Setup Exit Setup Go To Audio Setup Page ' Press the direction button V to highlight "Exit Setup" and press ► (PLAY) to highlight "Main Page" and press ► (PLAY). Iv Display Wide Normal/PS Normal/LB Wide SPDIF Output RAW Off SPDIF/RAW SPDIF/PCM Captions On On Off Screen Saver On On Off Main Page TV DISPLAY 1. FUNCTION SETTING...
User Guide
Page 22
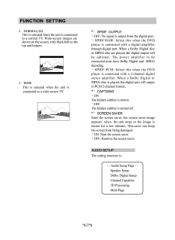
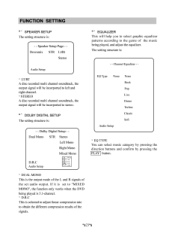
... OUTPUT OFF: No signal is output from being damaged. SPDIF/PCM: Select this when the DVD player is connected with a 2-channel digital stereo amplifier. " ON: Start the screen saver. AUDIO SETUP The setting structure is shown. When a Dolby Digital disc or MPEG disc are shown on the top and bottom. 3. Wide-screen images are played, the digital output will output in PCM 2-channel format. °' CAPTIONS ' ON The hidden subtitle is : - - Speaker Setup Dolby Digital Setup Channel Equalizer...
... OUTPUT OFF: No signal is output from being damaged. SPDIF/PCM: Select this when the DVD player is connected with a 2-channel digital stereo amplifier. " ON: Start the screen saver. AUDIO SETUP The setting structure is shown. When a Dolby Digital disc or MPEG disc are shown on the top and bottom. 3. Wide-screen images are played, the digital output will output in PCM 2-channel format. °' CAPTIONS ' ON The hidden subtitle is : - - Speaker Setup Dolby Digital Setup Channel Equalizer...
User Guide
Page 23
... - 3/4 - 1/2 0" FF4 .6 DUAL MONO This is the output mode of the L and R signals of the set to the genre of the signals. Downmix STR Lt/Rt Stereo Audio Setup °6 LT/RT A disc recorded multi channel soundtrack, the output signal will help you to select graphic equalizer patterns according to "MIXED MONO", the function only works when the DVD being played, and adjust the equalizer. Channel Equalizer - - If it is...
... - 3/4 - 1/2 0" FF4 .6 DUAL MONO This is the output mode of the L and R signals of the set to the genre of the signals. Downmix STR Lt/Rt Stereo Audio Setup °6 LT/RT A disc recorded multi channel soundtrack, the output signal will help you to select graphic equalizer patterns according to "MIXED MONO", the function only works when the DVD being played, and adjust the equalizer. Channel Equalizer - - If it is...
User Guide
Page 24
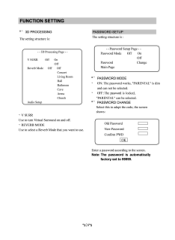
...: PASSWORD SETUP The setting structure is automatically factory set to 99999. °§24°S REVERB MODE Use to select a Reverb Mode that you want to the screen. PASSWORD CHANGE Select this to adapt the code, the screen shows: 1 Old Password New Password Confirm PWD OK Enter a password according to use. - -Password Setup Page - - OFF: The password is dim and can be selected. Password Mode Off On Off Password Change Main Page '3- PASSWORD MODE ON: The password works, "PARENTAL" is locked, "PARENTAL...
...: PASSWORD SETUP The setting structure is automatically factory set to 99999. °§24°S REVERB MODE Use to select a Reverb Mode that you want to the screen. PASSWORD CHANGE Select this to adapt the code, the screen shows: 1 Old Password New Password Confirm PWD OK Enter a password according to use. - -Password Setup Page - - OFF: The password is dim and can be selected. Password Mode Off On Off Password Change Main Page '3- PASSWORD MODE ON: The password works, "PARENTAL" is locked, "PARENTAL...

User Guide
Page 25
... into stop mode. °§25°S If not, the language recorded on the disc, you cannot play DVD video disc rated higher than the PG grade. °" DEFAULT >> RESET Each function setting returns to grade of disc and your desire. Note: °' "PREFERENCES" only can select sounds, subtitles or disc menu languages. FUNCTION SETTING PREFERENCES The setting structure is shown. °- LANGUAGE SELECTION If a language mentioned above is recorded on the disc is : Audio - - ENG...
... into stop mode. °§25°S If not, the language recorded on the disc, you cannot play DVD video disc rated higher than the PG grade. °" DEFAULT >> RESET Each function setting returns to grade of disc and your desire. Note: °' "PREFERENCES" only can select sounds, subtitles or disc menu languages. FUNCTION SETTING PREFERENCES The setting structure is shown. °- LANGUAGE SELECTION If a language mentioned above is recorded on the disc is : Audio - - ENG...

User Guide
Page 28
... show REPEAT Chapter REPEAT Track 2. Set a starting point A. The screen shows: A-B IAB Afterwards, the unit plays from A to the following steps. 1. This function can be used to enjoy some part on the disc. Repeat a chapter. Press REPEAT , the screen shows " ..___.) ALL". The unit plays the current track. ° PLAY DVD or CD. 1. Press A-B again till " _ _) AB " disappears. °S28°S PLAYING A DISC REPEATEDLY ' DVD You may repeat a track, a disc according to B. 3. Remove "REPEAT" function...
... show REPEAT Chapter REPEAT Track 2. Set a starting point A. The screen shows: A-B IAB Afterwards, the unit plays from A to the following steps. 1. This function can be used to enjoy some part on the disc. Repeat a chapter. Press REPEAT , the screen shows " ..___.) ALL". The unit plays the current track. ° PLAY DVD or CD. 1. Press A-B again till " _ _) AB " disappears. °S28°S PLAYING A DISC REPEATEDLY ' DVD You may repeat a track, a disc according to B. 3. Remove "REPEAT" function...

User Guide
Page 30
... track 6. PLAY DISCS IN VARIOUS WAYS TIME SEARCH (DV ) TIME SEARCH You may directly enter a time, title or chapter number to set the time for the desired location. E 1. Press button to enter the time. Example: Play from 1:02:38. °S30°S Press button El, 8 to select track 6. The screen shows: Track 06/20 00:01 Example: Search chapter 2 in title 6. 2. PLAY DVD 1. The screen shows: Title...
... track 6. PLAY DISCS IN VARIOUS WAYS TIME SEARCH (DV ) TIME SEARCH You may directly enter a time, title or chapter number to set the time for the desired location. E 1. Press button to enter the time. Example: Play from 1:02:38. °S30°S Press button El, 8 to select track 6. The screen shows: Track 06/20 00:01 Example: Search chapter 2 in title 6. 2. PLAY DVD 1. The screen shows: Title...
User Guide
Page 35
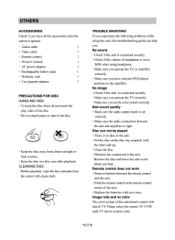
... problems while using headphone. Remove the disc and leave the unit on the disc tray properly with clean cloth. Remote control does not work .6 Remove barriers between the unit and amplifier is connected securely. Image rolls and no color The color system of headphone is set to the disc. -6 Keep the disc away from the center with the label side up. Bad sound quality Mack sure the audio output mode...
... problems while using headphone. Remove the disc and leave the unit on the disc tray properly with clean cloth. Remote control does not work .6 Remove barriers between the unit and amplifier is connected securely. Image rolls and no color The color system of headphone is set to the disc. -6 Keep the disc away from the center with the label side up. Bad sound quality Mack sure the audio output mode...
User Guide
Page 36
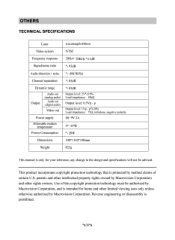
.... Use of certain U.S. Reverse engineering or disassembly is protected by method claims of this copyright protection technology must be advised. OTHERS TECHNICAL SPECIFICATIONS Laser wavelength 650mn Video system NTSC Frequency response Signal/noise ratio 20Hz° '20KHz °Z.1dB ° ) 95dB Audio distortion + noise ° c -80(11(Hz) Channel separation ° ) 85dB Dynamic range Output Audio out (analog audio) Audio out (digital audio) Video...
.... Use of certain U.S. Reverse engineering or disassembly is protected by method claims of this copyright protection technology must be advised. OTHERS TECHNICAL SPECIFICATIONS Laser wavelength 650mn Video system NTSC Frequency response Signal/noise ratio 20Hz° '20KHz °Z.1dB ° ) 95dB Audio distortion + noise ° c -80(11(Hz) Channel separation ° ) 85dB Dynamic range Output Audio out (analog audio) Audio out (digital audio) Video...
User Guide
Page 37
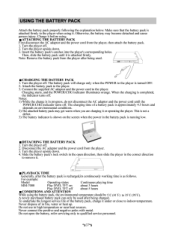
USING THE BATTERY PACK Attach the battery pack properly following the explanation below. Connect the supplied AC adaptor and the power cord to the player is turned OFF. 2. The charging time of in fire, water or heat up. Disconnect the AC adaptor and the power cord from the player, then attach the battery pack. 1. For example: Model Operating status Continuous playing time MM-7000 Play DVD, TFT on about 5 hours While using the battery pack...
USING THE BATTERY PACK Attach the battery pack properly following the explanation below. Connect the supplied AC adaptor and the power cord to the player is turned OFF. 2. The charging time of in fire, water or heat up. Disconnect the AC adaptor and the power cord from the player, then attach the battery pack. 1. For example: Model Operating status Continuous playing time MM-7000 Play DVD, TFT on about 5 hours While using the battery pack...


