User Guide
Page 1
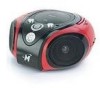
MP3844 User's Guide Portable CD Player with AM/FM Stereo Radio Before operating this product, please read these instructions completely.
MP3844 User's Guide Portable CD Player with AM/FM Stereo Radio Before operating this product, please read these instructions completely.
User Guide
Page 2
... of important operating and maintenance (servicing) instructions in the instruction manual. The user could lose the authority to beam. NO USER-SERVICEABLE PARTS INSIDE. Keep these instructions handy for many years. DANGER: Invisible and hazardous laser radiation when open and interlock failed or defeated. FCC WARNING: This equipment may generate or use radio frequency energy. Avoid direct exposure to operate this equipment if an unauthorized change or modi...
... of important operating and maintenance (servicing) instructions in the instruction manual. The user could lose the authority to beam. NO USER-SERVICEABLE PARTS INSIDE. Keep these instructions handy for many years. DANGER: Invisible and hazardous laser radiation when open and interlock failed or defeated. FCC WARNING: This equipment may generate or use radio frequency energy. Avoid direct exposure to operate this equipment if an unauthorized change or modi...

User Guide
Page 3
... will not occur in a residential installation. LASER SAFETY: This unit employs a laser. Only qualified service personnel should attempt to service this product. 2 CAUTION: USE OF CONTROLS, ADJUSTMENTS OR PERFORMANCE PROCEDURE HEREIN MAY RESULT IN HAZARDOUS RADIATION EXPOSURE. INFORMATION: This equipment has been tested and found to comply with the instructions, may cause harmful interference to radio communications. However, there is...
... will not occur in a residential installation. LASER SAFETY: This unit employs a laser. Only qualified service personnel should attempt to service this product. 2 CAUTION: USE OF CONTROLS, ADJUSTMENTS OR PERFORMANCE PROCEDURE HEREIN MAY RESULT IN HAZARDOUS RADIATION EXPOSURE. INFORMATION: This equipment has been tested and found to comply with the instructions, may cause harmful interference to radio communications. However, there is...
User Guide
Page 4
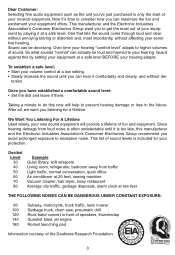
... lets the sound come through loud and clear without dis- Guard against this by playing it at a safe level. Taking a minute to do this manufacturer and the Electronic Industries Association's Consumer Electronics Group recommend you listening for your musical enjoyment. Decibel...speakers, thunderclap 140 Gunshot blast, jet engine 180 Rocket launching pad Information courtesy of sound. tortion. This list of fun and enjoyment. Now it there. After all, we want you have established a comfortable sound level: • Set the dial and leave it 's time to higher volumes...
... lets the sound come through loud and clear without dis- Guard against this by playing it at a safe level. Taking a minute to do this manufacturer and the Electronic Industries Association's Consumer Electronics Group recommend you listening for your musical enjoyment. Decibel...speakers, thunderclap 140 Gunshot blast, jet engine 180 Rocket launching pad Information courtesy of sound. tortion. This list of fun and enjoyment. Now it there. After all, we want you have established a comfortable sound level: • Set the dial and leave it 's time to higher volumes...
User Guide
Page 5
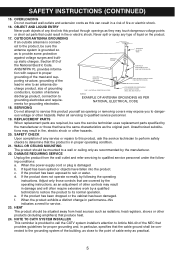
... operated. 2. If the plug should be operated only from battery power, or other ). POWER-CORD PROTECTION Power-supply cords should be followed. 5. LIGHTNING To protect your obsolete outlet. POWER LINES An outside antenna system, extreme care should be read all operating instructions carefully. The openings should not be placed in a built-in the back or bottom are general precautions and may not have been adhered to replace...
... operated. 2. If the plug should be operated only from battery power, or other ). POWER-CORD PROTECTION Power-supply cords should be followed. 5. LIGHTNING To protect your obsolete outlet. POWER LINES An outside antenna system, extreme care should be read all operating instructions carefully. The openings should not be placed in a built-in the back or bottom are general precautions and may not have been adhered to replace...
User Guide
Page 6
... PER NATIONAL ELECTRICAL CODE 18. ous voltage or other hazards. 20. WALL OR CEILING MOUNTING The product should be sure the service technician uses replacement parts specified by a qualified technician to restore the product to the point of any kind into the product. ing conditions: a. When the power-supply cord or plug is grounded so as an adjustment of the ELECTRIC...
... PER NATIONAL ELECTRICAL CODE 18. ous voltage or other hazards. 20. WALL OR CEILING MOUNTING The product should be sure the service technician uses replacement parts specified by a qualified technician to restore the product to the point of any kind into the product. ing conditions: a. When the power-supply cord or plug is grounded so as an adjustment of the ELECTRIC...

User Guide
Page 7
.../PAUSE (®p) Button 7. X-BASS Button 13. BAND (AM/FM ST.) Switch 17. Skip/Search n Button 6 PHONES (Headphones) Jack (Side of Unit) 3. Skip/Search o Button 14. FUNCTION (CD/POWER OFF/RADIO) Switch 18. Carrying Handle 4. CD Compartment 5. AC Power Jack (Rear of Unit) 6. STOP (I) Button 11. VOLUME Control 8. Left Speaker 10. Display 9. FM Antenna 16. CD Door OPEN Button 19. Right Speaker 21. PROG. (Program) Button 12. TUNING Control 20. REPEAT Button 15. Battery Compartment (Bottom of Unit) 2. LOCATION OF CONTROLS 15 1 2 3 16 4 17 5 6 18 7 19...
.../PAUSE (®p) Button 7. X-BASS Button 13. BAND (AM/FM ST.) Switch 17. Skip/Search n Button 6 PHONES (Headphones) Jack (Side of Unit) 3. Skip/Search o Button 14. FUNCTION (CD/POWER OFF/RADIO) Switch 18. Carrying Handle 4. CD Compartment 5. AC Power Jack (Rear of Unit) 6. STOP (I) Button 11. VOLUME Control 8. Left Speaker 10. Display 9. FM Antenna 16. CD Door OPEN Button 19. Right Speaker 21. PROG. (Program) Button 12. TUNING Control 20. REPEAT Button 15. Battery Compartment (Bottom of Unit) 2. LOCATION OF CONTROLS 15 1 2 3 16 4 17 5 6 18 7 19...
User Guide
Page 8
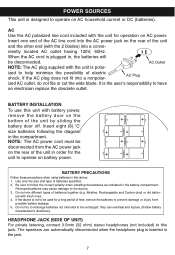
...'s directions.) HEADPHONE JACK (SIDE OF UNIT) For private listening, connect 3.5mm (32 ohm) stereo headphones (not included) to this unit with fresh ones. 4. AC Use the AC polarized line cord included with the 2 blades) into a nonpolar- BATTERY INSTALLATION To use this jack. POWER SOURCES This unit is not to be used for the unit to operate on battery power. + -+ + -+ - niently located AC outlet having 120V, 60Hz. AC Plug...
...'s directions.) HEADPHONE JACK (SIDE OF UNIT) For private listening, connect 3.5mm (32 ohm) stereo headphones (not included) to this unit with fresh ones. 4. AC Use the AC polarized line cord included with the 2 blades) into a nonpolar- BATTERY INSTALLATION To use this jack. POWER SOURCES This unit is not to be used for the unit to operate on battery power. + -+ + -+ - niently located AC outlet having 120V, 60Hz. AC Plug...
User Guide
Page 9
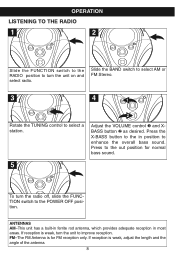
Adjust the VOLUME control 1 and XBASS button 2 as desired. Press the X-BASS button to the in most areas. OPERATION LISTENING TO THE RADIO 1 2 Slide the FUNCTION switch to the RADIO position to enhance the overall bass sound. If reception is weak, turn the unit to the POWER OFF position. Press to the out position for FM reception only. ANTENNAS AM-This unit has a built-in ferrite rod...
Adjust the VOLUME control 1 and XBASS button 2 as desired. Press the X-BASS button to the in most areas. OPERATION LISTENING TO THE RADIO 1 2 Slide the FUNCTION switch to the RADIO position to enhance the overall bass sound. If reception is weak, turn the unit to the POWER OFF position. Press to the out position for FM reception only. ANTENNAS AM-This unit has a built-in ferrite rod...

User Guide
Page 10
... continue playback; Close the CD compartment door. 3 1 Press the PLAY/PAUSE (®p) button; Press the X-BASS button to the in the display. 4 2 Adjust the VOLUME control 1 and XBASS button 2 as desired. To search forward or backward through the tracks on and select CD. Press the PLAY/PAUSE (®p) button once again to enhance the overall bass sound. OPERATION (CONTINUED) TO PLAY A CD 1 2 2 1 Slide the FUNCTION switch 1 to the CD position to pause playback; playback will...
... continue playback; Close the CD compartment door. 3 1 Press the PLAY/PAUSE (®p) button; Press the X-BASS button to the in the display. 4 2 Adjust the VOLUME control 1 and XBASS button 2 as desired. To search forward or backward through the tracks on and select CD. Press the PLAY/PAUSE (®p) button once again to enhance the overall bass sound. OPERATION (CONTINUED) TO PLAY A CD 1 2 2 1 Slide the FUNCTION switch 1 to the CD position to pause playback; playback will...

User Guide
Page 11
... TRACKS 1 4 2 2 2 3 1 1 To repeat a single track, press the REPEAT button 1 once while in the display. "RPT" will light solid. Never touch the lens when the CD door is open the CD door while the disc is rotating. "RPT" will blink in the Stop mode; To turn the unit off, slide the FUNCTION switch to stop rotating. To repeat all tracks will be repeated continuously. Press the STOP (I) button to the POWER...
... TRACKS 1 4 2 2 2 3 1 1 To repeat a single track, press the REPEAT button 1 once while in the display. "RPT" will light solid. Never touch the lens when the CD door is open the CD door while the disc is rotating. "RPT" will blink in the Stop mode; To turn the unit off, slide the FUNCTION switch to stop rotating. To repeat all tracks will be repeated continuously. Press the STOP (I) button to the POWER...

User Guide
Page 12
... display. "PRG" will light and the tracks will be programmed. 3 4 1 2 Press the PROG button again; OPERATION (CONTINUED) TO PROGRAM THE MEMORY (UP TO 30 TRACKS) 1 2 1 2 With the power on and the unit in sequence, up to begin playback; Press the PLAY/PAUSE (®/p) button to 30 tracks. the selected track has now been programmed and counted as program 1. 5 Repeat steps 2 and 3 to program the other desired tracks in the Stop mode...
... display. "PRG" will light and the tracks will be programmed. 3 4 1 2 Press the PROG button again; OPERATION (CONTINUED) TO PROGRAM THE MEMORY (UP TO 30 TRACKS) 1 2 1 2 With the power on and the unit in sequence, up to begin playback; Press the PLAY/PAUSE (®/p) button to 30 tracks. the selected track has now been programmed and counted as program 1. 5 Repeat steps 2 and 3 to program the other desired tracks in the Stop mode...
User Guide
Page 13
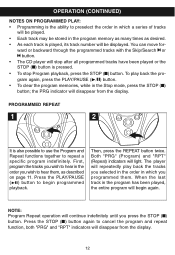
...: Program Repeat operation will disappear from the display. OPERATION (CONTINUED) NOTES ON PROGRAMMED PLAY: • Programming is the ability to repeat a specific program indefinitely. PROGRAMMED REPEAT 1 2 It is also possible to use the Program and Repeat functions together to preselect the order in which you press the STOP (I ) button; First, program the tracks you wish to hear in the Stop mode, press the STOP (I ) button. When the last track in the program memory as many times...
...: Program Repeat operation will disappear from the display. OPERATION (CONTINUED) NOTES ON PROGRAMMED PLAY: • Programming is the ability to repeat a specific program indefinitely. PROGRAMMED REPEAT 1 2 It is also possible to use the Program and Repeat functions together to preselect the order in which you press the STOP (I ) button; First, program the tracks you wish to hear in the Stop mode, press the STOP (I ) button. When the last track in the program memory as many times...
User Guide
Page 14
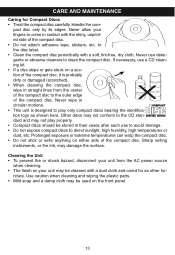
... the compact disc, wipe in straight lines from the AC power source when cleaning. • The finish on the front panel. 13 niture. Prolonged exposure or extreme temperatures can warp the compact disc. • Do not stick or write anything on a sec- Never use a CD clean-... CARE AND MAINTENANCE Caring for as shown here. pact disc only by its edges. to the CD stan- gents or abrasive cleaners to play properly. • Compact discs should be cleaned with a soft, lint-free...
... the compact disc, wipe in straight lines from the AC power source when cleaning. • The finish on the front panel. 13 niture. Prolonged exposure or extreme temperatures can warp the compact disc. • Do not stick or write anything on a sec- Never use a CD clean-... CARE AND MAINTENANCE Caring for as shown here. pact disc only by its edges. to the CD stan- gents or abrasive cleaners to play properly. • Compact discs should be cleaned with a soft, lint-free...
User Guide
Page 15
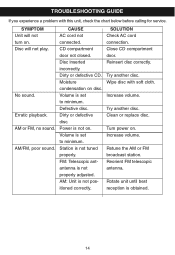
Erratic playback. CAUSE AC cord not connected. CD compartment door not closed. Moisture condensation on . Dirty or defective disc. Station is not positioned correctly. AM: Unit is not tuned properly. Try another disc. Clean or replace disc. Reorient FM telescopic antenna. SYMPTOM Unit will not play. Disc will not turn on . Disc inserted incorrectly. Volume is set to minimum. Increase volume. Increase volume. TROUBLESHOOTING GUIDE If you experience a problem with soft cloth...
Erratic playback. CAUSE AC cord not connected. CD compartment door not closed. Moisture condensation on . Dirty or defective disc. Station is not positioned correctly. AM: Unit is not tuned properly. Try another disc. Clean or replace disc. Reorient FM telescopic antenna. SYMPTOM Unit will not play. Disc will not turn on . Disc inserted incorrectly. Volume is set to minimum. Increase volume. Increase volume. TROUBLESHOOTING GUIDE If you experience a problem with soft cloth...
User Guide
Page 16
... PURCHASE OR MEMOREX. FOR PARTS AND ACCESSORIES, CONTACT FOX INTERNATIONAL AT 1-800-321-6993. 15 FOR ADDITIONAL SET-UP OR OPERATING ASSISTANCE, PLEASE VISIT OUR WEBSITE AT WWW.MEMOREXELECTRONICS.COM OR CONTACT CUSTOMER SERVICE AT (954) 660-7100. SPECIFICATIONS GENERAL: Power Source 120V, 60Hz AC Battery 12V DC (8 x 1.5V 'C' size batteries) Alkaline is recommended for longer life Speaker 2 x 3W Output Power 2 x 1.8W RADIO SECTION: Frequency...
... PURCHASE OR MEMOREX. FOR PARTS AND ACCESSORIES, CONTACT FOX INTERNATIONAL AT 1-800-321-6993. 15 FOR ADDITIONAL SET-UP OR OPERATING ASSISTANCE, PLEASE VISIT OUR WEBSITE AT WWW.MEMOREXELECTRONICS.COM OR CONTACT CUSTOMER SERVICE AT (954) 660-7100. SPECIFICATIONS GENERAL: Power Source 120V, 60Hz AC Battery 12V DC (8 x 1.5V 'C' size batteries) Alkaline is recommended for longer life Speaker 2 x 3W Output Power 2 x 1.8W RADIO SECTION: Frequency...


