User Guide
Page 1
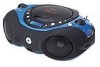
MP3851SP User's Guide Portable CD Player with AM/FM Stereo Radio Before operating this product, please read these instructions completely.
MP3851SP User's Guide Portable CD Player with AM/FM Stereo Radio Before operating this product, please read these instructions completely.
User Guide
Page 2
... of important operating and maintenance (servicing) instructions in the instruction manual. Keep these instructions handy for many years. Changes or modifications to persons. REFER SERVICING TO QUALIFIED SERVICE PERSONNEL. (This Caution Marking is located at the bottom enclosure of the unit.) DANGEROUS VOLTAGE: The lightning flash with arrowhead symbol within an equilateral triangle is intended to alert the user to...
... of important operating and maintenance (servicing) instructions in the instruction manual. Keep these instructions handy for many years. Changes or modifications to persons. REFER SERVICING TO QUALIFIED SERVICE PERSONNEL. (This Caution Marking is located at the bottom enclosure of the unit.) DANGEROUS VOLTAGE: The lightning flash with arrowhead symbol within an equilateral triangle is intended to alert the user to...
User Guide
Page 3
... du Canada. 2 Only qualified service personnel should attempt to service this product. CAUTION: USE OF CONTROLS, ADJUSTMENTS OR PERFORMANCE PROCEDURE HEREIN MAY RESULT IN HAZARDOUS RADIATION EXPOSURE. Lightning and power surges ARE NOT covered under warranty for this device due to Part 15 of the following measures: • Reorient or relocate the receiving antenna. • Increase the separation...
... du Canada. 2 Only qualified service personnel should attempt to service this product. CAUTION: USE OF CONTROLS, ADJUSTMENTS OR PERFORMANCE PROCEDURE HEREIN MAY RESULT IN HAZARDOUS RADIATION EXPOSURE. Lightning and power surges ARE NOT covered under warranty for this device due to Part 15 of the following measures: • Reorient or relocate the receiving antenna. • Increase the separation...

User Guide
Page 4
... For A Lifetime Used wisely, your volume control at a safe level BEFORE your protection. Over time your musical enjoyment. Guard against this now will provide a lifetime of fun and enjoyment. Dear Customer: Selecting fine audio equipment such as the unit you've just purchased is only the start of your hearing "comfort level" adapts to higher volumes of sound. Once you...
... For A Lifetime Used wisely, your volume control at a safe level BEFORE your protection. Over time your musical enjoyment. Guard against this now will provide a lifetime of fun and enjoyment. Dear Customer: Selecting fine audio equipment such as the unit you've just purchased is only the start of your hearing "comfort level" adapts to higher volumes of sound. Once you...
User Guide
Page 5
... ventilation is provided or the manufacturer's instructions have the capability to be connected to the operating instructions. 11. These openings must not be moved with the product. POWER-CORD PROTECTION Power-supply cords should be retained for example: near water-for future reference. 3. This will fit into such power lines or circuits. When installing an outside antenna system should never be placed near...
... ventilation is provided or the manufacturer's instructions have the capability to be connected to the operating instructions. 11. These openings must not be moved with the product. POWER-CORD PROTECTION Power-supply cords should be retained for example: near water-for future reference. 3. This will fit into such power lines or circuits. When installing an outside antenna system should never be placed near...
User Guide
Page 6
...-this product through openings as recommended by the manufacturer. 22. SAFETY CHECK Upon completion of any type of antenna discharge product, connection to grounding electrodes and requirements for service. 23. e. When the product exhibits a distinct change in proper operating condition. 21. SAFETY INSTRUCTIONS (CONTINUED) 15. NEC - ous voltage or other products (including amplifiers) that the cable ground shall be...
...-this product through openings as recommended by the manufacturer. 22. SAFETY CHECK Upon completion of any type of antenna discharge product, connection to grounding electrodes and requirements for service. 23. e. When the product exhibits a distinct change in proper operating condition. 21. SAFETY INSTRUCTIONS (CONTINUED) 15. NEC - ous voltage or other products (including amplifiers) that the cable ground shall be...
User Guide
Page 7
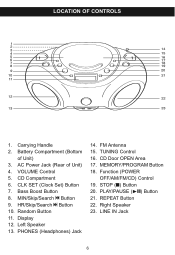
Battery Compartment (Bottom of Unit) 4. AC Power Jack (Rear of Unit) 3. MIN/Skip/Search o Button 9. Display 12. CD Door OPEN Area 17. MEMORY/PROGRAM Button 18. STOP (I) Button 20. LINE IN Jack 6 CLK SET (Clock Set) Button 7. Bass Boost Button 8. Left Speaker 13. Function (POWER OFF/AM/FM/CD) Control 19. REPEAT Button 22. CD Compartment 6. PLAY/PAUSE (®p) Button 21. Carrying Handle 2. TUNING Control 16. HR/Skip/Search n Button 10. FM Antenna 15. PHONES (Headphones) Jack 14. Right Speaker 23. Random Button 11. VOLUME Control 5. LOCATION OF ...
Battery Compartment (Bottom of Unit) 4. AC Power Jack (Rear of Unit) 3. MIN/Skip/Search o Button 9. Display 12. CD Door OPEN Area 17. MEMORY/PROGRAM Button 18. STOP (I) Button 20. LINE IN Jack 6 CLK SET (Clock Set) Button 7. Bass Boost Button 8. Left Speaker 13. Function (POWER OFF/AM/FM/CD) Control 19. REPEAT Button 22. CD Compartment 6. PLAY/PAUSE (®p) Button 21. Carrying Handle 2. TUNING Control 16. HR/Skip/Search n Button 10. FM Antenna 15. PHONES (Headphones) Jack 14. Right Speaker 23. Random Button 11. VOLUME Control 5. LOCATION OF ...
User Guide
Page 8
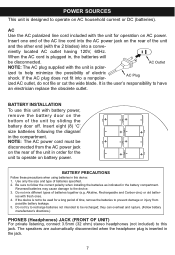
... different types of batteries specified. 2. If the device is not to be disconnected from possible battery leakage. 5. they can overheat and rupture. (Follow battery manufacturer's directions.) PHONES (Headphones) JACK (FRONT OF UNIT) For private listening, connect 3.5mm (32 ohm) stereo headphones (not included) to operate on battery power. - -+ + -+ - -+ - + -+ - + BATTERY PRECAUTIONS Follow these precautions when using batteries in order for a long period of time, remove the batteries...
... different types of batteries specified. 2. If the device is not to be disconnected from possible battery leakage. 5. they can overheat and rupture. (Follow battery manufacturer's directions.) PHONES (Headphones) JACK (FRONT OF UNIT) For private listening, connect 3.5mm (32 ohm) stereo headphones (not included) to operate on battery power. - -+ + -+ - -+ - + -+ - + BATTERY PRECAUTIONS Follow these precautions when using batteries in order for a long period of time, remove the batteries...
User Guide
Page 9
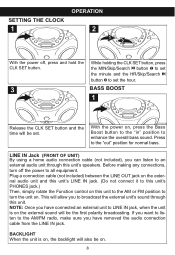
... using a home audio connection cable (not included), you can listen to an external audio unit through this unit's speakers. Before making any connections, turn the unit on. NOTE: Once you have connected an external unit to LINE IN jack, when the unit is on, the backlight will be on. 8 OPERATION SETTING THE CLOCK 1 2 1 2 With the power off the power to all equipment. 2 Plug a connection cable (not included) between the LINE...
... using a home audio connection cable (not included), you can listen to an external audio unit through this unit's speakers. Before making any connections, turn the unit on. NOTE: Once you have connected an external unit to LINE IN jack, when the unit is on, the backlight will be on. 8 OPERATION SETTING THE CLOCK 1 2 1 2 With the power off the power to all equipment. 2 Plug a connection cable (not included) between the LINE...
User Guide
Page 10
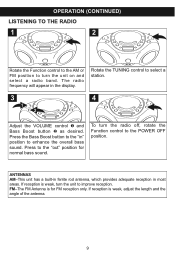
... to select a station. 3 1 1 2 4 2 Adjust the VOLUME control 1 and Bass Boost button 2 as desired. FM-The FM Antenna is weak, adjust the length and the angle of the antenna. 9 If reception is weak, turn the unit on and select a radio band. If reception is for normal bass sound. The radio frequency will appear in most areas. OPERATION (CONTINUED) LISTENING TO THE RADIO 1 2 Rotate the Function control to the AM...
... to select a station. 3 1 1 2 4 2 Adjust the VOLUME control 1 and Bass Boost button 2 as desired. FM-The FM Antenna is weak, adjust the length and the angle of the antenna. 9 If reception is weak, turn the unit on and select a radio band. If reception is for normal bass sound. The radio frequency will appear in most areas. OPERATION (CONTINUED) LISTENING TO THE RADIO 1 2 Rotate the Function control to the AM...

User Guide
Page 11
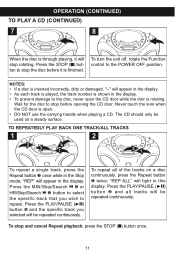
.../Skip/ Search n 2 button. Press the Bass Boost button to the "in the display. 2 4 Adjust the VOLUME control 1 and Bass Boost button 2 as desired. CONTINUED ON THE NEXT PAGE 10 Press to the "out" position for normal bass sound. 5 1 2 Press the PLAY/PAUSE (®p) button again to pause playback; Close the CD compartment door. 3 1 2 Press the PLAY/PAUSE (®p) button; the Play indicator will blink. Open the CD compartment door by...
.../Skip/ Search n 2 button. Press the Bass Boost button to the "in the display. 2 4 Adjust the VOLUME control 1 and Bass Boost button 2 as desired. CONTINUED ON THE NEXT PAGE 10 Press to the "out" position for normal bass sound. 5 1 2 Press the PLAY/PAUSE (®p) button again to pause playback; Close the CD compartment door. 3 1 2 Press the PLAY/PAUSE (®p) button; the Play indicator will blink. Open the CD compartment door by...
User Guide
Page 12
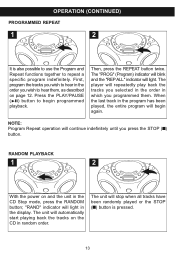
... specific track that you selected will light in the Stop mode; To repeat all tracks will stop and cancel Repeat playback, press the STOP (I ) button to stop the disc before opening the CD door. "REP" will appear in the display. • As each track is played, the track number is rotating. To turn the unit off, rotate the Function control to repeat. Never tou1ch the lens when the CD door is open the CD...
... specific track that you selected will light in the Stop mode; To repeat all tracks will stop and cancel Repeat playback, press the STOP (I ) button to stop the disc before opening the CD door. "REP" will appear in the display. • As each track is played, the track number is rotating. To turn the unit off, rotate the Function control to repeat. Never tou1ch the lens when the CD door is open the CD...
User Guide
Page 13
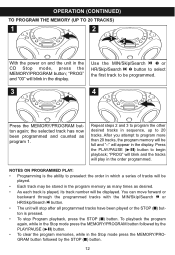
... each track is played, its track number will be full and "--" will be displayed. Use the MIN/Skip/Search o 1 or HR/Skip/Search n 2 button to select the first track to 20 tracks. Press the PLAY/PAUSE (®/p) button to preselect the order in which a series of tracks will play in the Stop mode press the MEMORY/PROGRAM button followed by the PLAY/PAUSE (®p) button. • To clear the program memories, while...
... each track is played, its track number will be full and "--" will be displayed. Use the MIN/Skip/Search o 1 or HR/Skip/Search n 2 button to select the first track to 20 tracks. Press the PLAY/PAUSE (®/p) button to preselect the order in which a series of tracks will play in the Stop mode press the MEMORY/PROGRAM button followed by the PLAY/PAUSE (®p) button. • To clear the program memories, while...
User Guide
Page 14
The player will continue indefinitely until you press the STOP (I ) button is also possible to use the Program and Repeat functions together to hear them . NOTE: Program Repeat operation will repeatedly play back the tracks you selected in the order in the2program has been played, the entire program will light. The "PROG" (Program) indicator will blink and the "REP ALL" indicator will begin programmed playback. RANDOM PLAYBACK 1 2 With the power on...
The player will continue indefinitely until you press the STOP (I ) button is also possible to use the Program and Repeat functions together to hear them . NOTE: Program Repeat operation will repeatedly play back the tracks you selected in the order in the2program has been played, the entire program will light. The "PROG" (Program) indicator will blink and the "REP ALL" indicator will begin programmed playback. RANDOM PLAYBACK 1 2 With the power on...
User Guide
Page 15
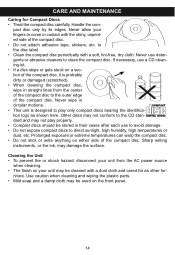
... your fingers to direct sunlight, high humidity, high temperatures or dust, etc. Other discs may not conform to the CD standard and may be stored in their cases after each use to avoid damage. • Do not expose compact discs to come in contact with...compact disc. If necessary, use detergents or abrasive cleaners to play properly. • Compact discs should be cleaned with a soft, lint-free, dry cloth. Never wipe in straight lines from the AC power source when cleaning. • The finish on either side of the compact disc. • Do not attach adhesive tape,...
... your fingers to direct sunlight, high humidity, high temperatures or dust, etc. Other discs may not conform to the CD standard and may be stored in their cases after each use to avoid damage. • Do not expose compact discs to come in contact with...compact disc. If necessary, use detergents or abrasive cleaners to play properly. • Compact discs should be cleaned with a soft, lint-free, dry cloth. Never wipe in straight lines from the AC power source when cleaning. • The finish on either side of the compact disc. • Do not attach adhesive tape,...
User Guide
Page 16
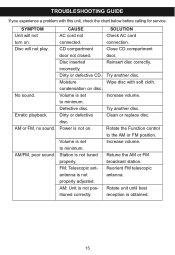
... will not play. Erratic playback. Close CD compartment door. Clean or replace disc. Retune the AM or FM broadcast station. CAUSE AC cord not connected. Wipe disc with this unit, check the chart below before calling for service. Increase volume. Reorient FM telescopic antenna. Disc inserted incorrectly. Increase volume. AM/FM, poor sound. Disc will not turn on disc. Defective disc. Volume is not tuned properly. TROUBLESHOOTING GUIDE If you experience a problem with...
... will not play. Erratic playback. Close CD compartment door. Clean or replace disc. Retune the AM or FM broadcast station. CAUSE AC cord not connected. Wipe disc with this unit, check the chart below before calling for service. Increase volume. Reorient FM telescopic antenna. Disc inserted incorrectly. Increase volume. AM/FM, poor sound. Disc will not turn on disc. Defective disc. Volume is not tuned properly. TROUBLESHOOTING GUIDE If you experience a problem with...
User Guide
Page 17
... MEMOREX. FOR ADDITIONAL SET-UP OR OPERATING ASSISTANCE, PLEASE VISIT OUR WEBSITE AT WWW.MEMOREXELECTRONICS.COM OR CONTACT CUSTOMER SERVICE AT (954) 660-7100. SPECIFICATIONS GENERAL: Power Source 120V, 60Hz AC Battery 12V DC (8 x 1.5V 'C' size batteries) Alkaline is recommended for longer life Speaker 2 x 3W Output Power 2 x 2W RADIO SECTION: Frequency Range (FM 87.5-108 MHz Frequency Range (AM 530-1710 KHz CD SECTION: Disc...
... MEMOREX. FOR ADDITIONAL SET-UP OR OPERATING ASSISTANCE, PLEASE VISIT OUR WEBSITE AT WWW.MEMOREXELECTRONICS.COM OR CONTACT CUSTOMER SERVICE AT (954) 660-7100. SPECIFICATIONS GENERAL: Power Source 120V, 60Hz AC Battery 12V DC (8 x 1.5V 'C' size batteries) Alkaline is recommended for longer life Speaker 2 x 3W Output Power 2 x 2W RADIO SECTION: Frequency Range (FM 87.5-108 MHz Frequency Range (AM 530-1710 KHz CD SECTION: Disc...


