
User Guide
Page 2
... generate or use radio frequency energy. ATTENTION: The exclamation point within an equilateral triangle is intended to alert the user to the presence of the cabinet. Avoid direct exposure to operate this equipment if an unauthorized change or modification is made. 1 DANGER: Invisible and hazardous laser radiation when open and interlock failed or defeated. Serial Number SAFETY PRECAUTIONS...
... generate or use radio frequency energy. ATTENTION: The exclamation point within an equilateral triangle is intended to alert the user to the presence of the cabinet. Avoid direct exposure to operate this equipment if an unauthorized change or modification is made. 1 DANGER: Invisible and hazardous laser radiation when open and interlock failed or defeated. Serial Number SAFETY PRECAUTIONS...
User Guide
Page 3
... attempt to service this product. These limits are designed to possible eye injury. Lightning and power surges ARE NOT covered under warranty for this device due to provide reasonable protection against harmful interference in a residential installation. However, there is connected. • Consult the dealer or an experienced radio/TV technician for help. CAUTION: USE OF CONTROLS, ADJUSTMENTS OR...
... attempt to service this product. These limits are designed to possible eye injury. Lightning and power surges ARE NOT covered under warranty for this device due to provide reasonable protection against harmful interference in a residential installation. However, there is connected. • Consult the dealer or an experienced radio/TV technician for help. CAUTION: USE OF CONTROLS, ADJUSTMENTS OR...
User Guide
Page 4
... loud and clear without annoying blaring or distortion and, most out of sound levels is included for a lifetime. Over time your equipment offers. Taking a minute to consider how you can hear it there. This list of your equipment by playing it 's time to do this by setting your equipment at a safe level BEFORE your volume control at a low setting. •...
... loud and clear without annoying blaring or distortion and, most out of sound levels is included for a lifetime. Over time your equipment offers. Taking a minute to consider how you can hear it there. This list of your equipment by playing it 's time to do this by setting your equipment at a safe level BEFORE your volume control at a low setting. •...

User Guide
Page 5
... the product. POWER-CORD PROTECTION Power-supply cords should be operated only from the type of the product and to protect it from the wall outlet before the product is a safety feature. This will fit into the power outlet only one blade wider than the other electric light or power circuits, or where it is provided or the manufacturer's instructions have the...
... the product. POWER-CORD PROTECTION Power-supply cords should be operated only from the type of the product and to protect it from the wall outlet before the product is a safety feature. This will fit into the power outlet only one blade wider than the other electric light or power circuits, or where it is provided or the manufacturer's instructions have the...
User Guide
Page 6
... close to determine that are required, be sure the service technician uses replacement parts specified by the manufacturer or those controls that the product is grounded so as an adjustment of any service or repairs to this indicates a need for service. 23. When the power-supply cord or plug is provided to call the CATV system installer's attention to Article 820-40 of the NEC...
... close to determine that are required, be sure the service technician uses replacement parts specified by the manufacturer or those controls that the product is grounded so as an adjustment of any service or repairs to this indicates a need for service. 23. When the power-supply cord or plug is provided to call the CATV system installer's attention to Article 820-40 of the NEC...
User Guide
Page 7
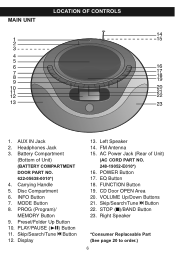
... Button 7. Preset/Folder Up Button 10. CD Door OPEN Area 20. STOP (I)/BAND Button 23. FUNCTION Button 19. Battery Compartment (Bottom of Unit) (AC CORD PART NO. 248-19052-E010*) 16. Disc Compartment 6. PROG (Program)/ MEMORY Button 9. FM Antenna 15. PLAY/PAUSE (®p) Button 11. Display 13. Left Speaker 14. Right Speaker *Consumer Replaceable Part (See page 20 to order.) 6 AC Power Jack (Rear of Unit) (BATTERY COMPARTMENT DOOR PART NO. 622-05638-0010*) 4. MODE Button 8. AUX IN Jack 2. VOLUME Up/Down Buttons...
... Button 7. Preset/Folder Up Button 10. CD Door OPEN Area 20. STOP (I)/BAND Button 23. FUNCTION Button 19. Battery Compartment (Bottom of Unit) (AC CORD PART NO. 248-19052-E010*) 16. Disc Compartment 6. PROG (Program)/ MEMORY Button 9. FM Antenna 15. PLAY/PAUSE (®p) Button 11. Display 13. Left Speaker 14. Right Speaker *Consumer Replaceable Part (See page 20 to order.) 6 AC Power Jack (Rear of Unit) (BATTERY COMPARTMENT DOOR PART NO. 622-05638-0010*) 4. MODE Button 8. AUX IN Jack 2. VOLUME Up/Down Buttons...
User Guide
Page 8
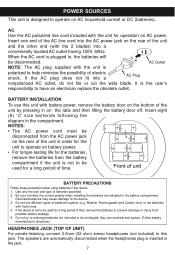
... for operation on the bottom of batteries together (e.g. The speakers are automatically disconnected when the headphones plug is plugged in the compartment. Be sure to follow the correct polarity when installing the batteries as indicated in the jack. 7 POWER SOURCES This unit is the user's responsibility to have an electrician replace the obsolete outlet. NOTES: • The AC power cord must be recharged; BATTERY INSTALLATION To use...
... for operation on the bottom of batteries together (e.g. The speakers are automatically disconnected when the headphones plug is plugged in the compartment. Be sure to follow the correct polarity when installing the batteries as indicated in the jack. 7 POWER SOURCES This unit is the user's responsibility to have an electrician replace the obsolete outlet. NOTES: • The AC power cord must be recharged; BATTERY INSTALLATION To use...
User Guide
Page 9
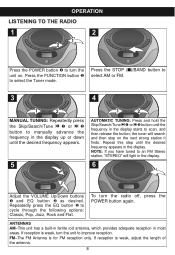
... and hold the Skip/Search/Tune o 1 or n 2 button until the desired frequency appears in most areas. OPERATION LISTENING TO THE RADIO 1 2 1 2 Press the POWER button 1 to improve reception. the tuner will light in the display. 6 1 Adjust the VOLUME Up/Down buttons 1 and EQ button 2 as desired. Repeat this step until the frequency in the display starts to an FM Stereo station, "STEREO" will search and then stop on...
... and hold the Skip/Search/Tune o 1 or n 2 button until the desired frequency appears in most areas. OPERATION LISTENING TO THE RADIO 1 2 1 2 Press the POWER button 1 to improve reception. the tuner will light in the display. 6 1 Adjust the VOLUME Up/Down buttons 1 and EQ button 2 as desired. Repeat this step until the frequency in the display starts to an FM Stereo station, "STEREO" will search and then stop on...

User Guide
Page 10
... Tuner mode. the preset number will blink and MEM will be erased. 2 Select the Tuner mode and the desired band as described on the previous page, Steps 1-2. NOTE: If the main power supply is interrupted, the memory presets will appear in the selected memory. OPERATION (CONTINUED) SETTING THE PRESETS (20 for FM, 10 for AM) 1 2 1 2 2 4 Press the POWER button 1 to program additional stations, if desired. Press the FUNCTION button 2 to set...
... Tuner mode. the preset number will blink and MEM will be erased. 2 Select the Tuner mode and the desired band as described on the previous page, Steps 1-2. NOTE: If the main power supply is interrupted, the memory presets will appear in the selected memory. OPERATION (CONTINUED) SETTING THE PRESETS (20 for FM, 10 for AM) 1 2 1 2 2 4 Press the POWER button 1 to program additional stations, if desired. Press the FUNCTION button 2 to set...
User Guide
Page 11
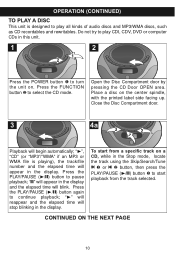
... the display. Do not try to pause playback; Press the PLAY/PAUSE (®/p) button again to select the CD mode. Press the PLAY/PAUSE (®/p) button to play all kinds of audio discs and MP3/WMA discs, such as CD recordables and rewritables. Open the Disc Compartment door by pressing the CD Door OPEN area. OPERATION (CONTINUED) TO PLAY A DISC This unit is playing), the track/file number and the elapsed time will appear in the display.
... the display. Do not try to pause playback; Press the PLAY/PAUSE (®/p) button again to select the CD mode. Press the PLAY/PAUSE (®/p) button to play all kinds of audio discs and MP3/WMA discs, such as CD recordables and rewritables. Open the Disc Compartment door by pressing the CD Door OPEN area. OPERATION (CONTINUED) TO PLAY A DISC This unit is playing), the track/file number and the elapsed time will appear in the display.

User Guide
Page 12
... disc, while in the Stop mode, select the desired folder by repeatedly pressing the Preset/Folder Up button 1. OPERATION (CONTINUED) TO PLAY A DISC (CONTINUED) 4b 5 2 1 4 1 3 2 To start playback. Press the PLAY/PAUSE (®/p) button 2 to start from a specific folder/file on the disc, press the Skip/Search/Tune o 1 or n 2 button. Adjust the VOLUME Up/Down buttons 1 and EQ button 2 as desired. To turn the unit off, press the POWER button...
... disc, while in the Stop mode, select the desired folder by repeatedly pressing the Preset/Folder Up button 1. OPERATION (CONTINUED) TO PLAY A DISC (CONTINUED) 4b 5 2 1 4 1 3 2 To start playback. Press the PLAY/PAUSE (®/p) button 2 to start from a specific folder/file on the disc, press the Skip/Search/Tune o 1 or n 2 button. Adjust the VOLUME Up/Down buttons 1 and EQ button 2 as desired. To turn the unit off, press the POWER button...
User Guide
Page 13
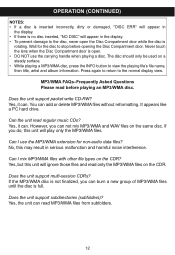
... music CDs? Can I mix MP3/WMA files with other file types on the CDR. Does the unit support multi-session CDRs? Yes, it can burn a new group of MP3/WMA files until the disc is full. However, you do, this may result in the display. • To prevent damage to the normal display view. Can the unit read before opening...
... music CDs? Can I mix MP3/WMA files with other file types on the CDR. Does the unit support multi-session CDRs? Yes, it can burn a new group of MP3/WMA files until the disc is full. However, you do, this may result in the display. • To prevent damage to the normal display view. Can the unit read before opening...

User Guide
Page 14
... begin playback. All tracks/files on a disc continuously, press the MODE button 1 twice (three times for an MP3/WMA disc) while in the display. TO RANDOMLY PLAY BACK ALL TRACKS/FILES 1 1 2 To randomly play all of the tracks/files on a disc, press the MODE button 1 three times (four times for a MP3/WMA disc) while in the Stop mode; "REP FOLDER" will appear in the Stop mode; NOTES ON REPEAT MODES: • For a MP3/WMA disc, you...
... begin playback. All tracks/files on a disc continuously, press the MODE button 1 twice (three times for an MP3/WMA disc) while in the display. TO RANDOMLY PLAY BACK ALL TRACKS/FILES 1 1 2 To randomly play all of the tracks/files on a disc, press the MODE button 1 three times (four times for a MP3/WMA disc) while in the Stop mode; "REP FOLDER" will appear in the Stop mode; NOTES ON REPEAT MODES: • For a MP3/WMA disc, you...
User Guide
Page 15
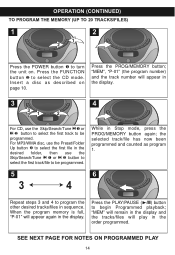
... order programmed. Insert a disc as program 1. 5 6 3 4 Repeat steps 3 and 4 to be programmed. For MP3/WMA disc, use the Preset/Folder Up button 3 to select the first file in the display. Press the PLAY/PAUSE (®/p) button to select the CD mode. the selected track/file has now been programmed and counted as described on . Press the FUNCTION button 2 to begin Programmed playback; OPERATION (CONTINUED) TO PROGRAM THE MEMORY (UP TO 20 TRACKS/FILES) 1 2 1 2 Press the POWER button...
... order programmed. Insert a disc as program 1. 5 6 3 4 Repeat steps 3 and 4 to be programmed. For MP3/WMA disc, use the Preset/Folder Up button 3 to select the first file in the display. Press the PLAY/PAUSE (®/p) button to select the CD mode. the selected track/file has now been programmed and counted as described on . Press the FUNCTION button 2 to begin Programmed playback; OPERATION (CONTINUED) TO PROGRAM THE MEMORY (UP TO 20 TRACKS/FILES) 1 2 1 2 Press the POWER button...

User Guide
Page 16
... played. • Each track/file may be displayed. Then, press the MODE button twice. OPERATION (CONTINUED) NOTES ON PROGRAMMED PLAY: • Programming is the ability to preselect the order in which you programmed them , as desired. • As each track/file is pressed. • To clear the Program memory, while in the Stop mode, press the STOP (I)/BAND button. The player will appear in the program memory as many times...
... played. • Each track/file may be displayed. Then, press the MODE button twice. OPERATION (CONTINUED) NOTES ON PROGRAMMED PLAY: • Programming is the ability to preselect the order in which you programmed them , as desired. • As each track/file is pressed. • To clear the Program memory, while in the Stop mode, press the STOP (I)/BAND button. The player will appear in the program memory as many times...

User Guide
Page 17
... downloaded at different times until the whole disc is burned on this player. Because of this, the music can be detected nor played on this layout, the first file will be "Blur01.mp3" and the last file will appear on a single session MP3/WMA disc. MULTI SESSION The computer user does not need to help you understand the MP3/WMA disc unit display and the playback...
... downloaded at different times until the whole disc is burned on this player. Because of this, the music can be detected nor played on this layout, the first file will be "Blur01.mp3" and the last file will appear on a single session MP3/WMA disc. MULTI SESSION The computer user does not need to help you understand the MP3/WMA disc unit display and the playback...
User Guide
Page 18
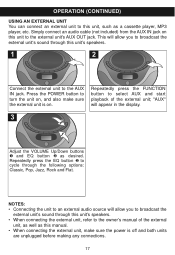
... a cassette player, MP3 player, etc. OPERATION (CONTINUED) USING AN EXTERNAL UNIT You can connect an external unit to cycle through the following options: Classic, Pop, Jazz, Rock and Flat. Repeatedly press the EQ button 2 to this unit's speakers. • When connecting the external unit, refer to the owner's manual of the external unit; NOTES: • Connecting the unit to an external audio source will appear in the display. 3 2 3 2 1 Adjust...
... a cassette player, MP3 player, etc. OPERATION (CONTINUED) USING AN EXTERNAL UNIT You can connect an external unit to cycle through the following options: Classic, Pop, Jazz, Rock and Flat. Repeatedly press the EQ button 2 to this unit's speakers. • When connecting the external unit, refer to the owner's manual of the external unit; NOTES: • Connecting the unit to an external audio source will appear in the display. 3 2 3 2 1 Adjust...
User Guide
Page 19
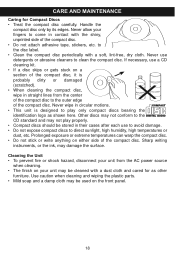
... for as shown here. If necessary, use to avoid damage. • Do not expose compact discs to the CD standard and may be cleaned with a soft, lint-free, dry cloth. Never wipe in straight lines from the AC power source when cleaning. • The finish on a section of the compact disc. • Do not attach adhesive tape, stickers, etc.
... for as shown here. If necessary, use to avoid damage. • Do not expose compact discs to the CD standard and may be cleaned with a soft, lint-free, dry cloth. Never wipe in straight lines from the AC power source when cleaning. • The finish on a section of the compact disc. • Do not attach adhesive tape, stickers, etc.
User Guide
Page 20
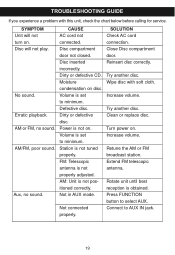
... unit until best reception is not tuned properly. Press FUNCTION button to AUX IN jack. 19 AM or FM, no sound. AM/FM, poor sound. Station is obtained. Increase volume. Increase volume. Erratic playback. Disc inserted incorrectly. SOLUTION Check AC cord connection. Close Disc compartment door. Wipe disc with this unit, check the chart below before calling for service. Turn power on . Dirty or defective CD. FM: Telescopic antenna is not...
... unit until best reception is not tuned properly. Press FUNCTION button to AUX IN jack. 19 AM or FM, no sound. AM/FM, poor sound. Station is obtained. Increase volume. Increase volume. Erratic playback. Disc inserted incorrectly. SOLUTION Check AC cord connection. Close Disc compartment door. Wipe disc with this unit, check the chart below before calling for service. Turn power on . Dirty or defective CD. FM: Telescopic antenna is not...
User Guide
Page 21
....025/12KHz for MPEG2.5 16/22.05/24KHz for MPEG2 32/44.1/48KHz for MPEG1 MP3 Playback ISO9660 format compatible WMA (Windows Media Audio Bit Rate 32kbps-192kbps Check the CD burner/recorder's documentation to change without notice. FOR ADDITIONAL SET-UP OR OPERATING ASSISTANCE, PLEASE VISIT OUR WEBSITE AT WWW.MEMOREXELECTRONICS.COM OR CONTACT CUSTOMER SERVICE AT (954) 660-7100.
....025/12KHz for MPEG2.5 16/22.05/24KHz for MPEG2 32/44.1/48KHz for MPEG1 MP3 Playback ISO9660 format compatible WMA (Windows Media Audio Bit Rate 32kbps-192kbps Check the CD burner/recorder's documentation to change without notice. FOR ADDITIONAL SET-UP OR OPERATING ASSISTANCE, PLEASE VISIT OUR WEBSITE AT WWW.MEMOREXELECTRONICS.COM OR CONTACT CUSTOMER SERVICE AT (954) 660-7100.


