User Guide
Page 4
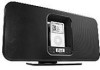
... Jack (Rear of Unit) 3. TUNE Up/Down/ Skip n / o Buttons 13. POWER IN Jack (Rear of Unit) 16. Power Button 8. iPod® Dock with Connector & Interchangeable Holders 5. MODE Button 6. VOLUME Up/Down Buttons 7. Display 10. Remote Sensor 17. FM Wire Antenna (Rear of Unit) (DETACHABLE...070E0202* AC ADAPTER POWER CORD WHITE PART NO. 0250457055W, BLACK PART NO. 0250457055*) 15. PRESET Button 12. SET Button 14. Right Speaker 11. Left Speaker 2. LOCATION OF CONTROLS MAIN UNIT 1. LINE IN Jack (Side of Unit) 4. Stand (Removable) (STAND WHITE PART NO. 084MI100601, BLACK...
... Jack (Rear of Unit) 3. TUNE Up/Down/ Skip n / o Buttons 13. POWER IN Jack (Rear of Unit) 16. Power Button 8. iPod® Dock with Connector & Interchangeable Holders 5. MODE Button 6. VOLUME Up/Down Buttons 7. Display 10. Remote Sensor 17. FM Wire Antenna (Rear of Unit) (DETACHABLE...070E0202* AC ADAPTER POWER CORD WHITE PART NO. 0250457055W, BLACK PART NO. 0250457055*) 15. PRESET Button 12. SET Button 14. Right Speaker 11. Left Speaker 2. LOCATION OF CONTROLS MAIN UNIT 1. LINE IN Jack (Side of Unit) 4. Stand (Removable) (STAND WHITE PART NO. 084MI100601, BLACK...
User Guide
Page 8
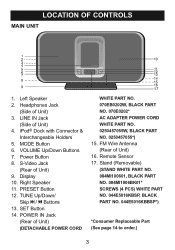
...always be heard through the Mi1006's speakers. Press the Power button to turn off , once you disconnect the iPod®, the Mi1006 will revert back to the AM/FM/LINE IN mode. If the Mi1006 is no device or iPod® connected to the LINE IN jack or the iPod® dock.) To turn this unit will... the tabs into place. 3 Press the rear side of the Mi1006. The external player's output sound will be in the Pause mode. If the Mi1006 is already on, when you can press the MODE button repeatedly to select between iPod (dock)/LINE IN/AM/FM mode as desired. (You will not be...
...always be heard through the Mi1006's speakers. Press the Power button to turn off , once you disconnect the iPod®, the Mi1006 will revert back to the AM/FM/LINE IN mode. If the Mi1006 is no device or iPod® connected to the LINE IN jack or the iPod® dock.) To turn this unit will... the tabs into place. 3 Press the rear side of the Mi1006. The external player's output sound will be in the Pause mode. If the Mi1006 is already on, when you can press the MODE button repeatedly to select between iPod (dock)/LINE IN/AM/FM mode as desired. (You will not be...
User Guide
Page 9
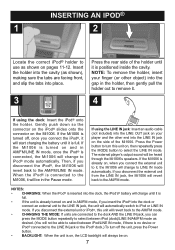
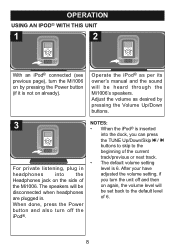
...; as per its owner's manual and the sound will be heard through the Mi1006's speakers. OPERATION USING AN IPOD® WITH THIS UNIT 1 2 With an iPod® connected (see previous page), turn the Mi1006 on by pressing the Volume Up/Down buttons. 3 For private listening, plug in... . Adjust the volu1me a1s desired by pressing the Power button (if it is 6. Th1e sp1eakers will be disconnected when headphones are plugged in headphones into the dock...
...; as per its owner's manual and the sound will be heard through the Mi1006's speakers. OPERATION USING AN IPOD® WITH THIS UNIT 1 2 With an iPod® connected (see previous page), turn the Mi1006 on by pressing the Volume Up/Down buttons. 3 For private listening, plug in... . Adjust the volu1me a1s desired by pressing the Power button (if it is 6. Th1e sp1eakers will be disconnected when headphones are plugged in headphones into the dock...
User Guide
Page 13
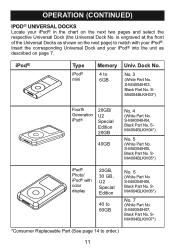
... described on page 7. SMI4004BLKIH06*) No. 7 (White Part No. SMI4004BLKIH07*) *Consumer Replaceable Part (See page 14 to 6GB Univ. Dock No. OPERATION (CONTINUED) IPOD® UNIVERSAL DOCKS Locate your iPod® in the chart on the next page) to match with color display 20GB, 30 GB, U2 Special Edition 40 to 60GB No. 6 (...White Part No. S-MI4004IH04, Black Part No. Insert the corresponding Universal Dock and your iPod® into the unit as shown on the next two pages and select the respective Universal...
... described on page 7. SMI4004BLKIH06*) No. 7 (White Part No. SMI4004BLKIH07*) *Consumer Replaceable Part (See page 14 to 6GB Univ. Dock No. OPERATION (CONTINUED) IPOD® UNIVERSAL DOCKS Locate your iPod® in the chart on the next page) to match with color display 20GB, 30 GB, U2 Special Edition 40 to 60GB No. 6 (...White Part No. S-MI4004IH04, Black Part No. Insert the corresponding Universal Dock and your iPod® into the unit as shown on the next two pages and select the respective Universal...
User Guide
Page 14
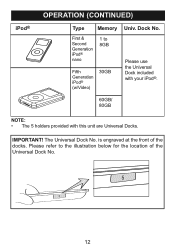
is engraved at the front of the Universal Dock No. 12 iPod® OPERATION (CONTINUED) Type Memory Univ. First & Second Generation iPod® nano 1 to the illustration below for the location of the docks. IMPORTANT! Please refer to 8GB Fifth Generation iPod® (w/Video) 30GB Please use the Universal Dock included with your iPod®. 60GB/ 80GB NOTE: • The 5 holders provided with this unit are Universal Docks. The Universal Dock No. Dock No.
is engraved at the front of the Universal Dock No. 12 iPod® OPERATION (CONTINUED) Type Memory Univ. First & Second Generation iPod® nano 1 to the illustration below for the location of the docks. IMPORTANT! Please refer to 8GB Fifth Generation iPod® (w/Video) 30GB Please use the Universal Dock included with your iPod®. 60GB/ 80GB NOTE: • The 5 holders provided with this unit are Universal Docks. The Universal Dock No. Dock No.


