

User Guide
Page 2
... is intended to alert the user to the presence of electric shock to constitute a risk of important operating and maintenance (servicing) instructions in the instruction manual. ATTENTION: The exclamation point within the product's enclosure that may generate or use radio frequency energy. ATTENTION: POUR ÉVITER LES CHOC ÉLECTRIQUES, INTRODUIRE...
... is intended to alert the user to the presence of electric shock to constitute a risk of important operating and maintenance (servicing) instructions in the instruction manual. ATTENTION: The exclamation point within the product's enclosure that may generate or use radio frequency energy. ATTENTION: POUR ÉVITER LES CHOC ÉLECTRIQUES, INTRODUIRE...
User Guide
Page 7
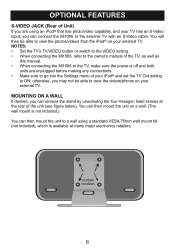
NOTES: • Set the TV's TV/VIDEO button or switch to the VIDEO setting. • When connecting the Mi1006, refer to the owner's manual of the TV, as well as this manual. • When connecting the Mi1006 to the TV, make sure the power is off and both units are using a standard VESA 75mm wall..., you may not be able to the external TV with an S-Video cable. You will then be able to ON; otherwise, you can connect the Mi1006 to view the photos/videos from the iPod® on a wall. (The wall mount is available at the rear of the unit (see figure below...
NOTES: • Set the TV's TV/VIDEO button or switch to the VIDEO setting. • When connecting the Mi1006, refer to the owner's manual of the TV, as well as this manual. • When connecting the Mi1006 to the TV, make sure the power is off and both units are using a standard VESA 75mm wall..., you may not be able to the external TV with an S-Video cable. You will then be able to ON; otherwise, you can connect the Mi1006 to view the photos/videos from the iPod® on a wall. (The wall mount is available at the rear of the unit (see figure below...
User Guide
Page 9
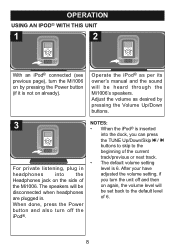
...is inserted into the Headphones jack on the side of 6. 8 Th1e sp1eakers will be heard through the Mi1006's speakers. After your have adjusted the volume setting, if you can press the TUNE Up/Down/Skip n /...already). 11 Operate the iPod® as per its owner's manual and the sound will be set back to the default level of the Mi1006. When done, press the Power button and also turn off...AN IPOD® WITH THIS UNIT 1 2 With an iPod® connected (see previous page), turn the Mi1006 on by pressing the Volume Up/Down buttons. 3 For private listening, plug in . Adjust the volu1me ...
...is inserted into the Headphones jack on the side of 6. 8 Th1e sp1eakers will be heard through the Mi1006's speakers. After your have adjusted the volume setting, if you can press the TUNE Up/Down/Skip n /...already). 11 Operate the iPod® as per its owner's manual and the sound will be set back to the default level of the Mi1006. When done, press the Power button and also turn off...AN IPOD® WITH THIS UNIT 1 2 With an iPod® connected (see previous page), turn the Mi1006 on by pressing the Volume Up/Down buttons. 3 For private listening, plug in . Adjust the volu1me ...
User Guide
Page 11
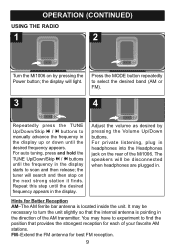
OPERATION (CONTINUED) USING THE RADIO 1 2 Turn the Mi1006 on the rear1of th1e Mi1006. the display will search and then stop on the next strong station it... (AM or FM). 3 11 4 11 Repeatedly press the TUNE Up/Down/Skip n / o buttons to manually advance the frequency in the display up or down until the frequency in the display starts to turn the unit ... antenna is pointing in the display. the tuner will light. For private listening, plug in . The speakers will be necessary to scan and then release; Repeat this step until the desired frequency appears in the ...
OPERATION (CONTINUED) USING THE RADIO 1 2 Turn the Mi1006 on the rear1of th1e Mi1006. the display will search and then stop on the next strong station it... (AM or FM). 3 11 4 11 Repeatedly press the TUNE Up/Down/Skip n / o buttons to manually advance the frequency in the display up or down until the frequency in the display starts to turn the unit ... antenna is pointing in the display. the tuner will light. For private listening, plug in . The speakers will be necessary to scan and then release; Repeat this step until the desired frequency appears in the ...
