User Guide
Page 3
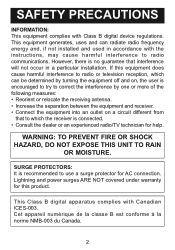
... installed and used in a particular installation. Cet appareil numérique de la classe B est conforme à la norme NMB-003 du Canada. 2 Lightning and power surges ARE NOT covered under warranty for AC connection. This equipment generates, uses and can be determined by turning the equipment off and on, the...
... installed and used in a particular installation. Cet appareil numérique de la classe B est conforme à la norme NMB-003 du Canada. 2 Lightning and power surges ARE NOT covered under warranty for AC connection. This equipment generates, uses and can be determined by turning the equipment off and on, the...
User Guide
Page 4
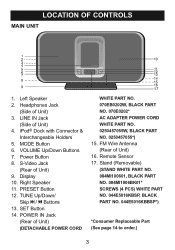
... NO. 070EB0202W, BLACK PART NO. 070E0202* AC ADAPTER POWER CORD WHITE PART NO. 0250457055W, BLACK PART NO. 0250457055*) 15. Remote Sensor 17. MODE Button 6. FM Wire Antenna (Rear of Unit) 3. Headphones Jack (Side of Unit) 16. VOLUME Up/Down Buttons 7. Power Button 8. Display 10. Left Speaker 2. LINE IN Jack (Side of Unit) 4. LOCATION...
... NO. 070EB0202W, BLACK PART NO. 070E0202* AC ADAPTER POWER CORD WHITE PART NO. 0250457055W, BLACK PART NO. 0250457055*) 15. Remote Sensor 17. MODE Button 6. FM Wire Antenna (Rear of Unit) 3. Headphones Jack (Side of Unit) 16. VOLUME Up/Down Buttons 7. Power Button 8. Display 10. Left Speaker 2. LINE IN Jack (Side of Unit) 4. LOCATION...
User Guide
Page 5
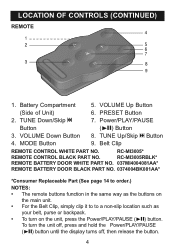
...: • The remote buttons function in the same way as your belt, purse or backpack. • To turn the unit off, press and hold the Power/PLAY/PAUSE (®p) button until the display turns off, then release the button. 4 TUNE Down/Skip o 7. MODE Button 9. To turn on the main unit.... • For the Belt Clip, simply clip it to to a non-slip location such as the buttons on the unit, press the Power/PLAY/PAUSE (®p) button. VOLUME Up Button (Side of Unit) 6. VOLUME Down Button 8. RC-MI3005* REMOTE CONTROL BLACK PART NO. LOCATION OF CONTROLS (...
...: • The remote buttons function in the same way as your belt, purse or backpack. • To turn the unit off, press and hold the Power/PLAY/PAUSE (®p) button until the display turns off, then release the button. 4 TUNE Down/Skip o 7. MODE Button 9. To turn on the main unit.... • For the Belt Clip, simply clip it to to a non-slip location such as the buttons on the unit, press the Power/PLAY/PAUSE (®p) button. VOLUME Up Button (Side of Unit) 6. VOLUME Down Button 8. RC-MI3005* REMOTE CONTROL BLACK PART NO. LOCATION OF CONTROLS (...
User Guide
Page 6
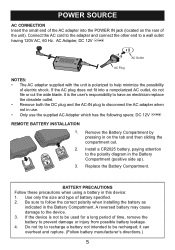
...; Only use the supplied AC Adapter which has the following specs: DC 12V Z REMOTE BATTERY INSTALLATION 1. 2. 3. it can overheat and rupture. (Follow battery manufacturer's directions.) 5 POWER SOURCE AC CONNECTION Insert the small end of the AC adapter into a nonpolarized AC outlet, do not file or cut the wide blade. If...
...; Only use the supplied AC Adapter which has the following specs: DC 12V Z REMOTE BATTERY INSTALLATION 1. 2. 3. it can overheat and rupture. (Follow battery manufacturer's directions.) 5 POWER SOURCE AC CONNECTION Insert the small end of the AC adapter into a nonpolarized AC outlet, do not file or cut the wide blade. If...
User Guide
Page 7
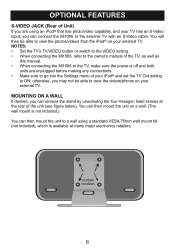
...'s TV/VIDEO button or switch to the VIDEO setting. • When connecting the Mi1006, refer to the owner's manual of the TV, as well as this manual. • When connecting the Mi1006 to the TV, make sure the power is available at the rear of the unit (see figure below). You can connect... the Mi1006 to the external TV with an S-Video cable. You will then be able to view...
...'s TV/VIDEO button or switch to the VIDEO setting. • When connecting the Mi1006, refer to the owner's manual of the TV, as well as this manual. • When connecting the Mi1006 to the TV, make sure the power is available at the rear of the unit (see figure below). You can connect... the Mi1006 to the external TV with an S-Video cable. You will then be able to view...
User Guide
Page 8
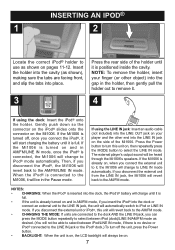
... change to the LINE IN jack or the iPod® dock.) To turn this unit will always be heard through the Mi1006's speakers. Then, if you can press the MODE button repeatedly to select between iPod (dock)/LINE IN/AM/FM mode as desired. (You will be able ..., insert your player and the other end into the gap in the Pause mode. If the Mi1006 is turned off the unit, press the Power button. • BACKLIGHT: When the unit is turned on the Mi1006. If the Mi1006 is on, the LCD backlight will revert back to the AM/FM mode. • CHANGING...
... change to the LINE IN jack or the iPod® dock.) To turn this unit will always be heard through the Mi1006's speakers. Then, if you can press the MODE button repeatedly to select between iPod (dock)/LINE IN/AM/FM mode as desired. (You will be able ..., insert your player and the other end into the gap in the Pause mode. If the Mi1006 is turned off the unit, press the Power button. • BACKLIGHT: When the unit is turned on the Mi1006. If the Mi1006 is on, the LCD backlight will revert back to the AM/FM mode. • CHANGING...
User Guide
Page 9
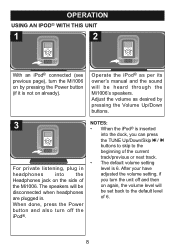
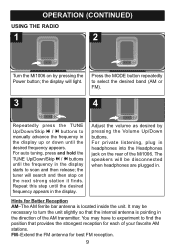
Adjust the volu1me a1s desired by pressing the Power button (if it is 6. NOTES: • When the iPod® is inserted into the ...manual and the sound will be set back to the beginning of the Mi1006. OPERATION USING AN IPOD® WITH THIS UNIT 1 2 With an iPod® connected (see previous page), turn the Mi1006 on by pressing the Volume Up/Down buttons. 3 For private listening... n / o buttons to skip to the default level of 6. 8 Th1e sp1eakers will be heard through the Mi1006's speakers. When done, press the Power button and also turn the unit off the iPod®.
Adjust the volu1me a1s desired by pressing the Power button (if it is 6. NOTES: • When the iPod® is inserted into the ...manual and the sound will be set back to the beginning of the Mi1006. OPERATION USING AN IPOD® WITH THIS UNIT 1 2 With an iPod® connected (see previous page), turn the Mi1006 on by pressing the Volume Up/Down buttons. 3 For private listening... n / o buttons to skip to the default level of 6. 8 Th1e sp1eakers will be heard through the Mi1006's speakers. When done, press the Power button and also turn the unit off the iPod®.
User Guide
Page 11
...the desired frequency appears in the display up or down until the frequency in headphones into the Headphones jack on the rear1of th1e Mi1006. The speakers will be necessary to manually advance the frequency in the display. FM-Extend the FM antenna for Better Reception AM-The AM ferrite... tuning,1pres1s and hold the TUNE Up/Down/Skip n / o buttons until the desired frequency appears. Adjust the volume as desired by pressing the Power button; For private listening, plug in the display starts to find the position that the internal antenna is located inside the unit. the tuner will...
...the desired frequency appears in the display up or down until the frequency in headphones into the Headphones jack on the rear1of th1e Mi1006. The speakers will be necessary to manually advance the frequency in the display. FM-Extend the FM antenna for Better Reception AM-The AM ferrite... tuning,1pres1s and hold the TUNE Up/Down/Skip n / o buttons until the desired frequency appears. Adjust the volume as desired by pressing the Power button; For private listening, plug in the display starts to find the position that the internal antenna is located inside the unit. the tuner will...
User Guide
Page 12
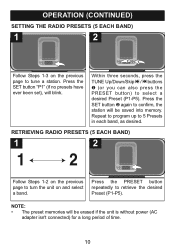
.... Press the SET button 2 again to select a desired Preset (P1-P5). NOTE: 11 • The preset memories will be erased if the unit is without power (AC adapter isn't connected) for a long period of time. 10 Press the SET button "P1" (if no presets have ever been set), will blink. 11...
.... Press the SET button 2 again to select a desired Preset (P1-P5). NOTE: 11 • The preset memories will be erased if the unit is without power (AC adapter isn't connected) for a long period of time. 10 Press the SET button "P1" (if no presets have ever been set), will blink. 11...
User Guide
Page 15
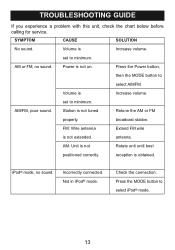
..., check the chart below before calling for service. set to minimum. AM/FM, poor sound. AM: Unit is not on. Not in iPod® mode. Power is not Rotate unit until best positioned correctly. Press the MODE button to select AM/FM. Volume is Increase volume. Check the connection. Press the...
..., check the chart below before calling for service. set to minimum. AM/FM, poor sound. AM: Unit is not on. Not in iPod® mode. Power is not Rotate unit until best positioned correctly. Press the MODE button to select AM/FM. Volume is Increase volume. Check the connection. Press the...
User Guide
Page 16
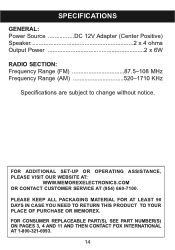
...ON PAGES 3, 4 AND 11 AND THEN CONTACT FOX INTERNATIONAL AT 1-800-321-6993. 14 SPECIFICATIONS GENERAL: Power Source DC 12V Adapter (Center Positive) Speaker 2 x 4 ohms Output Power 2 x 6W RADIO SECTION: Frequency Range (FM 87.5-108 MHz Frequency Range (AM 520-1710 KHz Specifications... are subject to change without notice. PLEASE KEEP ALL PACKAGING MATERIAL FOR AT LEAST 90 DAYS IN CASE YOU NEED TO RETURN THIS PRODUCT TO YOUR PLACE OF PURCHASE OR MEMOREX...
...ON PAGES 3, 4 AND 11 AND THEN CONTACT FOX INTERNATIONAL AT 1-800-321-6993. 14 SPECIFICATIONS GENERAL: Power Source DC 12V Adapter (Center Positive) Speaker 2 x 4 ohms Output Power 2 x 6W RADIO SECTION: Frequency Range (FM 87.5-108 MHz Frequency Range (AM 520-1710 KHz Specifications... are subject to change without notice. PLEASE KEEP ALL PACKAGING MATERIAL FOR AT LEAST 90 DAYS IN CASE YOU NEED TO RETURN THIS PRODUCT TO YOUR PLACE OF PURCHASE OR MEMOREX...