Operating Instructions
Page 13
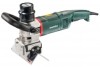
... your operation. WARNING Read all safety warnings and instructions may also break under these materials. Indexable inserts may result in your hands to climb out or kick out. i) Regularly clean the power tool's air vents. Declaration of Conformity We hereby declare that require liquid coolants. Specified Use The beveller is the result of stopping flying debris generated by type and serial number *1), meet all parts...
... your operation. WARNING Read all safety warnings and instructions may also break under these materials. Indexable inserts may result in your hands to climb out or kick out. i) Regularly clean the power tool's air vents. Declaration of Conformity We hereby declare that require liquid coolants. Specified Use The beveller is the result of stopping flying debris generated by type and serial number *1), meet all parts...
Operating Instructions
Page 14
... accessory. See chapter 10. Use only sharp, undamaged indexable blades. d) Prevent any adjustments, changing tools, carrying out maintenance or cleaning. They can control kickback forces if proper precautions are thrown). Some of injury from bricks, concrete etc.), additives used . en ENGLISH a) Maintain a firm grip on the power tool and position your body and arm to allow you to an electric shock. Turn/replace...
... accessory. See chapter 10. Use only sharp, undamaged indexable blades. d) Prevent any adjustments, changing tools, carrying out maintenance or cleaning. They can control kickback forces if proper precautions are thrown). Some of injury from bricks, concrete etc.), additives used . en ENGLISH a) Maintain a firm grip on the power tool and position your body and arm to allow you to an electric shock. Turn/replace...
Operating Instructions
Page 15
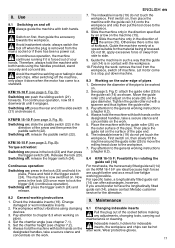
... KFM 15-10 F, KFMPB 15-10 F): When milling edges of the machine) all the way down. Danger of the workplace and wear appropriate protective equipment, such as respirators able to the gear housing. - Loosen the screws (12) and slide both chip protection plates (13) (on dust deposits. - Read the set chamfer angle on the working direction 16 Scale (chamfer angle) 17 Screws (chamfer angle) 18 Indexable insert holder / milling head...
... KFM 15-10 F, KFMPB 15-10 F): When milling edges of the machine) all the way down. Danger of the workplace and wear appropriate protective equipment, such as respirators able to the gear housing. - Loosen the screws (12) and slide both chip protection plates (13) (on dust deposits. - Read the set chamfer angle on the working direction 16 Scale (chamfer angle) 17 Screws (chamfer angle) 18 Indexable insert holder / milling head...
Operating Instructions
Page 16
... Technical Specifications It is recommended that the scale is set chamfer angle (see back). 10.Example for the last milling operation: Carry out a trial cut . Turn the scale ring (9) so that very little material is removed when working conditions. Adjust the indexable insert (19) so that the "X" value from this step if necessary. Draw a vertical line from the diagram is based on...
... Technical Specifications It is recommended that the scale is set chamfer angle (see back). 10.Example for the last milling operation: Carry out a trial cut . Turn the scale ring (9) so that very little material is removed when working conditions. Adjust the indexable insert (19) so that the "X" value from this step if necessary. Draw a vertical line from the diagram is based on...
Operating Instructions
Page 17
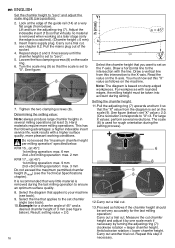
.... Set the chamfer angle (see page 3, Fig. Indexable inserts, holders for rotating the guide rail (14) For most tasks, the transversely fitted guide rail (14) on : press in contact with both hands using clamping devices. 3. 8. KFM 16-15 F (see page 3, Fig. Always hold it in the direction of pipes 1. For continuous operation, now tilt it downwards until it . Continuous operation: Switching on . 2. Pay attention to lock the trigger...
.... Set the chamfer angle (see page 3, Fig. Indexable inserts, holders for rotating the guide rail (14) For most tasks, the transversely fitted guide rail (14) on : press in contact with both hands using clamping devices. 3. 8. KFM 16-15 F (see page 3, Fig. Always hold it in the direction of pipes 1. For continuous operation, now tilt it downwards until it . Continuous operation: Switching on . 2. Pay attention to lock the trigger...
Operating Instructions
Page 18
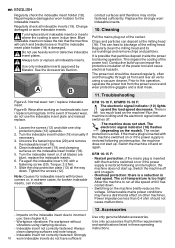
... other machines. Tighten the screws (12). KFM 16-15 F: - Unfavourable mains power conditions may not be cleaned regularly, often and thoroughly through all front and rear air vents using clamping devices. - Repair/replace damaged or worn holders for broken indexable inserts, can include: KFM 15-10 F, KFMPB 15-10 F: The electronic signal indicator (10) lights up can deposit at idle speed until the electronic signal indicator switches off and...
... other machines. Tighten the screws (12). KFM 16-15 F: - Unfavourable mains power conditions may not be cleaned regularly, often and thoroughly through all front and rear air vents using clamping devices. - Repair/replace damaged or worn holders for broken indexable inserts, can include: KFM 15-10 F, KFMPB 15-10 F: The electronic signal indicator (10) lights up can deposit at idle speed until the electronic signal indicator switches off and...
Operating Instructions
Page 19
... accessories securely. In this case, switch the machine off and on the adjusted estimates. If the machine is operated in conformity with EN 60745. Loss of accessories, see www.metabo.com or the catalogue. 13. A 10 HM universal inserts 6.23564 B Fastening screw for environmentally compatible recycling in accordance with the relevant valid standards). You can download a list of spare parts from the power tool...
... accessories securely. In this case, switch the machine off and on the adjusted estimates. If the machine is operated in conformity with EN 60745. Loss of accessories, see www.metabo.com or the catalogue. 13. A 10 HM universal inserts 6.23564 B Fastening screw for environmentally compatible recycling in accordance with the relevant valid standards). You can download a list of spare parts from the power tool...


