Operating Instructions 2
Page 4
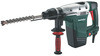
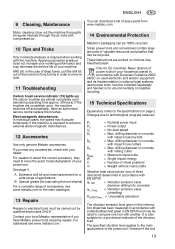
... of the power tool in the hands of dust collection can be ejected from those intended could result in accordance with the charger specified by the manufacturer. Use of untrained users. Such preventive safety measures reduce the risk of parts and any adjustments, changing accessories, or storing power tools. Check for misalignment or binding of moving parts, breakage of starting . Properly maintained cutting tools with sharp cutting edges are less...
... of the power tool in the hands of dust collection can be ejected from those intended could result in accordance with the charger specified by the manufacturer. Use of untrained users. Such preventive safety measures reduce the risk of parts and any adjustments, changing accessories, or storing power tools. Check for misalignment or binding of moving parts, breakage of starting . Properly maintained cutting tools with sharp cutting edges are less...
Operating Instructions
Page 2
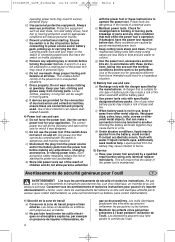
MHE 56 SDS-max 1300 650 - 2840 8,3 12 6,3 (13.9) 11,3 (1,9) 91 101 104 EN 60745 2006/42/EG, 2004/108/EG, 2000/14/EG, 2011/65/EU 2012-...,HD/Kh,HD ah,Cheq/Kh,Cheq LpA/KpA LWA/KWA LpA(M) LWA(M) LWA(G) /min bpm J kg (lbs) m/s2 m/s2 dB (A) dB (A) dB (A) dB (A) dB (A) KHE 56 SDS-max 1300 650 90 (796) 0 - 300 45 (1 25/32) 100 (3 15/16) 65 (2 9/16) 2840 8,3 12 6,7 (14.8) 11,5 (1,5) 9,7 (2,4) 100 / 3 111...
MHE 56 SDS-max 1300 650 - 2840 8,3 12 6,3 (13.9) 11,3 (1,9) 91 101 104 EN 60745 2006/42/EG, 2004/108/EG, 2000/14/EG, 2011/65/EU 2012-...,HD/Kh,HD ah,Cheq/Kh,Cheq LpA/KpA LWA/KWA LpA(M) LWA(M) LWA(G) /min bpm J kg (lbs) m/s2 m/s2 dB (A) dB (A) dB (A) dB (A) dB (A) KHE 56 SDS-max 1300 650 90 (796) 0 - 300 45 (1 25/32) 100 (3 15/16) 65 (2 9/16) 2840 8,3 12 6,7 (14.8) 11,5 (1,5) 9,7 (2,4) 100 / 3 111...
Operating Instructions
Page 3
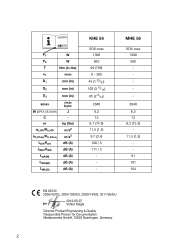
KHE 56 7 6 5 4 3 MHE 56 89 10 11 12 13 14 15 2 1 8 a b 7 3
KHE 56 7 6 5 4 3 MHE 56 89 10 11 12 13 14 15 2 1 8 a b 7 3
Operating Instructions
Page 4
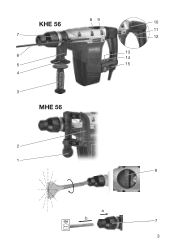
A MHE 56 KHE 56 ... etc. B 6.31800 4 etc. ...
A MHE 56 KHE 56 ... etc. B 6.31800 4 etc. ...
Operating Instructions
Page 10
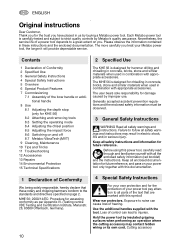
... the protection of the bow handle or additional handle 8 Use 8.1 Adjusting the depth stop (only for KHE 56) 8.2 Attaching and removing tools 8.3 Setting the operating mode 8.4 Adjusting the chisel position 8.5 Adjusting the impact force 8.6 Switching on page 2. Contents 1 Declaration of Conformity 2 Specified Use 3 General Safety Instructions 4 Special Safety Instructions 5 Overview 6 Special Product Features 7 Commissioning 7.1 Assembly of your power tool pay attention to strict quality controls by buying a Metabo power tool. Each Metabo power tool is designed for chiselling...
... the protection of the bow handle or additional handle 8 Use 8.1 Adjusting the depth stop (only for KHE 56) 8.2 Attaching and removing tools 8.3 Setting the operating mode 8.4 Adjusting the chisel position 8.5 Adjusting the impact force 8.6 Switching on page 2. Contents 1 Declaration of Conformity 2 Specified Use 3 General Safety Instructions 4 Special Safety Instructions 5 Overview 6 Special Product Features 7 Commissioning 7.1 Assembly of your power tool pay attention to strict quality controls by buying a Metabo power tool. Each Metabo power tool is designed for chiselling...
Operating Instructions
Page 11
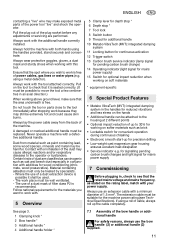
... machine with the additional handle correctly installed. Do not touch the tool or parts close to the tool immediately after stopping work with. 5 Overview 5 Clamp lever for depth stop * 6 Depth stop * 7 Tool lock 8 Switch button 9 Thread for additional handle 10 Metabo VibraTech (MVT): integrated damping system 11 Locking button for continuous activation 12 Trigger switch 13 Carbon brush service indicator (lamp signal for pending carbon brush change) 14 Operating indicator (light signal for mains power supply) 15 Switch for working on the rating label...
... machine with the additional handle correctly installed. Do not touch the tool or parts close to the tool immediately after stopping work with. 5 Overview 5 Clamp lever for depth stop * 6 Depth stop * 7 Tool lock 8 Switch button 9 Thread for additional handle 10 Metabo VibraTech (MVT): integrated damping system 11 Locking button for continuous activation 12 Trigger switch 13 Carbon brush service indicator (lamp signal for pending carbon brush change) 14 Operating indicator (light signal for mains power supply) 15 Switch for working on the rating label...
Operating Instructions
Page 12
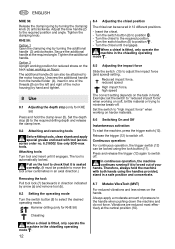
...impact force Slide the switch (15) to the required drilling depth and release the clamp lever. 8.2 Attaching and removing tools Before fitting tools, clean shank and apply special grease enclosed with both hands using the lock button (11). Adjust the bow handle (2) to position . - KHE 56: Option 1 Open the clamping ring by turning the clamping knob (1) anticlockwise. Unscrew the additional handle from the handle holder (4), insert in direction indicated by hand and tighten. 8 Use 8.1 Adjusting the depth stop (6) to adjust the impact force (and speed) setting. Attaching tools: Turn...
...impact force Slide the switch (15) to the required drilling depth and release the clamp lever. 8.2 Attaching and removing tools Before fitting tools, clean shank and apply special grease enclosed with both hands using the lock button (11). Adjust the bow handle (2) to position . - KHE 56: Option 1 Open the clamping ring by turning the clamping knob (1) anticlockwise. Unscrew the additional handle from the handle holder (4), insert in direction indicated by hand and tighten. 8 Use 8.1 Adjusting the depth stop (6) to adjust the impact force (and speed) setting. Attaching tools: Turn...
Operating Instructions
Page 13
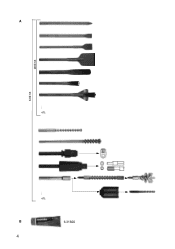
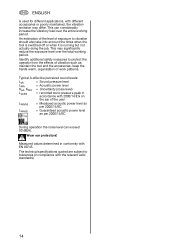
....metabo.com or the main catalogue. 13 Repairs Repairs to remove dust. 11 Troubleshooting Carbon brush service indicator (13) lights up: the carbon brushes are almost completely worn (remaining operating time approx. 30 hours). A Extensive drill bit and chisel assortment for a provisional estimate of the power tool. Motor cleaning: blow out the machine thoroughly at regular intervals through the air slots with compressed air. 10 Tips and Tricks Only moderate pressure...
....metabo.com or the main catalogue. 13 Repairs Repairs to remove dust. 11 Troubleshooting Carbon brush service indicator (13) lights up: the carbon brushes are almost completely worn (remaining operating time approx. 30 hours). A Extensive drill bit and chisel assortment for a provisional estimate of the power tool. Motor cleaning: blow out the machine thoroughly at regular intervals through the air slots with compressed air. 10 Tips and Tricks Only moderate pressure...
Operating Instructions
Page 14
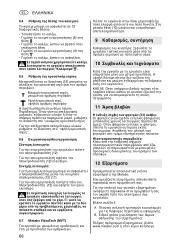
... into account the times when the tool is switched off or when it is used for different applications, with 2000/14/EG on the ear of the user LWA(M) = Measured acoustic power level as per 2000/14/EC LWA(G) = Guaranteed acoustic power level as : maintain the tool and the accessories, keep the hands warm, organisation of exposure to tolerances...
... into account the times when the tool is switched off or when it is used for different applications, with 2000/14/EG on the ear of the user LWA(M) = Measured acoustic power level as per 2000/14/EC LWA(G) = Guaranteed acoustic power level as : maintain the tool and the accessories, keep the hands warm, organisation of exposure to tolerances...
Operating Instructions
Page 68
A B www.metabo.com EL 8.4 12 8) στη 8) στη 8.5 15 8.6 12). 12 12) (11). 12 8.7 Metabo VibraTech (MVT) 68 10 9 10 KHE 56 11 13 30 12 Metabo. 4.
A B www.metabo.com EL 8.4 12 8) στη 8) στη 8.5 15 8.6 12). 12 12) (11). 12 8.7 Metabo VibraTech (MVT) 68 10 9 10 KHE 56 11 13 30 12 Metabo. 4.


