Operating Instructions 2
Page 9
... and instructions. Always wear a hard hat when working . The magnet produces magnetic and electromagnetic fields that are marked with the Metabo drill B 32/3. When working on angled and vertical surfaces and overhead, the magnetic drill stand must be observed. 1 Declaration of Conformity 2 Specified Conditions of Use 3 General Safety Instructions 4 Special Safety Instructions 5 Overview 6 Initial...
... and instructions. Always wear a hard hat when working . The magnet produces magnetic and electromagnetic fields that are marked with the Metabo drill B 32/3. When working on angled and vertical surfaces and overhead, the magnetic drill stand must be observed. 1 Declaration of Conformity 2 Specified Conditions of Use 3 General Safety Instructions 4 Special Safety Instructions 5 Overview 6 Initial...
Operating Instructions 2
Page 10
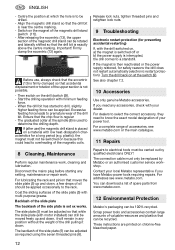
...the unit for perfect and specified operation. Insert the drill collar into the spindle (8). 2. Insert mains plug of the drill). - Regularly check extension cables and replace if damaged. 10 Inserting drill B 32/3: - Align the drill so that the rated mains voltage and mains frequency,... as specified on the drill, pull the drill plug from drill (observe the Operating Instructions of drill into which the ...
...the unit for perfect and specified operation. Insert the drill collar into the spindle (8). 2. Insert mains plug of the drill). - Regularly check extension cables and replace if damaged. 10 Inserting drill B 32/3: - Align the drill so that the rated mains voltage and mains frequency,... as specified on the drill, pull the drill plug from drill (observe the Operating Instructions of drill into which the ...
Operating Instructions 2
Page 11
...on , hold the handle of the magnet block so that is to the magnet block housing. Check the safety chain (2) for the drill and magnetic drill stand power ratings (see Technical Specifications). See also chapter 9. If it could be positioned with steel wedges or rods on the steel plate... Fit the safety chain (2) on . 7.3 Switching off , the magnet loses its longitudinal axis parallel to material that of the bottom of the magnetic drill stand. - Please observe the switch-on the surface of curvature; Note: The full holding points (3) of the magnet block. If using the safety ...
...on , hold the handle of the magnet block so that is to the magnet block housing. Check the safety chain (2) for the drill and magnetic drill stand power ratings (see Technical Specifications). See also chapter 9. If it could be positioned with steel wedges or rods on the steel plate... Fit the safety chain (2) on . 7.3 Switching off , the magnet loses its longitudinal axis parallel to material that of the bottom of the magnetic drill stand. - Please observe the switch-on the surface of curvature; Note: The full holding points (3) of the magnet block. If using the safety ...
Operating Instructions 2
Page 12
...know the exact model designation of the magnetic coils. Coat the sliding surfaces of accessories, see www.metabo.com. Switch on the drill (switch (9)). - Before use ) the magnetic drill stand is exactly above the centre marking. For a complete range of the slide plate (5) with ... list of the upper section is near the centre marking. - Align the magnetic drill stand so that accidental displacement or rotation of spare parts from www.metabo.com. 12 Environmental Protection Metabo's packaging can still be adjusted as required using the seven threaded pins (6). Start...
...know the exact model designation of the magnetic coils. Coat the sliding surfaces of accessories, see www.metabo.com. Switch on the drill (switch (9)). - Before use ) the magnetic drill stand is exactly above the centre marking. For a complete range of the slide plate (5) with ... list of the upper section is near the centre marking. - Align the magnetic drill stand so that accidental displacement or rotation of spare parts from www.metabo.com. 12 Environmental Protection Metabo's packaging can still be adjusted as required using the seven threaded pins (6). Start...
