
Operating Instructions
Page 1
STE 140 STE 140 Plus STEB 140 STEB 140 Plus de Originalbetriebsanleitung 5 en Original instructions 9 fr Notice originale 13 nl Originele gebruiksaanwijzing 17 it Istruzioni per l'uso originali 21 es Manual original 25 pt Manual original 29 sv Originalbruksanvisning 33 fi Alkuperäinen käyttöopas 37 no Original bruksanvisning 41 da Original brugsanvisning 45 pl Instrukcja oryginalna 49 el 53 hu Eredeti használati utasítás 58 ru 62 www.metabo.com Made in Germany
STE 140 STE 140 Plus STEB 140 STEB 140 Plus de Originalbetriebsanleitung 5 en Original instructions 9 fr Notice originale 13 nl Originele gebruiksaanwijzing 17 it Istruzioni per l'uso originali 21 es Manual original 25 pt Manual original 29 sv Originalbruksanvisning 33 fi Alkuperäinen käyttöopas 37 no Original bruksanvisning 41 da Original brugsanvisning 45 pl Instrukcja oryginalna 49 el 53 hu Eredeti használati utasítás 58 ru 62 www.metabo.com Made in Germany
Operating Instructions
Page 10
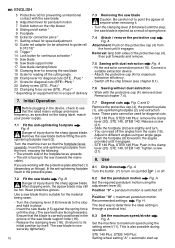
...sides of the protective cap (4), then pull forwards and remove. 7.5 Sawing with dust extraction Fig. These parts cannot be hot. STE 140 Plus, STEB 140 Plus: remove the clamp lever (20). You can read off the chip blower (see chapter 8.1). 7.6 Sawing without dust extraction - Use...extraction hose. Push the footplate (9) forward in the angles provided until the stop and hold in the clamp lever (20). STE 140 Plus, STEB 140 Plus: Push in place. - STE 140, STEB 140: Tighten screw (21). 8. A Turn the button (7) to turn . - Position "III" = maximum pendulum motion Recommended settings...
...sides of the protective cap (4), then pull forwards and remove. 7.5 Sawing with dust extraction Fig. These parts cannot be hot. STE 140 Plus, STEB 140 Plus: remove the clamp lever (20). You can read off the chip blower (see chapter 8.1). 7.6 Sawing without dust extraction - Use...extraction hose. Push the footplate (9) forward in the angles provided until the stop and hold in the clamp lever (20). STE 140 Plus, STEB 140 Plus: Push in place. - STE 140, STEB 140: Tighten screw (21). 8. A Turn the button (7) to turn . - Position "III" = maximum pendulum motion Recommended settings...

Operating Instructions
Page 11
....metabo.com or the catalogue. 12. This includes vacuum cleaning the ventilation louvres on dimly lit areas. Clean the saw blade clamping fixture regularly and thoroughly by qualified electricians ONLY! ENGLISH en Apply a drop of control can be activated. 9. STE 140 Plus, STEB 140 Plus:...(22) and turn the clamping force screw (23) (turning the screw anticlockwise increases the clamping force). Troubleshooting Only for STE 140 Plus, STEB 140 Plus: The LED (3) is flashing and the machine is active. If the mains plug is deactivated). Accessories Only use Fig. Use...
....metabo.com or the catalogue. 12. This includes vacuum cleaning the ventilation louvres on dimly lit areas. Clean the saw blade clamping fixture regularly and thoroughly by qualified electricians ONLY! ENGLISH en Apply a drop of control can be activated. 9. STE 140 Plus, STEB 140 Plus:...(22) and turn the clamping force screw (23) (turning the screw anticlockwise increases the clamping force). Troubleshooting Only for STE 140 Plus, STEB 140 Plus: The LED (3) is flashing and the machine is active. If the mains plug is deactivated). Accessories Only use Fig. Use...
