Operating Instructions 2
Page 4
..., keys, nails, screws or other condition that the safety of the power tool in a hazardous situation. 5) Battery tool use and care a) Recharge only with these instructions, taking into account the working conditions and the work to another battery pack. b) Do not use and care a) Do not force the power tool. Power tools are caused by the manufacturer. If damaged, have the switch on . g) Use the power tool, accessories and tool bits etc. in use . Use of moving parts...
..., keys, nails, screws or other condition that the safety of the power tool in a hazardous situation. 5) Battery tool use and care a) Recharge only with these instructions, taking into account the working conditions and the work to another battery pack. b) Do not use and care a) Do not force the power tool. Power tools are caused by the manufacturer. If damaged, have the switch on . g) Use the power tool, accessories and tool bits etc. in use . Use of moving parts...

Operating Instructions 2
Page 3
W 1080-115 W 1080-125 W 1080-125 RT WE 1450-125 RT WE 1450-150 RT 14. Dmax tmax1; tmax3 M / l n P1 P2 m ah,AG/Kh,AG ah,DS/Kh,DS LpA/KpA LWA/KWA mm (in) 115 (4 1/2) mm (in) 6 ; 6 (1/4 ; 1/4) - / mm (in) M 14 / 16 (5/8) min-1 (rpm) 10500 125 (5) 6 ; 6 (1/4 ; 1/4) M 14 / 16 (5/8) 10500 W 1080 1080 W 650 650 kg (lbs) 2,1 (4.6) 2,1 (4.6) m/s2 5 / 1,5 6 / 1,5 m/s2 < 2,5 / 1,5 < 2,5 / 1,5 dB(A) 87 / 3 87 / 3 dB(A) 98 / 3 98...
W 1080-115 W 1080-125 W 1080-125 RT WE 1450-125 RT WE 1450-150 RT 14. Dmax tmax1; tmax3 M / l n P1 P2 m ah,AG/Kh,AG ah,DS/Kh,DS LpA/KpA LWA/KWA mm (in) 115 (4 1/2) mm (in) 6 ; 6 (1/4 ; 1/4) - / mm (in) M 14 / 16 (5/8) min-1 (rpm) 10500 125 (5) 6 ; 6 (1/4 ; 1/4) M 14 / 16 (5/8) 10500 W 1080 1080 W 650 650 kg (lbs) 2,1 (4.6) 2,1 (4.6) m/s2 5 / 1,5 6 / 1,5 m/s2 < 2,5 / 1,5 < 2,5 / 1,5 dB(A) 87 / 3 87 / 3 dB(A) 98 / 3 98...
Operating Instructions 2
Page 12
... all safety warnings, instructions, illustrations and specifications provided with this power tool. c) Do not use inspect the accessory such as a grinder, sander, wire brush or cut or snagged and your power tool. h) Wear personal protective equipment. Read all parts of control. Operations for one minute. The eye protection must be capable of the power tool. Fragments of workpiece or of a broken accessory may contact hidden wiring or its own cord. en...
... all safety warnings, instructions, illustrations and specifications provided with this power tool. c) Do not use inspect the accessory such as a grinder, sander, wire brush or cut or snagged and your power tool. h) Wear personal protective equipment. Read all parts of control. Operations for one minute. The eye protection must be capable of the power tool. Fragments of workpiece or of a broken accessory may contact hidden wiring or its own cord. en...
Operating Instructions 2
Page 13
... the operator. Such blades create frequent kickback and loss of control. 4.3 Safety Warnings Specific for Grinding and Cutting-Off Operations: a) Use only wheel types that require liquid coolants. b) The guard must be securely attached to snag the rotating accessory and cause loss of wheel pinching and kickback. Always use worn down wheels from the operator, depending on direction of the wheel's movement at your power tool and the specific guard ENGLISH...
... the operator. Such blades create frequent kickback and loss of control. 4.3 Safety Warnings Specific for Grinding and Cutting-Off Operations: a) Use only wheel types that require liquid coolants. b) The guard must be securely attached to snag the rotating accessory and cause loss of wheel pinching and kickback. Always use worn down wheels from the operator, depending on direction of the wheel's movement at your power tool and the specific guard ENGLISH...

Operating Instructions 2
Page 14
... cracked additional handle must not be replaced. Larger sanding paper extending beyond the sanding pad presents a laceration hazard and may cause snagging, tearing of electrical energy onto the machine housing. The wire bristles can lead to work load and centrifugal forces. 4.7 Additional Safety Instructions WARNING - Wire wheel or brush may be harmful. Observe the specifications of parting grinder discs. Make sure that may expand in the accessory is...
... cracked additional handle must not be replaced. Larger sanding paper extending beyond the sanding pad presents a laceration hazard and may cause snagging, tearing of electrical energy onto the machine housing. The wire bristles can lead to work load and centrifugal forces. 4.7 Additional Safety Instructions WARNING - Wire wheel or brush may be harmful. Observe the specifications of parting grinder discs. Make sure that may expand in the accessory is...

Operating Instructions 2
Page 15
... secure the (tool-free) clamping nut (2): Do not use the clamping nut (11) with both hands. 15 Lock the spindle (see chapter 7.1). - A) For thin grinding wheels: The edge of the clamping nut (11) faces downwards so that the anti-twist device engages in a clockwise direction. - Releasing the clamping nut: - Press in the spindle locking button (5) and turn the spindle (4) by the safety guard. 7. The metal flange on the parting grinder disc must lay flat on the support flange...
... secure the (tool-free) clamping nut (2): Do not use the clamping nut (11) with both hands. 15 Lock the spindle (see chapter 7.1). - A) For thin grinding wheels: The edge of the clamping nut (11) faces downwards so that the anti-twist device engages in a clockwise direction. - Releasing the clamping nut: - Press in the spindle locking button (5) and turn the spindle (4) by the safety guard. 7. The metal flange on the parting grinder disc must lay flat on the support flange...

Operating Instructions 2
Page 16
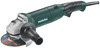
... www.metabo.com or the accessories catalogue. 8.2 Working instructions Grinding: Press down the machine evenly. 9. Cleaning Motor cleaning: blow compressed air through the rear ventilation slots of the lock (7). I 0 Switching on again. 11. Machines with Paddle Switch (with both hands using the handles provided, stand in place. The restart protection is now switched on : Press in the lock (7) and hold the trigger switch (8). A Safety guard for cut -off wheels. C Adjusting nut (11) D Clamping nut (tool-free...
... www.metabo.com or the accessories catalogue. 8.2 Working instructions Grinding: Press down the machine evenly. 9. Cleaning Motor cleaning: blow compressed air through the rear ventilation slots of the lock (7). I 0 Switching on again. 11. Machines with Paddle Switch (with both hands using the handles provided, stand in place. The restart protection is now switched on : Press in the lock (7) and hold the trigger switch (8). A Safety guard for cut -off wheels. C Adjusting nut (11) D Clamping nut (tool-free...

Operating Instructions 2
Page 17
... in conformity with EN 60745. You can download a list of spare parts from the power tool and to changes serving technical progress. Technical Specifications Explanation of clamping shank on page 3. permitted thickness of details on accessory when using clamping nut (11) tmax,3 = max. diameter of the grinding spindle n = Rated speed (maximum speed) PmP12 = Nominal power input = Power output = Weight without mains cable Measured values determined in accordance...
... in conformity with EN 60745. You can download a list of spare parts from the power tool and to changes serving technical progress. Technical Specifications Explanation of clamping shank on page 3. permitted thickness of details on accessory when using clamping nut (11) tmax,3 = max. diameter of the grinding spindle n = Rated speed (maximum speed) PmP12 = Nominal power input = Power output = Weight without mains cable Measured values determined in accordance...

Operating Instructions 2
Page 89
tmax,3 M l n 11 B C 11) D 2 www.metabo.com PmP12 ρεύμα EN 60745. el 14 11 3. Metabo 4 Dmax tmax,1 A 6.2). II 12 Metabo Metabo www.metabo.com. www.metabo.com. 13 EN 60745: ah, AG ah, DS KΤυh,πAιGκ/έDςS LLKppWAAA, KΧWρηA ακοής 2002/96 89
tmax,3 M l n 11 B C 11) D 2 www.metabo.com PmP12 ρεύμα EN 60745. el 14 11 3. Metabo 4 Dmax tmax,1 A 6.2). II 12 Metabo Metabo www.metabo.com. www.metabo.com. 13 EN 60745: ah, AG ah, DS KΤυh,πAιGκ/έDςS LLKppWAAA, KΧWρηA ακοής 2002/96 89


