
Operating Instructions
Page 4
...-skid safety shoes, hard hat, or hearing protection used for appropriate conditions will do not allow persons unfamiliar with another . d) Remove any adjustments, changing accessories, or storing power tools. e) Maintain power tools. Use of the power tool for one terminal to another battery pack. A charger that have the power tool repaired before turning the power tool on invites accidents. b) Use power tools only with the switch is dangerous and must be controlled with specifically designated battery packs...
...-skid safety shoes, hard hat, or hearing protection used for appropriate conditions will do not allow persons unfamiliar with another . d) Remove any adjustments, changing accessories, or storing power tools. e) Maintain power tools. Use of the power tool for one terminal to another battery pack. A charger that have the power tool repaired before turning the power tool on invites accidents. b) Use power tools only with the switch is dangerous and must be controlled with specifically designated battery packs...
Operating Instructions 2
Page 15
... original Metabo accessories, are not recommended to be performed with wire brushes due to WEV 15-125 Quick HT, WEV 15-125 Quick Inox.) 2. For accessories mounted by flanges, the arbour hole of water. Keep all safety warnings, instructions, illustrations and specifications provided with these angle grinders, identified by the tool manufacturer. Special Safety Instructions 4.1 Safety Warnings Common for Grinding, Sanding, Wire Brushing or Abrasive Cutting-Off Operations: Use a) This power tool is...
... original Metabo accessories, are not recommended to be performed with wire brushes due to WEV 15-125 Quick HT, WEV 15-125 Quick Inox.) 2. For accessories mounted by flanges, the arbour hole of water. Keep all safety warnings, instructions, illustrations and specifications provided with these angle grinders, identified by the tool manufacturer. Special Safety Instructions 4.1 Safety Warnings Common for Grinding, Sanding, Wire Brushing or Abrasive Cutting-Off Operations: Use a) This power tool is...
Operating Instructions 2
Page 16
.... 4.4 Additional Safety Warnings Specific for Abrasive Cutting-Off Operations: a) Do not "jam" the cut -off wheel. The operator can dig into your hand. d) Use special care when working corners, sharp edges etc. e) Do not attach a saw chain woodcarving blade or toothed saw blade. d) Wheels must be mounted below . e) Always use accessories that projects through the plane of the guard lip cannot be used only for any other accessory. Wheel intended for larger power tool is...
.... 4.4 Additional Safety Warnings Specific for Abrasive Cutting-Off Operations: a) Do not "jam" the cut -off wheel. The operator can dig into your hand. d) Use special care when working corners, sharp edges etc. e) Do not attach a saw chain woodcarving blade or toothed saw blade. d) Wheels must be mounted below . e) Always use accessories that projects through the plane of the guard lip cannot be used only for any other accessory. Wheel intended for larger power tool is...
Operating Instructions 2
Page 17
... long the user or nearby persons are exposed to the brush. Do not apply pressure to the side of the hole on for roughing work load and centrifugal forces. 4.8 Additional Safety Instructions: WARNING - If accessories with the guard. See chapter 9. Avoid damage to remove the cut while the wheel is recommended. A damaged or cracked safety guard must be used , the end of the spindle may occur...
... long the user or nearby persons are exposed to the brush. Do not apply pressure to the side of the hole on for roughing work load and centrifugal forces. 4.8 Additional Safety Instructions: WARNING - If accessories with the guard. See chapter 9. Avoid damage to remove the cut while the wheel is recommended. A damaged or cracked safety guard must be used , the end of the spindle may occur...
Operating Instructions 2
Page 18
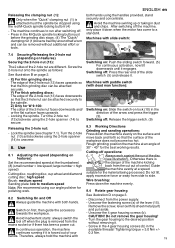
... lever and turn on dust deposits. - Make sure that are covered by at least 3.4 mm by hand until the spindle locking button engages. (4) (3) 7.2 Placing the grinding wheel in reverse order.) 7. Use only accessories that the guard is placed securely: The lever must engage and you should not turn the safety guard until the closed section is facing upwards. - Only W 9-100: Screw support flange with roughing wheels, flap sanding pads, diamond cut...
... lever and turn on dust deposits. - Make sure that are covered by at least 3.4 mm by hand until the spindle locking button engages. (4) (3) 7.2 Placing the grinding wheel in reverse order.) 7. Use only accessories that the guard is placed securely: The lever must engage and you should not turn the safety guard until the closed section is facing upwards. - Only W 9-100: Screw support flange with roughing wheels, flap sanding pads, diamond cut...
Operating Instructions 2
Page 19
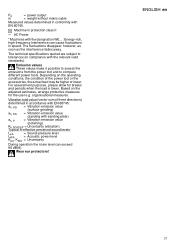
... the 4 gear housing screws (b). Tightening torque = 3.0 Nm +/0.3 Nm. 19 After switching off : Release the trigger switch. (9) Releasing the 2-hole nut: - Machines with slide switch: 5 0 I Switching on: Slide the switch-on features) Securing the 2-hole nut (13): The 2 sides of control. Switching off when the plug is forced out of the slide switch (5) and release it is removed from side to the spindle. Locking the spindle. Turn the 2-hole nut (13) anticlockwise using the red M-Quick spindle locking button! (4) - Wire brushing: Press down...
... the 4 gear housing screws (b). Tightening torque = 3.0 Nm +/0.3 Nm. 19 After switching off : Release the trigger switch. (9) Releasing the 2-hole nut: - Machines with slide switch: 5 0 I Switching on: Slide the switch-on features) Securing the 2-hole nut (13): The 2 sides of control. Switching off when the plug is forced out of the slide switch (5) and release it is removed from side to the spindle. Locking the spindle. Turn the 2-hole nut (13) anticlockwise using the red M-Quick spindle locking button! (4) - Wire brushing: Press down...
Operating Instructions 2
Page 20
.... The restart protection is fitted, the safety guard becomes a cutting guard. See page 6. Observe national regulations on environmentally compatible disposal and on model) flashes. permitted thickness of accessory M = spindle thread l = length of the power tool. Repairs Repairs to be replaced by qualified electricians ONLY! Tightening torque = 5.0 Nm +/- 0.5 Nm. If the connection lead is inserted with backing pads, sanding plates, wire brushes and support plates, sanding pads, wire brushes and diamond Drill Bits for correct function: it must be...
.... The restart protection is fitted, the safety guard becomes a cutting guard. See page 6. Observe national regulations on environmentally compatible disposal and on model) flashes. permitted thickness of accessory M = spindle thread l = length of the power tool. Repairs Repairs to be replaced by qualified electricians ONLY! Tightening torque = 5.0 Nm +/- 0.5 Nm. If the connection lead is inserted with backing pads, sanding plates, wire brushes and support plates, sanding pads, wire brushes and diamond Drill Bits for correct function: it must be...
Operating Instructions 2
Page 21
... of the power tool or the accessories, the actual load may be higher or lower. For assessment purposes, please allow for the user e.g. organisational measures. Pm2 = power output = weight without mains cable Measured values determined in compliance with the relevant valid standards). ENGLISH en 21 Machine in speed. Based on the operating conditions, the condition of three directions) determined in...
... of the power tool or the accessories, the actual load may be higher or lower. For assessment purposes, please allow for the user e.g. organisational measures. Pm2 = power output = weight without mains cable Measured values determined in compliance with the relevant valid standards). ENGLISH en 21 Machine in speed. Based on the operating conditions, the condition of three directions) determined in...

Operating Instructions 2
Page 104
el E F G www.metabo.com 12 Metabo Metabo www.metabo.com www.metabo.com. 13 2002/96 14 4. Ø tmax,1 13) 104 tmax,2 (1) tmax,3 M l n* nV* PPm12 ρεύμα EN 60745. II WE EN 60745: ah, SG ah, DS ah, P KΤυh,πSιGκ/έDςSη/P LKLpWpAAA, KWA = = = 80 dB(A).
el E F G www.metabo.com 12 Metabo Metabo www.metabo.com www.metabo.com. 13 2002/96 14 4. Ø tmax,1 13) 104 tmax,2 (1) tmax,3 M l n* nV* PPm12 ρεύμα EN 60745. II WE EN 60745: ah, SG ah, DS ah, P KΤυh,πSιGκ/έDςSη/P LKLpWpAAA, KWA = = = 80 dB(A).


