
Operating Instructions 2
Page 4
... protection used . d) Remove any adjustments, changing accessories, or storing power tools. Do not wear loose clothing or jewellery. Use of dust collection can reduce dustrelated hazards. 4) Power tool use the power tool if the switch does not turn it on . Any power tool that may create a risk of dust extraction and collection facilities, ensure these are easier to operate the power tool. c) Disconnect the plug from the power source and/or the battery pack...
... protection used . d) Remove any adjustments, changing accessories, or storing power tools. Do not wear loose clothing or jewellery. Use of dust collection can reduce dustrelated hazards. 4) Power tool use the power tool if the switch does not turn it on . Any power tool that may create a risk of dust extraction and collection facilities, ensure these are easier to operate the power tool. c) Disconnect the plug from the power source and/or the battery pack...
Operating Instructions 2
Page 3
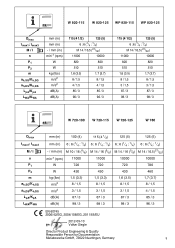
...mm (in) mm (in) - / mm (in ) min-1 (rpm) W W kg (lbs) m/s2 m/s2 dB(A) dB(A) 115 (4 1/2) 125 (5) 6 ; 6 (1/4 ; 1/4) M 14 / 16,5 (21/32) 11000 10000 820 820 510 510 1,6 (3.5) 1,7 (3.7) 8 / 1,5 8 / 1,5 4 / 1,5 4 / 1,5 85 / 3 85 / 3 96 / 3 96 / 3 115 (4 1/2) 125 (5) 6 ; 6 (1/4 ; 1/4) M 14 / 16,5 (21/32) 11000 10000 820 820 510 510 1,6 (3.5) 1,7 (3.7) 8 / 1,5 8 / 1,5 3 / 1,5 3 / 1,5 87 / 3 87 / 3 98 / 3 98 / ...Metabowerke GmbH, 72622 Nuertingen, Germany 3 W 720-100 W 720-115 W 720-125 W 780 Dmax tmax1; 13. W 820-115 W 820-125 WP 820-115 WP 820-125 Dmax tmax1;
...mm (in) mm (in) - / mm (in ) min-1 (rpm) W W kg (lbs) m/s2 m/s2 dB(A) dB(A) 115 (4 1/2) 125 (5) 6 ; 6 (1/4 ; 1/4) M 14 / 16,5 (21/32) 11000 10000 820 820 510 510 1,6 (3.5) 1,7 (3.7) 8 / 1,5 8 / 1,5 4 / 1,5 4 / 1,5 85 / 3 85 / 3 96 / 3 96 / 3 115 (4 1/2) 125 (5) 6 ; 6 (1/4 ; 1/4) M 14 / 16,5 (21/32) 11000 10000 820 820 510 510 1,6 (3.5) 1,7 (3.7) 8 / 1,5 8 / 1,5 3 / 1,5 3 / 1,5 87 / 3 87 / 3 98 / 3 98 / ...Metabowerke GmbH, 72622 Nuertingen, Germany 3 W 720-100 W 720-115 W 720-125 W 780 Dmax tmax1; 13. W 820-115 W 820-125 WP 820-115 WP 820-125 Dmax tmax1;
Operating Instructions 2
Page 11
... accessory must be at maximum no-load speed for future reference. General Safety Instructions For your electrical tool, pay attention to all safety warnings, instructions, illustrations and specifications provided with these angle grinders conform to function as a grinder, sander, wire brush or cut or snagged and your control. 11 g) Do not use face shield, safety goggles or safety glasses. Pass on application, use a damaged accessory. Special Safety Instructions 4.1 Safety Warnings Common for the protection of stopping...
... accessory must be at maximum no-load speed for future reference. General Safety Instructions For your electrical tool, pay attention to all safety warnings, instructions, illustrations and specifications provided with these angle grinders conform to function as a grinder, sander, wire brush or cut or snagged and your control. 11 g) Do not use face shield, safety goggles or safety glasses. Pass on application, use a damaged accessory. Special Safety Instructions 4.1 Safety Warnings Common for the protection of stopping...
Operating Instructions 2
Page 12
... in direction opposite to the wheel's movement at the point of control. 4.3 Safety Warnings Specific for peripheral grinding, side forces applied to a complete stop. Supports must be placed under these materials. n) Regularly clean the power tool's air vents. Abrasive wheels may cause them to make an excessive depth of cut for your hand. The operator can be forced in motion otherwise kickback may cause electrical...
... in direction opposite to the wheel's movement at the point of control. 4.3 Safety Warnings Specific for peripheral grinding, side forces applied to a complete stop. Supports must be placed under these materials. n) Regularly clean the power tool's air vents. Abrasive wheels may cause them to make an excessive depth of cut for your hand. The operator can be forced in motion otherwise kickback may cause electrical...
Operating Instructions 2
Page 13
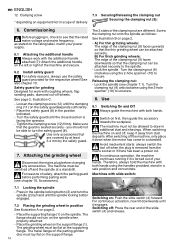
... additional handle must lay flat and be held firmly. Overview See page 2. 1 Support flange 2 Spindle 3 Spindle locking button 4 Sliding on/off switch * 5 Trigger * 6 Switch-on cleaning the motor. The wire bristles can lead to remove dust, first disconnect the power tool from grease or impacts! Always wear protective goggles. using our angle polisher for roughing work . 5. During machining, of metals in dusty conditions, ensure that may not touch the base of electrical...
... additional handle must lay flat and be held firmly. Overview See page 2. 1 Support flange 2 Spindle 3 Spindle locking button 4 Sliding on/off switch * 5 Trigger * 6 Switch-on cleaning the motor. The wire bristles can lead to remove dust, first disconnect the power tool from grease or impacts! Always wear protective goggles. using our angle polisher for roughing work . 5. During machining, of metals in dusty conditions, ensure that may not touch the base of electrical...
Operating Instructions 2
Page 14
... power supply. 6.1 Attaching the additional handle Always work with the additional handle attached (7)! Lock the spindle. Turn the clamping nut (9) anticlockwise using the 2-hole spanner (10) to the spindle. - Use 8.1 Switching On and Off Always guide the machine with roughing wheels, flap sanding pads, diamond cut . Attach the additional handle on the left or right of safety, attach the parting guard before changing any accessories. Safety guard for grinding Designed for the respective wheel! Screw the clamping nut onto the spindle...
... power supply. 6.1 Attaching the additional handle Always work with the additional handle attached (7)! Lock the spindle. Turn the clamping nut (9) anticlockwise using the 2-hole spanner (10) to the spindle. - Use 8.1 Switching On and Off Always guide the machine with roughing wheels, flap sanding pads, diamond cut . Attach the additional handle on the left or right of safety, attach the parting guard before changing any accessories. Safety guard for grinding Designed for the respective wheel! Screw the clamping nut onto the spindle...
Operating Instructions 2
Page 15
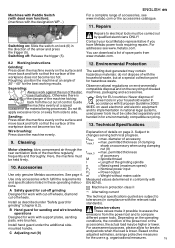
... of control. Accessories Use only genuine Metabo accessories. See page 4. B Hand guard for sanding and wire brushing operations Designed for work with support plates, sanding pads, wire brushes. ~ Alternating current The technical specifications quoted are subject to tolerances (in your local Metabo representative if you have Metabo power tools requiring repairs. Repairs Repairs to compare different power tools. Separating: Always work with cut-off wheels, diamond cut-off wheels. Do not tilt, apply excessive force or sway from www.metabo.com. 8.2 Working instructions Grinding...
... of control. Accessories Use only genuine Metabo accessories. See page 4. B Hand guard for sanding and wire brushing operations Designed for work with support plates, sanding pads, wire brushes. ~ Alternating current The technical specifications quoted are subject to tolerances (in your local Metabo representative if you have Metabo power tools requiring repairs. Repairs Repairs to compare different power tools. Separating: Always work with cut-off wheels, diamond cut-off wheels. Do not tilt, apply excessive force or sway from www.metabo.com. 8.2 Working instructions Grinding...

Operating Instructions 2
Page 16
en ENGLISH Vibration total value (vector sum of three directions) determined in accordance with EN 60745: ah, SG = Vibration emission value (surface grinding) ah, DS = Vibration emission value (disc sanding) Kh,SG/DS = Uncertainty (vibration) Typical A-effective perceived sound levels: LKLpWpAAA, = Sound pressure level = Acoustic power level KWA= Uncertainty Wear ear protectors! 16
en ENGLISH Vibration total value (vector sum of three directions) determined in accordance with EN 60745: ah, SG = Vibration emission value (surface grinding) ah, DS = Vibration emission value (disc sanding) Kh,SG/DS = Uncertainty (vibration) Typical A-effective perceived sound levels: LKLpWpAAA, = Sound pressure level = Acoustic power level KWA= Uncertainty Wear ear protectors! 16
Operating Instructions 2
Page 82
Dmax tmax,1 9) I 0 el 4 Totmann WP...) 56 6 5 5 A 6.2). B C 9 www.metabo.com 11 8.2 30° - 40 9 10 Metabo 4 82 Metabo Metabo www.metabo.com www.metabo.com. 12 2002/96 13 3.
Dmax tmax,1 9) I 0 el 4 Totmann WP...) 56 6 5 5 A 6.2). B C 9 www.metabo.com 11 8.2 30° - 40 9 10 Metabo 4 82 Metabo Metabo www.metabo.com www.metabo.com. 12 2002/96 13 3.


