
Operating manual
Page 1
US, CA M.-Nr. 07 658 660 en - Operating instructions Rotary Iron B 990 To prevent accidents and machine damage, read these instructions before Installation or use.
US, CA M.-Nr. 07 658 660 en - Operating instructions Rotary Iron B 990 To prevent accidents and machine damage, read these instructions before Installation or use.

Operating manual
Page 2
... Guide to the Rotary Iron 6 Moving the appliance 8 Transport strut 8 Before using for the first time 10 Power cord 10 Dust cover 10 Before ironing 12 Preparing the work area 12 Preparing the laundry 13 Testing the finger guard 14 Ironing 15 Turning on and off 15 Selecting the ironing temperature 15 Selecting... bedspreads 21 Pillow cases 21 Duvet covers 22 Shirts 23 Pants 25 Skirts 25 Cleaning and Care 26 Washing or replacing the iron cover 26 Frequently asked questions 30 After sales service 31 Electrical connection 32 Technical data 33 Help protect our environment 34 2
... Guide to the Rotary Iron 6 Moving the appliance 8 Transport strut 8 Before using for the first time 10 Power cord 10 Dust cover 10 Before ironing 12 Preparing the work area 12 Preparing the laundry 13 Testing the finger guard 14 Ironing 15 Turning on and off 15 Selecting the ironing temperature 15 Selecting... bedspreads 21 Pillow cases 21 Duvet covers 22 Shirts 23 Pants 25 Skirts 25 Cleaning and Care 26 Washing or replacing the iron cover 26 Frequently asked questions 30 After sales service 31 Electrical connection 32 Technical data 33 Help protect our environment 34 2
Operating manual
Page 3
...house checked by a Miele authorized service technician in a safe place for reference, and pass them on to prevent accidents and machine damage. Keep these instructions in accordance with the appliance should be dangerous and may void the warranty. ~ Before setting up the rotary iron, check for any... future user. Turn off the rotary iron, unplug from the wall outlet and call Technical Service. ~ If the power cord is dangerous. Please read ...
...house checked by a Miele authorized service technician in a safe place for reference, and pass them on to prevent accidents and machine damage. Keep these instructions in accordance with the appliance should be dangerous and may void the warranty. ~ Before setting up the rotary iron, check for any... future user. Turn off the rotary iron, unplug from the wall outlet and call Technical Service. ~ If the power cord is dangerous. Please read ...
Operating manual
Page 4
...Do not use an extension cord to connect this appliance to operate it themselves. ~ When the rotary iron is heated there is heated. Please contact the nearest Miele Dealer or Miele Technical Service with these applications. IMPORTANT SAFETY INSTRUCTIONS ~ Before connecting the appliance, ensure that it...certain circumstances it is a danger of the appliance. ~ Only operate the rotary iron when all jewelry and tie back long hair before ironing. ~ Never allow children to play on or near the rotary iron or to electricity. Extension cords do not guarantee the required safety of loose...
...Do not use an extension cord to connect this appliance to operate it themselves. ~ When the rotary iron is heated there is heated. Please contact the nearest Miele Dealer or Miele Technical Service with these applications. IMPORTANT SAFETY INSTRUCTIONS ~ Before connecting the appliance, ensure that it...certain circumstances it is a danger of the appliance. ~ Only operate the rotary iron when all jewelry and tie back long hair before ironing. ~ Never allow children to play on or near the rotary iron or to electricity. Extension cords do not guarantee the required safety of loose...

Operating manual
Page 5
Accessories ~ Accessories should only be void. This could tip over the rotary iron. ~ Turn the appliance off before removing the plug from the electrical outlet. ~ Pull only on the plug and not on the bar when it back ... plate when it is swung out. Swing it is heated. IMPORTANT SAFETY INSTRUCTIONS ~ The swing out bar is only to be used if approved by Miele.
Accessories ~ Accessories should only be void. This could tip over the rotary iron. ~ Turn the appliance off before removing the plug from the electrical outlet. ~ Pull only on the plug and not on the bar when it back ... plate when it is swung out. Swing it is heated. IMPORTANT SAFETY INSTRUCTIONS ~ The swing out bar is only to be used if approved by Miele.
Operating manual
Page 6
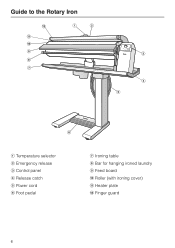
Guide to the Rotary Iron l k j i h g a b c d e f a Temperature selector b Emergency release c Control panel d Release catch e Power cord f Foot pedal g Ironing table h Bar for hanging ironed laundry i Feed board j Roller (with ironing cover) k Heater plate l Finger guard 6
Guide to the Rotary Iron l k j i h g a b c d e f a Temperature selector b Emergency release c Control panel d Release catch e Power cord f Foot pedal g Ironing table h Bar for hanging ironed laundry i Feed board j Roller (with ironing cover) k Heater plate l Finger guard 6
Operating manual
Page 7
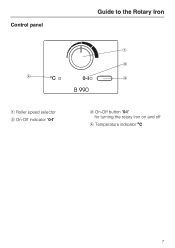
Control panel d a Roller speed selector b On-Off indicator "0-I" Guide to the Rotary Iron a b c c On-Off button "0-I" for turning the rotary iron on and off d Temperature indicator oC 7
Control panel d a Roller speed selector b On-Off indicator "0-I" Guide to the Rotary Iron a b c c On-Off button "0-I" for turning the rotary iron on and off d Temperature indicator oC 7

Operating manual
Page 8
...appliance. If the transport strut is in place, only transport the rotary iron in a safe place. The rotary iron can be moved again (e.g. when moving to move it. Moving the appliance Transport strut Moving the appliance The rotary iron has four rollers. ^ Pull the transport strut out (see ...illustration). To steer and to be moved either when assembled or folded. 8 Keep the transport strut in a folded position. ^ Hold the rotary iron with the ironing table and push or pull ...
...appliance. If the transport strut is in place, only transport the rotary iron in a safe place. The rotary iron can be moved again (e.g. when moving to move it. Moving the appliance Transport strut Moving the appliance The rotary iron has four rollers. ^ Pull the transport strut out (see ...illustration). To steer and to be moved either when assembled or folded. 8 Keep the transport strut in a folded position. ^ Hold the rotary iron with the ironing table and push or pull ...
Operating manual
Page 9
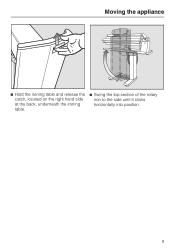
Moving the appliance ^ Hold the ironing table and release the catch, located on the right hand side at the back, underneath the ironing table. ^ Swing the top section of the rotary iron to the side until it clicks horizontally into position. 9
Moving the appliance ^ Hold the ironing table and release the catch, located on the right hand side at the back, underneath the ironing table. ^ Swing the top section of the rotary iron to the side until it clicks horizontally into position. 9

Operating manual
Page 12
... laundry if necessary. 12 Place close by: - Small items can be sure to secure the appliance so that it does not roll. When positioning the rotary iron horizontally be hung over the swing out bar. Shirts, overalls, blouses, etc., should be hung on , are useful. a surface for...
... laundry if necessary. 12 Place close by: - Small items can be sure to secure the appliance so that it does not roll. When positioning the rotary iron horizontally be hung over the swing out bar. Shirts, overalls, blouses, etc., should be hung on , are useful. a surface for...
Operating manual
Page 13
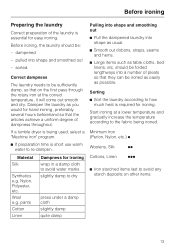
... dampness The laundry needs to the fabric being used, select a "Machine iron" program. ^ If preparation time is short use warm water to avoid any starch deposits on the first pass through the rotary iron at a lower temperature and gradually increase the temperature according to be sufficiently... damp, so that they can be : - Nylon, Polyester, etc. Minimum Iron (Perlon, Nylon, etc.) ß Woolens, Silk ßß...
... dampness The laundry needs to the fabric being used, select a "Machine iron" program. ^ If preparation time is short use warm water to avoid any starch deposits on the first pass through the rotary iron at a lower temperature and gradually increase the temperature according to be sufficiently... damp, so that they can be : - Nylon, Polyester, etc. Minimum Iron (Perlon, Nylon, etc.) ß Woolens, Silk ßß...
Operating manual
Page 14
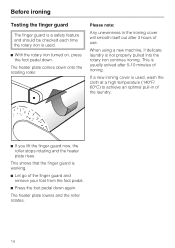
The heater plate comes down again. If a new ironing cover is used . ^ With the rotary iron turned on, press the foot pedal down. This shows that the finger guard is not properly pulled into the rotary iron continue ironing. The heater plate lowers and the roller rotates. 14 This is used , ...176;F/ 60°C) to achieve an optimal pull-in the ironing cover will smooth itself out after 5-10 minutes of ironing. Before ironing Testing the finger guard The finger guard is a safety feature and should be checked each time the rotary iron is usually solved after 3 hours of use. When using...
The heater plate comes down again. If a new ironing cover is used . ^ With the rotary iron turned on, press the foot pedal down. This shows that the finger guard is not properly pulled into the rotary iron continue ironing. The heater plate lowers and the roller rotates. 14 This is used , ...176;F/ 60°C) to achieve an optimal pull-in the ironing cover will smooth itself out after 5-10 minutes of ironing. Before ironing Testing the finger guard The finger guard is a safety feature and should be checked each time the rotary iron is usually solved after 3 hours of use. When using...

Operating manual
Page 15
... by dots on the ring around the temperature selector. The indicator light goes out. 15 To turn off with the international fabric care symbols for ironing. Ironing Turning on and off The rotary iron is turned on and off ^ Press and release the button. These correspond with the "0-I Temperature range cool...
... by dots on the ring around the temperature selector. The indicator light goes out. 15 To turn off with the international fabric care symbols for ironing. Ironing Turning on and off The rotary iron is turned on and off ^ Press and release the button. These correspond with the "0-I Temperature range cool...

Operating manual
Page 16
... the ßß Woolens setting. A lower roller speed makes it easier to get them smooth and dry. handkerchiefs can be ironed at a higher roller speed. Selecting the roller speed There are 5 roller speed settings, from low (approximately 6.5 ft/min.[2 m/min]) to the desired ... However, if there is reached. The temperature "C°" indicator will go out when the temperature selected is more cotton than one pass through the rotary iron to iron complicated articles such as shirts and blouses. Do not use the cotton setting. ^ Set the roller speed selector to high 15 ft/min. [4.5 ...
... the ßß Woolens setting. A lower roller speed makes it easier to get them smooth and dry. handkerchiefs can be ironed at a higher roller speed. Selecting the roller speed There are 5 roller speed settings, from low (approximately 6.5 ft/min.[2 m/min]) to the desired ... However, if there is reached. The temperature "C°" indicator will go out when the temperature selected is more cotton than one pass through the rotary iron to iron complicated articles such as shirts and blouses. Do not use the cotton setting. ^ Set the roller speed selector to high 15 ft/min. [4.5 ...
Operating manual
Page 18
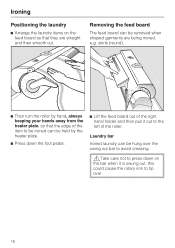
... left of the roller. Removing the feed board The feed board can be removed when shaped garments are straight and then smooth out. Laundry bar Ironed laundry can be hung over the swing out bar to avoid creasing. ,Take care not to press down the foot pedal. ^ Lift the feed board... down on the feed board so that the edge of the right hand holder and then pull it is swung out, this could cause the rotary iron to be ironed can be held by hand, always keeping your hands away from the heater plate, so that they are being...
... left of the roller. Removing the feed board The feed board can be removed when shaped garments are straight and then smooth out. Laundry bar Ironed laundry can be hung over the swing out bar to avoid creasing. ,Take care not to press down the foot pedal. ^ Lift the feed board... down on the feed board so that the edge of the right hand holder and then pull it is swung out, this could cause the rotary iron to be ironed can be held by hand, always keeping your hands away from the heater plate, so that they are being...
Operating manual
Page 19
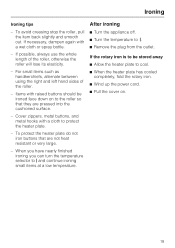
..., alternate between using the right and left hand sides of the roller, otherwise the roller will lose its elasticity. - When you have nearly finished ironing you can turn the temperature selector to g. ^ Remove the plug from the outlet. If possible, always use the whole length of the roller. ... Allow the heater plate to cool. ^ When the heater plate has cooled completely, fold the rotary iron. ^ Wind up the power cord. ^ Pull the cover on to be ironed face down on . 19 If the rotary iron is to the roller so that are pressed into the cushioned surface. - If necessary, dampen again...
..., alternate between using the right and left hand sides of the roller, otherwise the roller will lose its elasticity. - When you have nearly finished ironing you can turn the temperature selector to g. ^ Remove the plug from the outlet. If possible, always use the whole length of the roller. ... Allow the heater plate to cool. ^ When the heater plate has cooled completely, fold the rotary iron. ^ Wind up the power cord. ^ Pull the cover on to be ironed face down on . 19 If the rotary iron is to the roller so that are pressed into the cushioned surface. - If necessary, dampen again...

Operating manual
Page 20
If there is a power failure when the rotary iron is reduced and the item can be held there possibly becoming scorched. ^ Pull the emergency release lever up . The item being ironed will stay on ) push the emergency release lever back down. The pressure is in use, the heater plate will be removed. When power has been restored (the On/Off indicator comes on the roller. Continue ironing as usual. 20 Ironing Power failure To free the trapped item In the event of a power failure, pull the emergency release lever up .
If there is a power failure when the rotary iron is reduced and the item can be held there possibly becoming scorched. ^ Pull the emergency release lever up . The item being ironed will stay on ) push the emergency release lever back down. The pressure is in use, the heater plate will be removed. When power has been restored (the On/Off indicator comes on the roller. Continue ironing as usual. 20 Ironing Power failure To free the trapped item In the event of a power failure, pull the emergency release lever up .
Operating manual
Page 21
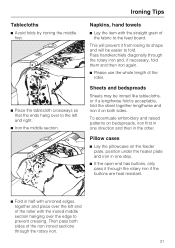
... ends hang over the left and right. ^ Iron the middle section. Pass handkerchiefs diagonally through the rotary iron and, if necessary, fold them and then iron again. ^ Please use the whole length of the non ironed sections through the rotary iron if the buttons are heat resistant. ^ Fold in... the other. This will be ironed like tablecloths, or if a ...
... ends hang over the left and right. ^ Iron the middle section. Pass handkerchiefs diagonally through the rotary iron and, if necessary, fold them and then iron again. ^ Please use the whole length of the non ironed sections through the rotary iron if the buttons are heat resistant. ^ Fold in... the other. This will be ironed like tablecloths, or if a ...
Operating manual
Page 22
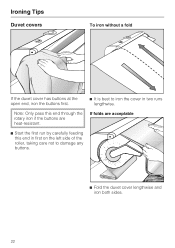
Ironing Tips Duvet covers To iron without a fold If the duvet cover has buttons at the open end, iron the buttons first. ^ It is best to iron the cover in first on the left side of the roller, taking care not to damage any buttons. ^ Fold the duvet cover lengthwise and iron both sides. 22 Note: Only pass this end in two runs lengthwise. If folds are acceptable ^ Start the first run by carefully feeding this end through the rotary iron if the buttons are heat-resistant.
Ironing Tips Duvet covers To iron without a fold If the duvet cover has buttons at the open end, iron the buttons first. ^ It is best to iron the cover in first on the left side of the roller, taking care not to damage any buttons. ^ Fold the duvet cover lengthwise and iron both sides. 22 Note: Only pass this end in two runs lengthwise. If folds are acceptable ^ Start the first run by carefully feeding this end through the rotary iron if the buttons are heat-resistant.
Operating manual
Page 28
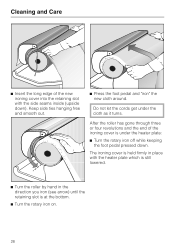
.... ^ Turn the roller by hand in place with the side seams inside (upside down . The ironing cover is held firmly in the direction you iron (see arrow) until the retaining slot is at the bottom. ^ Turn the rotary iron on. 28 Keep side ties hanging free and smooth out. ^ Press the foot pedal and... "iron" the new cloth around. Cleaning and Care ^ Insert the long edge of the ironing cover is under the cloth as it turns. Do not let...
.... ^ Turn the roller by hand in place with the side seams inside (upside down . The ironing cover is held firmly in the direction you iron (see arrow) until the retaining slot is at the bottom. ^ Turn the rotary iron on. 28 Keep side ties hanging free and smooth out. ^ Press the foot pedal and... "iron" the new cloth around. Cleaning and Care ^ Insert the long edge of the ironing cover is under the cloth as it turns. Do not let...


