
Operating manual
Page 2
...the Rotary Iron 6 Moving the appliance 8 Transport strut 8 Before using for the first time 10 Power cord 10 Dust cover 10 Before ironing 12 Preparing the work area 12 Preparing the laundry 13 Testing the finger guard 14 Ironing 15 Turning on and off 15 Selecting the ironing temperature... 15 Selecting the roller speed 16 Ironing 17 Positioning the laundry 18 Removing the feed board 18 After ironing 19 Power failure 20 Ironing Tips 21 Tablecloths 21 Napkins, hand towels...
...the Rotary Iron 6 Moving the appliance 8 Transport strut 8 Before using for the first time 10 Power cord 10 Dust cover 10 Before ironing 12 Preparing the work area 12 Preparing the laundry 13 Testing the finger guard 14 Ironing 15 Turning on and off 15 Selecting the ironing temperature... 15 Selecting the roller speed 16 Ironing 17 Positioning the laundry 18 Removing the feed board 18 After ironing 19 Power failure 20 Ironing Tips 21 Tablecloths 21 Napkins, hand towels...
Operating manual
Page 6
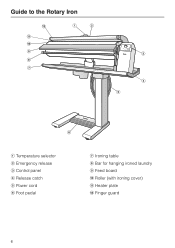
Guide to the Rotary Iron l k j i h g a b c d e f a Temperature selector b Emergency release c Control panel d Release catch e Power cord f Foot pedal g Ironing table h Bar for hanging ironed laundry i Feed board j Roller (with ironing cover) k Heater plate l Finger guard 6
Guide to the Rotary Iron l k j i h g a b c d e f a Temperature selector b Emergency release c Control panel d Release catch e Power cord f Foot pedal g Ironing table h Bar for hanging ironed laundry i Feed board j Roller (with ironing cover) k Heater plate l Finger guard 6
Operating manual
Page 18
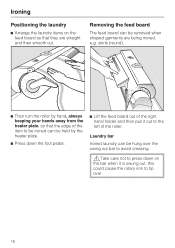
Removing the feed board The feed board can be hung over the swing out bar to avoid creasing. ,Take care not to press down the foot pedal. ^ Lift the feed board out of the right hand holder and then pull it is swung out, this could cause the rotary iron to the left of the item... to be ironed can be held by hand, always keeping your hands away from the heater...
Removing the feed board The feed board can be hung over the swing out bar to avoid creasing. ,Take care not to press down the foot pedal. ^ Lift the feed board out of the right hand holder and then pull it is swung out, this could cause the rotary iron to the left of the item... to be ironed can be held by hand, always keeping your hands away from the heater...
Operating manual
Page 21
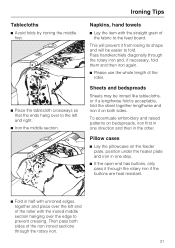
...the straight grain of the fabric to the feed board. Pass handkerchiefs diagonally through the rotary iron. 21 To accentuate embroidery and raised patterns on bedspreads, iron first in one step. ^ If the open end has buttons, only pass it through the rotary iron if the buttons are heat resistant. ^ Fold...place over the edge to prevent creasing. Pillow cases ^ Lay the pillowcase on both sides of the non ironed sections through the rotary iron and, if necessary, fold them and then iron again. ^ Please use the whole length of the roller. Then pass both sides. Sheets and bedspreads ...
...the straight grain of the fabric to the feed board. Pass handkerchiefs diagonally through the rotary iron. 21 To accentuate embroidery and raised patterns on bedspreads, iron first in one step. ^ If the open end has buttons, only pass it through the rotary iron if the buttons are heat resistant. ^ Fold...place over the edge to prevent creasing. Pillow cases ^ Lay the pillowcase on both sides of the non ironed sections through the rotary iron and, if necessary, fold them and then iron again. ^ Please use the whole length of the roller. Then pass both sides. Sheets and bedspreads ...
Operating manual
Page 29
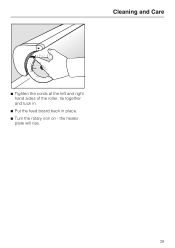
the heater plate will rise. 29 Cleaning and Care ^ Tighten the cords at the left and right hand sides of the roller, tie together and tuck in. ^ Put the feed board back in place. ^ Turn the rotary iron on -
the heater plate will rise. 29 Cleaning and Care ^ Tighten the cords at the left and right hand sides of the roller, tie together and tuck in. ^ Put the feed board back in place. ^ Turn the rotary iron on -

