Operating instructions/Installation instructions
Page 2
Vacuum Cleaners USA 24 2 en - Contents IMPORTANT SAFETY INSTRUCTIONS 3 Appliance description 10 Caring for the environment 12 References to illustrations 13 Electrobrush operating instructions 13 Preparing for use 13 Use...15 Parking, transport and storage 16 Maintenance ...17 Emptying the dust container 17 Cleaning the dust container 17 Cleaning the filter frame 17 Cleaning the fine dust filter 18 Starting the ComfortClean self-cleaning function manually 18 When to change the...
Vacuum Cleaners USA 24 2 en - Contents IMPORTANT SAFETY INSTRUCTIONS 3 Appliance description 10 Caring for the environment 12 References to illustrations 13 Electrobrush operating instructions 13 Preparing for use 13 Use...15 Parking, transport and storage 16 Maintenance ...17 Emptying the dust container 17 Cleaning the dust container 17 Cleaning the filter frame 17 Cleaning the fine dust filter 18 Starting the ComfortClean self-cleaning function manually 18 When to change the...
Operating instructions/Installation instructions
Page 6
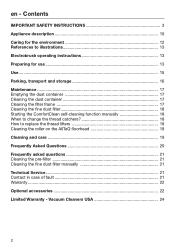
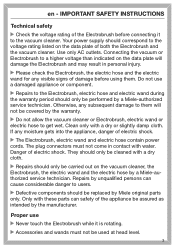
... not use the vacuum cleaner if the power cord is damaged it get pinched, for example, under a door. Please make sure that you keep your hand in particular fine dust, e.g. If the power cord is damaged. Repairs and other work by unqualified persons can the manufacturer guarantee the safety of the appliance. 6 For safety reasons this metal strip during vacuuming. Repairs should be released...
... not use the vacuum cleaner if the power cord is damaged it get pinched, for example, under a door. Please make sure that you keep your hand in particular fine dust, e.g. If the power cord is damaged. Repairs and other work by unqualified persons can the manufacturer guarantee the safety of the appliance. 6 For safety reasons this metal strip during vacuuming. Repairs should be released...
Operating instructions/Installation instructions
Page 7
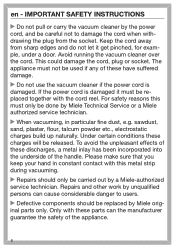
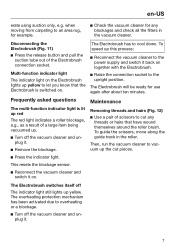
... the fine dust filter. Dust container / fine dust container: only clean these parts under running cold water. Do not use any sharp or pointed objects and do not clean the inside of liquid dish soap, then dry carefully. - IMPORTANT SAFETY INSTRUCTIONS Cleaning Do not let the vacuum cleaner, the Electrobrush, the telescopic wand and the suction hose get wet. The Electrobrush, telescopic wand and suction hose contain electrical wires. damp cleaning of 24...
... the fine dust filter. Dust container / fine dust container: only clean these parts under running cold water. Do not use any sharp or pointed objects and do not clean the inside of liquid dish soap, then dry carefully. - IMPORTANT SAFETY INSTRUCTIONS Cleaning Do not let the vacuum cleaner, the Electrobrush, the telescopic wand and the suction hose get wet. The Electrobrush, telescopic wand and suction hose contain electrical wires. damp cleaning of 24...
Operating instructions/Installation instructions
Page 11
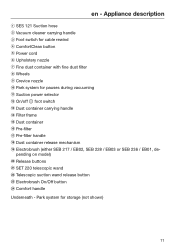
...; foot switch m Dust container carrying handle n Filter frame o Dust container p Pre-filter q Pre-filter handle r Dust container release mechanism s Electrobrush (either SEB 217 / EB02, SEB 228 / EB03 or SEB 236 / EB01, de- pending on model) t Release buttons u SET 220 telescopic wand v Telescopic suction wand release button w Electrobrush On/Off button x Comfort handle Underneath - en - Appliance description a SES 121 Suction hose b Vacuum cleaner carrying handle c Foot switch for cable rewind d ComfortClean button e Power cord f Upholstery nozzle g Fine dust container with fine dust filter...
...; foot switch m Dust container carrying handle n Filter frame o Dust container p Pre-filter q Pre-filter handle r Dust container release mechanism s Electrobrush (either SEB 217 / EB02, SEB 228 / EB03 or SEB 236 / EB01, de- pending on model) t Release buttons u SET 220 telescopic wand v Telescopic suction wand release button w Electrobrush On/Off button x Comfort handle Underneath - en - Appliance description a SES 121 Suction hose b Vacuum cleaner carrying handle c Foot switch for cable rewind d ComfortClean button e Power cord f Upholstery nozzle g Fine dust container with fine dust filter...
Operating instructions/Installation instructions
Page 13
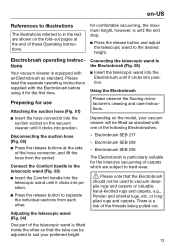
... following Electrobrushes. Electrobrush operating instructions Your vacuum cleaner is a risk of these Operating Instructions. Preparing for use Attaching the suction hose (Fig. 01) Insert the hose connector into the suction socket on the model, your preferred height 13 Connect the Comfort handle to the telescopic wand (Fig. 03) Insert the Comfort handle into the telescopic wand until the end stop. Press the release button and adjust the...
... following Electrobrushes. Electrobrush operating instructions Your vacuum cleaner is a risk of these Operating Instructions. Preparing for use Attaching the suction hose (Fig. 01) Insert the hose connector into the suction socket on the model, your preferred height 13 Connect the Comfort handle to the telescopic wand (Fig. 03) Insert the Comfort handle into the telescopic wand until the end stop. Press the release button and adjust the...
Operating instructions/Installation instructions
Page 14
... detach these parts from each other, press the release button and pull the telescopic wand out of the suction nozzle, twisting it clicks into contact with the brush protruding: Press the foot switch . The floorhead can be sure to scratching, and flooring with the brush retracted: 14 Press the foot switch . The head can be used for cleaning hard flooring which...
... detach these parts from each other, press the release button and pull the telescopic wand out of the suction nozzle, twisting it clicks into contact with the brush protruding: Press the foot switch . The floorhead can be sure to scratching, and flooring with the brush retracted: 14 Press the foot switch . The head can be used for cleaning hard flooring which...
Operating instructions/Installation instructions
Page 15
... cord. Turning the vacuum cleaner on the cord rewind foot switch. Do not pull or carry by pulling the cord. Do not unplug by the cord, use the settings are suitable for. 15 Selecting the suction power The suction power can deactivate this , take hold of the end of the cord while rewinding it and give it to get into the electrical socket. If vacuuming for quickly vacuuming smooth hard floors...
... cord. Turning the vacuum cleaner on the cord rewind foot switch. Do not pull or carry by pulling the cord. Do not unplug by the cord, use the settings are suitable for. 15 Selecting the suction power The suction power can deactivate this , take hold of the end of the cord while rewinding it and give it to get into the electrical socket. If vacuuming for quickly vacuuming smooth hard floors...
Operating instructions/Installation instructions
Page 16
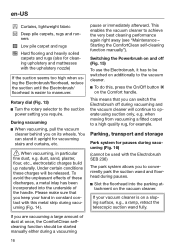
... used with the upholstery nozzle) If the suction seems too high when using suction only, e.g. pause or immediately afterward. Starting the ComfortClean self-cleaning function manually"). If your hand in particular fine dust, e.g. If you keep your vacuum cleaner is easier to the vacuum cleaner. To do this metal strip during a vacuuming 16 You can switch the Electrobrush off (Fig. 15) To use the Electrobrush, it upright for vacuuming...
... used with the upholstery nozzle) If the suction seems too high when using suction only, e.g. pause or immediately afterward. Starting the ComfortClean self-cleaning function manually"). If your hand in particular fine dust, e.g. If you keep your vacuum cleaner is easier to the vacuum cleaner. To do this metal strip during a vacuuming 16 You can switch the Electrobrush off (Fig. 15) To use the Electrobrush, it upright for vacuuming...
Operating instructions/Installation instructions
Page 17
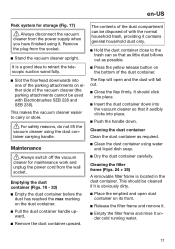
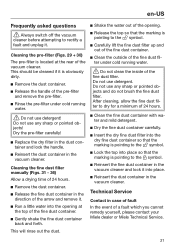
...; Clean the dust container using the dust container carrying handle. Maintenance Always switch off the vacuum cleaner for storage (Fig. 17) Always disconnect the vacuum cleaner from the power supply when you have finished using it audibly clicks into one of the parking attachments on the dust container. Pull the dust container handle upward. Remove the dust container upward. Cleaning the filter frame (Figs. 24 + 25) A removable filter frame...
...; Clean the dust container using the dust container carrying handle. Maintenance Always switch off the vacuum cleaner for storage (Fig. 17) Always disconnect the vacuum cleaner from the power supply when you have finished using it audibly clicks into one of the parking attachments on the dust container. Pull the dust container handle upward. Remove the dust container upward. Cleaning the filter frame (Figs. 24 + 25) A removable filter frame...
Operating instructions/Installation instructions
Page 18
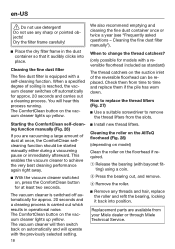
... on model) Clean the roller on the floorhead if required. Release the bearing (with a reversible floorhead included as standard) The thread catchers on the vacuum cleaner lights up yellow. Cleaning the fine dust filter manually"). Do not use detergent! Check them if the pile has worn down. The ComfortClean button on the suction inlet of dust at least two seconds. This enables the vacuum cleaner to change the...
... on model) Clean the roller on the floorhead if required. Release the bearing (with a reversible floorhead included as standard) The thread catchers on the vacuum cleaner lights up yellow. Cleaning the fine dust filter manually"). Do not use detergent! Check them if the pile has worn down. The ComfortClean button on the suction inlet of dust at least two seconds. This enables the vacuum cleaner to change the...
Operating instructions/Installation instructions
Page 20
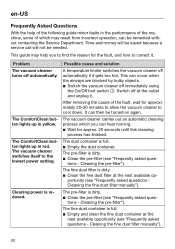
... power setting. Cleaning the pre-filter"). Cleaning the fine dust filter manually"). 20 Possible cause and solution A temperature limiter switches the vacuum cleaner off immediately using the On/Off foot switch . Switch off automatically. tions - This guide may result from incorrect operation, can be needed. The pre-filter is full. Empty the dust container. Problem The vacuum cleaner turns off at the next available opportunity (see "Frequently asked questions Cleaning the fine dust filter manually...
... power setting. Cleaning the pre-filter"). Cleaning the fine dust filter manually"). 20 Possible cause and solution A temperature limiter switches the vacuum cleaner off immediately using the On/Off foot switch . Switch off automatically. tions - This guide may result from incorrect operation, can be needed. The pre-filter is full. Empty the dust container. Problem The vacuum cleaner turns off at the next available opportunity (see "Frequently asked questions Cleaning the fine dust filter manually...
Operating instructions/Installation instructions
Page 21
... dust container. Clean the outside of the fine dust filter under cold running water. Do not clean the inside of the fine dust filter. Do not use detergent! Cleaning the fine dust filter manually (Figs. 31 - 36) Allow a drying time of 24 hours. Remove the dust container. Release the fine dust container in the vacuum cleaner. Dry the pre-filter carefully! Replace the dry filter in the dust container and lock the handle...
... dust container. Clean the outside of the fine dust filter under cold running water. Do not clean the inside of the fine dust filter. Do not use detergent! Cleaning the fine dust filter manually (Figs. 31 - 36) Allow a drying time of 24 hours. Remove the dust container. Release the fine dust container in the vacuum cleaner. Dry the pre-filter carefully! Replace the dry filter in the dust container and lock the handle...
Operating instructions/Installation instructions
Page 22
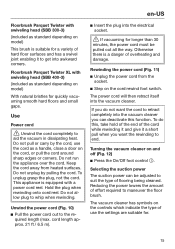
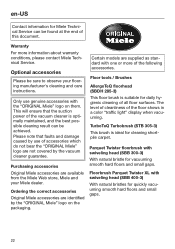
... standard with swiveling head (SBB 300-3) With natural bristle for quickly vacuuming smooth hard floors and small gaps. 22 Only use of this document. Please note that the suction power of the vacuum cleaner is suitable for daily hygienic cleaning of the floor shows in a color "traffic light" display when vacuuming. TurboTeQ Turbobrush (STB 305-3) This brush is ideal for Miele Technical Service can be achieved...
... standard with swiveling head (SBB 300-3) With natural bristle for quickly vacuuming smooth hard floors and small gaps. 22 Only use of this document. Please note that the suction power of the vacuum cleaner is suitable for daily hygienic cleaning of the floor shows in a color "traffic light" display when vacuuming. TurboTeQ Turbobrush (STB 305-3) This brush is ideal for Miele Technical Service can be achieved...
Operating instructions/Installation instructions
Page 24
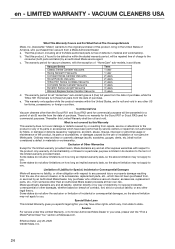
...accessories which have other rights, which has not been purchased from a Miele Authorized Dealer: a. Commercial Use Vacuum cleaners other express warranties with respect to the consumer (both parts and labor) by an Authorized Miele Dealer. What is as follows: Vacuum Series Classic Series Canister Vacuums Swing Series H1 Vacuums Compact Series Canister Vacuums Scout Robotic Vacuums Triflex HX1 Series Cordless Vacuums Complete Series Canister Vacuums Dynamic Series Upright Vacuums Blizzard Bagless Series Canister Vacuums Term 1 year 1 year 2 years 2 years 2 years 3 years 3 years 3 years...
...accessories which have other rights, which has not been purchased from a Miele Authorized Dealer: a. Commercial Use Vacuum cleaners other express warranties with respect to the consumer (both parts and labor) by an Authorized Miele Dealer. What is as follows: Vacuum Series Classic Series Canister Vacuums Swing Series H1 Vacuums Compact Series Canister Vacuums Scout Robotic Vacuums Triflex HX1 Series Cordless Vacuums Complete Series Canister Vacuums Dynamic Series Upright Vacuums Blizzard Bagless Series Canister Vacuums Term 1 year 1 year 2 years 2 years 2 years 3 years 3 years 3 years...

Operating instructions/Installation instructions
Page 49
... periods: a) Domestic appliances in accordance with proof of original purchase. 3. Six (6) months, for canister and upright models. d) Vacuums in commercial use : - b) The product was installed by a person designated by Miele, the original warranty period is located in Canada. 3.2 Warranty claims will repair, or at any Miele authorized part or accessory discovered to a Miele authorized dealer, as applicable, within five (5) years from the sixth (6th) year and...
... periods: a) Domestic appliances in accordance with proof of original purchase. 3. Six (6) months, for canister and upright models. d) Vacuums in commercial use : - b) The product was installed by a person designated by Miele, the original warranty period is located in Canada. 3.2 Warranty claims will repair, or at any Miele authorized part or accessory discovered to a Miele authorized dealer, as applicable, within five (5) years from the sixth (6th) year and...
User manual
Page 2
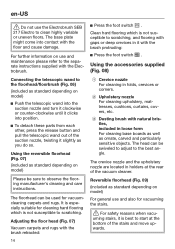
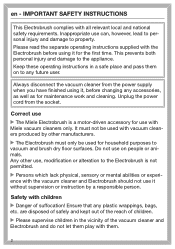
... the Electrobrush before using it, before changing any accessories, as well as for the first time. Unplug the power cord from the power supply when you have finished using it without supervision or instruction by other manufacturers. The Electrobrush must not be used with Miele vacuum cleaners only. en - Inappropriate use on to vacuum and brush dry floor surfaces. Please read the separate operating instructions supplied with...
... the Electrobrush before using it, before changing any accessories, as well as for the first time. Unplug the power cord from the power supply when you have finished using it without supervision or instruction by other manufacturers. The Electrobrush must not be used with Miele vacuum cleaners only. en - Inappropriate use on to vacuum and brush dry floor surfaces. Please read the separate operating instructions supplied with...
User manual
Page 3
Use only AC outlets. Clean only with these parts can cause considerable danger to the Electrobrush, electric hose and electric wand during the warranty period should be replaced by a Miele-authorized service technician. Only with a dry or slightly damp cloth. Your power supply should only be used at head level. 3 The plug connectors must not come in personal injury. Please check the Electrobrush, the electric hose and the electric wand for...
Use only AC outlets. Clean only with these parts can cause considerable danger to the Electrobrush, electric hose and electric wand during the warranty period should be replaced by a Miele-authorized service technician. Only with a dry or slightly damp cloth. Your power supply should only be used at head level. 3 The plug connectors must not come in personal injury. Please check the Electrobrush, the electric hose and the electric wand for...

User manual
Page 6
... hand-knotted rugs and carpets, e.g., Persian and oriental rugs, etc. Vacuum Cleaners: Fig. 02 to keep the fringe smooth. Features of the rug across the fringe towards the floor to Fig. 08 Adjusting the height (Fig. 09) The Electrobrush has five settings for cleaning hard floors. Setting 1 - The Electrobrush will switch itself off (Fig. 10) Press the connection socket release button to use...
... hand-knotted rugs and carpets, e.g., Persian and oriental rugs, etc. Vacuum Cleaners: Fig. 02 to keep the fringe smooth. Features of the rug across the fringe towards the floor to Fig. 08 Adjusting the height (Fig. 09) The Electrobrush has five settings for cleaning hard floors. Setting 1 - The Electrobrush will switch itself off (Fig. 10) Press the connection socket release button to use...
User manual
Page 7
... using suction only, e.g. To speed up this process: Reconnect the vacuum cleaner to the power supply and switch it back on the Electrobrush lights up . Turn off the vacuum cleaner and unplug it on . Maintenance Removing threads and hairs (Fig. 12) Use a pair of the Electrobrush connection socket. when moving from carpeting to let you know that have wound themselves around the roller brush...
... using suction only, e.g. To speed up this process: Reconnect the vacuum cleaner to the power supply and switch it back on the Electrobrush lights up . Turn off the vacuum cleaner and unplug it on . Maintenance Removing threads and hairs (Fig. 12) Use a pair of the Electrobrush connection socket. when moving from carpeting to let you know that have wound themselves around the roller brush...
Product sheet
Page 1
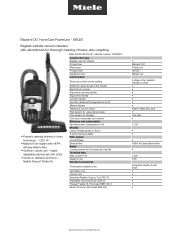
... heavy-duty carpeting. EAN: 4002515970348 / material number: 10829420 Construction type Bagless vacuum cleaner Product line Motor type Product type Appliance color Control panel Electronic suction power setting • Powerful cleaning thanks to Vortex technology - 1,200 W • Maximum air hygiene with electrobrush for storage One-touch automatic cord rewind Efficiency and sustainability Nominal power consumption in W Mobility Caster wheels gentle on delicate hard floors - flexible Parquet Twister XL Switch for floorhead and handle Technical data...
... heavy-duty carpeting. EAN: 4002515970348 / material number: 10829420 Construction type Bagless vacuum cleaner Product line Motor type Product type Appliance color Control panel Electronic suction power setting • Powerful cleaning thanks to Vortex technology - 1,200 W • Maximum air hygiene with electrobrush for storage One-touch automatic cord rewind Efficiency and sustainability Nominal power consumption in W Mobility Caster wheels gentle on delicate hard floors - flexible Parquet Twister XL Switch for floorhead and handle Technical data...


