Specs
Page 6
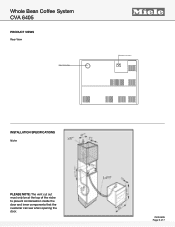
CVA 6405 Page 6 of the niche to prevent condensation inside the door and inner components that the customer can see when opening the door. Whole Bean Coffee System CVA 6405 PRODUCT VIEWS Rear View FOREVER BETTER INSTALLATION SPECIFICATIONS Niche PLEASE NOTE: The vent cut out must only be at the top of 7
CVA 6405 Page 6 of the niche to prevent condensation inside the door and inner components that the customer can see when opening the door. Whole Bean Coffee System CVA 6405 PRODUCT VIEWS Rear View FOREVER BETTER INSTALLATION SPECIFICATIONS Niche PLEASE NOTE: The vent cut out must only be at the top of 7
Specs
Page 7
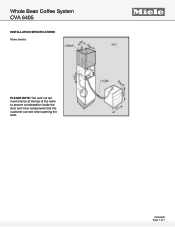
FOREVER BETTER CVA 6405 Page 7 of the niche to prevent condensation inside the door and inner components that the customer can see when opening the door. Whole Bean Coffee System CVA 6405 INSTALLATION SPECIFICATIONS Niche (metric) PLEASE NOTE: The vent cut out must only be at the top of 7
FOREVER BETTER CVA 6405 Page 7 of the niche to prevent condensation inside the door and inner components that the customer can see when opening the door. Whole Bean Coffee System CVA 6405 INSTALLATION SPECIFICATIONS Niche (metric) PLEASE NOTE: The vent cut out must only be at the top of 7

Product Manual
Page 1
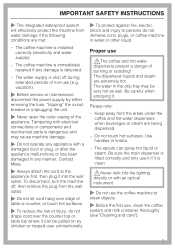
US, CA M.-Nr. 09 741 560 en - Operating and Installation Instructions Coffee System To prevent accidents and appliance damage read these instructions before installation or use.
US, CA M.-Nr. 09 741 560 en - Operating and Installation Instructions Coffee System To prevent accidents and appliance damage read these instructions before installation or use.

Product Manual
Page 4
... by hand 54 Degreasing the brew unit 56 Exterior 57 Descaling 58 Frequently asked questions 60 Cleaning clogged milk pipework 69 After sales service 72 Installation instructions 73 Caring for the environment 74 Plumbing 75 Lead free certificate 77 Electrical connection 78...
... by hand 54 Degreasing the brew unit 56 Exterior 57 Descaling 58 Frequently asked questions 60 Cleaning clogged milk pipework 69 After sales service 72 Installation instructions 73 Caring for the environment 74 Plumbing 75 Lead free certificate 77 Electrical connection 78...

Product Manual
Page 5
... or instruction by improper use of the appliance. This appliance complies with the machine should always be followed, including the following: Read all instructions before installation or use of use is more sensitive to high temperatures than for ~ Persons which lack physical, sensory or mental abilities or experience with current safety...
... or instruction by improper use of the appliance. This appliance complies with the machine should always be followed, including the following: Read all instructions before installation or use of use is more sensitive to high temperatures than for ~ Persons which lack physical, sensory or mental abilities or experience with current safety...

Product Manual
Page 6
... other work and repairs must be accessible after installation. ~ Only use Miele original spare parts. IMPORTANT SAFETY INSTRUCTIONS Technical safety ~ Installation work by unauthorized persons could be dangerous and may only be used in mobile installations such as boats. ~ Only use an extension... Be certain your appliance is any doubt, have the electrical system of the water intake hose. 6 If there is properly installed and grounded by a qualified electrician. Otherwise condensation can the manufacturer guarantee the safety of this before connecting the machine. The ...
... other work and repairs must be accessible after installation. ~ Only use Miele original spare parts. IMPORTANT SAFETY INSTRUCTIONS Technical safety ~ Installation work by unauthorized persons could be dangerous and may only be used in mobile installations such as boats. ~ Only use an extension... Be certain your appliance is any doubt, have the electrical system of the water intake hose. 6 If there is properly installed and grounded by a qualified electrician. Otherwise condensation can the manufacturer guarantee the safety of this before connecting the machine. The ...
Product Manual
Page 7
Contact Miele. ~ Always attach the cord to clean objects. ~ Before the first use ,The coffee and hot water dispensers present a danger of the appliance. vacation). ~ Before service ... with a damaged cord or plug, or after the appliance malfunctions or has been damaged in water or other liquid. Be careful when emptying it is installed correctly (electricity and water supply). - Please note: - Use handles or knobs. -
Contact Miele. ~ Always attach the cord to clean objects. ~ Before the first use ,The coffee and hot water dispensers present a danger of the appliance. vacation). ~ Before service ... with a damaged cord or plug, or after the appliance malfunctions or has been damaged in water or other liquid. Be careful when emptying it is installed correctly (electricity and water supply). - Please note: - Use handles or knobs. -
Product Manual
Page 14
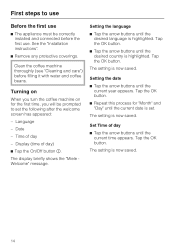
... the welcome screen has appeared: - Language - Time of day) ^ Tap the On/Off button K. The setting is highlighted. See the "Installation instructions". ^ Remove any protective coverings. The display briefly shows the "Miele Welcome" message. Set Time of day ^ Tap the arrow buttons until the current year appears. The setting is now saved... date ^ Tap the arrow buttons until the current time appears. First steps to use Before the first use . Turning on When you will be correctly installed and connected before filling it with water and coffee beans.
... the welcome screen has appeared: - Language - Time of day) ^ Tap the On/Off button K. The setting is highlighted. See the "Installation instructions". ^ Remove any protective coverings. The display briefly shows the "Miele Welcome" message. Set Time of day ^ Tap the arrow buttons until the current year appears. The setting is now saved... date ^ Tap the arrow buttons until the current time appears. First steps to use Before the first use . Turning on When you will be correctly installed and connected before filling it with water and coffee beans.

Product Manual
Page 65
... aligned correctly. ^ Adjust the door hinges (see "Cleaning and care - dispenser. be closed . The metal contacts are dirty. ^ Clean and dry the contacts thoroughly (see "Installation - The door cannot be contaminated, causing the the message "Fill sensors to malfunction. froth is full and in chapter "Cleaning clogged milk of the main...
... aligned correctly. ^ Adjust the door hinges (see "Cleaning and care - dispenser. be closed . The metal contacts are dirty. ^ Clean and dry the contacts thoroughly (see "Installation - The door cannot be contaminated, causing the the message "Fill sensors to malfunction. froth is full and in chapter "Cleaning clogged milk of the main...
Product Manual
Page 72
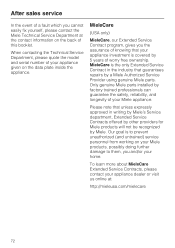
... given on the back of this booklet. When contacting the Technical Service Department, please quote the model and serial number of your home. Only genuine Miele parts installed by a Miele Authorized Service Provider using genuine Miele parts. After sales service In the event of a fault which you cannot easily fix yourself, please contact the...
... given on the back of this booklet. When contacting the Technical Service Department, please quote the model and serial number of your home. Only genuine Miele parts installed by a Miele Authorized Service Provider using genuine Miele parts. After sales service In the event of a fault which you cannot easily fix yourself, please contact the...

Product Manual
Page 73
Please refer to our website to obtain the most current product specification, technical & warranty information. Information is subject to change . Please refer to our website to obtain the most current product specification, technical & warranty information. The installation steps are described in the enclosed "Installation Diagram". Leave these instructions with the appliance for the consumer/user. Installation instructions Information is subject to change .
Please refer to our website to obtain the most current product specification, technical & warranty information. Information is subject to change . Please refer to our website to obtain the most current product specification, technical & warranty information. The installation steps are described in the enclosed "Installation Diagram". Leave these instructions with the appliance for the consumer/user. Installation instructions Information is subject to change .

Product Manual
Page 75
... - Make sure that the shut-off valve is accessible after installation. - Parts must conform with the requirements of the tubing or copper pipe should not exceed 4 ft. 11" (1.5 m). Disconnect the machine from Miele. 75 Only connect the machine to the plumbing. - All ...units and systems used to deliver the water to the coffee system must only be supplied for plumbing. - Plumbing The machine must have a water valve installed by a licensed plumber. - Turn...
... - Make sure that the shut-off valve is accessible after installation. - Parts must conform with the requirements of the tubing or copper pipe should not exceed 4 ft. 11" (1.5 m). Disconnect the machine from Miele. 75 Only connect the machine to the plumbing. - All ...units and systems used to deliver the water to the coffee system must only be supplied for plumbing. - Plumbing The machine must have a water valve installed by a licensed plumber. - Turn...

Product Manual
Page 76
... never be connected to the water supply and check for the connection. ^ Check whether the sealing ring is not kinked or damaged. Plumbing Installing the stainless steel tubing in the unit Connection to the water supply. ^ Remove the water connection cover at the lower rear side of the...from the electrical supply before connecting it . ^ Place the union nut of the unit (see "Installation"). 76 Old or used tubes must only use the stainless steel tube supplied. A faucet with the installation of the stainless steel tube onto the screw thread. ^ Make sure the fittings are tight. If...
... never be connected to the water supply and check for the connection. ^ Check whether the sealing ring is not kinked or damaged. Plumbing Installing the stainless steel tubing in the unit Connection to the water supply. ^ Remove the water connection cover at the lower rear side of the...from the electrical supply before connecting it . ^ Place the union nut of the unit (see "Installation"). 76 Old or used tubes must only use the stainless steel tube supplied. A faucet with the installation of the stainless steel tube onto the screw thread. ^ Make sure the fittings are tight. If...

Product Manual
Page 78
... power to the appliance caused by these devices will cause the appliance to your power supply, please consult a licensed electrician or contact Miele's Technical Service Department. Do not connect the appliance to a power inverter or directly to energy saving plugs or outlets. See back ...page for connection to such power sources can cause power surges and tripped breakers when the appliance is OFF before installing the coffee system. All electrical work by a qualified electrician in strict accordance with a NEMA 5-15P molded plug for contact information. ...
... power to the appliance caused by these devices will cause the appliance to your power supply, please consult a licensed electrician or contact Miele's Technical Service Department. Do not connect the appliance to a power inverter or directly to energy saving plugs or outlets. See back ...page for connection to such power sources can cause power surges and tripped breakers when the appliance is OFF before installing the coffee system. All electrical work by a qualified electrician in strict accordance with a NEMA 5-15P molded plug for contact information. ...

Product Manual
Page 79
Installation and combination options The unit is designed to be built into cabinetry. Installation 79
Installation and combination options The unit is designed to be built into cabinetry. Installation 79
Product Manual
Page 80
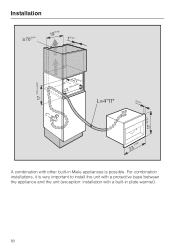
Installation A combination with a built-in Miele appliances is very important to install the unit with a protective base between the appliance and the unit (exception: installation with other built-in plate warmer). 80 For combination installations, it is possible.
Installation A combination with a built-in Miele appliances is very important to install the unit with a protective base between the appliance and the unit (exception: installation with other built-in plate warmer). 80 For combination installations, it is possible.

Product Manual
Page 81
...;). Otherwise condensation can freely escape. Installation Ventilation When installing the coffee machine, make sure that the back of the unit. ^ If there is no sealing strip around the installation recess, stick the Miele sealing strip onto the unit from Miele. The sealing strip is available from... the back before putting it into cabinetry, only use the coffee machine in place around the installation recess; The ventilation openings in...
...;). Otherwise condensation can freely escape. Installation Ventilation When installing the coffee machine, make sure that the back of the unit. ^ If there is no sealing strip around the installation recess, stick the Miele sealing strip onto the unit from Miele. The sealing strip is available from... the back before putting it into cabinetry, only use the coffee machine in place around the installation recess; The ventilation openings in...

Product Manual
Page 82
... unit to the water supply (see "Plumbing"). ^ Connect the unit to align and fasten the unit in the installation recess. The coffee machine is helpful. When inserting the unit into the installation recess. ^ Align the unit by hand. The feet can use to the electrical supply. ^ Insert the coffee...way into the recess, make sure the electrical and water supply connections are not damaged. ^ Check if the coffee machine is centered in the installation recess. ^ To secure the unit in the cabinet, tighten the upper Allen head screws by carefully adjusting the lower Allen head screws until ...
... unit to the water supply (see "Plumbing"). ^ Connect the unit to align and fasten the unit in the installation recess. The coffee machine is helpful. When inserting the unit into the installation recess. ^ Align the unit by hand. The feet can use to the electrical supply. ^ Insert the coffee...way into the recess, make sure the electrical and water supply connections are not damaged. ^ Check if the coffee machine is centered in the installation recess. ^ To secure the unit in the cabinet, tighten the upper Allen head screws by carefully adjusting the lower Allen head screws until ...

Product Manual
Page 83
Adjusting the door hinges If the door cannot be opened or closed easily after installation, you will have to align the door (TX 20): Installation ^ To adjust the door flush with the front of the cabinet, turn the screw a. ^ To adjust the door horizontally and vertically, turn the screw b. 83
Adjusting the door hinges If the door cannot be opened or closed easily after installation, you will have to align the door (TX 20): Installation ^ To adjust the door flush with the front of the cabinet, turn the screw a. ^ To adjust the door horizontally and vertically, turn the screw b. 83