
Guarantee booklet
Page 2
... other than authorised Miele Service Agents or dealers. 4. Date of purchase: Installed by a third party and claims in respect of charge faults in respect of the parts concerned at Gütersloh. Miscellaneous Further claims for 12 months. Conditions of components subject to rectify free of damaged laundry are covered by : a) Faulty installation, viz. Model No.: Serial No. the failure...
... other than authorised Miele Service Agents or dealers. 4. Date of purchase: Installed by a third party and claims in respect of charge faults in respect of the parts concerned at Gütersloh. Miscellaneous Further claims for 12 months. Conditions of components subject to rectify free of damaged laundry are covered by : a) Faulty installation, viz. Model No.: Serial No. the failure...

Guarantee booklet
Page 6
...) howsoever outside Miele's control; Such factors include but are also entitled to the merchantability of its Product range. use or installation; iv. vi. You are implied under the Australian Consumer Law. where applicable, settlement of delivery, or ii. the date of the development (evidentiary documentation required), or iii. Miele does not make a Warranty Claim. 6 viii. use of parts, components or accessories which is...
...) howsoever outside Miele's control; Such factors include but are also entitled to the merchantability of its Product range. use or installation; iv. vi. You are implied under the Australian Consumer Law. where applicable, settlement of delivery, or ii. the date of the development (evidentiary documentation required), or iii. Miele does not make a Warranty Claim. 6 viii. use of parts, components or accessories which is...

Guarantee booklet
Page 7
... the product to check the Miele user manual. A copy of a Service or Repair. It is available from Miele or www.miele.com.au and www.miele.co.nz Miele may be provided by Miele prior to its nearest Chartered Agent or authorised Service Agent. SERVICE & SPARE PARTS While Miele will depend upon the particular Miele Product. After this contract. If the problem persists follow our simple...
... the product to check the Miele user manual. A copy of a Service or Repair. It is available from Miele or www.miele.com.au and www.miele.co.nz Miele may be provided by Miele prior to its nearest Chartered Agent or authorised Service Agent. SERVICE & SPARE PARTS While Miele will depend upon the particular Miele Product. After this contract. If the problem persists follow our simple...

Guarantee booklet
Page 8
Warranty Card IMPORTANT DO NOT RETURN THIS PAGE TO MIELE For your reference, please enter the particulars of purchase Store details Installed by 8 Date of your purchase below and retain, with your purchase documentation. Serial no . Model no .
Warranty Card IMPORTANT DO NOT RETURN THIS PAGE TO MIELE For your reference, please enter the particulars of purchase Store details Installed by 8 Date of your purchase below and retain, with your purchase documentation. Serial no . Model no .

Guarantee booklet
Page 12
... its parts or accessories. • Direct, indirect or consequential damages, losses or other costs and expenses resulting from which the Miele Customer can purchase an extended limited warranty for their duration to a Miele Repair Center. In addition, the Miele Customer may have been exhausted. Exclusion Of Other Warranties Any express or implied warranties with the warranty service, he or she must include the model and serial number of the Miele...
... its parts or accessories. • Direct, indirect or consequential damages, losses or other costs and expenses resulting from which the Miele Customer can purchase an extended limited warranty for their duration to a Miele Repair Center. In addition, the Miele Customer may have been exhausted. Exclusion Of Other Warranties Any express or implied warranties with the warranty service, he or she must include the model and serial number of the Miele...

Guarantee booklet
Page 15
... than normal use and operation of the Miele Product in accordance with the manufacturer's published space or environmental requirements; • Miele Products installed in cabinetry and other defect, or non-availability during maintenance or repair, or unavailability of spare or replacement parts; • Cleaning, preventive maintenance or customer education; • Any Miele Product, the serial numbers of the Miele Product, such as electrical wiring, water or gas piping...
... than normal use and operation of the Miele Product in accordance with the manufacturer's published space or environmental requirements; • Miele Products installed in cabinetry and other defect, or non-availability during maintenance or repair, or unavailability of spare or replacement parts; • Cleaning, preventive maintenance or customer education; • Any Miele Product, the serial numbers of the Miele Product, such as electrical wiring, water or gas piping...

Guarantee booklet
Page 17
..., manufacturer's representative or other purposes must be extended for use in a household by an Authorized Miele Installer and properly registered with Miele, this Limited Warranty, the Miele Authorized Service Agent shall not be required to proceed with the covered repair until the owner has remedied the applicable hazard at its discretion determine to replace the product with a product of similar or equal features...
..., manufacturer's representative or other purposes must be extended for use in a household by an Authorized Miele Installer and properly registered with Miele, this Limited Warranty, the Miele Authorized Service Agent shall not be required to proceed with the covered repair until the owner has remedied the applicable hazard at its discretion determine to replace the product with a product of similar or equal features...

Guarantee booklet
Page 18
...'s specifications and the owner's manual, or any other defect, or non-availability during maintenance or repair, or unavailability of spare or replacement parts; • Cleaning, preventive maintenance or customer education; • Any Miele Product, the serial numbers of which were removed, altered or otherwise compromised; any repair, service, conversion or alteration to it accessible to the Miele Product or its accessories caused by , or resulting from improper ventilation...
...'s specifications and the owner's manual, or any other defect, or non-availability during maintenance or repair, or unavailability of spare or replacement parts; • Cleaning, preventive maintenance or customer education; • Any Miele Product, the serial numbers of which were removed, altered or otherwise compromised; any repair, service, conversion or alteration to it accessible to the Miele Product or its accessories caused by , or resulting from improper ventilation...

Guarantee booklet
Page 24
... of defects in Canada only. Upon request, such labour shall be defective in I. Parts and labour. d) Vacuums in normal, non-commercial, household use : - Six (6) months, for which the motor warranty is returned together with applicable installation instructions; If a claim of such a defect is replaced by Miele and at any failure to conform to this Warranty shall cover the replacement or repair of purchase...
... of defects in Canada only. Upon request, such labour shall be defective in I. Parts and labour. d) Vacuums in normal, non-commercial, household use : - Six (6) months, for which the motor warranty is returned together with applicable installation instructions; If a claim of such a defect is replaced by Miele and at any failure to conform to this Warranty shall cover the replacement or repair of purchase...

Operating instructions/Installation instructions
Page 2
... 22 Cleaning and care 23 Stainless steel housing 23 Grease filters ...23 OdorFree Charcoal Filter 25 Resetting the filter saturation timer for the OdorFree Charcoal Filters 26 Disposing of the OdorFree Charcoal Filter 26 Changing a light bulb 27 Service and warranty 28 Location of the data plate 28 Installation...29 Before installation 29 Appliance dimensions 30 Distance between cooktop and ventilation hood (S 32 Installation recommendations 33 Installing the hood 33 Exhaust air connection 34 Setting up for recirculation mode 35 Installing the joystick 36 Joystick extension...
... 22 Cleaning and care 23 Stainless steel housing 23 Grease filters ...23 OdorFree Charcoal Filter 25 Resetting the filter saturation timer for the OdorFree Charcoal Filters 26 Disposing of the OdorFree Charcoal Filter 26 Changing a light bulb 27 Service and warranty 28 Location of the data plate 28 Installation...29 Before installation 29 Appliance dimensions 30 Distance between cooktop and ventilation hood (S 32 Installation recommendations 33 Installing the hood 33 Exhaust air connection 34 Setting up for recirculation mode 35 Installing the joystick 36 Joystick extension...

Operating instructions/Installation instructions
Page 5
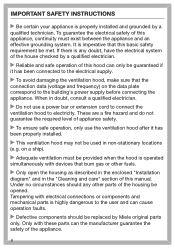
...: TO REDUCE THE RISK OF FIRE, ELECTRIC SHOCK, OR INJURY TO PERSONS, OBSERVE THE FOLLOWING: - Before servicing or cleaning the appliance, switch power off at the service panel and lock the service disconnecting means to the service panel. Installation, repair and maintenance work by unauthorized persons could be dangerous and may void the warranty. A damaged ventilation hood oven can be performed by the manufacturer. If...
...: TO REDUCE THE RISK OF FIRE, ELECTRIC SHOCK, OR INJURY TO PERSONS, OBSERVE THE FOLLOWING: - Before servicing or cleaning the appliance, switch power off at the service panel and lock the service disconnecting means to the service panel. Installation, repair and maintenance work by unauthorized persons could be dangerous and may void the warranty. A damaged ventilation hood oven can be performed by the manufacturer. If...
Operating instructions/Installation instructions
Page 6
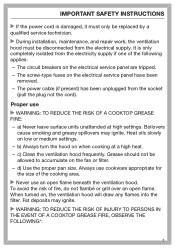
... operation, only use a power bar or extension cord to connect the ventilation hood to the building's power supply before connecting the appliance. These are a fire hazard and do not guarantee the required level of this manual. Tampering with electrical connections or components and mechanical parts is any other fuels. Only open the housing as described in the enclosed "Installation diagram" and in the "Cleaning and care" section of this hood...
... operation, only use a power bar or extension cord to connect the ventilation hood to the building's power supply before connecting the appliance. These are a fire hazard and do not guarantee the required level of this manual. Tampering with electrical connections or components and mechanical parts is any other fuels. Only open the housing as described in the enclosed "Installation diagram" and in the "Cleaning and care" section of this hood...
Operating instructions/Installation instructions
Page 7
... service technician. During installation, maintenance, and repair work, the ventilation hood must be allowed to accumulate on when cooking at high settings. The power cable (if present) has been unplugged from the socket (pull the plug not the cord). Always use cookware appropriate for the size of the cooking area. Never use WARNING: TO REDUCE THE RISK OF A COOKTOP GREASE FIRE: - a) Never leave surface units unattended...
... service technician. During installation, maintenance, and repair work, the ventilation hood must be allowed to accumulate on when cooking at high settings. The power cable (if present) has been unplugged from the socket (pull the plug not the cord). Always use cookware appropriate for the size of the cooking area. Never use WARNING: TO REDUCE THE RISK OF A COOKTOP GREASE FIRE: - a) Never leave surface units unattended...

Operating instructions/Installation instructions
Page 10
... the wall or ceiling, do not damage electrical wiring and other hidden utilities. - b) Sufficient air is needed for Heating, Refrigeration and Air Conditioning Engineers (ASHRAE), and the local code authorities. - The minimum safety distances between the cooking appliance and the ventilation hood can result in the "Installation" section must be vented to prevent back drafting. If more than one cooking appliance is required. IMPORTANT SAFETY INSTRUCTIONS Proper installation...
... the wall or ceiling, do not damage electrical wiring and other hidden utilities. - b) Sufficient air is needed for Heating, Refrigeration and Air Conditioning Engineers (ASHRAE), and the local code authorities. - The minimum safety distances between the cooking appliance and the ventilation hood can result in the "Installation" section must be vented to prevent back drafting. If more than one cooking appliance is required. IMPORTANT SAFETY INSTRUCTIONS Proper installation...
Operating instructions/Installation instructions
Page 16
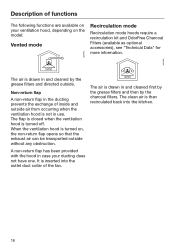
... model: Vented mode Recirculation mode Recirculation mode hoods require a recirculation kit and OdorFree Charcoal Filters (available as optional accessories), see "Technical Data" for more information. The air is turned off. When the ventilation hood is turned on, the non-return flap opens so that the exhaust air can be transported outside . A non-return flap has been provided with the hood in and cleaned first by the grease filters and then by the grease filters and directed outside...
... model: Vented mode Recirculation mode Recirculation mode hoods require a recirculation kit and OdorFree Charcoal Filters (available as optional accessories), see "Technical Data" for more information. The air is turned off. When the ventilation hood is turned on, the non-return flap opens so that the exhaust air can be transported outside . A non-return flap has been provided with the hood in and cleaned first by the grease filters and then by the grease filters and directed outside...
Operating instructions/Installation instructions
Page 23
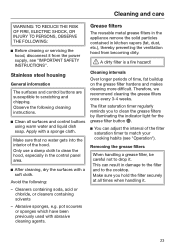
... filter securely at all surfaces and control buttons using warm water and liquid dish soap. Stainless steel housing General information The surfaces and control buttons are susceptible to drop it. Make sure you to clean the grease filters by illuminating the indicator light for the grease filter button . You can result in damage to the filter and to the cooktop. Grease filters The reusable metal grease filters in the appliance remove...
... filter securely at all surfaces and control buttons using warm water and liquid dish soap. Stainless steel housing General information The surfaces and control buttons are susceptible to drop it. Make sure you to clean the grease filters by illuminating the indicator light for the grease filter button . You can result in damage to the filter and to the cooktop. Grease filters The reusable metal grease filters in the appliance remove...
Operating instructions/Installation instructions
Page 25
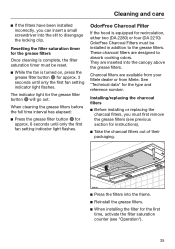
... charcoal filters are designed to disengage the locking clip. See "Technical data" for recirculation, either two (DA 2280) or four (DA 2210) OdorFree Charcoal Filters must be installed in addition to the grease filters. OdorFree Charcoal Filter If the hood is complete, the filter saturation timer must be reset. While the fan is turned on, press the grease filter button for approx. 6 seconds until only the first fan setting indicator light flashes. Charcoal filters are inserted...
... charcoal filters are designed to disengage the locking clip. See "Technical data" for recirculation, either two (DA 2280) or four (DA 2210) OdorFree Charcoal Filters must be installed in addition to the grease filters. OdorFree Charcoal Filter If the hood is complete, the filter saturation timer must be reset. While the fan is turned on, press the grease filter button for approx. 6 seconds until only the first fan setting indicator light flashes. Charcoal filters are inserted...

Operating instructions/Installation instructions
Page 27
... replacing the bulbs (see "IMPORTANT SAFETY INSTRUCTIONS"). Remove the grease filters. Remove the charcoal filters if the hood is used in recirculation mode, the charcoal filters. 27 Please follow the manufacturer's safety instructions. Replace the grease filters and, if using the hood in recirculation mode. Allow the bulbs to cool down for some time. Changing a light bulb The bulbs should be replaced with the following: GU/GZ 10, 120 V, 50 W Replacement bulbs are available from the electrical...
... replacing the bulbs (see "IMPORTANT SAFETY INSTRUCTIONS"). Remove the grease filters. Remove the charcoal filters if the hood is used in recirculation mode, the charcoal filters. 27 Please follow the manufacturer's safety instructions. Replace the grease filters and, if using the hood in recirculation mode. Allow the bulbs to cool down for some time. Changing a light bulb The bulbs should be replaced with the following: GU/GZ 10, 120 V, 50 W Replacement bulbs are available from the electrical...

Operating instructions/Installation instructions
Page 35
... from Miele and Miele dealers, is required to be set (2 filters). The DA 2210 requires two conversion kits and two OdorFree Charcoal Filter sets (4 filters). You will also need a DKF 15-1 OdorFree Charcoal Filter set up for recirculation. Installation Install the conversion kit as described in recirculation mode. Non-return flaps are not used in vented mode, the appliance must be used in the exhaust grille point towards the center of the room and not towards a wall or the ceiling. Make...
... from Miele and Miele dealers, is required to be set (2 filters). The DA 2210 requires two conversion kits and two OdorFree Charcoal Filter sets (4 filters). You will also need a DKF 15-1 OdorFree Charcoal Filter set up for recirculation. Installation Install the conversion kit as described in recirculation mode. Non-return flaps are not used in vented mode, the appliance must be used in the exhaust grille point towards the center of the room and not towards a wall or the ceiling. Make...
Operating instructions/Installation instructions
Page 38
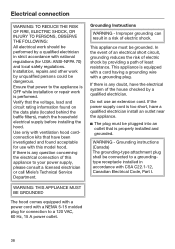
... installed and grounded. Do not use with this appliance to the appliance is OFF while installation or repair work is any doubt, have the electrical system of this model hood. WARNING: THIS APPLIANCE MUST BE GROUNDED The hood comes equipped with a power cord with a NEMA 5-15 molded plug for connection to a groundingtype receptacle installed in accordance with CSA C22.1-12, Canadian Electrical Code, Part I. WARNING - Grounding instructions (Canada...
... installed and grounded. Do not use with this appliance to the appliance is OFF while installation or repair work is any doubt, have the electrical system of this model hood. WARNING: THIS APPLIANCE MUST BE GROUNDED The hood comes equipped with a power cord with a NEMA 5-15 molded plug for connection to a groundingtype receptacle installed in accordance with CSA C22.1-12, Canadian Electrical Code, Part I. WARNING - Grounding instructions (Canada...


