
Operating and Installation manual
Page 1
US M.-Nr. 09 523 580 en - Operating and Installation Instructions Ventilation System DA 6590 D To prevent accidents and appliance damage, read these instructions before installation or use.
US M.-Nr. 09 523 580 en - Operating and Installation Instructions Ventilation System DA 6590 D To prevent accidents and appliance damage, read these instructions before installation or use.

Operating and Installation manual
Page 2
... 8 Operation 10 Turning the fan on K 10 Selecting the power level 10 Intensive setting "IS 10 Delayed shut down 5 ¢15 11 Overhead lighting I 11 Filter timer 12 Cleaning and care 14 Cleaning the casing 14 Panels and grease filters 15 Resetting the grease filter timer 17 Changing the light bulbs 18 After Sales Service 19 Installation instructions 21 Caring for the environment 23 Appliance dimensions 24 Structural support 26 Installation 27 Installation instructions 27 Installation materials 27 Air extraction 28 Electrical connection...
... 8 Operation 10 Turning the fan on K 10 Selecting the power level 10 Intensive setting "IS 10 Delayed shut down 5 ¢15 11 Overhead lighting I 11 Filter timer 12 Cleaning and care 14 Cleaning the casing 14 Panels and grease filters 15 Resetting the grease filter timer 17 Changing the light bulbs 18 After Sales Service 19 Installation instructions 21 Caring for the environment 23 Appliance dimensions 24 Structural support 26 Installation 27 Installation instructions 27 Installation materials 27 Air extraction 28 Electrical connection...

Operating and Installation manual
Page 3
... doubt, have questions, contact Miele. ~ b) Before servicing or cleaning the appliance, switch power off at the service panel and lock the service disconnecting means to the service panel. ~ c) Be certain your appliance is properly installed and grounded by a qualified electrician. 3 If the service disconnecting means cannot be met. IMPORTANT SAFETY INSTRUCTIONS READ AND SAVE THESE INSTRUCTIONS Keep these instructions carefully before installing or using the Ventilation System. ~ This appliance...
... doubt, have questions, contact Miele. ~ b) Before servicing or cleaning the appliance, switch power off at the service panel and lock the service disconnecting means to the service panel. ~ c) Be certain your appliance is properly installed and grounded by a qualified electrician. 3 If the service disconnecting means cannot be met. IMPORTANT SAFETY INSTRUCTIONS READ AND SAVE THESE INSTRUCTIONS Keep these instructions carefully before installing or using the Ventilation System. ~ This appliance...

Operating and Installation manual
Page 4
... standards. IMPORTANT SAFETY INSTRUCTIONS ~ d) Before connecting the appliance to prevent hazards. Tampering with electrical connections or components and mechanical parts is highly dangerous to the user and can cause operation faults. ~ g) Before discarding an old appliance, disconnect it from the power supply and remove the power cord to the power supply make sure that the voltage and frequency listed on the fan or filter. ~ d) Use the proper pan size.
... standards. IMPORTANT SAFETY INSTRUCTIONS ~ d) Before connecting the appliance to prevent hazards. Tampering with electrical connections or components and mechanical parts is highly dangerous to the user and can cause operation faults. ~ g) Before discarding an old appliance, disconnect it from the power supply and remove the power cord to the power supply make sure that the voltage and frequency listed on the fan or filter. ~ d) Use the proper pan size.

Operating and Installation manual
Page 5
... condensation. ~ Never operate gas burners without the grease filters in use a steam cleaner to clean the hood. Adjust the burner so that the flames do not go out immediately, EVACUATE AND CALL THE FIRE DEPARTMENT. ~ b) NEVER PICK UP A FLAMING PAN - IMPORTANT SAFETY INSTRUCTIONS ,WARNING TO REDUCE THE RISK OF INJURY TO PERSONS IN THE EVENT OF A COOKTOP GREASE FIRE, OBSERVE...
... condensation. ~ Never operate gas burners without the grease filters in use a steam cleaner to clean the hood. Adjust the burner so that the flames do not go out immediately, EVACUATE AND CALL THE FIRE DEPARTMENT. ~ b) NEVER PICK UP A FLAMING PAN - IMPORTANT SAFETY INSTRUCTIONS ,WARNING TO REDUCE THE RISK OF INJURY TO PERSONS IN THE EVENT OF A COOKTOP GREASE FIRE, OBSERVE...

Operating and Installation manual
Page 6
..., (e.g. Extension cords do not damage electrical wiring and other hidden utilities. ~ d) Ducted hoods must always be vented to the outdoors. ~ e) Do not use an extension cord to connect the appliance to prevent back drafting. danger of overheating). ~ g) Do not install this hood over cooktops that burn solid fuel. ~ h) Provided a larger distance is needed for Heating, Refrigeration and Air Conditioning Engineers (ASHRAE), and the local code authorities. ~ c) When cutting or...
..., (e.g. Extension cords do not damage electrical wiring and other hidden utilities. ~ d) Ducted hoods must always be vented to the outdoors. ~ e) Do not use an extension cord to connect the appliance to prevent back drafting. danger of overheating). ~ g) Do not install this hood over cooktops that burn solid fuel. ~ h) Provided a larger distance is needed for Heating, Refrigeration and Air Conditioning Engineers (ASHRAE), and the local code authorities. ~ c) When cutting or...

Operating and Installation manual
Page 9
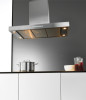
...l Filter button The grease filter symbol l of hours. 9 Guide to turn off and also dims it. You can be cleaned. The fan can also check or change the number of the filter button comes on when the grease filters need to be set to the ventilation system a Chimney extension b Chimney c Canopy d Control panel e Overhead lighting f Grease filter g Glass or stainless steel panels Optional accessories DRP 6590 D glass (3 elements) DRP 6590 D stainless steel (3 elements) h Overhead lighting button This button turns the light on and off automatically after cleaning the grease filters...
...l Filter button The grease filter symbol l of hours. 9 Guide to turn off and also dims it. You can be cleaned. The fan can also check or change the number of the filter button comes on when the grease filters need to be set to the ventilation system a Chimney extension b Chimney c Canopy d Control panel e Overhead lighting f Grease filter g Glass or stainless steel panels Optional accessories DRP 6590 D glass (3 elements) DRP 6590 D stainless steel (3 elements) h Overhead lighting button This button turns the light on and off automatically after cleaning the grease filters...

Operating and Installation manual
Page 12
... suit your cooking habits. - The filter button signals that the grease filter needs to be set to select a shorter operating time or + for the grease filter timer is better to turn the fan back on cleaning and replacing filters and resetting the timers. The factory setting for a longer one of the timer button and one . ^ Save the setting by turning on the grease filter symbol [. All the lights go out. The lighting however will...
... suit your cooking habits. - The filter button signals that the grease filter needs to be set to select a shorter operating time or + for the grease filter timer is better to turn the fan back on cleaning and replacing filters and resetting the timers. The factory setting for a longer one of the timer button and one . ^ Save the setting by turning on the grease filter symbol [. All the lights go out. The lighting however will...

Operating and Installation manual
Page 14
... when cleaning the controls. Cleaning the casing - oven spray. The following instructions for stainless steel can be followed in use. To help prevent resoiling, a conditioner for cleaning "Stainless steel" surfaces and "Stainless steel colored controls" should be cleaned using a soft cloth. 14 Do not use abrasive cleaners, scouring pads, steel wool or caustic (oven) cleaners on the hood. powder or cream cleansers, Before cleaning or servicing the hood, disconnect it from the power supply...
... when cleaning the controls. Cleaning the casing - oven spray. The following instructions for stainless steel can be followed in use. To help prevent resoiling, a conditioner for cleaning "Stainless steel" surfaces and "Stainless steel colored controls" should be cleaned using a soft cloth. 14 Do not use abrasive cleaners, scouring pads, steel wool or caustic (oven) cleaners on the hood. powder or cream cleansers, Before cleaning or servicing the hood, disconnect it from the power supply...

Operating and Installation manual
Page 15
... over time and makes cleaning more difficult. ,A dirty filter is halogen lighting in the kitchen. Panels and grease filters The glass or stainless steel panels and the reusable metal grease filters remove solid particles from the vented kitchen air (grease, dust, etc.) and prevent soiling of the ventilation hood. Special instructions for glass surfaces ^ The glass edge can become discolored or damaged if not cleaned regularly. Do not use a stainless steel cleaner on . Special instructions for appliances...
... over time and makes cleaning more difficult. ,A dirty filter is halogen lighting in the kitchen. Panels and grease filters The glass or stainless steel panels and the reusable metal grease filters remove solid particles from the vented kitchen air (grease, dust, etc.) and prevent soiling of the ventilation hood. Special instructions for glass surfaces ^ The glass edge can become discolored or damaged if not cleaned regularly. Do not use a stainless steel cleaner on . Special instructions for appliances...

Operating and Installation manual
Page 18
... your hands. Please follow the manufacturer's instructions. ^ Flip the light cover back up, making sure it clicks into place. 18 Cleaning and care Changing the light bulbs ,WARNING TO REDUCE THE RISK OF FIRE, ELECTRIC SHOCK, OR INJURY TO PERSONS, OBSERVE THE FOLLOWING: Before changing the light bulbs, disconnect the hood from its socket. ^ Using a cloth or glove, insert the new halogen bulb (type 12 V, 20 W, G4). Do...
... your hands. Please follow the manufacturer's instructions. ^ Flip the light cover back up, making sure it clicks into place. 18 Cleaning and care Changing the light bulbs ,WARNING TO REDUCE THE RISK OF FIRE, ELECTRIC SHOCK, OR INJURY TO PERSONS, OBSERVE THE FOLLOWING: Before changing the light bulbs, disconnect the hood from its socket. ^ Using a cloth or glove, insert the new halogen bulb (type 12 V, 20 W, G4). Do...

Operating and Installation manual
Page 19
... easily fix yourself, please contact the Miele Technical Service Department. ^ When contacting the Technical Service Department, please quote the model and serial number of your appliance investment is visible when the grease filters are removed. After Sales Service Repairs In the event of a fault which is covered by a Miele Authorized Service Provider using genuine Miele parts. These are shown on your Miele products, possibly doing further damage to...
... easily fix yourself, please contact the Miele Technical Service Department. ^ When contacting the Technical Service Department, please quote the model and serial number of your appliance investment is visible when the grease filters are removed. After Sales Service Repairs In the event of a fault which is covered by a Miele Authorized Service Provider using genuine Miele parts. These are shown on your Miele products, possibly doing further damage to...

Operating and Installation manual
Page 24
variance of 1 3/16" (30 mm) in any direction is not secured in the center. A max. Appliance dimensions 1) Opening for exhaust duct and power cord Exhaust connection C 6" (150 mm) The exhaust connection in the ceiling plate is possible. 24 This makes installation possible if the connection in the ceiling is not centered above the cooktop.
variance of 1 3/16" (30 mm) in any direction is not secured in the center. A max. Appliance dimensions 1) Opening for exhaust duct and power cord Exhaust connection C 6" (150 mm) The exhaust connection in the ceiling plate is possible. 24 This makes installation possible if the connection in the ceiling is not centered above the cooktop.
Operating and Installation manual
Page 25
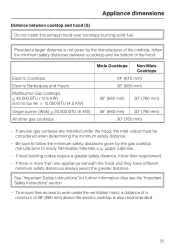
... free access to work under the hood, the total output must be considered when determining the minimum safety distance. - Appliance dimensions Distance between a cooktop and the bottom of the hood: Electric Cooktops Electric Barbeques and Fryers Multiburner Gas cooktops < 43,000 BTU (12.6 KW) and no burner > 15,000 BTU (4.5 KW) Single burner (Wok) < 20,500 BTU (6 KW) All other gas cooktops Miele Cooktops Non-Miele Cooktops...
... free access to work under the hood, the total output must be considered when determining the minimum safety distance. - Appliance dimensions Distance between a cooktop and the bottom of the hood: Electric Cooktops Electric Barbeques and Fryers Multiburner Gas cooktops < 43,000 BTU (12.6 KW) and no burner > 15,000 BTU (4.5 KW) Single burner (Wok) < 20,500 BTU (6 KW) All other gas cooktops Miele Cooktops Non-Miele Cooktops...

Operating and Installation manual
Page 26
Do not attach the plate directly to the ceiling joists directly. This ceiling plate must be attached to rigid structural framing that is supported in its entirety by the ceiling joists, or to the ceiling with anchors, toggle bolts, etc. ,CAUTION When cutting or drilling into the wall or ceiling, do not damage electrical wiring and other hidden utilities. 26 Structural support The ceiling mounting plate will support the weight of the hood.
Do not attach the plate directly to the ceiling joists directly. This ceiling plate must be attached to rigid structural framing that is supported in its entirety by the ceiling joists, or to the ceiling with anchors, toggle bolts, etc. ,CAUTION When cutting or drilling into the wall or ceiling, do not damage electrical wiring and other hidden utilities. 26 Structural support The ceiling mounting plate will support the weight of the hood.

Operating and Installation manual
Page 27
... securing the chimney. 27 Installation materials 4 levelling plates for correcting an uneven ceiling. 1 vent collar for allowing a variable position for the vent hole in the ceiling. 4 screws 8 x 60 mm with 4 washers and 4 wall anchors S 10for securing the ceiling plate to the vent collar. 2 screws M4 x 8 mm for attaching the exhaust duct to the ceiling The screws and anchors are described in the "Appliance Dimensions" and " Important Safety Instruction" chapters. For...
... securing the chimney. 27 Installation materials 4 levelling plates for correcting an uneven ceiling. 1 vent collar for allowing a variable position for the vent hole in the ceiling. 4 screws 8 x 60 mm with 4 washers and 4 wall anchors S 10for securing the ceiling plate to the vent collar. 2 screws M4 x 8 mm for attaching the exhaust duct to the ceiling The screws and anchors are described in the "Appliance Dimensions" and " Important Safety Instruction" chapters. For...

Operating and Installation manual
Page 28
... diameter of toxic fumes. Make sure all local building codes when installing the hood. Where the ductwork is horizontal, it must slope away from approved non-flammable materials for exhaust ducting. Please read and follow the "IMPORTANT SAFETY INSTRUCTIONS" to prevent condensation dripping into spaces within walls or ceilings or in attics, crawl spaces or garages. Air extraction ,WARNING Danger...
... diameter of toxic fumes. Make sure all local building codes when installing the hood. Where the ductwork is horizontal, it must slope away from approved non-flammable materials for exhaust ducting. Please read and follow the "IMPORTANT SAFETY INSTRUCTIONS" to prevent condensation dripping into spaces within walls or ceilings or in attics, crawl spaces or garages. Air extraction ,WARNING Danger...

Operating and Installation manual
Page 29
... any condensate which may occur. If the exhaust is ducted into the hood (series ...EXT only). 29 In some cases, a condensate trap may need to be required to the flow direction of the flue. Air extraction Condensate trap optional accessory - Never connect an exhaust hood to an active chimney, dryer vent, flue, or room venting ductwork. If the ventilation system is designed for ducts 5" (125 mm) and 6" (150 mm) in...
... any condensate which may occur. If the exhaust is ducted into the hood (series ...EXT only). 29 In some cases, a condensate trap may need to be required to the flow direction of the flue. Air extraction Condensate trap optional accessory - Never connect an exhaust hood to an active chimney, dryer vent, flue, or room venting ductwork. If the ventilation system is designed for ducts 5" (125 mm) and 6" (150 mm) in...

Operating and Installation manual
Page 30
... the voltage, load and circuit rating information found on the data plate (located behind the grease filter), match the household electrical supply before the machine is installed, it is recommended to install a protective switch (30 mA). If there is any question concerning the electrical connection of this appliance to your power supply, please consult a licensed electrician or call Miele's Technical Service Department. WARNING: THIS...
... the voltage, load and circuit rating information found on the data plate (located behind the grease filter), match the household electrical supply before the machine is installed, it is recommended to install a protective switch (30 mA). If there is any question concerning the electrical connection of this appliance to your power supply, please consult a licensed electrician or call Miele's Technical Service Department. WARNING: THIS...
DA 6590 D Incognito Island Hood
Page 2
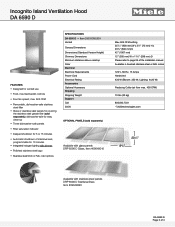
... SPECIFICATIONS DA 6590 D - Incognito Island Ventilation Hood DA 6590 D FOREVER BETTER FEATURES Designed for 5 or 15 minutes Automatic shutdown of the installation manual Available in brushed stainless steel or RAL colors 120 V, 60 Hz, 15 Amps Hardwired 430 W (Blower: 350 W; Item 28659058USA Vented Canopy Dimensions Dimensions (Standard Version Height) Chimney Dimensions Minimum distance above cooktop Color Electrical Electrical Requirements Power Cord Electrical Rating Accessories Optional Accessory Shipping Shipping Weight Support Call 20/20 OPTIONAL PANELS...
... SPECIFICATIONS DA 6590 D - Incognito Island Ventilation Hood DA 6590 D FOREVER BETTER FEATURES Designed for 5 or 15 minutes Automatic shutdown of the installation manual Available in brushed stainless steel or RAL colors 120 V, 60 Hz, 15 Amps Hardwired 430 W (Blower: 350 W; Item 28659058USA Vented Canopy Dimensions Dimensions (Standard Version Height) Chimney Dimensions Minimum distance above cooktop Color Electrical Electrical Requirements Power Cord Electrical Rating Accessories Optional Accessory Shipping Shipping Weight Support Call 20/20 OPTIONAL PANELS...


