Specs
Page 2
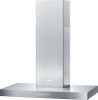
... 28659650USA Vented or Recirculating Canopy Dimensions Dimensions (Standard Height) - Incognito Wall Ventilation Hood DA 6596 W FOREVER BETTER FEATURES • NEW: LED ClearView lighting • NEW: Con@ctivity - communication between hood and cooktop • Front-mounted backlit controls • Four fan speeds (incl. dishwasher safe for easy clean-up • Filter saturation indicator (grease and charcoal filter) • Delayed shutdown for 5 or 15 minutes • Automatic shutdown of intensive level, programmable for covering the stainless steel grease filter...
... 28659650USA Vented or Recirculating Canopy Dimensions Dimensions (Standard Height) - Incognito Wall Ventilation Hood DA 6596 W FOREVER BETTER FEATURES • NEW: LED ClearView lighting • NEW: Con@ctivity - communication between hood and cooktop • Front-mounted backlit controls • Four fan speeds (incl. dishwasher safe for easy clean-up • Filter saturation indicator (grease and charcoal filter) • Delayed shutdown for 5 or 15 minutes • Automatic shutdown of intensive level, programmable for covering the stainless steel grease filter...
Product Manual
Page 2
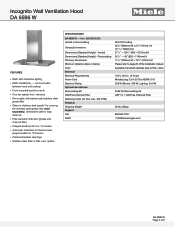
... grease filters 23 Activating/changing the grease filter saturation counter 24 Checking the elapsed operating time 24 Cleaning and care 25 Stainless steel housing 25 Panels and grease filters for edge extraction 26 OdorFree Charcoal Filter 28 Resetting the filter saturation counter for the filter 30 Disposing of the OdorFree Charcoal Filter 30 Installation ...31 Before installation 31 Removing the protective film 31 Installation Instructions 31 Disassembly...31 Installation parts...32 Appliance dimensions 34 Distance between cooktop and ventilation hood (S 35 Installation...
... grease filters 23 Activating/changing the grease filter saturation counter 24 Checking the elapsed operating time 24 Cleaning and care 25 Stainless steel housing 25 Panels and grease filters for edge extraction 26 OdorFree Charcoal Filter 28 Resetting the filter saturation counter for the filter 30 Disposing of the OdorFree Charcoal Filter 30 Installation ...31 Before installation 31 Removing the protective film 31 Installation Instructions 31 Disassembly...31 Installation parts...32 Appliance dimensions 34 Distance between cooktop and ventilation hood (S 35 Installation...
Product Manual
Page 3
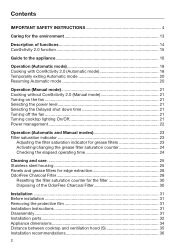
Contents Drilling diagram for wall mounting 36 Plywood backing 37 To install a plywood backing 37 Exhaust duct...38 Condensate trap ...39 Reducing Collar ...39 Electrical connection 40 Activating Con@ctivity 2.0 41 Installation of the Con@ctivity 2.0 stick 41 Activating Con@ctivity 2.0 41 Activating the ventilation hood 41 Activating the cooktop 41 Checking activation 42 Deactivating Con@ctivity 2.0 42 Service and warranty 43 Location of the data plate 43 Technical data ...44 3
Contents Drilling diagram for wall mounting 36 Plywood backing 37 To install a plywood backing 37 Exhaust duct...38 Condensate trap ...39 Reducing Collar ...39 Electrical connection 40 Activating Con@ctivity 2.0 41 Installation of the Con@ctivity 2.0 stick 41 Activating Con@ctivity 2.0 41 Activating the ventilation hood 41 Activating the cooktop 41 Checking activation 42 Deactivating Con@ctivity 2.0 42 Service and warranty 43 Location of the data plate 43 Technical data ...44 3
Product Manual
Page 4
Keep these operating instructions in these operating instructions. This ventilation hood is not intended for the first time. Use CAUTION: For General Ventilating Use Only. Improper use of the appliance can lead to any future user. Only use the appliance for residential use only. Do Not Use To Exhaust Hazardous Or Explosive Materials And Vapors. This appliance is suitable for installation above gas or electric cooking surfaces...
Keep these operating instructions in these operating instructions. This ventilation hood is not intended for the first time. Use CAUTION: For General Ventilating Use Only. Improper use of the appliance can lead to any future user. Only use the appliance for residential use only. Do Not Use To Exhaust Hazardous Or Explosive Materials And Vapors. This appliance is suitable for installation above gas or electric cooking surfaces...

Product Manual
Page 5
.... Never use a damaged ventilation hood. 5 Technical safety WARNING: TO REDUCE THE RISK OF FIRE, ELECTRIC SHOCK, OR INJURY TO PERSONS, OBSERVE THE FOLLOWING: - Before servicing or cleaning the appliance, switch power off at the service panel and lock the service disconnecting means to the service panel. Installation, repair and maintenance work by unauthorized persons could be dangerous and may void the warranty. A damaged ventilation hood oven can...
.... Never use a damaged ventilation hood. 5 Technical safety WARNING: TO REDUCE THE RISK OF FIRE, ELECTRIC SHOCK, OR INJURY TO PERSONS, OBSERVE THE FOLLOWING: - Before servicing or cleaning the appliance, switch power off at the service panel and lock the service disconnecting means to the service panel. Installation, repair and maintenance work by unauthorized persons could be dangerous and may void the warranty. A damaged ventilation hood oven can...
Product Manual
Page 6
... described in the enclosed "Installation diagram" and in the "Cleaning and care" section of this manual. These are a fire hazard and do not guarantee the required level of appliance safety. To ensure safe operation, only use a power bar or extension cord to connect the ventilation hood to the user and can cause operation faults. 6 Under no circumstances should any doubt, have the electrical system of the house...
... described in the enclosed "Installation diagram" and in the "Cleaning and care" section of this manual. These are a fire hazard and do not guarantee the required level of appliance safety. To ensure safe operation, only use a power bar or extension cord to connect the ventilation hood to the user and can cause operation faults. 6 Under no circumstances should any doubt, have the electrical system of the house...
Product Manual
Page 7
... oils slowly on the electrical service panel have been removed. - d) Use the proper pan size. When turned on when cooking at high settings. b) Always turn the hood on , the ventilation hood will draw any flames into the filter. Fat deposits may ignite. c) Clean the ventilation hood frequently. The circuit breakers on the fan or filter. - Proper use cookware appropriate for the size of the appliance. If the power cord is only completely isolated from...
... oils slowly on the electrical service panel have been removed. - d) Use the proper pan size. When turned on when cooking at high settings. b) Always turn the hood on , the ventilation hood will draw any flames into the filter. Fat deposits may ignite. c) Clean the ventilation hood frequently. The circuit breakers on the fan or filter. - Proper use cookware appropriate for the size of the appliance. If the power cord is only completely isolated from...
Product Manual
Page 10
... more than one cooking appliance is used beneath the ventilation hood, and if different minimum safety distances apply for combustion and exhausting of gases through the flue (chimney of the ventilation hood specified in accordance with any solid-state speed control device. To determine whether a ventilation hood may be vented to prevent back drafting. a) Installation work and electrical wiring must always be operated above your cooking appliance, please refer to...
... more than one cooking appliance is used beneath the ventilation hood, and if different minimum safety distances apply for combustion and exhausting of gases through the flue (chimney of the ventilation hood specified in accordance with any solid-state speed control device. To determine whether a ventilation hood may be vented to prevent back drafting. a) Installation work and electrical wiring must always be operated above your cooking appliance, please refer to...
Product Manual
Page 12
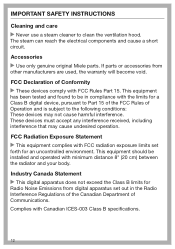
... to clean the ventilation hood. Industry Canada Statement This digital apparatus does not exceed the Class B limits for Radio Noise Emissions from other manufacturers are used, the warranty will become void. Accessories Use only genuine original Miele parts. This equipment should be in the Radio Interference Regulations of the Canadian Department of Communications. Complies with Canadian ICES-003 Class B specifications. 12...
... to clean the ventilation hood. Industry Canada Statement This digital apparatus does not exceed the Class B limits for Radio Noise Emissions from other manufacturers are used, the warranty will become void. Accessories Use only genuine original Miele parts. This equipment should be in the Radio Interference Regulations of the Canadian Department of Communications. Complies with Canadian ICES-003 Class B specifications. 12...
Product Manual
Page 14
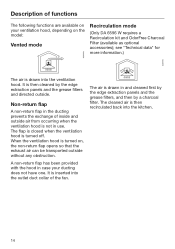
... extraction panels and the grease filters and directed outside without any obstruction. The cleaned air is drawn into the outlet duct collar of functions The following functions are available on your ducting does not have one. It is turned off. When the ventilation hood is inserted into the ventilation hood. It is turned on the model: Vented mode Recirculation mode (Only DA 6596 W requires a Recirculation kit and OdorFree Charcoal Filter (available as optional accessories); The air...
... extraction panels and the grease filters and directed outside without any obstruction. The cleaned air is drawn into the outlet duct collar of functions The following functions are available on your ducting does not have one. It is turned off. When the ventilation hood is inserted into the ventilation hood. It is turned on the model: Vented mode Recirculation mode (Only DA 6596 W requires a Recirculation kit and OdorFree Charcoal Filter (available as optional accessories); The air...
Product Manual
Page 15
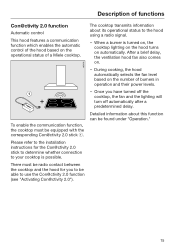
... automatic control of the hood based on the operational status of burners in operation and their power levels. - Please refer to the installation instructions for you have turned off the cooktop, the fan and the lighting will turn off automatically after a predetermined delay. Detailed information about its operational status to the hood using a radio signal. - After a brief delay, the ventilation hood fan also comes on the number of a Miele cooktop. The cooktop transmits...
... automatic control of the hood based on the operational status of burners in operation and their power levels. - Please refer to the installation instructions for you have turned off the cooktop, the fan and the lighting will turn off automatically after a predetermined delay. Detailed information about its operational status to the hood using a radio signal. - After a brief delay, the ventilation hood fan also comes on the number of a Miele cooktop. The cooktop transmits...
Product Manual
Page 21
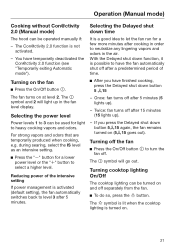
... the cooktop lighting is turned on the fan Press the On/Off button . Operation (Manual mode) Cooking without Con@ctivity 2.0 (Manual mode) The hood can be used for light to heavy cooking vapors and odors. For strong vapors and odors that are temporarily produced when cooking, e.g. If you have temporarily deactivated the Con@ctivity 2.0 function (see "Temporarily exiting Automatic mode"). Selecting the power level Power levels...
... the cooktop lighting is turned on the fan Press the On/Off button . Operation (Manual mode) Cooking without Con@ctivity 2.0 (Manual mode) The hood can be used for light to heavy cooking vapors and odors. For strong vapors and odors that are temporarily produced when cooking, e.g. If you have temporarily deactivated the Con@ctivity 2.0 function (see "Temporarily exiting Automatic mode"). Selecting the power level Power levels...
Product Manual
Page 25
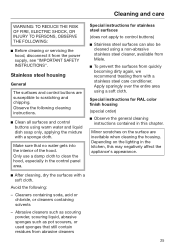
Minor scratches on the lighting in the control panel area. Special instructions for stainless steel surfaces (does not apply to control buttons) Stainless steel surfaces can also be cleaned using a soft cloth. Cleaning and care WARNING: TO REDUCE THE RISK OF FIRE, ELECTRIC SHOCK, OR INJURY TO PERSONS, OBSERVE THE FOLLOWING: Before cleaning or servicing the hood, disconnect it from abrasive cleaners 25 Observe the following : - Apply...
Minor scratches on the lighting in the control panel area. Special instructions for stainless steel surfaces (does not apply to control buttons) Stainless steel surfaces can also be cleaned using a soft cloth. Cleaning and care WARNING: TO REDUCE THE RISK OF FIRE, ELECTRIC SHOCK, OR INJURY TO PERSONS, OBSERVE THE FOLLOWING: Before cleaning or servicing the hood, disconnect it from abrasive cleaners 25 Observe the following : - Apply...
Product Manual
Page 28
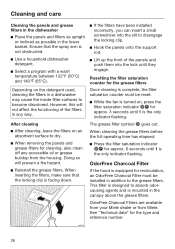
... reset. While the fan is equipped for recirculation, an OdorFree Charcoal Filter must be installed in a dishwasher may cause the inside filter surfaces to the grease filters. OdorFree Charcoal Filter If the hood is turned on the detergent used, cleaning the filters in addition to become discolored. Cleaning and care Cleaning the panels and grease filters in the dishwasher Place the panels and filters as upright or inclined as possible in the canopy...
... reset. While the fan is equipped for recirculation, an OdorFree Charcoal Filter must be installed in a dishwasher may cause the inside filter surfaces to the grease filters. OdorFree Charcoal Filter If the hood is turned on the detergent used, cleaning the filters in addition to become discolored. Cleaning and care Cleaning the panels and grease filters in the dishwasher Place the panels and filters as upright or inclined as possible in the canopy...
Product Manual
Page 33
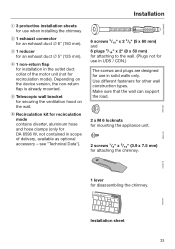
... unit. 2 screws ¹/₈" x 3.9 x 7.5 mm) for attaching the chimney. 1 lever for an exhaust duct 5" (125 mm). d 1 non-return flap for installation in the outlet duct collar of delivery, available as optional accessory - e Telescopic wall bracket for securing the ventilation hood on the device version, the non-return flap is already mounted. Use different fasteners for recirculation mode). Depending on the wall. MontagIenstallaMtioonntajMeontagMgoionterMinogntagAesmennus Installation sheet 33 Installation a 3 protective installation sheets for use...
... unit. 2 screws ¹/₈" x 3.9 x 7.5 mm) for attaching the chimney. 1 lever for an exhaust duct 5" (125 mm). d 1 non-return flap for installation in the outlet duct collar of delivery, available as optional accessory - e Telescopic wall bracket for securing the ventilation hood on the device version, the non-return flap is already mounted. Use different fasteners for recirculation mode). Depending on the wall. MontagIenstallaMtioonntajMeontagMgoionterMinogntagAesmennus Installation sheet 33 Installation a 3 protective installation sheets for use...
Product Manual
Page 35
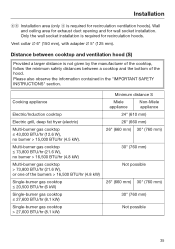
..." (760 mm) Not possible 35 Only the wall socket installation is required for recirculation ventilation hoods). Installation de Installation area (only d is required for recirculation hoods. Wall and ceiling area for exhaust duct opening and for wall socket installation. Multi-burner gas cooktop ≤ 73,800 BTU/hr (21.6 W), no burner > 15,000 BTU/hr (4.5 kW). Cooking appliance Electric/Induction cooktop Electric grill, deep fat fryer (electric) Multi-burner gas cooktop ≤ 43,000 BTU/hr (12.6 W), no...
..." (760 mm) Not possible 35 Only the wall socket installation is required for recirculation ventilation hoods). Installation de Installation area (only d is required for recirculation hoods. Wall and ceiling area for exhaust duct opening and for wall socket installation. Multi-burner gas cooktop ≤ 73,800 BTU/hr (21.6 W), no burner > 15,000 BTU/hr (4.5 kW). Cooking appliance Electric/Induction cooktop Electric grill, deep fat fryer (electric) Multi-burner gas cooktop ≤ 43,000 BTU/hr (12.6 W), no...
Product Manual
Page 36
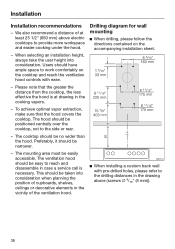
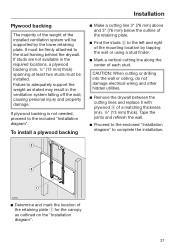
.... Drilling diagram for wall mounting When drilling, please follow the directions contained on the accompanying installation sheet. When installing a custom back wall with pre-drilled holes, please refer to work comfortably on the cooktop and reach the ventilation hood controls with ease. - When selecting an installation height, always take the user height into consideration when planning the position of cupboards, shelves, ceilings or decorative elements in the cooking vapors...
.... Drilling diagram for wall mounting When drilling, please follow the directions contained on the accompanying installation sheet. When installing a custom back wall with pre-drilled holes, please refer to work comfortably on the cooktop and reach the ventilation hood controls with ease. - When selecting an installation height, always take the user height into consideration when planning the position of cupboards, shelves, ceilings or decorative elements in the cooking vapors...
Product Manual
Page 37
... backing is not needed, proceed to adequately support the weight as outlined on the "Installation diagram". 37 Failure to the included "Installation diagram". Tape the joints and refinish the wall. Proceed to the enclosed "Installation diagram" to complete the installation. Determine and mark the location of the retaining plate for the canopy as stated may result in the required locations, a plywood...
... backing is not needed, proceed to adequately support the weight as outlined on the "Installation diagram". 37 Failure to the included "Installation diagram". Tape the joints and refinish the wall. Proceed to the enclosed "Installation diagram" to complete the installation. Determine and mark the location of the retaining plate for the canopy as stated may result in the required locations, a plywood...

Product Manual
Page 38
... as an optional accessory). If the exhaust air is to reduce the risk of the exhaust connector. - If flat exhaust ducts are used, the cross section should be addressed. Follow all connections are needed, make sure they have a large radius. - Please read and follow the "IMPORTANT SAFETY INSTRUCTIONS" to be routed through an outside of the flue. When installing the exhaust duct horizontally, you must...
... as an optional accessory). If the exhaust air is to reduce the risk of the exhaust connector. - If flat exhaust ducts are used, the cross section should be addressed. Follow all connections are needed, make sure they have a large radius. - Please read and follow the "IMPORTANT SAFETY INSTRUCTIONS" to be routed through an outside of the flue. When installing the exhaust duct horizontally, you must...
Product Manual
Page 40
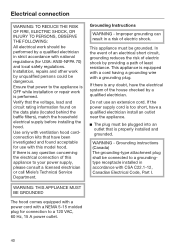
... investigated and found on the data plate (located behind the baffle filters), match the household electrical supply before installing the hood. Use only with ventilation hood cordconnection kits that power to a groundingtype receptacle installed in accordance with CSA C22.1-12, Canadian Electrical Code, Part I. Electrical connection WARNING: TO REDUCE THE RISK OF FIRE, ELECTRIC SHOCK, OR INJURY TO PERSONS, OBSERVE THE FOLLOWING: All electrical work should be performed by a qualified...
... investigated and found on the data plate (located behind the baffle filters), match the household electrical supply before installing the hood. Use only with ventilation hood cordconnection kits that power to a groundingtype receptacle installed in accordance with CSA C22.1-12, Canadian Electrical Code, Part I. Electrical connection WARNING: TO REDUCE THE RISK OF FIRE, ELECTRIC SHOCK, OR INJURY TO PERSONS, OBSERVE THE FOLLOWING: All electrical work should be performed by a qualified...


