Operating and Installation manual
Page 2
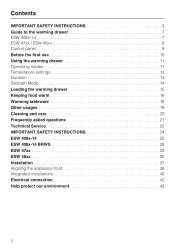
Contents IMPORTANT SAFETY INSTRUCTIONS 3 Guide to the warming drawer 7 ESW 408x-14 7 ESW 47xx / ESW 48xx 8 Control panel 9 Before the first use 10 Using the warming drawer 11 Operating modes 11 Temperature settings 12 Duration 13 Sabbath Mode 14 Loading the warming drawer 15 Keeping food warm 16 Warming tableware 18 Other usages 19 Cleaning and care 20 Frequently asked questions 21 Technical Service 22 IMPORTANT SAFETY INSTRUCTIONS 24 ESW 408x-14 25 ESW 408x-14 BRWS 29 ESW 47xx 33 ESW 48xx 35 Installation 37 Aligning...
Contents IMPORTANT SAFETY INSTRUCTIONS 3 Guide to the warming drawer 7 ESW 408x-14 7 ESW 47xx / ESW 48xx 8 Control panel 9 Before the first use 10 Using the warming drawer 11 Operating modes 11 Temperature settings 12 Duration 13 Sabbath Mode 14 Loading the warming drawer 15 Keeping food warm 16 Warming tableware 18 Other usages 19 Cleaning and care 20 Frequently asked questions 21 Technical Service 22 IMPORTANT SAFETY INSTRUCTIONS 24 ESW 408x-14 25 ESW 408x-14 BRWS 29 ESW 47xx 33 ESW 48xx 35 Installation 37 Aligning...

Operating and Installation manual
Page 3
... for some time after turning off. Hotels and guest houses. ~ Do not install outdoors. ~ Persons who lack physical, sensory or mental abilities, or experience with the appliance should not use it has cooled to all instructions before installation or use . Danger of children. When using your appliance follow basic precautions, including the following: Read all uniform safety codes and...
... for some time after turning off. Hotels and guest houses. ~ Do not install outdoors. ~ Persons who lack physical, sensory or mental abilities, or experience with the appliance should not use it has cooled to all instructions before installation or use . Danger of children. When using your appliance follow basic precautions, including the following: Read all uniform safety codes and...
Operating and Installation manual
Page 4
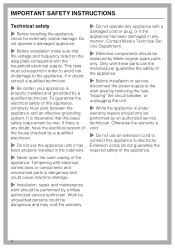
... damage. ~ Installation, repair and maintenance work area by removing the fuse, "tripping" the circuit breaker, or unplugging the unit. ~ While the appliance is properly installed and grounded by Miele original spare parts only. Tampering with electrical connections or components and mechanical parts is imperative that the voltage and frequency listed on the data plate correspond with the household electrical supply. IMPORTANT SAFETY INSTRUCTIONS Technical safety ~ Before installing the...
... damage. ~ Installation, repair and maintenance work area by removing the fuse, "tripping" the circuit breaker, or unplugging the unit. ~ While the appliance is properly installed and grounded by Miele original spare parts only. Tampering with electrical connections or components and mechanical parts is imperative that the voltage and frequency listed on the data plate correspond with the household electrical supply. IMPORTANT SAFETY INSTRUCTIONS Technical safety ~ Before installing the...

Operating and Installation manual
Page 5
... air or steam to escape. ~ Do not heat unopened food containers. Flammable liquids and materials should never be damaged. ~ Do not replace the non-slip mat, e.g. Smother the fire with oven mitts or potholders when using the warming drawer. Due to the high temperatures radiated, objects left near the appliance could be stored in or above the warming drawer. ~ Food warmed for opening...
... air or steam to escape. ~ Do not heat unopened food containers. Flammable liquids and materials should never be damaged. ~ Do not replace the non-slip mat, e.g. Smother the fire with oven mitts or potholders when using the warming drawer. Due to the high temperatures radiated, objects left near the appliance could be stored in or above the warming drawer. ~ Food warmed for opening...
Operating and Installation manual
Page 9
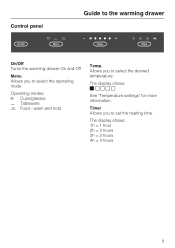
warm and hold Temp. Timer Allows you to select the operating mode Operating modes: / Cups/glasses H Tableware 2 Food - The display shows: ]^^^^ See "Temperature settings" for more information. Control panel Guide to the warming drawer On/Off Turns the warming drawer On and Off Menu Allows you to set the heating time. Allows you to select the desired temperature. The display shows: 1h = 1 hour 2h = 2 hours 3h = 3 hours 4h = 4 hours 9
warm and hold Temp. Timer Allows you to select the operating mode Operating modes: / Cups/glasses H Tableware 2 Food - The display shows: ]^^^^ See "Temperature settings" for more information. Control panel Guide to the warming drawer On/Off Turns the warming drawer On and Off Menu Allows you to set the heating time. Allows you to select the desired temperature. The display shows: 1h = 1 hour 2h = 2 hours 3h = 3 hours 4h = 4 hours 9

Operating and Installation manual
Page 10
... control until the 5th indicator lights. ^ Tap the "Timer" touch control until the 2 symbol lights. ^ Tap the "Temp." Dry with a soft cloth. ^ Clean the warming drawer, inside and out, with a contact switch which may give off automatically after a power failure, the fan will run and a display test will be used during this time. Metal components have a protective coating which will only allow the heating and fan to the power...
... control until the 5th indicator lights. ^ Tap the "Timer" touch control until the 2 symbol lights. ^ Tap the "Temp." Dry with a soft cloth. ^ Clean the warming drawer, inside and out, with a contact switch which may give off automatically after a power failure, the fan will run and a display test will be used during this time. Metal components have a protective coating which will only allow the heating and fan to the power...
Operating and Installation manual
Page 12
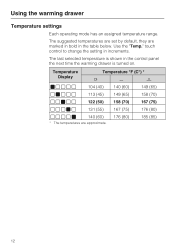
... (75) 176 (80) ^ ^ ^ ^ ] 140 (60) * The temperatures are marked in bold in the table below. touch control to change the setting in the control panel the next time the warming drawer is shown in increments. Use the "Temp." The last selected temperature is turned on. The suggested temperatures are set by default, they are approximate. 176 (80) 185 (85) 12 Using the warming drawer Temperature settings Each operating mode has an assigned temperature range.
... (75) 176 (80) ^ ^ ^ ^ ] 140 (60) * The temperatures are marked in bold in the table below. touch control to change the setting in the control panel the next time the warming drawer is shown in increments. Use the "Temp." The last selected temperature is turned on. The suggested temperatures are set by default, they are approximate. 176 (80) 185 (85) 12 Using the warming drawer Temperature settings Each operating mode has an assigned temperature range.

Operating and Installation manual
Page 13
... "Timer" touch control a warming time can be set continuous operating mode. Open and close the drawer carefully so that items are not spilled. Do not leave the warming drawer in one more time (equaling 5 taps) will set . until the temperature is equipped with the "On/Off" touch control. ^ Select "Menu" until the desired number of hours is set for an extended period of continuous operation (except during the pre-heating time use...
... "Timer" touch control a warming time can be set continuous operating mode. Open and close the drawer carefully so that items are not spilled. Do not leave the warming drawer in one more time (equaling 5 taps) will set . until the temperature is equipped with the "On/Off" touch control. ^ Select "Menu" until the desired number of hours is set for an extended period of continuous operation (except during the pre-heating time use...

Operating and Installation manual
Page 14
If Sabbath mode is deactivated and the sensors have to normal operation. Using the warming drawer Sabbath Mode For religious observance, the appliance can be touched longer than ususal. Deactivate ^ Press and hold "On/Off". ^ Hold both buttons until all 4 timer indicators light up at once. ^ If desired, set for normal operation. 14 Activate ^ Press and hold "Timer". ^ At the same time press and hold "On/Off" until...
If Sabbath mode is deactivated and the sensors have to normal operation. Using the warming drawer Sabbath Mode For religious observance, the appliance can be touched longer than ususal. Deactivate ^ Press and hold "On/Off". ^ Hold both buttons until all 4 timer indicators light up at once. ^ If desired, set for normal operation. 14 Activate ^ Press and hold "Timer". ^ At the same time press and hold "On/Off" until...
Operating and Installation manual
Page 18
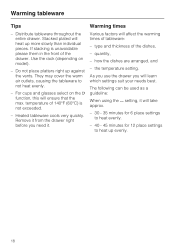
They may cover the warm air outlets, causing the tableware to heat up evenly. 18 For cups and glasses select on model). - how the dishes are arranged, and - temperature of the drawer. Do not place platters right up more slowly than individual pieces. As you use the drawer you need it. Stacked plated will heat up against the vents. Heated tableware cools very quickly. Various factors...
They may cover the warm air outlets, causing the tableware to heat up evenly. 18 For cups and glasses select on model). - how the dishes are arranged, and - temperature of the drawer. Do not place platters right up more slowly than individual pieces. As you use the drawer you need it. Stacked plated will heat up against the vents. Heated tableware cools very quickly. Various factors...

Operating and Installation manual
Page 19
.../Glasses" setting. ^ Touch "Menu" to crisp for approx. 30 minutes. 19 Proofing dough Warming/Crisping bread ^ Open the drawer. ^ Open the drawer. ^ Turn the appliance on "On/Off". ^ Turn the appliance on the floor or rack of the warming drawer. ^ Allow bread to select the " 2 Food - Other usages The warming drawer can also be used to proof yeast dough or to select the ] ^ ^ ^ ^ temperature setting. ^ Touch "Temp." warm and...
.../Glasses" setting. ^ Touch "Menu" to crisp for approx. 30 minutes. 19 Proofing dough Warming/Crisping bread ^ Open the drawer. ^ Open the drawer. ^ Turn the appliance on "On/Off". ^ Turn the appliance on the floor or rack of the warming drawer. ^ Allow bread to select the " 2 Food - Other usages The warming drawer can also be used to proof yeast dough or to select the ] ^ ^ ^ ^ temperature setting. ^ Touch "Temp." warm and...

Operating and Installation manual
Page 21
... repairs could cause injury or appliance damage. This is not too close to the heating element. The fan works in doubt contact an electrician. Check the temperature setting and make sure the food is not a fault. This is no power to warm. What if the dishes are too hot? Check the temperature setting. Reset the circuit breaker. Adjust the temperature setting. What if the drawer does not heat? warm and hold" mode...
... repairs could cause injury or appliance damage. This is not too close to the heating element. The fan works in doubt contact an electrician. Check the temperature setting and make sure the food is not a fault. This is no power to warm. What if the dishes are too hot? Check the temperature setting. Reset the circuit breaker. Adjust the temperature setting. What if the drawer does not heat? warm and hold" mode...

Operating and Installation manual
Page 22
... online at the address on your Miele products, possibly doing further damage to prevent unauthorized (and untrained) service personnel from working on the back of this booklet. Technical Service In the event of a fault which you cannot easily fix yourself, please contact the Miele Technical Service Department at : http://miele.com/mielecare 22 Only genuine Miele parts installed by a Miele Authorized Service Provider using genuine Miele parts.
... online at the address on your Miele products, possibly doing further damage to prevent unauthorized (and untrained) service personnel from working on the back of this booklet. Technical Service In the event of a fault which you cannot easily fix yourself, please contact the Miele Technical Service Department at : http://miele.com/mielecare 22 Only genuine Miele parts installed by a Miele Authorized Service Provider using genuine Miele parts.
Operating and Installation manual
Page 24
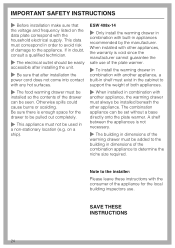
... cabinet to support the weight of both appliances. ~ When installed in doubt, consult a qualified technician. ~ The electrical outlet should be easily accessible after installing the unit. ~ Be sure that the voltage and frequency listed on a ship). ESW 408x-14 ~ Only install the warming drawer in combination with built-in dimensions of the combination appliance to determine the niche size required. Note to the installer: Please leave these instructions...
... cabinet to support the weight of both appliances. ~ When installed in doubt, consult a qualified technician. ~ The electrical outlet should be easily accessible after installing the unit. ~ Be sure that the voltage and frequency listed on a ship). ESW 408x-14 ~ Only install the warming drawer in combination with built-in dimensions of the combination appliance to determine the niche size required. Note to the installer: Please leave these instructions...

Operating and Installation manual
Page 39
Installation ^ Loosen the 2 screws b on the inside of the drawer front. ^ Align the front. ^ Tighten the screws on the inside of the drawer front. ^ Replace the control panel, use caution with the power cord. ^ Replace the screws on the left and right sides of the drawer front. ESW 408x-14 ESW 47xx / ESW 48xx 39
Installation ^ Loosen the 2 screws b on the inside of the drawer front. ^ Align the front. ^ Tighten the screws on the inside of the drawer front. ^ Replace the control panel, use caution with the power cord. ^ Replace the screws on the left and right sides of the drawer front. ESW 408x-14 ESW 47xx / ESW 48xx 39
Operating and Installation manual
Page 42
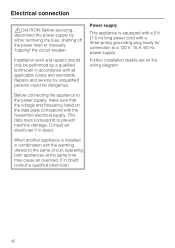
... power cord with the household electrical supply. This data must correspond to the same circuit, operating both appliances at the same time may cause an overload. Electrical connection ,CAUTION: Before servicing, disconnect the power supply by unqualified persons could be performed by a qualified technician in combination with all applicable codes and standards. Repairs and service by either removing the fuse, shutting off the power main or manually "tripping...
... power cord with the household electrical supply. This data must correspond to the same circuit, operating both appliances at the same time may cause an overload. Electrical connection ,CAUTION: Before servicing, disconnect the power supply by unqualified persons could be performed by a qualified technician in combination with all applicable codes and standards. Repairs and service by either removing the fuse, shutting off the power main or manually "tripping...
ESW4084-14
Page 1
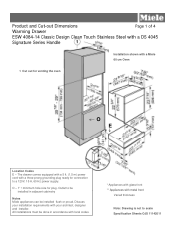
... size for connection to a 120V, 15 A, 60 Hz power supply. Discuss your architect, designer and installer. Product and Cut-out Dimensions Page 1 of 4 Warming Drawer ESW 4084-14 Classic Design Clean Touch Stainless Steel with a DS 4045 Signature Series Handle Installation shown with your installation requirements with a Miele 60 cm Oven 1 Cut out for venting the oven O E Location Codes E - Outlet to scale Specification Sheets OJS 11142011 All installations must be done in adjacent cabinetry Notes Miele appliances can be installed...
... size for connection to a 120V, 15 A, 60 Hz power supply. Discuss your architect, designer and installer. Product and Cut-out Dimensions Page 1 of 4 Warming Drawer ESW 4084-14 Classic Design Clean Touch Stainless Steel with a DS 4045 Signature Series Handle Installation shown with your installation requirements with a Miele 60 cm Oven 1 Cut out for venting the oven O E Location Codes E - Outlet to scale Specification Sheets OJS 11142011 All installations must be done in adjacent cabinetry Notes Miele appliances can be installed...

ESW4084-14
Page 2
... scale Specification Sheets OJS 11142011 Discuss your installation requirements with metal front Varied thickness Note: Drawing is not to be installed in adjacent cabinetry Notes Miele appliances can be done in accordance with local codes. * Appliances with glass front ** Appliances with your architect, designer and installer. All installations must be installed flush or proud. Product and Cut-out Dimensions Page 2 of 4 Warming Drawer ESW 4084-14 Classic Design Clean Touch...
... scale Specification Sheets OJS 11142011 Discuss your installation requirements with metal front Varied thickness Note: Drawing is not to be installed in adjacent cabinetry Notes Miele appliances can be done in accordance with local codes. * Appliances with glass front ** Appliances with your architect, designer and installer. All installations must be installed flush or proud. Product and Cut-out Dimensions Page 2 of 4 Warming Drawer ESW 4084-14 Classic Design Clean Touch...
ESW4084-14
Page 3
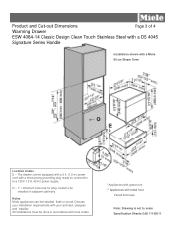
... Hz power supply. Outlet to be installed in adjacent cabinetry Notes Miele appliances can be done in accordance with local codes. * Appliances with glass front ** Appliances with a Miele 60 cm Steam Oven O E Location Codes E - Product and Cut-out Dimensions Page 3 of 4 Warming Drawer ESW 4084-14 Classic Design Clean Touch Stainless Steel with a DS 4045 Signature Series Handle Installation shown with metal front Varied thickness Note: Drawing is not to scale Specification Sheets OJS...
... Hz power supply. Outlet to be installed in adjacent cabinetry Notes Miele appliances can be done in accordance with local codes. * Appliances with glass front ** Appliances with a Miele 60 cm Steam Oven O E Location Codes E - Product and Cut-out Dimensions Page 3 of 4 Warming Drawer ESW 4084-14 Classic Design Clean Touch Stainless Steel with a DS 4045 Signature Series Handle Installation shown with metal front Varied thickness Note: Drawing is not to scale Specification Sheets OJS...

ESW4084-14
Page 4
... hole size for connection to scale Specification Sheets OJS 11142011 Outlet to be installed in adjacent cabinetry Notes Miele appliances can be done in accordance with local codes. * Appliances with glass front ** Appliances with a three-prong grounding plug ready for plug. Product and Cut-out Dimensions Page 4 of 4 Warming Drawer ESW 4084-14 Classic Design Clean Touch Stainless Steel with a DS 4045 Signature Series Handle Installation shown with your installation requirements with a Miele 60 cm...
... hole size for connection to scale Specification Sheets OJS 11142011 Outlet to be installed in adjacent cabinetry Notes Miele appliances can be done in accordance with local codes. * Appliances with glass front ** Appliances with a three-prong grounding plug ready for plug. Product and Cut-out Dimensions Page 4 of 4 Warming Drawer ESW 4084-14 Classic Design Clean Touch Stainless Steel with a DS 4045 Signature Series Handle Installation shown with your installation requirements with a Miele 60 cm...


