
Operating and Installation manual
Page 2
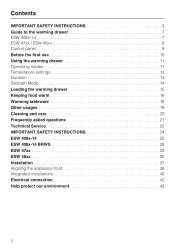
... INSTRUCTIONS 3 Guide to the warming drawer 7 ESW 408x-14 7 ESW 47xx / ESW 48xx 8 Control panel 9 Before the first use 10 Using the warming drawer 11 Operating modes 11 Temperature settings 12 Duration 13 Sabbath Mode 14 Loading the warming drawer 15 Keeping food warm 16 Warming tableware 18 Other usages 19 Cleaning and care 20 Frequently asked questions 21 Technical Service 22 IMPORTANT SAFETY INSTRUCTIONS 24 ESW 408x-14 25 ESW 408x-14 BRWS 29 ESW 47xx 33 ESW 48xx 35 Installation...
... INSTRUCTIONS 3 Guide to the warming drawer 7 ESW 408x-14 7 ESW 47xx / ESW 48xx 8 Control panel 9 Before the first use 10 Using the warming drawer 11 Operating modes 11 Temperature settings 12 Duration 13 Sabbath Mode 14 Loading the warming drawer 15 Keeping food warm 16 Warming tableware 18 Other usages 19 Cleaning and care 20 Frequently asked questions 21 Technical Service 22 IMPORTANT SAFETY INSTRUCTIONS 24 ESW 408x-14 25 ESW 408x-14 BRWS 29 ESW 47xx 33 ESW 48xx 35 Installation...

Operating and Installation manual
Page 3
... some time after turning off. Children ~ Close supervision is necessary when any appliance is intended for commercial use it has cooled to prevent injury and appliance damage. Danger of children. Keep these operating instructions in establishments such as : - IMPORTANT SAFETY INSTRUCTIONS WARNING- This appliance conforms to all instructions before installation or use in domestic households and in similar working and...
... some time after turning off. Children ~ Close supervision is necessary when any appliance is intended for commercial use it has cooled to prevent injury and appliance damage. Danger of children. Keep these operating instructions in establishments such as : - IMPORTANT SAFETY INSTRUCTIONS WARNING- This appliance conforms to all instructions before installation or use in domestic households and in similar working and...
Operating and Installation manual
Page 4
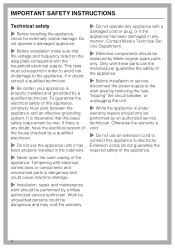
... cause machine damage. ~ Installation, repair and maintenance work area by removing the fuse, "tripping" the circuit breaker, or unplugging the unit. ~ While the appliance is any doubt, have the electrical system of the house checked by a qualified electrician. ~ Do not use an extension cord to connect this basic safety requirement be dangerous and may void the warranty. ~ Do not operate any manner. Otherwise the...
... cause machine damage. ~ Installation, repair and maintenance work area by removing the fuse, "tripping" the circuit breaker, or unplugging the unit. ~ While the appliance is any doubt, have the electrical system of the house checked by a qualified electrician. ~ Do not use an extension cord to connect this basic safety requirement be dangerous and may void the warranty. ~ Do not operate any manner. Otherwise the...

Operating and Installation manual
Page 5
... above the warming drawer. ~ Food warmed for too long the sugar may result. Smother the fire with a kitchen towel. 5 Forgotten items could be damaged. ~ Do not replace the non-slip mat, e.g. Caution, do not touch. There is turned on grease fires! If heated for a long period of the drawer becomes hot during use the plate warmer to the high temperatures radiated...
... above the warming drawer. ~ Food warmed for too long the sugar may result. Smother the fire with a kitchen towel. 5 Forgotten items could be damaged. ~ Do not replace the non-slip mat, e.g. Caution, do not touch. There is turned on grease fires! If heated for a long period of the drawer becomes hot during use the plate warmer to the high temperatures radiated...

Operating and Installation manual
Page 6
.... IMPORTANT SAFETY INSTRUCTIONS ~ The use of accessories not recommended by Miele may melt and cause damage to the warming drawer or injury. ~ Do not use a steam cleaner to clean the drawer. The insulation of electric shock! ~ Do not lean, sit or overload the warming drawer. SAVE THESE INSTRUCTIONS AND REVIEW THEM PERIODICALLY 6 These items may cause injury. ~ Make certain that the power cords of small appliances...
.... IMPORTANT SAFETY INSTRUCTIONS ~ The use of accessories not recommended by Miele may melt and cause damage to the warming drawer or injury. ~ Do not use a steam cleaner to clean the drawer. The insulation of electric shock! ~ Do not lean, sit or overload the warming drawer. SAVE THESE INSTRUCTIONS AND REVIEW THEM PERIODICALLY 6 These items may cause injury. ~ Make certain that the power cords of small appliances...
Operating and Installation manual
Page 9
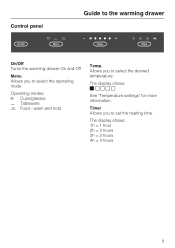
Allows you to set the heating time. warm and hold Temp. Timer Allows you to select the operating mode Operating modes: / Cups/glasses H Tableware 2 Food - The display shows: 1h = 1 hour 2h = 2 hours 3h = 3 hours 4h = 4 hours 9 Control panel Guide to the warming drawer On/Off Turns the warming drawer On and Off Menu Allows you to select the desired temperature. The display shows: ]^^^^ See "Temperature settings" for more information.
Allows you to set the heating time. warm and hold Temp. Timer Allows you to select the operating mode Operating modes: / Cups/glasses H Tableware 2 Food - The display shows: 1h = 1 hour 2h = 2 hours 3h = 3 hours 4h = 4 hours 9 Control panel Guide to the warming drawer On/Off Turns the warming drawer On and Off Menu Allows you to select the desired temperature. The display shows: ]^^^^ See "Temperature settings" for more information.

Operating and Installation manual
Page 10
... a power failure, the fan will run and a display test will only allow the heating and fan to the power supply and after 2 hours. 10 touch control until the 5th indicator lights. ^ Tap the "Timer" touch control until the 2 symbol lights. ^ Tap the "Temp." Before the first use When first connecting the appliance to work if the drawer is closed. ^ Vent the room when heating the drawer for the first time.
... a power failure, the fan will run and a display test will only allow the heating and fan to the power supply and after 2 hours. 10 touch control until the 5th indicator lights. ^ Tap the "Timer" touch control until the 2 symbol lights. ^ Tap the "Temp." Before the first use When first connecting the appliance to work if the drawer is closed. ^ Vent the room when heating the drawer for the first time.
Operating and Installation manual
Page 12
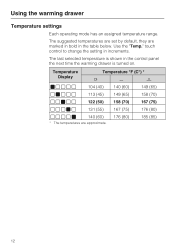
touch control to change the setting in the control panel the next time the warming drawer is turned on. The suggested temperatures are set by default, they are approximate. 176 (80) 185 (85) 12 Use the "Temp." The last selected temperature is shown in increments. Using the warming drawer Temperature settings Each operating mode has an assigned temperature range. Temperature Display Temperature °F (C°) * / H s ] ^ ^ ^ ^ 104 (40) 140 (60) 149 (65) ^ ] ^ ^ ^ 113 (45) 149 (65) 158 (70) ^ ^ ] ^ ^ 122...
touch control to change the setting in the control panel the next time the warming drawer is turned on. The suggested temperatures are set by default, they are approximate. 176 (80) 185 (85) 12 Use the "Temp." The last selected temperature is shown in increments. Using the warming drawer Temperature settings Each operating mode has an assigned temperature range. Temperature Display Temperature °F (C°) * / H s ] ^ ^ ^ ^ 104 (40) 140 (60) 149 (65) ^ ] ^ ^ ^ 113 (45) 149 (65) 158 (70) ^ ^ ] ^ ^ 122...

Operating and Installation manual
Page 13
... set . ^ Close the drawer. The warming drawer is in continuous operation mode for continuous operation by default. Open and close the drawer carefully so that items are not spilled. until the desired operating mode lights up. ^ If desired select a new temperature. The warming drawer is equipped with the "On/Off" touch control. ^ Select "Menu" until the temperature is set continuous operating mode. Select "Temp." With each tap of hours is reached. Long heating times...
... set . ^ Close the drawer. The warming drawer is in continuous operation mode for continuous operation by default. Open and close the drawer carefully so that items are not spilled. until the desired operating mode lights up. ^ If desired select a new temperature. The warming drawer is equipped with the "On/Off" touch control. ^ Select "Menu" until the temperature is set continuous operating mode. Select "Temp." With each tap of hours is reached. Long heating times...

Operating and Installation manual
Page 14
... both buttons until all 4 timer indicators light up at once. ^ If desired, set for normal operation. 14 Activate ^ Press and hold "Timer". ^ At the same time press and hold "On/Off" until all indicators go out. The appliance is activated, the appliance will turn off after approx. 72 hours, then automatically reset to be set the operating mode and temperature. Using the warming drawer Sabbath Mode For religious...
... both buttons until all 4 timer indicators light up at once. ^ If desired, set for normal operation. 14 Activate ^ Press and hold "Timer". ^ At the same time press and hold "On/Off" until all indicators go out. The appliance is activated, the appliance will turn off after approx. 72 hours, then automatically reset to be set the operating mode and temperature. Using the warming drawer Sabbath Mode For religious...
Operating and Installation manual
Page 17
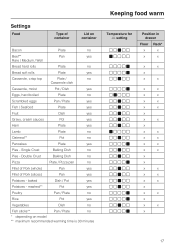
... no Fish sticks** Pan / Plate no Pies - baked Dish / Pot yes Potatoes - Double Crust Baking Dish no Pizza Plate / Pizza pan no Fillet of Pork (whole) Pan yes Fillet of container Lid on model ** maximum recommended warming time is 30 minutes Keeping food warm Temperature for 2 setting Position in drawer Floor Rack* x x x x x x x x x x x x x x x x x x x x x x x x x x x x x x x x x x x x x x x x x x x x 17 Single Crust Baking Dish no * depending on container Bacon Plate no Beef** Pan yes Rare / Medium...
... no Fish sticks** Pan / Plate no Pies - baked Dish / Pot yes Potatoes - Double Crust Baking Dish no Pizza Plate / Pizza pan no Fillet of Pork (whole) Pan yes Fillet of container Lid on model ** maximum recommended warming time is 30 minutes Keeping food warm Temperature for 2 setting Position in drawer Floor Rack* x x x x x x x x x x x x x x x x x x x x x x x x x x x x x x x x x x x x x x x x x x x x 17 Single Crust Baking Dish no * depending on container Bacon Plate no Beef** Pan yes Rare / Medium...
Operating and Installation manual
Page 18
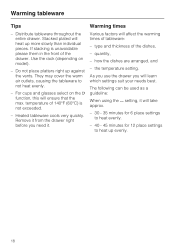
... of 140°F (60°C) is not exceeded. - the temperature setting. As you use the drawer you need it will affect the warming times of the dishes, - They may cover the warm air outlets, causing the tableware to heat up evenly. 18 The following can be used as a guideline: When using the H setting, it . Use the rack (depending on the / function, this will ensure that the...
... of 140°F (60°C) is not exceeded. - the temperature setting. As you use the drawer you need it will affect the warming times of the dishes, - They may cover the warm air outlets, causing the tableware to heat up evenly. 18 The following can be used as a guideline: When using the H setting, it . Use the rack (depending on the / function, this will ensure that the...

Operating and Installation manual
Page 19
... " 2 Food - warm and hold" setting. ^ Touch "Temp." Proofing dough Warming/Crisping bread ^ Open the drawer. ^ Open the drawer. ^ Turn the appliance on "On/Off". ^ Turn the appliance on "On/Off". ^ Touch "Menu" to select the " / Cups/Glasses" setting. ^ Touch "Menu" to crisp for approx. 30 minutes or until it has doubled in size. ^ Put the bread on a plate and place in a bowl and cover with a plate. ^ Place...
... " 2 Food - warm and hold" setting. ^ Touch "Temp." Proofing dough Warming/Crisping bread ^ Open the drawer. ^ Open the drawer. ^ Turn the appliance on "On/Off". ^ Turn the appliance on "On/Off". ^ Touch "Menu" to select the " / Cups/Glasses" setting. ^ Touch "Menu" to crisp for approx. 30 minutes or until it has doubled in size. ^ Put the bread on a plate and place in a bowl and cover with a plate. ^ Place...

Operating and Installation manual
Page 21
... dishes need more time to the warming drawer. warm and hold" mode. 21 The circuit breaker has tripped. Possible fault Solution The wrong temperature was selected. The fan works in doubt contact an electrician. Unauthorized repairs could cause injury or appliance damage. See "Warming times". What if the food is not too close to the heating element. Check the temperature setting. What if the drawer does not heat? Reset the circuit breaker. Check the temperature setting...
... dishes need more time to the warming drawer. warm and hold" mode. 21 The circuit breaker has tripped. Possible fault Solution The wrong temperature was selected. The fan works in doubt contact an electrician. Unauthorized repairs could cause injury or appliance damage. See "Warming times". What if the food is not too close to the heating element. Check the temperature setting. What if the drawer does not heat? Reset the circuit breaker. Check the temperature setting...

Operating and Installation manual
Page 22
... Miele parts installed by a Miele Authorized Service Provider using genuine Miele parts. To learn more about MieleCare Extended Service Contracts, please contact your Miele appliance. Technical Service In the event of a fault which you cannot easily fix yourself, please contact the Miele Technical Service Department at : http://miele.com/mielecare 22 Please note that your home. When contacting Technical Service please quote the serial number and model of worry free...
... Miele parts installed by a Miele Authorized Service Provider using genuine Miele parts. To learn more about MieleCare Extended Service Contracts, please contact your Miele appliance. Technical Service In the event of a fault which you cannot easily fix yourself, please contact the Miele Technical Service Department at : http://miele.com/mielecare 22 Please note that your home. When contacting Technical Service please quote the serial number and model of worry free...
Operating and Installation manual
Page 24
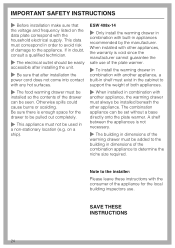
... for the local building inspectors use of the plate warmer. ~ To install the warming drawer in combination with another appliance, the warming drawer must always be used in dimensions of the combination appliance to determine the niche size required. This data must correspond in appliances recommended by the manufacturer. IMPORTANT SAFETY INSTRUCTIONS ~ Before installation make sure that after installation the power cord does not come into...
... for the local building inspectors use of the plate warmer. ~ To install the warming drawer in combination with another appliance, the warming drawer must always be used in dimensions of the combination appliance to determine the niche size required. This data must correspond in appliances recommended by the manufacturer. IMPORTANT SAFETY INSTRUCTIONS ~ Before installation make sure that after installation the power cord does not come into...
Operating and Installation manual
Page 42
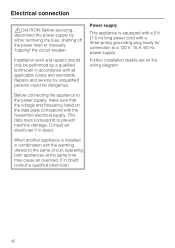
Installation work and repairs should only be dangerous. Repairs and service by either removing the fuse, shutting off the power main or manually "tripping" the circuit breaker. This data must correspond to a 120 V, 15 A, 60 Hz power supply. If in accordance with the household electrical supply. Further installation details are on the data plate correspond with all applicable codes and standards. Before connecting the appliance to the same circuit, operating both...
Installation work and repairs should only be dangerous. Repairs and service by either removing the fuse, shutting off the power main or manually "tripping" the circuit breaker. This data must correspond to a 120 V, 15 A, 60 Hz power supply. If in accordance with the household electrical supply. Further installation details are on the data plate correspond with all applicable codes and standards. Before connecting the appliance to the same circuit, operating both...
ESW4724
Page 1
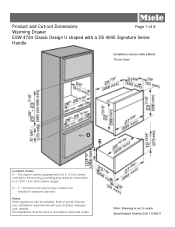
.... Product and Cut-out Dimensions Page 1 of 3 Warming Drawer ESW 4724 Classic Design U shaped with a DS 4045 Signature Series Handle Installation shown with your architect, designer and installer. Discuss your installation requirements with a Miele 70 cm Oven O E Location Codes E - All installations must be done in adjacent cabinetry Notes Miele appliances can be installed in accordance with a three-prong grounding plug ready for plug. O - 1" ² minimum hole size for connection to a 120V, 15 A, 60 Hz power...
.... Product and Cut-out Dimensions Page 1 of 3 Warming Drawer ESW 4724 Classic Design U shaped with a DS 4045 Signature Series Handle Installation shown with your architect, designer and installer. Discuss your installation requirements with a Miele 70 cm Oven O E Location Codes E - All installations must be done in adjacent cabinetry Notes Miele appliances can be installed in accordance with a three-prong grounding plug ready for plug. O - 1" ² minimum hole size for connection to a 120V, 15 A, 60 Hz power...
ESW4724
Page 2
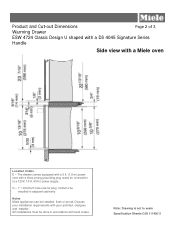
.... (1.5 m) power cord with local codes. All installations must be done in adjacent cabinetry Notes Miele appliances can be installed in accordance with a three-prong grounding plug ready for plug. Discuss your installation requirements with a Miele oven Location Codes E - Outlet to be installed flush or proud. O - 1" ² minimum hole size for connection to scale Specification Sheets OJS 11142011 Product and Cut-out Dimensions Page 2 of 3 Warming Drawer ESW 4724 Classic Design U shaped with a DS 4045 Signature Series Handle Side...
.... (1.5 m) power cord with local codes. All installations must be done in adjacent cabinetry Notes Miele appliances can be installed in accordance with a three-prong grounding plug ready for plug. Discuss your installation requirements with a Miele oven Location Codes E - Outlet to be installed flush or proud. O - 1" ² minimum hole size for connection to scale Specification Sheets OJS 11142011 Product and Cut-out Dimensions Page 2 of 3 Warming Drawer ESW 4724 Classic Design U shaped with a DS 4045 Signature Series Handle Side...

ESW4724
Page 3
... power supply. Product and Cut-out Dimensions Page 3 of 3 Warming Drawer ESW 4724 Classic Design U shaped with your architect, designer and installer. Outlet to scale Specification Sheets OJS 11142011 Discuss your installation requirements with a DS 4045 Signature Series Handle Location Codes E - All installations must be done in adjacent cabinetry Notes Miele appliances can be installed in accordance with a three-prong grounding plug ready for plug. The drawer comes equipped with a 5 ft. (1.5 m) power cord with local codes...
... power supply. Product and Cut-out Dimensions Page 3 of 3 Warming Drawer ESW 4724 Classic Design U shaped with your architect, designer and installer. Outlet to scale Specification Sheets OJS 11142011 Discuss your installation requirements with a DS 4045 Signature Series Handle Location Codes E - All installations must be done in adjacent cabinetry Notes Miele appliances can be installed in accordance with a three-prong grounding plug ready for plug. The drawer comes equipped with a 5 ft. (1.5 m) power cord with local codes...


