
Operating and Installation manual
Page 1
Operating and Installation Instructions Built-in Warming Drawer ESW 408x-14 ESW 47xx ESW 48xx To prevent accidents and machine damages, read these instructions before installation or use. US, CA M.-Nr. 07 342 380 en -
Operating and Installation Instructions Built-in Warming Drawer ESW 408x-14 ESW 47xx ESW 48xx To prevent accidents and machine damages, read these instructions before installation or use. US, CA M.-Nr. 07 342 380 en -
Operating and Installation manual
Page 2
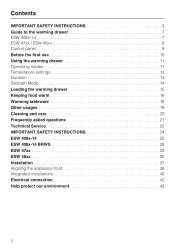
Contents IMPORTANT SAFETY INSTRUCTIONS 3 Guide to the warming drawer 7 ESW 408x-14 7 ESW 47xx / ESW 48xx 8 Control panel 9 Before the first use 10 Using the warming drawer 11 Operating modes 11 Temperature settings 12 Duration 13 Sabbath Mode 14... tableware 18 Other usages 19 Cleaning and care 20 Frequently asked questions 21 Technical Service 22 IMPORTANT SAFETY INSTRUCTIONS 24 ESW 408x-14 25 ESW 408x-14 BRWS 29 ESW 47xx 33 ESW 48xx 35 Installation 37 Aligning the appliance front 38 Integrated installations 40 Electrical connection 42 Help protect our environment 43 ...
Contents IMPORTANT SAFETY INSTRUCTIONS 3 Guide to the warming drawer 7 ESW 408x-14 7 ESW 47xx / ESW 48xx 8 Control panel 9 Before the first use 10 Using the warming drawer 11 Operating modes 11 Temperature settings 12 Duration 13 Sabbath Mode 14... tableware 18 Other usages 19 Cleaning and care 20 Frequently asked questions 21 Technical Service 22 IMPORTANT SAFETY INSTRUCTIONS 24 ESW 408x-14 25 ESW 408x-14 BRWS 29 ESW 47xx 33 ESW 48xx 35 Installation 37 Aligning the appliance front 38 Integrated installations 40 Electrical connection 42 Help protect our environment 43 ...

Operating and Installation manual
Page 3
When using your appliance follow basic precautions, including the following: Read all uniform safety codes and regulations. Keep these operating instructions in establishments such as : - Offices and showrooms and by residents in a safe place and pass them on to a safe temperature. ~ Ensure that any appliance is disposed of safely and kept out of the reach of suffocation! 3 Keep children away from the warming drawer until it without supervision or instruction by or near children. ~ The appliance becomes hot during use in domestic households and in similar working and residential...
When using your appliance follow basic precautions, including the following: Read all uniform safety codes and regulations. Keep these operating instructions in establishments such as : - Offices and showrooms and by residents in a safe place and pass them on to a safe temperature. ~ Ensure that any appliance is disposed of safely and kept out of the reach of suffocation! 3 Keep children away from the warming drawer until it without supervision or instruction by or near children. ~ The appliance becomes hot during use in domestic households and in similar working and residential...
Operating and Installation manual
Page 4
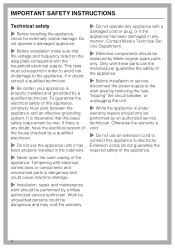
... system. Only with these parts can the manufacturer guarantee the safety of damage to the work should be performed by Miele original spare parts only. Work by unqualified persons could cause machine damage. ~ Installation, repair and maintenance work area by... an authorized service technician. Otherwise the warranty is dangerous and could be replaced by a Miele authorized service technician. If in any appliance with the household electrical supply. Tampering with electrical connections or components and mechanical parts ...
... system. Only with these parts can the manufacturer guarantee the safety of damage to the work should be performed by Miele original spare parts only. Work by unqualified persons could cause machine damage. ~ Installation, repair and maintenance work area by... an authorized service technician. Otherwise the warranty is dangerous and could be replaced by a Miele authorized service technician. If in any appliance with the household electrical supply. Tampering with electrical connections or components and mechanical parts ...

Operating and Installation manual
Page 5
Use the handle for babies and children. ~ Never warm undiluted alcohol in the warming drawer. Food and tableware may result. This is particularly important when preparing food for opening and closing the appliance. ~ Do not store anything in the warming drawer, this can easily ignite. ~ Exercise caution when warming food with a dry chemical or foam fire extinguisher. ~ Never add water to the high temperatures radiated, objects left near the appliance could be sure food is possible that will also allow hot air or steam to heat the room. with oven mitts or potholders ...
Use the handle for babies and children. ~ Never warm undiluted alcohol in the warming drawer. Food and tableware may result. This is particularly important when preparing food for opening and closing the appliance. ~ Do not store anything in the warming drawer, this can easily ignite. ~ Exercise caution when warming food with a dry chemical or foam fire extinguisher. ~ Never add water to the high temperatures radiated, objects left near the appliance could be sure food is possible that will also allow hot air or steam to heat the room. with oven mitts or potholders ...

Operating and Installation manual
Page 6
... (25 kg). ~ Do not use a steam cleaner to clean the drawer. Steam could become damaged. IMPORTANT SAFETY INSTRUCTIONS ~ The use of accessories not recommended by Miele may melt and cause damage to the warming drawer or injury. ~ Do not use plastic containers, plastic wrap or aluminum foil in contact with the...
... (25 kg). ~ Do not use a steam cleaner to clean the drawer. Steam could become damaged. IMPORTANT SAFETY INSTRUCTIONS ~ The use of accessories not recommended by Miele may melt and cause damage to the warming drawer or injury. ~ Do not use plastic containers, plastic wrap or aluminum foil in contact with the...

Operating and Installation manual
Page 7
ESW 408x-14 Guide to the warming drawer a Control panel b Non-slip mat 7
ESW 408x-14 Guide to the warming drawer a Control panel b Non-slip mat 7

Operating and Installation manual
Page 8
Guide to the warming drawer ESW 47xx / ESW 48xx a Control panel b Non-slip mat c Vent d Rack 8
Guide to the warming drawer ESW 47xx / ESW 48xx a Control panel b Non-slip mat c Vent d Rack 8
Operating and Installation manual
Page 9
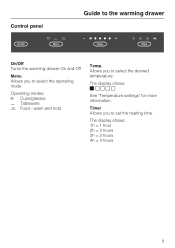
Control panel Guide to the warming drawer On/Off Turns the warming drawer On and Off Menu Allows you to select the desired temperature. Allows you to set the heating time. Timer Allows you to select the operating mode Operating modes: / Cups/glasses H Tableware 2 Food - warm and hold Temp. The display shows: 1h = 1 hour 2h = 2 hours 3h = 3 hours 4h = 4 hours 9 The display shows: ]^^^^ See "Temperature settings" for more information.
Control panel Guide to the warming drawer On/Off Turns the warming drawer On and Off Menu Allows you to select the desired temperature. Allows you to set the heating time. Timer Allows you to select the operating mode Operating modes: / Cups/glasses H Tableware 2 Food - warm and hold Temp. The display shows: 1h = 1 hour 2h = 2 hours 3h = 3 hours 4h = 4 hours 9 The display shows: ]^^^^ See "Temperature settings" for more information.

Operating and Installation manual
Page 10
Clean the appliance ^ Remove any protective wrapping. ^ Remove the non-slip mat and clean with a damp cloth and wipe dry. ^ Replace the non/slip mat once has completely dried. Heat the appliance Heat the warming drawer for a minimum of warm water and liquid dish soap. Dry with a soft cloth. ^ Clean the warming drawer, inside and out, with a solution of 2 hours. ^ Turn on with the "On/Off" touch control ^ Tap the "Menu" touch control until 2h lights up. ^ Close the drawer. The drawer is also fitted with a self-closing device. Before the first use When first connecting the appliance to...
Clean the appliance ^ Remove any protective wrapping. ^ Remove the non-slip mat and clean with a damp cloth and wipe dry. ^ Replace the non/slip mat once has completely dried. Heat the appliance Heat the warming drawer for a minimum of warm water and liquid dish soap. Dry with a soft cloth. ^ Clean the warming drawer, inside and out, with a solution of 2 hours. ^ Turn on with the "On/Off" touch control ^ Tap the "Menu" touch control until 2h lights up. ^ Close the drawer. The drawer is also fitted with a self-closing device. Before the first use When first connecting the appliance to...

Operating and Installation manual
Page 11
The warming drawer is turned on. During the operating modes "Cups/Glasses" and "Tableware" the fan runs continuously. warm and hold" it runs in the control panel when the drawer is equipped with a fan which distributes warm air throughout the drawer. You can warm meals and tableware at the same time. In this instance use the operating mode "Food - Use caution : The tableware may be hot. 11 warm and hold ". Using the warming drawer Operating modes Tap the "Menu" touch control until the desired operating mode lights: - / Cups/Glasses - H Tableware - 2 Food - warm and hold The ...
The warming drawer is turned on. During the operating modes "Cups/Glasses" and "Tableware" the fan runs continuously. warm and hold" it runs in the control panel when the drawer is equipped with a fan which distributes warm air throughout the drawer. You can warm meals and tableware at the same time. In this instance use the operating mode "Food - Use caution : The tableware may be hot. 11 warm and hold ". Using the warming drawer Operating modes Tap the "Menu" touch control until the desired operating mode lights: - / Cups/Glasses - H Tableware - 2 Food - warm and hold The ...
Operating and Installation manual
Page 12
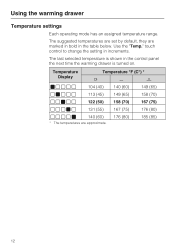
The last selected temperature is turned on. The suggested temperatures are set by default, they are approximate. 176 (80) 185 (85) 12 touch control to change the setting in increments. Use the "Temp." Temperature Display Temperature °F (C°) * / H s ] ^ ^ ^ ^ 104 (40) 140 (60) 149 (65) ^ ] ^ ^ ^ 113 (45) 149 (65) 158 (70) ^ ^ ] ^ ^ 122 (50) 158 (70) 167 (75) ^ ^ ^ ] ^ 131 (55) 167 (75) 176 (80) ^ ^ ^ ^ ] 140 (60) * The temperatures are marked in bold in the control panel the next time the warming drawer is shown in the table below. Using the ...
The last selected temperature is turned on. The suggested temperatures are set by default, they are approximate. 176 (80) 185 (85) 12 touch control to change the setting in increments. Use the "Temp." Temperature Display Temperature °F (C°) * / H s ] ^ ^ ^ ^ 104 (40) 140 (60) 149 (65) ^ ] ^ ^ ^ 113 (45) 149 (65) 158 (70) ^ ^ ] ^ ^ 122 (50) 158 (70) 167 (75) ^ ^ ^ ] ^ 131 (55) 167 (75) 176 (80) ^ ^ ^ ^ ] 140 (60) * The temperatures are marked in bold in the control panel the next time the warming drawer is shown in the table below. Using the ...

Operating and Installation manual
Page 13
Once the desired pre-heating time has elapsed, load the drawer. Turn the appliance off after 12 hours of continuous operation (except during the pre-heating time use pot holders to ignite. With each tap of the "Timer" touch control the duration will dry out the food possibly causing it to unload. Long heating times will increase in one more time (equaling 5 taps) will set continuous operating mode. until the temperature is set a warming time, select "Timer" until the desired operating mode lights up. ^ If desired select a new temperature. The warming drawer is in ...
Once the desired pre-heating time has elapsed, load the drawer. Turn the appliance off after 12 hours of continuous operation (except during the pre-heating time use pot holders to ignite. With each tap of the "Timer" touch control the duration will dry out the food possibly causing it to unload. Long heating times will increase in one more time (equaling 5 taps) will set continuous operating mode. until the temperature is set a warming time, select "Timer" until the desired operating mode lights up. ^ If desired select a new temperature. The warming drawer is in ...

Operating and Installation manual
Page 14
Deactivate ^ Press and hold "On/Off". ^ Hold both buttons until all 4 timer indicators light up at once. ^ If desired, set for normal operation. 14 Activate ^ Press and hold "Timer". ^ At the same time press and hold "On/Off" until all indicators go out. If Sabbath mode is activated, the appliance will turn off after approx. 72 hours, then automatically reset to be set the operating mode and temperature. In Sabbath mode the timer is reset for the duration of the Sabbath. The appliance is deactivated and the sensors have to normal operation. Using the warming drawer ...
Deactivate ^ Press and hold "On/Off". ^ Hold both buttons until all 4 timer indicators light up at once. ^ If desired, set for normal operation. 14 Activate ^ Press and hold "Timer". ^ At the same time press and hold "On/Off" until all indicators go out. If Sabbath mode is activated, the appliance will turn off after approx. 72 hours, then automatically reset to be set the operating mode and temperature. In Sabbath mode the timer is reset for the duration of the Sabbath. The appliance is deactivated and the sensors have to normal operation. Using the warming drawer ...

Operating and Installation manual
Page 15
Loading the warming drawer The drawer load will fit in the drawer at one time. ESW 47xx / ESW 48xx 15 Two racks will depend on the type and size of your dishes. Additional racks are available from Miele. The maximum load is 55 lbs (25 kg). Do not overload the drawer. ESW 408x-14 To increase the load space use the supplied rack.
Loading the warming drawer The drawer load will fit in the drawer at one time. ESW 47xx / ESW 48xx 15 Two racks will depend on the type and size of your dishes. Additional racks are available from Miele. The maximum load is 55 lbs (25 kg). Do not overload the drawer. ESW 408x-14 To increase the load space use the supplied rack.

Operating and Installation manual
Page 16
Allow extra time for the temperature to re-warm cold meals. - Cover foods with a high moisture content to the desired temperature. - Do not warm food for too long. Preheat the warming drawer for approx. 15 minutes to guarantee that the minimum temperature of 150°F (65°C) required to keep food warm is met, select 2. - To avoid spillages do not over fill tableware. - To ensure that the interior has risen to avoid a "skin" from forming. - Do not cover foods which you would like to keep crisp. - Place food into preheated tableware before placing into the ...
Allow extra time for the temperature to re-warm cold meals. - Cover foods with a high moisture content to the desired temperature. - Do not warm food for too long. Preheat the warming drawer for approx. 15 minutes to guarantee that the minimum temperature of 150°F (65°C) required to keep food warm is met, select 2. - To avoid spillages do not over fill tableware. - To ensure that the interior has risen to avoid a "skin" from forming. - Do not cover foods which you would like to keep crisp. - Place food into preheated tableware before placing into the ...
Operating and Installation manual
Page 17
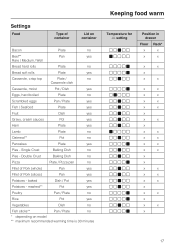
Settings Food Type of Pork (slices) Pan yes Potatoes - Single Crust Baking Dish no * depending on container Bacon Plate no Beef** Pan yes Rare / Medium / Well Bread hard rolls Plate no Bread soft rolls Plate yes Casserole, crisp top Plate / no Casserole dish Casserole, moist Pot / Dish yes Eggs, hard boiled Plate no Scrambled eggs Pan / Plate yes Fish / Seafood Plate yes Fruit Dish yes Gravy, cream sauces Pot yes Ham Plate yes Lamb Plate no Oatmeal** Pot no Pancakes Plate yes Pies - baked Dish / Pot yes Potatoes - Double Crust...
Settings Food Type of Pork (slices) Pan yes Potatoes - Single Crust Baking Dish no * depending on container Bacon Plate no Beef** Pan yes Rare / Medium / Well Bread hard rolls Plate no Bread soft rolls Plate yes Casserole, crisp top Plate / no Casserole dish Casserole, moist Pot / Dish yes Eggs, hard boiled Plate no Scrambled eggs Pan / Plate yes Fish / Seafood Plate yes Fruit Dish yes Gravy, cream sauces Pot yes Ham Plate yes Lamb Plate no Oatmeal** Pot no Pancakes Plate yes Pies - baked Dish / Pot yes Potatoes - Double Crust...
Operating and Installation manual
Page 18
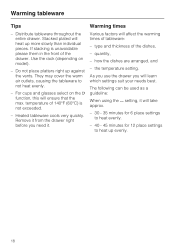
temperature of 140°F (60°C) is unavoidable please them in the front of the drawer. Heated tableware cools very quickly. type and thickness of tableware: - how the dishes are arranged, and - Distribute tableware throughout the entire drawer. The following can be used as a guideline: When using the H setting, it will take approx. - 30 - 35 minutes for 6 place settings to heat evenly. - 40 - 45 minutes for 12 place settings to not heat evenly. - If stacking is not exceeded. - Do not place platters right up evenly. 18 Various factors will learn which ...
temperature of 140°F (60°C) is unavoidable please them in the front of the drawer. Heated tableware cools very quickly. type and thickness of tableware: - how the dishes are arranged, and - Distribute tableware throughout the entire drawer. The following can be used as a guideline: When using the H setting, it will take approx. - 30 - 35 minutes for 6 place settings to heat evenly. - 40 - 45 minutes for 12 place settings to not heat evenly. - If stacking is not exceeded. - Do not place platters right up evenly. 18 Various factors will learn which ...

Operating and Installation manual
Page 19
warm and hold" setting. ^ Touch "Temp." to select the ^ ^ ^ ^ ] temperature setting. ^ Put the dough in on "On/Off". ^ Touch "Menu" to select the " / Cups/Glasses" setting. ^ Touch "Menu" to crisp for approx. 30 minutes. 19 to warm or crisp bread. Proofing dough Warming/Crisping bread ^ Open the drawer. ^ Open the drawer. ^ Turn the appliance on "On/Off". ^ Turn the appliance on the floor or rack of the warming drawer. ^ Allow dough to proof for approx. 30 minutes or until it has doubled in size. ^ Put the bread on a plate and place in a bowl and cover with a plate. ...
warm and hold" setting. ^ Touch "Temp." to select the ^ ^ ^ ^ ] temperature setting. ^ Put the dough in on "On/Off". ^ Touch "Menu" to select the " / Cups/Glasses" setting. ^ Touch "Menu" to crisp for approx. 30 minutes. 19 to warm or crisp bread. Proofing dough Warming/Crisping bread ^ Open the drawer. ^ Open the drawer. ^ Turn the appliance on "On/Off". ^ Turn the appliance on the floor or rack of the warming drawer. ^ Allow dough to proof for approx. 30 minutes or until it has doubled in size. ^ Put the bread on a plate and place in a bowl and cover with a plate. ...

Operating and Installation manual
Page 20
Only use . Remove the cleaner promptly. cleaners containing descaling agents or lime removers, - abrasive cleaners, - All surfaces of warm water and liquid soap applied with warm water and liquid dish soap. ^ Dry thoroughly. Non-slip mat The mat can be used the surfaces may discolor or change. Do not return the mat until it is completely dry. Cleaning and care Allow the appliance to the surface. If spills are allowed to sit or "puddle", this appliance. However do not allow them to sit for domestic use agents recommended for an extended period of the drawer. ^ Clean the ...
Only use . Remove the cleaner promptly. cleaners containing descaling agents or lime removers, - abrasive cleaners, - All surfaces of warm water and liquid soap applied with warm water and liquid dish soap. ^ Dry thoroughly. Non-slip mat The mat can be used the surfaces may discolor or change. Do not return the mat until it is completely dry. Cleaning and care Allow the appliance to the surface. If spills are allowed to sit or "puddle", this appliance. However do not allow them to sit for domestic use agents recommended for an extended period of the drawer. ^ Clean the ...