
Specs
Page 2
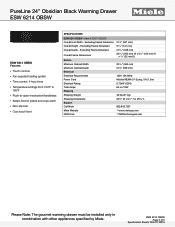
ESW 6214 OBSW Page 2 of 3 Specification Sheets TRS 07132015 Excluding Fascia Dimension Overall Depth - Excluding Fascia Dimension Overall Height - Excluding Fascia Dimension Overall Fascia Dimensions Built-In Minimum Cabinet Width Minimum Cabinet Depth Electrical Electrical Requirements Power Cord Electrical Rating Total Amps Shipping Shipping Weight Shipping Dimensions Support Call Miele Miele Website 20/20 Link 211/8" (537 mm) 59/16" (141 mm) 219/16" (548 mm) 237/16" (595 mm) W x 51/4" (134 mm) H x 7/8" (22 mm) D 221...
ESW 6214 OBSW Page 2 of 3 Specification Sheets TRS 07132015 Excluding Fascia Dimension Overall Depth - Excluding Fascia Dimension Overall Height - Excluding Fascia Dimension Overall Fascia Dimensions Built-In Minimum Cabinet Width Minimum Cabinet Depth Electrical Electrical Requirements Power Cord Electrical Rating Total Amps Shipping Shipping Weight Shipping Dimensions Support Call Miele Miele Website 20/20 Link 211/8" (537 mm) 59/16" (141 mm) 219/16" (548 mm) 237/16" (595 mm) W x 51/4" (134 mm) H x 7/8" (22 mm) D 221...
Specs
Page 3
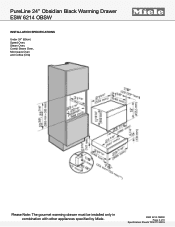
PureLine 24" Obsidian Black Warming Drawer ESW 6214 OBSW INSTALLATION SPECIFICATIONS Under 24" (60cm) Speed Oven, Steam Oven, Combi Steam Oven, Microwave Oven, and Coffee (CVA) FOREVER BETTER Please Note: The gourmet warming drawer must be installed only in combination with other appliances specified by Miele. ESW 6214 OBSW Page 3 of 3 Specification Sheets TRS 07132015
PureLine 24" Obsidian Black Warming Drawer ESW 6214 OBSW INSTALLATION SPECIFICATIONS Under 24" (60cm) Speed Oven, Steam Oven, Combi Steam Oven, Microwave Oven, and Coffee (CVA) FOREVER BETTER Please Note: The gourmet warming drawer must be installed only in combination with other appliances specified by Miele. ESW 6214 OBSW Page 3 of 3 Specification Sheets TRS 07132015
Specs
Page 4
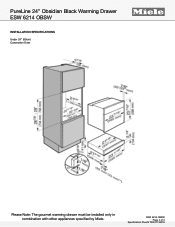
PureLine 24" Obsidian Black Warming Drawer ESW 6214 OBSW INSTALLATION SPECIFICATIONS Under 24" (60cm) Convection Oven FOREVER BETTER Please Note: The gourmet warming drawer must be installed only in combination with other appliances specified by Miele. ESW 6214 OBSW Page 4 of 4 Specification Sheets TRS 07132015
PureLine 24" Obsidian Black Warming Drawer ESW 6214 OBSW INSTALLATION SPECIFICATIONS Under 24" (60cm) Convection Oven FOREVER BETTER Please Note: The gourmet warming drawer must be installed only in combination with other appliances specified by Miele. ESW 6214 OBSW Page 4 of 4 Specification Sheets TRS 07132015
Product Manual
Page 2
Contents IMPORTANT SAFETY INSTRUCTIONS 3 Guide to the appliance 6 Warming drawer 6 Control panel 7 Standard accessories 8 Before using for the first time 9 Operation 10 Operating modes 10 Temperature settings 11 Duration 12 Keeping food warm 13 Warming dishes 15 Capacity 16 Other uses 17 Cleaning and care 18 Frequently asked questions 19 Optional accessories 20 IMPORTANT SAFETY INSTRUCTIONS 22 Installation dimensions 23 Installation 25 Electrical connection 26 Technical Service 27 Help protect our environment 28 2
Contents IMPORTANT SAFETY INSTRUCTIONS 3 Guide to the appliance 6 Warming drawer 6 Control panel 7 Standard accessories 8 Before using for the first time 9 Operation 10 Operating modes 10 Temperature settings 11 Duration 12 Keeping food warm 13 Warming dishes 15 Capacity 16 Other uses 17 Cleaning and care 18 Frequently asked questions 19 Optional accessories 20 IMPORTANT SAFETY INSTRUCTIONS 22 Installation dimensions 23 Installation 25 Electrical connection 26 Technical Service 27 Help protect our environment 28 2
Product Manual
Page 3
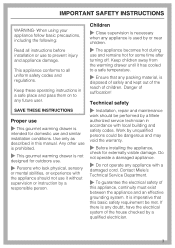
.... Work by a Miele authorized service technician in this manual. Children ~ Close supervision is necessary when any packing material, is used by a qualified electrician. 3 Technical safety ~ Installation, repair and maintenance work should not use and similar installation conditions. It is imperative that any appliance is disposed of safely and kept out of the reach of suffocation! SAVE THESE INSTRUCTIONS Proper use ~ This gourmet warming drawer...
.... Work by a Miele authorized service technician in this manual. Children ~ Close supervision is necessary when any packing material, is used by a qualified electrician. 3 Technical safety ~ Installation, repair and maintenance work should not use and similar installation conditions. It is imperative that any appliance is disposed of safely and kept out of the reach of suffocation! SAVE THESE INSTRUCTIONS Proper use ~ This gourmet warming drawer...

Product Manual
Page 4
... kitchen cabinet, only use of accessories not recommended by Miele may burn due to heat rooms. ~ Do not replace the non-slip mat with oven mitts or potholders when using the appliance. This data must not be operated in mobile installations (boats). ~ Under no circumstance open . 4 They can be replaced by either removing the fuse, unplugging the unit or manually "tripping" the circuit breaker. Fire hazard! ~ The use...
... kitchen cabinet, only use of accessories not recommended by Miele may burn due to heat rooms. ~ Do not replace the non-slip mat with oven mitts or potholders when using the appliance. This data must not be operated in mobile installations (boats). ~ Under no circumstance open . 4 They can be replaced by either removing the fuse, unplugging the unit or manually "tripping" the circuit breaker. Fire hazard! ~ The use...
Product Manual
Page 5
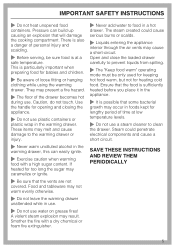
... burns or scalds. ~ Liquids entering the appliance interior through the air vents may present a fire hazard. ~ The floor of time at a safe temperature. SAVE THESE INSTRUCTIONS AND REVIEW THEM PERIODICALLY 5 There is also a danger of loose fitting or hanging clothing while using the warming drawer. The steam created could penetrate electrical components and cause a short circuit. Pressure can easily ignite. ~ Exercise caution when...
... burns or scalds. ~ Liquids entering the appliance interior through the air vents may present a fire hazard. ~ The floor of time at a safe temperature. SAVE THESE INSTRUCTIONS AND REVIEW THEM PERIODICALLY 5 There is also a danger of loose fitting or hanging clothing while using the warming drawer. The steam created could penetrate electrical components and cause a short circuit. Pressure can easily ignite. ~ Exercise caution when...
Product Manual
Page 7
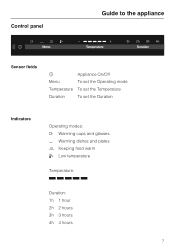
Control panel Guide to the appliance Sensor fields s Appliance On/Off Menu To set the Operating mode Temperature To set the Temperature Duration To set the Duration Indicators Operating modes: H Warming cups and glasses H Warming dishes and plates 2 Keeping food warm ¯ Low temperature Temperature: Q Q Q Q Q Duration: 1h 1 hour 2h 2 hours 3h 3 hours 4h 4 hours 7
Control panel Guide to the appliance Sensor fields s Appliance On/Off Menu To set the Operating mode Temperature To set the Temperature Duration To set the Duration Indicators Operating modes: H Warming cups and glasses H Warming dishes and plates 2 Keeping food warm ¯ Low temperature Temperature: Q Q Q Q Q Duration: 1h 1 hour 2h 2 hours 3h 3 hours 4h 4 hours 7
Product Manual
Page 9
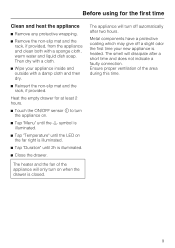
.... ^ Tap "Duration" until 2h is heated. The smell will only turn off a slight odor the first time your appliance inside and outside with a damp cloth and then dry. ^ Reinsert the non-slip mat and the rack, if provided. Heat the empty drawer for the first time Clean and heat the appliance ^ Remove any protective wrapping. ^ Remove the non-slip mat and the...
.... ^ Tap "Duration" until 2h is heated. The smell will only turn off a slight odor the first time your appliance inside and outside with a damp cloth and then dry. ^ Reinsert the non-slip mat and the rack, if provided. Heat the empty drawer for the first time Clean and heat the appliance ^ Remove any protective wrapping. ^ Remove the non-slip mat and the...
Product Manual
Page 10
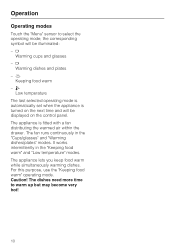
..., use the "Keeping food warm" operating mode. The dishes need more time to select the operating mode; Operation Operating modes Touch the "Menu" sensor to warm up but may become very hot! 10 the corresponding symbol will be illuminated: -H Warming cups and glasses -H Warming dishes and plates -2 Keeping food warm -¯ Low temperature The last selected operating mode is automatically set when the appliance is fitted with a fan distributing the warmed air within the drawer. The fan...
..., use the "Keeping food warm" operating mode. The dishes need more time to select the operating mode; Operation Operating modes Touch the "Menu" sensor to warm up but may become very hot! 10 the corresponding symbol will be illuminated: -H Warming cups and glasses -H Warming dishes and plates -2 Keeping food warm -¯ Low temperature The last selected operating mode is automatically set when the appliance is fitted with a fan distributing the warmed air within the drawer. The fan...
Product Manual
Page 11
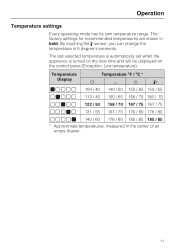
By touching the 6 sensor, you can change the temperature in bold. The last selected temperature is automatically set when the appliance is turned on the next time and will be displayed on the control panel (Exception: Low temperature). The factory settings for recommended temperatures are shown in 5 degree increments. Temperature Display Temperature °F / °C * H... / 80 ^ ^ ^ ^ ] 140 / 60 176 / 80 185 / 85 185 / 85 * Approximate temperatures, measured in the center of an empty drawer 11 Operation Temperature settings Every operating mode has its own temperature range.
By touching the 6 sensor, you can change the temperature in bold. The last selected temperature is automatically set when the appliance is turned on the next time and will be displayed on the control panel (Exception: Low temperature). The factory settings for recommended temperatures are shown in 5 degree increments. Temperature Display Temperature °F / °C * H... / 80 ^ ^ ^ ^ ] 140 / 60 176 / 80 185 / 85 185 / 85 * Approximate temperatures, measured in the center of an empty drawer 11 Operation Temperature settings Every operating mode has its own temperature range.
Product Manual
Page 12
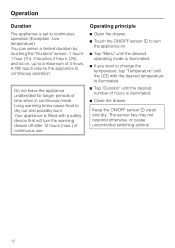
... ON/OFF sensor s clean and dry. The sensor key may not respond otherwise, or cause uncontrolled switching actions. 12 Do not leave the appliance unattended for longer periods of 4 hours. Operating principle ^ Open the drawer. ^ Touch the ON/OFF sensor s to turn the warming drawer off after 12 hours (max.) of hours is set to a maximum of time when in continuous mode. A fifth touch...
... ON/OFF sensor s clean and dry. The sensor key may not respond otherwise, or cause uncontrolled switching actions. 12 Do not leave the appliance unattended for longer periods of 4 hours. Operating principle ^ Open the drawer. ^ Touch the ON/OFF sensor s to turn the warming drawer off after 12 hours (max.) of hours is set to a maximum of time when in continuous mode. A fifth touch...
Product Manual
Page 13
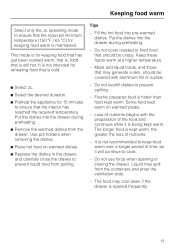
.... ^ Replace the dishes in the drawer, and carefully close the drawer to prevent liquid food from spilling. Put the dishes into the drawer during preheating. - Do not cover roasted or fried food that the interior has reached the required temperature. Keep these foods warm at a higher temperature. - It is not recommended to keep food warm over a longer period of time, as it is being kept warm. Use...
.... ^ Replace the dishes in the drawer, and carefully close the drawer to prevent liquid food from spilling. Put the dishes into the drawer during preheating. - Do not cover roasted or fried food that the interior has reached the required temperature. Keep these foods warm at a higher temperature. - It is not recommended to keep food warm over a longer period of time, as it is being kept warm. Use...
Product Manual
Page 14
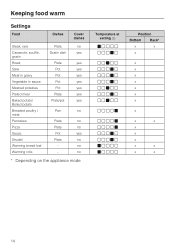
... appliance mode Temperature at setting 2 ^ ^ ^ ^ ] Position Bottom Rack* x x x x x x x x x x x x x x x x x x x x 14 Keeping food warm Settings Food Dishes Cover dishes Steak, rare Plate no Casserole, soufflé, Gratin dish yes gratin Roast Plate yes Stew Pot yes Meat in gravy Pot yes Vegetable in sauce Pot yes Mashed potatoes Pot yes Plated meal Plate yes Baked potato/ Boiled potato Plate/pot yes Breaded poultry / meat Pan no Pancakes Plate no Pizza Plate...
... appliance mode Temperature at setting 2 ^ ^ ^ ^ ] Position Bottom Rack* x x x x x x x x x x x x x x x x x x x x 14 Keeping food warm Settings Food Dishes Cover dishes Steak, rare Plate no Casserole, soufflé, Gratin dish yes gratin Roast Plate yes Stew Pot yes Meat in gravy Pot yes Vegetable in sauce Pot yes Mashed potatoes Pot yes Plated meal Plate yes Baked potato/ Boiled potato Plate/pot yes Breaded poultry / meat Pan no Pancakes Plate no Pizza Plate...
Product Manual
Page 15
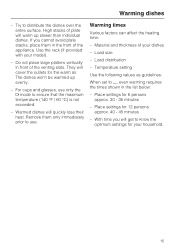
... H, even warming requires the times shown in the front of your model). - Remove them in the list below: - With time you cannot avoid plate stacks, place them only immediately prior to use only the H mode to know the optimum settings for 6 persons approx. 30 - 35 minutes - For cups and glasses, use . Warming times Various factors can affect the heating time: - Place settings for the warm air. Warming dishes - Use the rack (if provided...
... H, even warming requires the times shown in the front of your model). - Remove them in the list below: - With time you cannot avoid plate stacks, place them only immediately prior to use only the H mode to know the optimum settings for 6 persons approx. 30 - 35 minutes - For cups and glasses, use . Warming times Various factors can affect the heating time: - Place settings for the warm air. Warming dishes - Use the rack (if provided...
Product Manual
Page 18
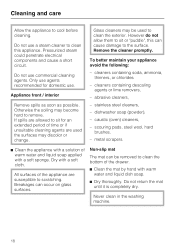
... for an extended period of the drawer. ^ Clean the mat by hand with warm water and liquid dish soap. ^ Dry thoroughly. Cleaning and care Allow the appliance to remove. To better maintain your appliance avoid the following: - Do not use a steam cleaner to scratching. If spills are susceptible to clean this can occur on glass surfaces. scouring pads, steel wool...
... for an extended period of the drawer. ^ Clean the mat by hand with warm water and liquid dish soap. ^ Dry thoroughly. Cleaning and care Allow the appliance to remove. To better maintain your appliance avoid the following: - Do not use a steam cleaner to scratching. If spills are susceptible to clean this can occur on glass surfaces. scouring pads, steel wool...
Product Manual
Page 19
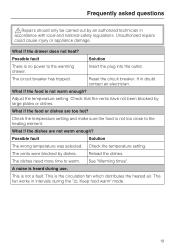
... is no power to the warming drawer. The vents were blocked by dishes. Possible fault Solution There is not too close to warm. Reload the dishes. See "Warming times". Insert the plug into the outlet. Reset the circuit breaker. What if the dishes are too hot? Check the temperature setting. The dishes need more time to the heating element. This is the circulation fan which distributes the heated air. The fan works in...
... is no power to the warming drawer. The vents were blocked by dishes. Possible fault Solution There is not too close to warm. Reload the dishes. See "Warming times". Insert the plug into the outlet. Reset the circuit breaker. What if the dishes are too hot? Check the temperature setting. The dishes need more time to the heating element. This is the circulation fan which distributes the heated air. The fan works in...
Product Manual
Page 24
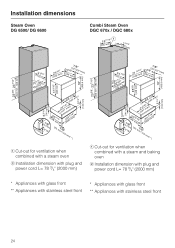
Installation dimensions Steam Oven DG 6500/ DG 6600 Combi Steam Oven DGC 670x / DGC 680x a Cut-out for ventilation when combined with a steam oven b Installation dimension with plug and power cord L= 78 3/4" (2000 mm) a Cut-out for ventilation when combined with a steam and baking oven b Installation dimension with plug and power cord L= 78 3/4" (2000 mm) * Appliances with glass front ** Appliances with stainless steel front * Appliances with glass front ** Appliances with stainless steel front 24
Installation dimensions Steam Oven DG 6500/ DG 6600 Combi Steam Oven DGC 670x / DGC 680x a Cut-out for ventilation when combined with a steam oven b Installation dimension with plug and power cord L= 78 3/4" (2000 mm) a Cut-out for ventilation when combined with a steam and baking oven b Installation dimension with plug and power cord L= 78 3/4" (2000 mm) * Appliances with glass front ** Appliances with stainless steel front * Appliances with glass front ** Appliances with stainless steel front 24
Product Manual
Page 26
... mm) long power cord with a three-prong grounding plug ready for connection to the power supply, make sure that the voltage and frequency listed on the wiring diagram. 26 Power supply This appliance is installed in combination with the household electrical supply. Repairs and service by unqualified persons could be performed by either removing the fuse, shutting off the power main or manually "tripping" the circuit breaker. Installation work and repairs should only...
... mm) long power cord with a three-prong grounding plug ready for connection to the power supply, make sure that the voltage and frequency listed on the wiring diagram. 26 Power supply This appliance is installed in combination with the household electrical supply. Repairs and service by unqualified persons could be performed by either removing the fuse, shutting off the power main or manually "tripping" the circuit breaker. Installation work and repairs should only...
Product Manual
Page 27
... the Miele Service department, Extended Service Contracts offered by other providers for Miele products will not be recognized by 5 years of worry free ownership. MieleCare (USA only) MieleCare, our Extended Service Contract program; To learn more about MieleCare Extended Service Contracts, please contact your home. Only genuine Miele parts installed by a Miele Authorized Service Provider using genuine Miele parts. When contacting Technical Service please quote the serial number and model...
... the Miele Service department, Extended Service Contracts offered by other providers for Miele products will not be recognized by 5 years of worry free ownership. MieleCare (USA only) MieleCare, our Extended Service Contract program; To learn more about MieleCare Extended Service Contracts, please contact your home. Only genuine Miele parts installed by a Miele Authorized Service Provider using genuine Miele parts. When contacting Technical Service please quote the serial number and model...


