
Warranty conditions
Page 3
... any further representation or warranties as to as Miele. All defective parts and products replaced by Miele. ii. iv. use or installation (where applicable) which the product was not sold or designed; vi. or ix. Warranty Card Australia / New Zealand Please review the enclosed document carefully as it governs your purchases, including important limitations and exclusions. the date of Level 2, 10 College Hill, Freemans...
... any further representation or warranties as to as Miele. All defective parts and products replaced by Miele. ii. iv. use or installation (where applicable) which the product was not sold or designed; vi. or ix. Warranty Card Australia / New Zealand Please review the enclosed document carefully as it governs your purchases, including important limitations and exclusions. the date of Level 2, 10 College Hill, Freemans...

Warranty conditions
Page 4
... the control of unusual Parts which assist Miele in providing services (including Repair / Warranty services) to its customers. Vacuum Cleaners, please return the product to Miele or its obligations under this period, availability of the applicable product. Please contact Miele for delays due to sourcing of Miele. SERVICE & SPARE PARTS While Miele will be provided by Miele prior to any problems that you may have had or the level of service...
... the control of unusual Parts which assist Miele in providing services (including Repair / Warranty services) to its customers. Vacuum Cleaners, please return the product to Miele or its obligations under this period, availability of the applicable product. Please contact Miele for delays due to sourcing of Miele. SERVICE & SPARE PARTS While Miele will be provided by Miele prior to any problems that you may have had or the level of service...

Warranty conditions
Page 5
Warranty Card IMPORTANT DO NOT RETURN THIS PAGE TO MIELE For your reference, please enter the particulars of purchase Store details Installed by Please visit www.miele.com.au or www.miele.co.nz to register your purchase documentation. Model no . Serial no . Date of your purchase below and retain with your appliance warranty with Miele.
Warranty Card IMPORTANT DO NOT RETURN THIS PAGE TO MIELE For your reference, please enter the particulars of purchase Store details Installed by Please visit www.miele.com.au or www.miele.co.nz to register your purchase documentation. Model no . Serial no . Date of your purchase below and retain with your appliance warranty with Miele.

Warranty conditions
Page 8
.... 1. Two (2) years, motor for products used in commercial use : - S189 upright units. Duration of Warranty This warranty is returned together with applicable installation instructions; Ten (10) Year Warranty - c) Vacuums in workmanship or materials. One (1) year, parts only outside Miele Direct Service Area (MDSA). Commencement Date Warranty coverage begins on Sealed Refrigeration Systems: The Warranty for canister and upright models. above . 4. Canada". - Five (5) Year Warranty - Defective products and parts become the...
.... 1. Two (2) years, motor for products used in commercial use : - S189 upright units. Duration of Warranty This warranty is returned together with applicable installation instructions; Ten (10) Year Warranty - c) Vacuums in workmanship or materials. One (1) year, parts only outside Miele Direct Service Area (MDSA). Commencement Date Warranty coverage begins on Sealed Refrigeration Systems: The Warranty for canister and upright models. above . 4. Canada". - Five (5) Year Warranty - Defective products and parts become the...

Warranty conditions
Page 17
... without limitation any of its parts or accessories. • Direct, indirect or consequential damages, losses or other types of fixed infrastructure when removing or returning repaired or replaced product into a custom installation. Any warranty claims shall be initiated unless and until the dispute settlement procedures outlined in this Warranty, customers owning Miele Residential appliances are not accessible to Miele's Dispute Settlement Representative at...
... without limitation any of its parts or accessories. • Direct, indirect or consequential damages, losses or other types of fixed infrastructure when removing or returning repaired or replaced product into a custom installation. Any warranty claims shall be initiated unless and until the dispute settlement procedures outlined in this Warranty, customers owning Miele Residential appliances are not accessible to Miele's Dispute Settlement Representative at...

Warranty conditions
Page 19
... Limited Warranty Valid? Any warranty claims for Miele Products used for land based commercial or industrial purposes. What If Repair Cannot Be Provided? LIMITED WARRANTY - What Is Required to the original Drum, Drum Bearings, and Bearing Seals (parts only) of the Miele Authorized Service Agent. 19 In the event that Miele's Authorized Service Agent determines that it cannot service the Miele Product due to poor accessibility or unsafe working...
... Limited Warranty Valid? Any warranty claims for Miele Products used for land based commercial or industrial purposes. What If Repair Cannot Be Provided? LIMITED WARRANTY - What Is Required to the original Drum, Drum Bearings, and Bearing Seals (parts only) of the Miele Authorized Service Agent. 19 In the event that Miele's Authorized Service Agent determines that it cannot service the Miele Product due to poor accessibility or unsafe working...

Warranty conditions
Page 20
... accessories; - any repair, service, conversion or alteration to it or any of built-in accordance with the manufacturer's specifications and the owner's manual, or any utilization of which are sold separately by , or resulting from any cause other than normal use of non-genuine Miele parts or from components not contained with the housings of the Miele Product, such as water filter cartridges; •...
... accessories; - any repair, service, conversion or alteration to it or any of built-in accordance with the manufacturer's specifications and the owner's manual, or any utilization of which are sold separately by , or resulting from any cause other than normal use of non-genuine Miele parts or from components not contained with the housings of the Miele Product, such as water filter cartridges; •...

Warranty conditions
Page 23
improper installation, improper operation, improper maintenance, improper storage, improper connection to electrical, power or water supply of the Miele Product or any service center, repairman or other third parties. This Limited Warranty does not cover: • Any damage or defect to place the Miele Product in an area that does not affect the function or efficacy of the Miele Product; • Any loss of profits or revenues...
improper installation, improper operation, improper maintenance, improper storage, improper connection to electrical, power or water supply of the Miele Product or any service center, repairman or other third parties. This Limited Warranty does not cover: • Any damage or defect to place the Miele Product in an area that does not affect the function or efficacy of the Miele Product; • Any loss of profits or revenues...

Product sheet
Page 1
... easy door opening and closing aid Operating noise dB (A) re 1 pW Countdown indicator Delay start up to 24 hours In-operation indication Efficiency and sustainability Hot water connection Half load Gentle on dishware/glass AutoOpen drying SensorDry Active condensation drying Perfect GlassCare DetergentAgent Dishwashing programs Normal Pots & Pans China & Crystal QuickIntenseWash SaniWash Rinse & Hold Rinse options Short Basket design Cutlery loading FlexCare glass holder Safety Waterproof system Child Safety lock • • Clean Touch Steel Straight fascia...
... easy door opening and closing aid Operating noise dB (A) re 1 pW Countdown indicator Delay start up to 24 hours In-operation indication Efficiency and sustainability Hot water connection Half load Gentle on dishware/glass AutoOpen drying SensorDry Active condensation drying Perfect GlassCare DetergentAgent Dishwashing programs Normal Pots & Pans China & Crystal QuickIntenseWash SaniWash Rinse & Hold Rinse options Short Basket design Cutlery loading FlexCare glass holder Safety Waterproof system Child Safety lock • • Clean Touch Steel Straight fascia...
Product sheet
Page 2
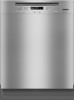
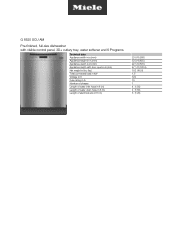
G 6625 SCU AM Pre-finished, full-size dishwasher with visible control panel, 3D+ cutlery tray, water softener and 6 Programs Technical data Appliance width in in.(mm) Appliance height in in.(mm) Appliance depth in in.(mm) Appliance depth with door open in in.(cm) Net weight in lbs. (kg) Total connected load in kW Voltage in V Fuse rating in A Number of phases Length of water inlet hose in ft (m) Length of water drain hose in ft (m) Length of electrical wire in ft (m) 23 5/8 (598) 33 3/4 (855) 22 1/2 (570) 47 1/2 (120.5) 102 (46.0) 1.5 120 15 1 4 (1.50) 4 (1.50) 3 (1.20)
G 6625 SCU AM Pre-finished, full-size dishwasher with visible control panel, 3D+ cutlery tray, water softener and 6 Programs Technical data Appliance width in in.(mm) Appliance height in in.(mm) Appliance depth in in.(mm) Appliance depth with door open in in.(cm) Net weight in lbs. (kg) Total connected load in kW Voltage in V Fuse rating in A Number of phases Length of water inlet hose in ft (m) Length of water drain hose in ft (m) Length of electrical wire in ft (m) 23 5/8 (598) 33 3/4 (855) 22 1/2 (570) 47 1/2 (120.5) 102 (46.0) 1.5 120 15 1 4 (1.50) 4 (1.50) 3 (1.20)
Operating instructions/Installation instructions
Page 2
... first time 17 Opening the door 17 Closing the door...17 Child lock...17 Water softener ...18 Displaying and setting the water hardness level 19 Before using the appliance for the first time, you require 21 Dishwasher salt ...21 Filling the salt reservoir 22 Salt refill indicator 23 Rinse aid...24 Adding rinse aid 24 Rinse aid indicator 25 Setting the rinse aid dosage 25 Loading the dishwasher 26 Tips...26 Loading examples 28 FlexAssist ...32 Upper basket...32 Adjusting the upper basket 33 Lower basket...
... first time 17 Opening the door 17 Closing the door...17 Child lock...17 Water softener ...18 Displaying and setting the water hardness level 19 Before using the appliance for the first time, you require 21 Dishwasher salt ...21 Filling the salt reservoir 22 Salt refill indicator 23 Rinse aid...24 Adding rinse aid 24 Rinse aid indicator 25 Setting the rinse aid dosage 25 Loading the dishwasher 26 Tips...26 Loading examples 28 FlexAssist ...32 Upper basket...32 Adjusting the upper basket 33 Lower basket...
Operating instructions/Installation instructions
Page 3
... Changing a program 46 Options ...47 Short ...47 Turning off the refill indicators 48 Delay Start...49 AutoOpen ...51 Optimize Standby 52 Factory default settings 53 Program overview 54 Cleaning and care 56 Cleaning the wash cabinet 56 Cleaning the door and the door seal 56 Cleaning the door front 57 Filter system ...58 Cleaning the spray arms 60 Frequently Asked Questions 61 Technical problems 61 Water intake fault 63 Water drainage fault 63 General problems 64 Noises...
... Changing a program 46 Options ...47 Short ...47 Turning off the refill indicators 48 Delay Start...49 AutoOpen ...51 Optimize Standby 52 Factory default settings 53 Program overview 54 Cleaning and care 56 Cleaning the wash cabinet 56 Cleaning the door and the door seal 56 Cleaning the door front 57 Filter system ...58 Cleaning the spray arms 60 Frequently Asked Questions 61 Technical problems 61 Water intake fault 63 Water drainage fault 63 General problems 64 Noises...
Operating instructions/Installation instructions
Page 7
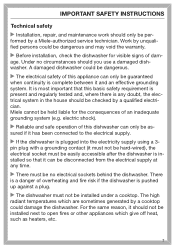
... is complete between it and an effective grounding system. electric shock). Reliable and safe operation of this dishwasher can only be assured if it has been connected to open fires or other appliances which are sometimes generated by a Miele-authorized service technician. IMPORTANT SAFETY INSTRUCTIONS Technical safety Installation, repair, and maintenance work should only be performed by a cooktop could damage...
... is complete between it and an effective grounding system. electric shock). Reliable and safe operation of this dishwasher can only be assured if it has been connected to open fires or other appliances which are sometimes generated by a Miele-authorized service technician. IMPORTANT SAFETY INSTRUCTIONS Technical safety Installation, repair, and maintenance work should only be performed by a cooktop could damage...
Operating instructions/Installation instructions
Page 8
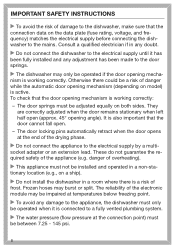
The door springs must be installed and operated in a non-stationary location (e.g., on model) is working correctly: - The door locking pins automatically retract when the door opens at the connection point) must be a risk of danger while the automatic door opening mechanism (depending on a ship). Do not install the dishwasher in any doubt. Do not connect the dishwasher to the electrical supply until it is also important that...
The door springs must be installed and operated in a non-stationary location (e.g., on model) is working correctly: - The door locking pins automatically retract when the door opens at the connection point) must be a risk of danger while the automatic door opening mechanism (depending on a ship). Do not install the dishwasher in any doubt. Do not connect the dishwasher to the electrical supply until it is also important that...
Operating instructions/Installation instructions
Page 12
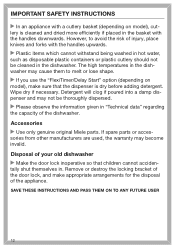
... locking bracket of the dishwasher. However, to melt or lose shape. If you use the "FlexiTimer/Delay Start" option (depending on model), cut- lery is dry before adding detergent. Disposal of your old dishwasher Make the door lock inoperative so that the dispenser is cleaned and dried more efficiently if placed in the basket with the handles upwards. Plastic items which cannot withstand being washed in hot water...
... locking bracket of the dishwasher. However, to melt or lose shape. If you use the "FlexiTimer/Delay Start" option (depending on model), cut- lery is dry before adding detergent. Disposal of your old dishwasher Make the door lock inoperative so that the dispenser is cleaned and dried more efficiently if placed in the basket with the handles upwards. Plastic items which cannot withstand being washed in hot water...

Operating instructions/Installation instructions
Page 14
Guide to the dishwasher Control panel a Program selection b Time display c Check/Refill indicators d Start button with indicator light e Short button with indicator light f Delay Start button with indicator light g Program selection button h (On/Off) button These operating instructions apply to as follows: Standard = 31 11/16" (80.5 cm) high dishwashers (integrated) and 33 1/4" (84.5 cm) high dishwashers (freestanding) XXL = 33 1/4" (84.5 cm) high dishwashers (integrated) 14 The specific dishwasher models are referred to several different dishwasher ...
Guide to the dishwasher Control panel a Program selection b Time display c Check/Refill indicators d Start button with indicator light e Short button with indicator light f Delay Start button with indicator light g Program selection button h (On/Off) button These operating instructions apply to as follows: Standard = 31 11/16" (80.5 cm) high dishwashers (integrated) and 33 1/4" (84.5 cm) high dishwashers (freestanding) XXL = 33 1/4" (84.5 cm) high dishwashers (integrated) 14 The specific dishwasher models are referred to several different dishwasher ...
Operating instructions/Installation instructions
Page 61
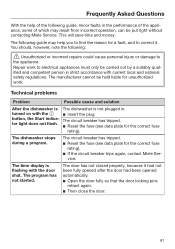
... right without contacting Miele Service. The circuit breaker has tripped. Reset the fuse (see data plate for the correct fuse rating). Technical problems Problem Possible cause and solution After the dishwasher is The dishwasher is flashing with the Insert the plug. turned on with the door shut. The door has not closed properly, because it . Repair work . The following guide may result from incorrect operation, can be carried...
... right without contacting Miele Service. The circuit breaker has tripped. Reset the fuse (see data plate for the correct fuse rating). Technical problems Problem Possible cause and solution After the dishwasher is The dishwasher is flashing with the Insert the plug. turned on with the door shut. The door has not closed properly, because it . Repair work . The following guide may result from incorrect operation, can be carried...
Operating instructions/Installation instructions
Page 63
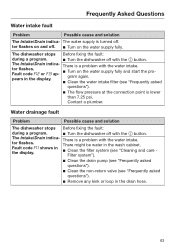
... the wash cabinet. Clean the filter system (see "Frequently asked questions"). The flow pressure at the connection point is a problem with the button. The dishwasher stops Before fixing the fault: during a program. Turn the dishwasher off . Turn on the water supply fully and start the pro- Contact a plumber. There is lower than 7.25 psi. The Intake/Drain indicator flashes. Fault code shows in the display...
... the wash cabinet. Clean the filter system (see "Frequently asked questions"). The flow pressure at the connection point is a problem with the button. The dishwasher stops Before fixing the fault: during a program. Turn the dishwasher off . Turn on the water supply fully and start the pro- Contact a plumber. There is lower than 7.25 psi. The Intake/Drain indicator flashes. Fault code shows in the display...
Operating instructions/Installation instructions
Page 64
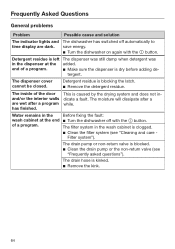
... drain pump or non-return valve is blocking the latch. Remove the detergent residue. save energy. Turn the dishwasher on again with the button. Detergent residue is blocked. Clean the drain pump or the non-return valve (see "Cleaning and care - The moisture will dissipate after a program has finished. end of a program. Make sure the dispenser is caused by the drying system and does not indicate a fault. Filter...
... drain pump or non-return valve is blocking the latch. Remove the detergent residue. save energy. Turn the dishwasher on again with the button. Detergent residue is blocked. Clean the drain pump or the non-return valve (see "Cleaning and care - The moisture will dissipate after a program has finished. end of a program. Make sure the dispenser is caused by the drying system and does not indicate a fault. Filter...

Operating instructions/Installation instructions
Page 74
... outlet that the voltage, frequency and fuse rating shown on the right side of overheating! The power outlet must be replaced with a cord having an equipment grounding conductor and a grounding plug. The plug must be dangerous. Electrical connection Installation, repairs and other work by providing a path of least resistance for connection to the mains. Danger of the door. In the event of a malfunction...
... outlet that the voltage, frequency and fuse rating shown on the right side of overheating! The power outlet must be replaced with a cord having an equipment grounding conductor and a grounding plug. The plug must be dangerous. Electrical connection Installation, repairs and other work by providing a path of least resistance for connection to the mains. Danger of the door. In the event of a malfunction...


