

Specs
Page 2
.../Amps Power Cord - The water pressure must be installed. Futura Series Slimline Fully Integrated Dishwasher SPECIFICATIONS G 4760 SCVi - If the pressure is supplied. 110V / 120V, 60Hz, 15 Amps Yes - Must be connected to a shut-off valve must be connected to a cold or hot water supply up to Hardwire 107 lbs (48.5 kg) 800.843.7231 8www.mieleusa.com 82020technologies.com Futura Series Slimline Fully Intergrated Dishwashers Page 2 of 5 Specification Sheet...
.../Amps Power Cord - The water pressure must be installed. Futura Series Slimline Fully Integrated Dishwasher SPECIFICATIONS G 4760 SCVi - If the pressure is supplied. 110V / 120V, 60Hz, 15 Amps Yes - Must be connected to a shut-off valve must be connected to a cold or hot water supply up to Hardwire 107 lbs (48.5 kg) 800.843.7231 8www.mieleusa.com 82020technologies.com Futura Series Slimline Fully Intergrated Dishwashers Page 2 of 5 Specification Sheet...
Product Manual
Page 2
... Closing the door ...17 Water softener...18 Displaying and setting the water hardness level 19 Before using the appliance for the first time, you require 21 Dishwasher salt...21 Filling the salt reservoir 22 Salt refill indicator 23 Rinse aid ...24 Adding rinse aid 24 Rinse aid indicator 25 Setting the rinse aid dosage 25 Loading the dishwasher 26 Tips ...26 Loading examples 28 Upper basket ...29 Adjusting the upper basket 30 Lower basket ...31 Cutlery...34 Cutlery tray (depending on model...
... Closing the door ...17 Water softener...18 Displaying and setting the water hardness level 19 Before using the appliance for the first time, you require 21 Dishwasher salt...21 Filling the salt reservoir 22 Salt refill indicator 23 Rinse aid ...24 Adding rinse aid 24 Rinse aid indicator 25 Setting the rinse aid dosage 25 Loading the dishwasher 26 Tips ...26 Loading examples 28 Upper basket ...29 Adjusting the upper basket 30 Lower basket ...31 Cutlery...34 Cutlery tray (depending on model...
Product Manual
Page 3
... ...42 Turning off the refill indicators 43 Delay Start ...44 Buzzer tones ...46 Optimize Standby 47 Factory default settings 48 Program overview 49 Cleaning and care 50 Cleaning the wash cabinet 50 Cleaning the door and the door seal 50 Cleaning the control panel 50 Cleaning the indicator reflector panel 50 Cleaning the door front 51 Filter system...52 Cleaning the spray arms 54 Frequently Asked Questions 55 Technical problems 55 Water intake fault 57 Water drainage fault 58 General problems 59 Noises...
... ...42 Turning off the refill indicators 43 Delay Start ...44 Buzzer tones ...46 Optimize Standby 47 Factory default settings 48 Program overview 49 Cleaning and care 50 Cleaning the wash cabinet 50 Cleaning the door and the door seal 50 Cleaning the control panel 50 Cleaning the indicator reflector panel 50 Cleaning the door front 51 Filter system...52 Cleaning the spray arms 54 Frequently Asked Questions 55 Technical problems 55 Water intake fault 57 Water drainage fault 58 General problems 59 Noises...
Product Manual
Page 8
... electrical safety of this dishwasher can only be guaranteed when continuity is pushed up against a plug. The dishwasher must not be held liable for visible signs of this appliance can only be installed under a cooktop. Miele cannot be hard-wired). IMPORTANT SAFETY INSTRUCTIONS Technical safety Installation, repair, and maintenance work should you use a damaged dishwash‐ er. electric shock). Reliable and safe operation...
... electrical safety of this dishwasher can only be guaranteed when continuity is pushed up against a plug. The dishwasher must not be held liable for visible signs of this appliance can only be installed under a cooktop. Miele cannot be hard-wired). IMPORTANT SAFETY INSTRUCTIONS Technical safety Installation, repair, and maintenance work should you use a damaged dishwash‐ er. electric shock). Reliable and safe operation...
Product Manual
Page 9
... the electrical supply by a multisocket adapter or an extension lead. The housing must be impaired at the end of the water connection contains an electrical valve. The door springs must not be installed and operated in a non-sta‐ tionary location (e.g., on both sides. Do not shorten the water intake hose, even if it has been fully installed and any doubt. Do not connect the dishwasher...
... the electrical supply by a multisocket adapter or an extension lead. The housing must be impaired at the end of the water connection contains an electrical valve. The door springs must not be installed and operated in a non-sta‐ tionary location (e.g., on both sides. Do not shorten the water intake hose, even if it has been fully installed and any doubt. Do not connect the dishwasher...

Product Manual
Page 11
... door springs must be installed and connected in compliance with the installation plan. Be careful when installing the dishwasher. The appliance may only be used with a Umodel plinth. IMPORTANT SAFETY INSTRUCTIONS Proper installation The dishwasher must be adjusted equally on any sharp metal components. The dishwasher must be correctly aligned horizontally to ensure problem-free operation. In order to ensure stability, built-under...
... door springs must be installed and connected in compliance with the installation plan. Be careful when installing the dishwasher. The appliance may only be used with a Umodel plinth. IMPORTANT SAFETY INSTRUCTIONS Proper installation The dishwasher must be adjusted equally on any sharp metal components. The dishwasher must be correctly aligned horizontally to ensure problem-free operation. In order to ensure stability, built-under...
Product Manual
Page 13
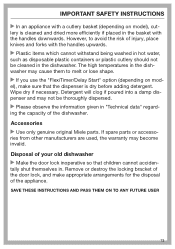
... dishwasher. Remove or destroy the locking bracket of the door lock, and make sure that children cannot acciden‐ tally shut themselves in. However, to melt or lose shape. If you use the "FlexiTimer/Delay Start" option (depending on model), cut‐ lery is dry before adding detergent. SAVE THESE INSTRUCTIONS AND PASS THEM ON TO ANY FUTURE USER 13 The high temperatures in the dish...
... dishwasher. Remove or destroy the locking bracket of the door lock, and make sure that children cannot acciden‐ tally shut themselves in. However, to melt or lose shape. If you use the "FlexiTimer/Delay Start" option (depending on model), cut‐ lery is dry before adding detergent. SAVE THESE INSTRUCTIONS AND PASS THEM ON TO ANY FUTURE USER 13 The high temperatures in the dish...
Product Manual
Page 24
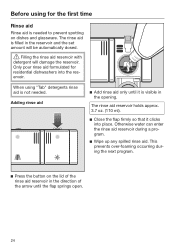
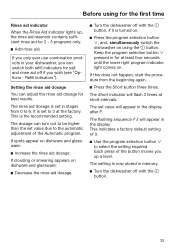
... rinse aid is not needed to prevent spotting on dishes and glassware. The rinse aid reservoir holds approx. 3.7 oz. (110 ml). Close the flap firmly so that it is needed . When using for residential dishwashers into place. This prevents over-foaming occurring dur‐ ing the next program. Press the button on the lid of the rinse aid reservoir in the direction...
... rinse aid is not needed to prevent spotting on dishes and glassware. The rinse aid reservoir holds approx. 3.7 oz. (110 ml). Close the flap firmly so that it is needed . When using for residential dishwashers into place. This prevents over-foaming occurring dur‐ ing the next program. Press the button on the lid of the rinse aid reservoir in the direction...
Product Manual
Page 25
... use combination prod‐ ucts in the display. It is the recommended setting. The Short indicator will appear in your dishwasher, you up , the rinse aid reservoir contains suffi‐ cient rinse aid for best results. The flashing sequence will flash 3 times at the factory. This indicates a factory default setting of the button moves you can adjust the rinse aid dosage for 2 - 3 programs only. Add rinse aid...
... use combination prod‐ ucts in the display. It is the recommended setting. The Short indicator will appear in your dishwasher, you up , the rinse aid reservoir contains suffi‐ cient rinse aid for best results. The flashing sequence will flash 3 times at the factory. This indicates a factory default setting of the button moves you can adjust the rinse aid dosage for 2 - 3 programs only. Add rinse aid...

Product Manual
Page 27
... the dishwasher, ensure that only very low tempera‐ tures are dish‐ washer-safe. 27 Wooden cutlery, cutting boards and dishware or items with a silver polish may occur on model). If delicate glass‐ ware is washed in ‐ dustrial cleaning agent. Tip: When purchasing new dishware and cutlery, make sure they are used (depending on glasses after a number of...
... the dishwasher, ensure that only very low tempera‐ tures are dish‐ washer-safe. 27 Wooden cutlery, cutting boards and dishware or items with a silver polish may occur on model). If delicate glass‐ ware is washed in ‐ dustrial cleaning agent. Tip: When purchasing new dishware and cutlery, make sure they are used (depending on glasses after a number of...
Product Manual
Page 38
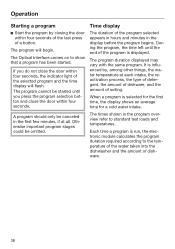
... indicator light of the program is run, the elec‐ tronic module calculates the program duration required according to standard test loads and temperatures. When a program is influ‐ enced by closing the door within four seconds. Oth‐ erwise important program stages could be canceled in the display before the program begins. The program will flash. Operation Starting a program Start the...
... indicator light of the program is run, the elec‐ tronic module calculates the program duration required according to standard test loads and temperatures. When a program is influ‐ enced by closing the door within four seconds. Oth‐ erwise important program stages could be canceled in the display before the program begins. The program will flash. Operation Starting a program Start the...
Product Manual
Page 50
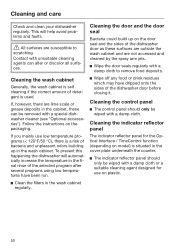
... grease deposits in the wash cabinet regularly. Contact with a special dish‐ washer cleaner (see "Optional accesso‐ ries"). If you mainly use on the door seal and the sides of the dishwasher door before closing it. If, however, there are not accessed and cleaned by the spray arm jets. Wipe the door seals regularly with a damp cloth. Cleaning the control panel The control panel should only be...
... grease deposits in the wash cabinet regularly. Contact with a special dish‐ washer cleaner (see "Optional accesso‐ ries"). If you mainly use on the door seal and the sides of the dishwasher door before closing it. If, however, there are not accessed and cleaned by the spray arm jets. Wipe the door seals regularly with a damp cloth. Cleaning the control panel The control panel should only be...
Product Manual
Page 55
... the indicator reflector panel correctly (see data plate for the correct fuse rating). The dishwasher is not plugged in strict accordance with the button. The dishwasher is not switched on. Turn the dishwasher on with current local and na‐ tional safety regulations. The following guide may result from incorrect operation, can be held liable for unauthor‐ ized work to electrical...
... the indicator reflector panel correctly (see data plate for the correct fuse rating). The dishwasher is not plugged in strict accordance with the button. The dishwasher is not switched on. Turn the dishwasher on with current local and na‐ tional safety regulations. The following guide may result from incorrect operation, can be held liable for unauthor‐ ized work to electrical...
Product Manual
Page 57
...‐ fault code or has gram again. The Intake/Drain indica‐ tor light is flashing and There is a problem with the button. Contact a plumber. 57 The Intake/Drain indica‐ tor light is flashing on the water supply all the way. The buzzer is lower than 4.35 psi. appeared in the display. Clean the water intake filter (see...
...‐ fault code or has gram again. The Intake/Drain indica‐ tor light is flashing and There is a problem with the button. Contact a plumber. 57 The Intake/Drain indica‐ tor light is flashing on the water supply all the way. The buzzer is lower than 4.35 psi. appeared in the display. Clean the water intake filter (see...
Product Manual
Page 58
... Interface is sounding. There might be water in the drain hose. 58 Filter system"). Clean the drain pump (see "Frequently asked questions"). Remove any kink or loop in the wash cabinet. The buzzer is Before fixing the fault: flashing quickly. Turn the dishwasher off with the water intake. peared in the display. The Intake/Drain indica‐ tor light is flashing and There is a problem with the button.
... Interface is sounding. There might be water in the drain hose. 58 Filter system"). Clean the drain pump (see "Frequently asked questions"). Remove any kink or loop in the wash cabinet. The buzzer is Before fixing the fault: flashing quickly. Turn the dishwasher off with the water intake. peared in the display. The Intake/Drain indica‐ tor light is flashing and There is a problem with the button.

Product Manual
Page 59
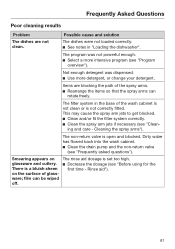
... program and the time display flash. The filter system in the Before fixing the fault: wash cabinet at program start time stops run‐ ning. The dispenser cover cannot be closed. If the door is clogged. Clean the filter system (see "Frequently asked questions"). end of a button at the end Turn the dishwasher off with the button. The drain pump or non-return valve is flashing quickly. Frequently Asked Questions General problems Problem Possible cause and...
... program and the time display flash. The filter system in the Before fixing the fault: wash cabinet at program start time stops run‐ ning. The dispenser cover cannot be closed. If the door is clogged. Clean the filter system (see "Frequently asked questions"). end of a button at the end Turn the dishwasher off with the button. The drain pump or non-return valve is flashing quickly. Frequently Asked Questions General problems Problem Possible cause and...
Product Manual
Page 61
..."). The filter system in "Loading the dishwasher". The rinse aid dosage is not correctly fitted. Rinse aid"). 61 Cleaning the spray arms"). Dirty water has flowed back into the wash cabinet. Clean the drain pump and the non-return valve (see "Before using for the first time - The non-return valve is a bluish sheen on glassware and cutlery. The program was dispensed. Use more intensive program (see "Clean‐ ing and care...
..."). The filter system in "Loading the dishwasher". The rinse aid dosage is not correctly fitted. Rinse aid"). 61 Cleaning the spray arms"). Dirty water has flowed back into the wash cabinet. Clean the drain pump and the non-return valve (see "Before using for the first time - The non-return valve is a bluish sheen on glassware and cutlery. The program was dispensed. Use more intensive program (see "Clean‐ ing and care...
Product Manual
Page 62
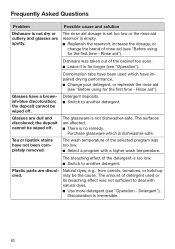
...‐ paired drying performance. Change your detergent, or replenish the rinse aid (see "Operation"). The wash temperature of rinse aid (see "Operation - Glasses have not been com‐ pletely removed. Frequently Asked Questions Problem Dishware is not dry or cutlery and glasses are affected. There is no remedy. Possible cause and solution The rinse aid dosage is set too low or the rinse aid reservoir is...
...‐ paired drying performance. Change your detergent, or replenish the rinse aid (see "Operation"). The wash temperature of rinse aid (see "Operation - Glasses have not been com‐ pletely removed. Frequently Asked Questions Problem Dishware is not dry or cutlery and glasses are affected. There is no remedy. Possible cause and solution The rinse aid dosage is set too low or the rinse aid reservoir is...

Product Manual
Page 70
... a proper outlet installed by a Miele service technician. Grounding instructions THIS APPLIANCE MUST BE GROUNDED. Electrical connection Installation, repairs and other work by providing a path of least resistance for connection to the mains. See data plate on the data plate match the household mains supply. The plug must be plugged into an appropri‐ ate outlet that the voltage, frequency and fuse rating shown on the...
... a proper outlet installed by a Miele service technician. Grounding instructions THIS APPLIANCE MUST BE GROUNDED. Electrical connection Installation, repairs and other work by providing a path of least resistance for connection to the mains. See data plate on the data plate match the household mains supply. The plug must be plugged into an appropri‐ ate outlet that the voltage, frequency and fuse rating shown on the...
Product Manual
Page 72
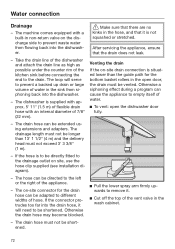
... the kitchen sink before connecting the end to empty itself of the vent valve in the hose, and that the drain does not leak. After servicing the appliance, ensure that it will serve to prevent a backed up drain or large volume of water in non-return valve on -site connector for the bottom basket rollers in the open the dishwasher door fully. Pull the lower spray arm firmly...
... the kitchen sink before connecting the end to empty itself of the vent valve in the hose, and that the drain does not leak. After servicing the appliance, ensure that it will serve to prevent a backed up drain or large volume of water in non-return valve on -site connector for the bottom basket rollers in the open the dishwasher door fully. Pull the lower spray arm firmly...


