Operating and Installation manual
Page 2
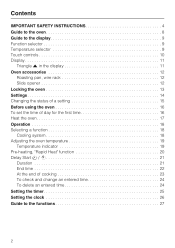
... SAFETY INSTRUCTIONS 4 Guide to the oven 8 Guide to the display 9 Function selector 9 Temperature selector 9 Touch controls 10 Display 11 Triangle V in the display 11 Oven accessories 12 Roasting pan, wire rack 12 Slide opener 12 Locking the oven 13 Settings 14 Changing the status of a setting 15 Before using the oven 16 To set the time of day for the first time 16 Heat the oven 17 Operation 18 Selecting a function 18 Cooling system 18 Adjusting the oven temperature 19 Temperature indicator...
... SAFETY INSTRUCTIONS 4 Guide to the oven 8 Guide to the display 9 Function selector 9 Temperature selector 9 Touch controls 10 Display 11 Triangle V in the display 11 Oven accessories 12 Roasting pan, wire rack 12 Slide opener 12 Locking the oven 13 Settings 14 Changing the status of a setting 15 Before using the oven 16 To set the time of day for the first time 16 Heat the oven 17 Operation 18 Selecting a function 18 Cooling system 18 Adjusting the oven temperature 19 Temperature indicator...
Operating and Installation manual
Page 3
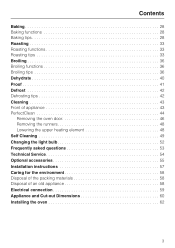
... of appliance 43 PerfectClean 44 Removing the oven door 46 Removing the runners 48 Lowering the upper heating element 48 Self Cleaning 49 Changing the light bulb 52 Frequently asked questions 53 Technical Service 54 Optional accessories 55 Installation instructions 57 Caring for the environment 58 Disposal of the packing materials 58 Disposal of an old appliance 58 Electrical connection 59 Appliance and Cut-out Dimensions 60 Installing the oven 62 3
... of appliance 43 PerfectClean 44 Removing the oven door 46 Removing the runners 48 Lowering the upper heating element 48 Self Cleaning 49 Changing the light bulb 52 Frequently asked questions 53 Technical Service 54 Optional accessories 55 Installation instructions 57 Caring for the environment 58 Disposal of the packing materials 58 Disposal of an old appliance 58 Electrical connection 59 Appliance and Cut-out Dimensions 60 Installing the oven 62 3
Operating and Installation manual
Page 5
... desired height while the oven is cool. ~ Open the door carefully to allow hot air or steam to escape before placing or removing food. ~ To prevent burns, allow the heating element to cool before starting the self cleaning function. Consult a qualified electrician if in the oven, turning them, or removing them from the oven. If there is essential for a good seal. The high temperatures needed for this basic safety requirement...
... desired height while the oven is cool. ~ Open the door carefully to allow hot air or steam to escape before placing or removing food. ~ To prevent burns, allow the heating element to cool before starting the self cleaning function. Consult a qualified electrician if in the oven, turning them, or removing them from the oven. If there is essential for a good seal. The high temperatures needed for this basic safety requirement...
Operating and Installation manual
Page 6
... °C) and after use it as the door glass, vents, and the control panel can be used to remove from the oven when hot. Do not use the baking tray or the roasting pan for cooking. The time required varies depending on a number of factors, such as initial temperature, quantity, type and consistency of the oven until they are unsure if food is thoroughly heated. IMPORTANT SAFETY INSTRUCTIONS ~ Caution: Heating elements may build up...
... °C) and after use it as the door glass, vents, and the control panel can be used to remove from the oven when hot. Do not use the baking tray or the roasting pan for cooking. The time required varies depending on a number of factors, such as initial temperature, quantity, type and consistency of the oven until they are unsure if food is thoroughly heated. IMPORTANT SAFETY INSTRUCTIONS ~ Caution: Heating elements may build up...
Operating and Installation manual
Page 7
... steam burns. IMPORTANT SAFETY INSTRUCTIONS General notes ~ Do not use a steam cleaner to children in cabinets above an oven. Do not let potholders come in contact with oils or fats, they present a fire hazard. ~ Do not use the oven to heat the room. ~ Make certain that is recommended to cover all cooked food that the power cords of interest to clean the oven. SAVE THESE INSTRUCTIONS AND REVIEW...
... steam burns. IMPORTANT SAFETY INSTRUCTIONS General notes ~ Do not use a steam cleaner to children in cabinets above an oven. Do not let potholders come in contact with oils or fats, they present a fire hazard. ~ Do not use the oven to heat the room. ~ Make certain that is recommended to cover all cooked food that the power cords of interest to clean the oven. SAVE THESE INSTRUCTIONS AND REVIEW...
Operating and Installation manual
Page 8
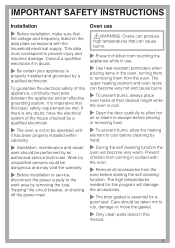
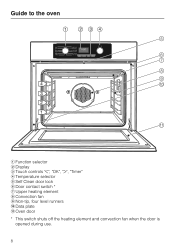
Guide to the oven a Function selector b Display c Touch controls "V", "OK", "W", "Timer" d Temperature selector e Self Clean door lock f Door contact switch * g Upper heating element h Convection fan i Non-tip, four level runners j Data plate k Oven door * This switch shuts off the heating element and convection fan when the door is opened during use. 8
Guide to the oven a Function selector b Display c Touch controls "V", "OK", "W", "Timer" d Temperature selector e Self Clean door lock f Door contact switch * g Upper heating element h Convection fan i Non-tip, four level runners j Data plate k Oven door * This switch shuts off the heating element and convection fan when the door is opened during use. 8
Operating and Installation manual
Page 12
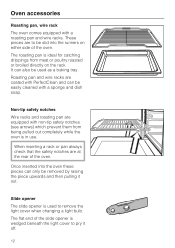
... the oven. The flat end of the slide opener is used as a baking tray. When inserting a rack or pan always check that the safety notches are coated with PerfectClean and can be easily cleaned with a sponge and dish soap. It can only be used to remove the light cover when changing a light bulb. Once inserted into the runners on the rack. Non-tip safety notches Wire racks and roasting pan...
... the oven. The flat end of the slide opener is used as a baking tray. When inserting a rack or pan always check that the safety notches are coated with PerfectClean and can be easily cleaned with a sponge and dish soap. It can only be used to remove the light cover when changing a light bulb. Once inserted into the runners on the rack. Non-tip safety notches Wire racks and roasting pan...
Operating and Installation manual
Page 13
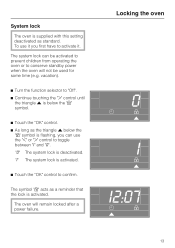
... a reminder that the lock is deactivated. vacation). ^ Turn the function selector to "Off". ^ Continue touching the "W" control until the triangle V is below the "0" symbol. ^ Touch the "OK" control. ^ As long as standard. The oven will not be used for some time (e.g. "I " and "0". To use the "V" or "W" control to toggle between "I " The system lock is supplied with this setting deactivated as the...
... a reminder that the lock is deactivated. vacation). ^ Turn the function selector to "Off". ^ Continue touching the "W" control until the triangle V is below the "0" symbol. ^ Touch the "OK" control. ^ As long as standard. The oven will not be used for some time (e.g. "I " and "0". To use the "V" or "W" control to toggle between "I " The system lock is supplied with this setting deactivated as the...
Operating and Installation manual
Page 15
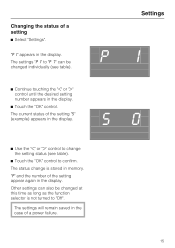
... Settings PI S0 ^ Use the "V" or "W" control to change is not turned to "Off". Other settings can be changed individually (see table). ^ Touch the "OK" control to "P 7" can also be changed at this time as long as the function selector is stored in memory. "P I " to confirm. The settings will remain saved in the case of the setting "S" (example) appears in the display. Changing the...
... Settings PI S0 ^ Use the "V" or "W" control to change is not turned to "Off". Other settings can be changed individually (see table). ^ Touch the "OK" control to "P 7" can also be changed at this time as long as the function selector is stored in memory. "P I " to confirm. The settings will remain saved in the case of the setting "S" (example) appears in the display. Changing the...
Operating and Installation manual
Page 16
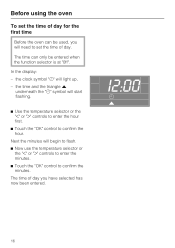
... need to set the time of day for the first time Before the oven can only be entered when the function selector is at "0ff". the clock symbol "m" will begin to flash. ^ Now use the temperature selector or the "V" or "W" controls to enter the minutes. ^ Touch the "OK" control to confirm the hour. The time of day you will start flashing. ^ Use the temperature...
... need to set the time of day for the first time Before the oven can only be entered when the function selector is at "0ff". the clock symbol "m" will begin to flash. ^ Now use the temperature selector or the "V" or "W" controls to enter the minutes. ^ Touch the "OK" control to confirm the hour. The time of day you will start flashing. ^ Use the temperature...
Operating and Installation manual
Page 17
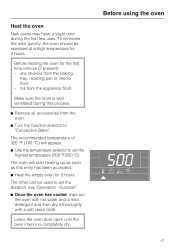
...;C) will start heating up as soon as this process. ^ Remove all accessories from the oven. ^ Turn the function selector to set the highest temperature (500 °F/250 °C). To eliminate the odor quickly, the oven should be used to "Convection Bake". any stickers from the appliance front. foil from the baking tray, roasting pan or interior floor. - The oven will appear. ^ Use the temperature selector to set the duration, see "Operation...
...;C) will start heating up as soon as this process. ^ Remove all accessories from the oven. ^ Turn the function selector to set the highest temperature (500 °F/250 °C). To eliminate the odor quickly, the oven should be used to "Convection Bake". any stickers from the appliance front. foil from the baking tray, roasting pan or interior floor. - The oven will appear. ^ Use the temperature selector to set the duration, see "Operation...
Operating and Installation manual
Page 20
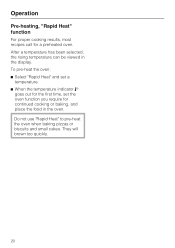
They will brown too quickly. 20 Do not use "Rapid Heat" to pre-heat the oven when baking pizzas or biscuits and small cakes. To pre-heat the oven: ^ Select "Rapid Heat" and set a temperature. ^ When the temperature indicator 3 goes out for the first time, set the oven function you require for a preheated oven. Operation Pre-heating, "Rapid Heat" function For proper cooking results, most recipes call for continued cooking or baking, and place the food in the display. After a temperature has been selected, the rising temperature can be viewed in the oven.
They will brown too quickly. 20 Do not use "Rapid Heat" to pre-heat the oven when baking pizzas or biscuits and small cakes. To pre-heat the oven: ^ Select "Rapid Heat" and set a temperature. ^ When the temperature indicator 3 goes out for the first time, set the oven function you require for a preheated oven. Operation Pre-heating, "Rapid Heat" function For proper cooking results, most recipes call for continued cooking or baking, and place the food in the display. After a temperature has been selected, the rising temperature can be viewed in the oven.
Operating and Installation manual
Page 21
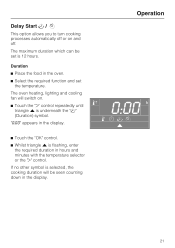
... oven. ^ Select the required function and set is underneath the "T" (Duration) symbol. The oven heating, lighting and cooling fan will be set the temperature. Duration ^ Place the food in hours and minutes with the temperature selector or the "W" control. If no other symbol is selected, the cooking duration will switch on and off or on . ^ Touch the "W" control repeatedly until triangle V is 12 hours. Operation Delay Start...
... oven. ^ Select the required function and set is underneath the "T" (Duration) symbol. The oven heating, lighting and cooling fan will be set the temperature. Duration ^ Place the food in hours and minutes with the temperature selector or the "W" control. If no other symbol is selected, the cooking duration will switch on and off or on . ^ Touch the "W" control repeatedly until triangle V is 12 hours. Operation Delay Start...
Operating and Installation manual
Page 22
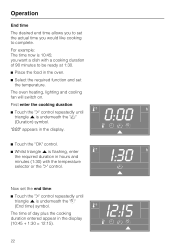
... in the display (10:45 + 1:30 = 12:15). 3 I2:I5 6 mTS V 22 The oven heating, lighting and cooling fan will switch on. V ^ Touch the "OK" control. ^ Whilst triangle V is 10:45; Operation End time The desired end time allows you to set the actual time you want a dish with the temperature selector or the "W" control. For example: The time now is flashing, enter 3 the required duration...
... in the display (10:45 + 1:30 = 12:15). 3 I2:I5 6 mTS V 22 The oven heating, lighting and cooling fan will switch on. V ^ Touch the "OK" control. ^ Whilst triangle V is 10:45; Operation End time The desired end time allows you to set the actual time you want a dish with the temperature selector or the "W" control. For example: The time now is flashing, enter 3 the required duration...
Operating and Installation manual
Page 23
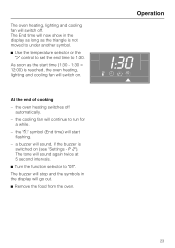
... oven heating, lighting and cooling fan will sound, if the buzzer is not moved to under another symbol. ^ Use the temperature selector or the "W" control to set the end time to run for a while. - a buzzer will switch on (see "Settings - P 2"). The buzzer will switch off automatically. - The oven heating, lighting and cooling fan will stop and the symbols in the display as long as the start flashing. - the oven heating switches off...
... oven heating, lighting and cooling fan will sound, if the buzzer is not moved to under another symbol. ^ Use the temperature selector or the "W" control to set the end time to run for a while. - a buzzer will switch on (see "Settings - P 2"). The buzzer will switch off automatically. - The oven heating, lighting and cooling fan will stop and the symbols in the display as long as the start flashing. - the oven heating switches off...
Operating and Installation manual
Page 50
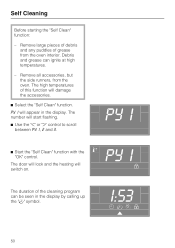
..." control. 3 PY I will switch on. 0 The duration of the cleaning program can ignite at high temperatures. - PY I The door will lock and the heating will appear in the display by calling up the "T" symbol. The high temperatures of grease from the oven. The number will damage the accessories. ^ Select the "Self Clean" function. Remove all accessories, but the side runners, from the oven interior. I , 2 and 3. Self Cleaning Before starting...
..." control. 3 PY I will switch on. 0 The duration of the cleaning program can ignite at high temperatures. - PY I The door will lock and the heating will appear in the display by calling up the "T" symbol. The high temperatures of grease from the oven. The number will damage the accessories. ^ Select the "Self Clean" function. Remove all accessories, but the side runners, from the oven interior. I , 2 and 3. Self Cleaning Before starting...
Operating and Installation manual
Page 51
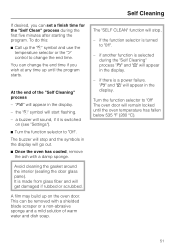
... on (see "Settings"). ^ Turn the function selector to "0ff". - A film may build up the "S" symbol and use the temperature selector or the "W" control to "0ff" The oven door will get damaged if rubbed or scrubbed. Turn the function selector to change the end time if you can be removed with a damp sponge. a buzzer will stop and the symbols in the display will appear...
... on (see "Settings"). ^ Turn the function selector to "0ff". - A film may build up the "S" symbol and use the temperature selector or the "W" control to "0ff" The oven door will get damaged if rubbed or scrubbed. Turn the function selector to change the end time if you can be removed with a damp sponge. a buzzer will stop and the symbols in the display will appear...
Operating and Installation manual
Page 52
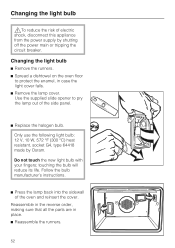
... case the light cover falls. ^ Remove the lamp cover. Changing the light bulb ,To reduce the risk of electric shock, disconnect this appliance from the power supply by Osram. Do not touch the new light bulb with your fingers; Only use the following light bulb: 12 V, 10 W, 572 °F (300 °C) heat resistant, socket G4, type 64418 made by shutting off the power main or tripping the circuit breaker.
... case the light cover falls. ^ Remove the lamp cover. Changing the light bulb ,To reduce the risk of electric shock, disconnect this appliance from the power supply by Osram. Do not touch the new light bulb with your fingers; Only use the following light bulb: 12 V, 10 W, 572 °F (300 °C) heat resistant, socket G4, type 64418 made by shutting off the power main or tripping the circuit breaker.
Operating and Installation manual
Page 53
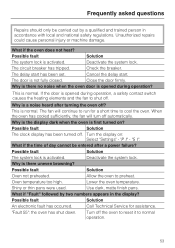
... opened during operation, a safety contact switch causes the heating elements and the fan to normal operation. 53 "P i" - Turn off . Possible fault Solution The clock display has been turned off the oven to reset it to shut off automatically. Turn the display on ? What if the time of day cannot be carried out by two numbers appears in accordance with local and national safety regulations. Oven temperature too high. Use dark, matte finish pans. "Fault...
... opened during operation, a safety contact switch causes the heating elements and the fan to normal operation. 53 "P i" - Turn off . Possible fault Solution The clock display has been turned off the oven to reset it to shut off automatically. Turn the display on ? What if the time of day cannot be carried out by two numbers appears in accordance with local and national safety regulations. Oven temperature too high. Use dark, matte finish pans. "Fault...

Operating and Installation manual
Page 59
... power supply. Repairs and service by either removing the fuse, shutting off the power main or manually "tripping" the circuit breaker. The silver data plate is installed and grounded in accordance with all applicable codes and standards. Electrical connection ,CAUTION: Before servicing, disconnect the power supply by unqualified persons could be dangerous. WARNING: THIS APPLIANCE MUST BE GROUNDED Installer: Please leave these instructions with all local codes and ordinances. Data plate Installation work...
... power supply. Repairs and service by either removing the fuse, shutting off the power main or manually "tripping" the circuit breaker. The silver data plate is installed and grounded in accordance with all applicable codes and standards. Electrical connection ,CAUTION: Before servicing, disconnect the power supply by unqualified persons could be dangerous. WARNING: THIS APPLIANCE MUST BE GROUNDED Installer: Please leave these instructions with all local codes and ordinances. Data plate Installation work...


