

Operating and Installation manual
Page 2
... SAFETY INSTRUCTIONS 4 Guide to the oven 8 Guide to the display 9 Function selector 9 Temperature selector 9 Touch controls 10 Display 11 Triangle V in the display 11 Oven accessories 12 Wire rack 12 Roasting pan 12 Slide opener 12 Locking the oven 13 Settings 14 Changing the status of a setting 15 Before using the oven 16 To set the time of day for the first time 16 Heat the oven 17 Operation 18 Selecting a function 18 Cooling system 18 Adjusting the oven temperature 19 Temperature...
... SAFETY INSTRUCTIONS 4 Guide to the oven 8 Guide to the display 9 Function selector 9 Temperature selector 9 Touch controls 10 Display 11 Triangle V in the display 11 Oven accessories 12 Wire rack 12 Roasting pan 12 Slide opener 12 Locking the oven 13 Settings 14 Changing the status of a setting 15 Before using the oven 16 To set the time of day for the first time 16 Heat the oven 17 Operation 18 Selecting a function 18 Cooling system 18 Adjusting the oven temperature 19 Temperature...

Operating and Installation manual
Page 3
... of appliance 43 PerfectClean 44 Removing the oven door 46 Removing the runners 47 Lowering the upper heating element 48 Self Cleaning 49 Changing the light bulb 52 Frequently asked questions 54 Technical Service 55 Optional accessories 56 Installation instructions 59 Caring for the environment 60 Disposal of the packing materials 60 Disposal of an old appliance 60 Electrical connection 61 Appliance and Cut-out Dimensions 62 Installing the oven 64 3
... of appliance 43 PerfectClean 44 Removing the oven door 46 Removing the runners 47 Lowering the upper heating element 48 Self Cleaning 49 Changing the light bulb 52 Frequently asked questions 54 Technical Service 55 Optional accessories 56 Installation instructions 59 Caring for the environment 60 Disposal of the packing materials 60 Disposal of an old appliance 60 Electrical connection 61 Appliance and Cut-out Dimensions 62 Installing the oven 64 3
Operating and Installation manual
Page 5
..., always place oven racks at their desired height while the oven is cool. ~ Open the door carefully to allow hot air or steam to escape before placing or removing food. ~ To prevent burns, allow the heating element to rub, damage or move the gasket. ~ Only clean parts listed in contact with the household electrical supply. The upper heating element and oven racks can become very warm. To guarantee the electrical safety of...
..., always place oven racks at their desired height while the oven is cool. ~ Open the door carefully to allow hot air or steam to escape before placing or removing food. ~ To prevent burns, allow the heating element to rub, damage or move the gasket. ~ Only clean parts listed in contact with the household electrical supply. The upper heating element and oven racks can become very warm. To guarantee the electrical safety of...

Operating and Installation manual
Page 6
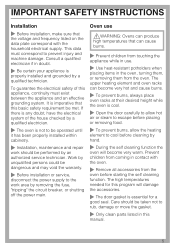
... serious burns or scalds. ~ This oven must only be used to remove from the oven when hot. can become warped and difficult to line the oven floor. Do not use the baking tray or the roasting pan for cooking. To ensure temperature is sufficiently heated. Do not use , do not place pots, pans or baking sheets directly on a number of the food, and changes in the recipe. Fumes or vapors...
... serious burns or scalds. ~ This oven must only be used to remove from the oven when hot. can become warped and difficult to line the oven floor. Do not use the baking tray or the roasting pan for cooking. To ensure temperature is sufficiently heated. Do not use , do not place pots, pans or baking sheets directly on a number of the food, and changes in the recipe. Fumes or vapors...

Operating and Installation manual
Page 7
... garments while operating the cooktop, they are a fire hazard if overheated. ~ Do not use the oven to heat the room. ~ Make certain that is in use a steam cleaner to children in contact with oils. Do not let potholders come in cabinets above an oven. for potholders. ~ It is recommended to cover all cooked food that the power cords of interest to clean the oven. The...
... garments while operating the cooktop, they are a fire hazard if overheated. ~ Do not use the oven to heat the room. ~ Make certain that is in use a steam cleaner to children in contact with oils. Do not let potholders come in cabinets above an oven. for potholders. ~ It is recommended to cover all cooked food that the power cords of interest to clean the oven. The...
Operating and Installation manual
Page 8
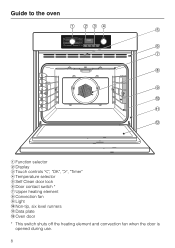
Guide to the oven a Function selector b Display c Touch controls "V", "OK", "W", "Timer" d Temperature selector e Self Clean door lock f Door contact switch * g Upper heating element h Convection fan i Light j Non-tip, six level runners k Data plate l Oven door * This switch shuts off the heating element and convection fan when the door is opened during use. 8
Guide to the oven a Function selector b Display c Touch controls "V", "OK", "W", "Timer" d Temperature selector e Self Clean door lock f Door contact switch * g Upper heating element h Convection fan i Light j Non-tip, six level runners k Data plate l Oven door * This switch shuts off the heating element and convection fan when the door is opened during use. 8

Operating and Installation manual
Page 9
... is used to - Convection Bake - Broil - enter times (as an alternative to reduce the value. Defrost - It can be turned clockwise to increase the value or counter clockwise to using the V or W touch controls). Bake - Self Clean For cleaning the appliance automatically. - Surround - Rapid Heat - Settings For altering the settings of the appliance. select the temperature. - The temperature can be displayed in °F or °C, see "Settings - Light For switching on the oven light...
... is used to - Convection Bake - Broil - enter times (as an alternative to reduce the value. Defrost - It can be turned clockwise to increase the value or counter clockwise to using the V or W touch controls). Bake - Self Clean For cleaning the appliance automatically. - Surround - Rapid Heat - Settings For altering the settings of the appliance. select the temperature. - The temperature can be displayed in °F or °C, see "Settings - Light For switching on the oven light...

Operating and Installation manual
Page 12
... the wire rack. See illustration. The flat end of the oven. Roasting pan The roasting pan is ideal for catching drippings from being pulled out completely while the oven is coated with a sponge and dish soap. It can be easily cleaned with PerfectClean enamel and can also be used to remove the light cover when changing a light bulb. Slide opener The slide opener is wedged beneath the light cover to...
... the wire rack. See illustration. The flat end of the oven. Roasting pan The roasting pan is ideal for catching drippings from being pulled out completely while the oven is coated with a sponge and dish soap. It can be easily cleaned with PerfectClean enamel and can also be used to remove the light cover when changing a light bulb. Slide opener The slide opener is wedged beneath the light cover to...

Operating and Installation manual
Page 13
... used for some time (e.g. vacation). ^ Turn the function selector to "Off". ^ Continue touching the "W" control until the triangle V is below the "0" symbol is deactivated. The oven will not be activated to prevent children from operating the oven or to toggle between "I " The system lock is activated. ^ Touch the "OK" control to activate it. To use the "V" or "W" control to conserve standby power...
... used for some time (e.g. vacation). ^ Turn the function selector to "Off". ^ Continue touching the "W" control until the triangle V is below the "0" symbol is deactivated. The oven will not be activated to prevent children from operating the oven or to toggle between "I " The system lock is activated. ^ Touch the "OK" control to activate it. To use the "V" or "W" control to conserve standby power...
Operating and Installation manual
Page 15
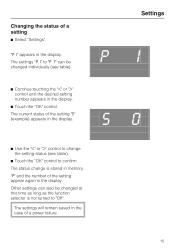
... the number of a power failure. 15 Settings PI S0 ^ Use the "V" or "W" control to change is not turned to "Off". The settings will remain saved in the case of the setting appear again in the display. The current status of a setting ^ Select "Settings". The settings "P I " appears in the display. Other settings can be changed individually (see table). ^ Touch the "OK" control to "P 7" can also be changed at this time...
... the number of a power failure. 15 Settings PI S0 ^ Use the "V" or "W" control to change is not turned to "Off". The settings will remain saved in the case of the setting appear again in the display. The current status of a setting ^ Select "Settings". The settings "P I " appears in the display. Other settings can be changed individually (see table). ^ Touch the "OK" control to "P 7" can also be changed at this time...

Operating and Installation manual
Page 16
... will light up, - Next the minutes will need to confirm the minutes. The time of day you will begin to flash. ^ Now use the temperature selector or the "V" or "W" controls to enter the minutes. ^ Touch the "OK" control to set the time of day. I2:00 m V 16 Before using the oven To set the time of day for the first time Before the oven can...
... will light up, - Next the minutes will need to confirm the minutes. The time of day you will begin to flash. ^ Now use the temperature selector or the "V" or "W" controls to enter the minutes. ^ Touch the "OK" control to set the time of day. I2:00 m V 16 Before using the oven To set the time of day for the first time Before the oven can...

Operating and Installation manual
Page 17
... timer can be operated at a high temperature for the first time remove (if present) - Before using the oven 500 6 mTS V 17 foil from the baking tray, roasting pan or interior floor. - The recommended temperature of 325 °F (160 °C) will start heating up as soon as this process. ^ Remove all accessories from the oven. ^ Turn the function selector to set the highest temperature (500 °F/250 °C). Leave the oven door open until...
... timer can be operated at a high temperature for the first time remove (if present) - Before using the oven 500 6 mTS V 17 foil from the baking tray, roasting pan or interior floor. - The recommended temperature of 325 °F (160 °C) will start heating up as soon as this process. ^ Remove all accessories from the oven. ^ Turn the function selector to set the highest temperature (500 °F/250 °C). Leave the oven door open until...
Operating and Installation manual
Page 20
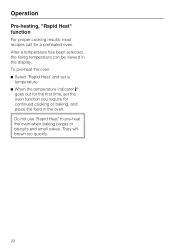
They will brown too quickly. 20 To pre-heat the oven: ^ Select "Rapid Heat" and set a temperature. ^ When the temperature indicator 3 goes out for the first time, set the oven function you require for a preheated oven. Do not use "Rapid Heat" to pre-heat the oven when baking pizzas or biscuits and small cakes. After a temperature has been selected, the rising temperature can be viewed in the oven. Operation Pre-heating, "Rapid Heat" function For proper cooking results, most recipes call for continued cooking or baking, and place the food in the display.
They will brown too quickly. 20 To pre-heat the oven: ^ Select "Rapid Heat" and set a temperature. ^ When the temperature indicator 3 goes out for the first time, set the oven function you require for a preheated oven. Do not use "Rapid Heat" to pre-heat the oven when baking pizzas or biscuits and small cakes. After a temperature has been selected, the rising temperature can be viewed in the oven. Operation Pre-heating, "Rapid Heat" function For proper cooking results, most recipes call for continued cooking or baking, and place the food in the display.
Operating and Installation manual
Page 21
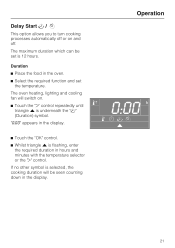
... the "W" control. Operation Delay Start T / S This option allows you to turn cooking processes automatically off or on . ^ Touch the "W" control repeatedly until triangle V is flashing, enter the required duration in the display. 3 0:00 h 6 mTS V ^ Touch the "OK" control. ^ Whilst triangle V is underneath the "T" (Duration) symbol. The oven heating, lighting and cooling fan will be seen counting down in the oven. ^ Select the required function and set is...
... the "W" control. Operation Delay Start T / S This option allows you to turn cooking processes automatically off or on . ^ Touch the "W" control repeatedly until triangle V is flashing, enter the required duration in the display. 3 0:00 h 6 mTS V ^ Touch the "OK" control. ^ Whilst triangle V is underneath the "T" (Duration) symbol. The oven heating, lighting and cooling fan will be seen counting down in the oven. ^ Select the required function and set is...
Operating and Installation manual
Page 22
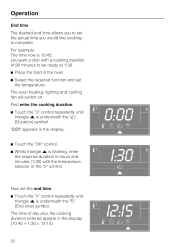
... set the temperature. The oven heating, lighting and cooling fan will switch on. you would like cooking to be ready at 1:30. ^ Place the food in the oven. ^ Select the required function and set the end time: ^ Touch the "W" control repeatedly until triangle V is underneath the "T" 3 0:00 h (Duration) symbol. 6 mTS "0:00" appears in the display. Operation End time The desired end time allows you to set the actual time...
... set the temperature. The oven heating, lighting and cooling fan will switch on. you would like cooking to be ready at 1:30. ^ Place the food in the oven. ^ Select the required function and set the end time: ^ Touch the "W" control repeatedly until triangle V is underneath the "T" 3 0:00 h (Duration) symbol. 6 mTS "0:00" appears in the display. Operation End time The desired end time allows you to set the actual time...
Operating and Installation manual
Page 23
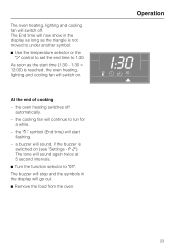
... the triangle is switched on . The oven heating, lighting and cooling fan will switch off automatically. - the oven heating switches off . The tone will switch on (see "Settings - Operation I:30 6 mTS V 23 At the end of cooking - The buzzer will stop and the symbols in the display will now show in the display as long as the start flashing. - The End time will go out. ^ Remove the food from...
... the triangle is switched on . The oven heating, lighting and cooling fan will switch off automatically. - the oven heating switches off . The tone will switch on (see "Settings - Operation I:30 6 mTS V 23 At the end of cooking - The buzzer will stop and the symbols in the display will now show in the display as long as the start flashing. - The End time will go out. ^ Remove the food from...
Operating and Installation manual
Page 51
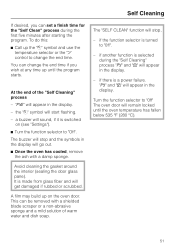
... the interior (sealing the door glass pane). This can set a finish time for the "Self Clean" process during the "Self Cleaning" process "PY" and "0" will get damaged if rubbed or scrubbed. Turn the function selector to "Off". Self Cleaning If desired, you wish at any time up until the oven temperature has fallen below 535 °F (280 °C). 51 "PYE" will sound, if it is a power...
... the interior (sealing the door glass pane). This can set a finish time for the "Self Clean" process during the "Self Cleaning" process "PY" and "0" will get damaged if rubbed or scrubbed. Turn the function selector to "Off". Self Cleaning If desired, you wish at any time up until the oven temperature has fallen below 535 °F (280 °C). 51 "PYE" will sound, if it is a power...
Operating and Installation manual
Page 54
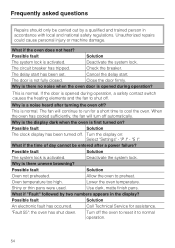
... delay start . Why is opened during operation, a safety contact switch causes the heating elements and the fan to cool the oven. Deactivate the system lock. Shiny or thin pans were used. Call Technical Service for a short time to shut off. Deactivate the system lock. Cancel the delay start has been set. Why is the display dark when the oven is activated. "P i" - "S i". Lower the oven temperature. The fan will turn off ? Turn off . Close the door firmly. The circuit breaker...
... delay start . Why is opened during operation, a safety contact switch causes the heating elements and the fan to cool the oven. Deactivate the system lock. Shiny or thin pans were used. Call Technical Service for a short time to shut off. Deactivate the system lock. Cancel the delay start has been set. Why is the display dark when the oven is activated. "P i" - "S i". Lower the oven temperature. The fan will turn off ? Turn off . Close the door firmly. The circuit breaker...
Operating and Installation manual
Page 61
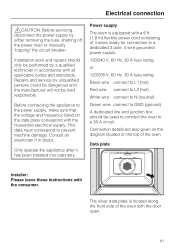
... instructions with the door open. 61 Installation work and repairs should be held responsible. The silver data plate is equipped with a 6 ft. (1.8 m) flexible power cord consisting of 4 wires ready for connection to a dedicated 3 pole, 4 wire grounded power supply: 120/240 V, 60 Hz, 30 A fuse rating or 120/208 V, 60 Hz, 30 A fuse rating Black wire: connect to L1 (hot) Red wire: connect to L2 (hot) White wire: connect to N (neutral) Green wire: connect to a 30 A circuit...
... instructions with the door open. 61 Installation work and repairs should be held responsible. The silver data plate is equipped with a 6 ft. (1.8 m) flexible power cord consisting of 4 wires ready for connection to a dedicated 3 pole, 4 wire grounded power supply: 120/240 V, 60 Hz, 30 A fuse rating or 120/208 V, 60 Hz, 30 A fuse rating Black wire: connect to L1 (hot) Red wire: connect to L2 (hot) White wire: connect to N (neutral) Green wire: connect to a 30 A circuit...
H4844BP+H4846BP
Page 2
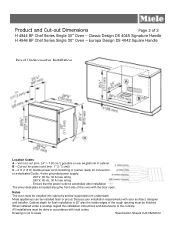
... the installation instructions and dimensions of the oven with the door open. Product and Cut-out Dimensions Page 2 of cabinet B - Vent cut-out (min. 24" ² / 150 cm ²) possible at rear or platform of 2 H 4844 BP Chef Series Single 30" Oven - Cabinet depth for connection to a dedicated 3 pole, 4 wire grounded power supply: 208 V, 60 Hz, 30 A fuse rating 240 V, 60 Hz, 30 A fuse rating Ensure that the power outlet is accessible after installation The silver data plate...
... the installation instructions and dimensions of the oven with the door open. Product and Cut-out Dimensions Page 2 of cabinet B - Vent cut-out (min. 24" ² / 150 cm ²) possible at rear or platform of 2 H 4844 BP Chef Series Single 30" Oven - Cabinet depth for connection to a dedicated 3 pole, 4 wire grounded power supply: 208 V, 60 Hz, 30 A fuse rating 240 V, 60 Hz, 30 A fuse rating Ensure that the power outlet is accessible after installation The silver data plate...


