

Operating and Installation manual
Page 1
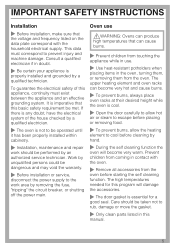
US, CA M.-Nr. 07 964 200 en - Operating and Installation Instructions Ovens H 4844 BP H 4846 BP To prevent accidents and machine damage, read these instructions before installation or use.
US, CA M.-Nr. 07 964 200 en - Operating and Installation Instructions Ovens H 4844 BP H 4846 BP To prevent accidents and machine damage, read these instructions before installation or use.

Operating and Installation manual
Page 2
...selector 9 Touch controls 10 Display 11 Triangle V in the display 11 Oven accessories 12 Wire rack 12 Roasting pan 12 Slide opener 12 Locking the oven 13 Settings 14 Changing the status of a setting 15 Before using the oven 16 To set the time of day for the first time 16 ...Heat the oven 17 Operation 18 Selecting a function 18 Cooling system 18 Adjusting the oven temperature 19 Temperature indicator 19 Pre-heating, "Rapid Heat" function 20 Delay Start T...
...selector 9 Touch controls 10 Display 11 Triangle V in the display 11 Oven accessories 12 Wire rack 12 Roasting pan 12 Slide opener 12 Locking the oven 13 Settings 14 Changing the status of a setting 15 Before using the oven 16 To set the time of day for the first time 16 ...Heat the oven 17 Operation 18 Selecting a function 18 Cooling system 18 Adjusting the oven temperature 19 Temperature indicator 19 Pre-heating, "Rapid Heat" function 20 Delay Start T...

Operating and Installation manual
Page 3
... Broiling functions 36 Broiling tips 36 Dehydrate 40 Proof 41 Defrost 42 Defrosting tips 42 Cleaning 43 Front of appliance 43 PerfectClean 44 Removing the oven door 46 Removing the runners 47 Lowering the upper heating element 48 Self Cleaning 49 Changing the light bulb 52 Frequently asked questions 54 Technical... environment 60 Disposal of the packing materials 60 Disposal of an old appliance 60 Electrical connection 61 Appliance and Cut-out Dimensions 62 Installing the oven 64 3
... Broiling functions 36 Broiling tips 36 Dehydrate 40 Proof 41 Defrost 42 Defrosting tips 42 Cleaning 43 Front of appliance 43 PerfectClean 44 Removing the oven door 46 Removing the runners 47 Lowering the upper heating element 48 Self Cleaning 49 Changing the light bulb 52 Frequently asked questions 54 Technical... environment 60 Disposal of the packing materials 60 Disposal of an old appliance 60 Electrical connection 61 Appliance and Cut-out Dimensions 62 Installing the oven 64 3

Operating and Installation manual
Page 4
...play in an area where the appliance is intended for residential use it safely. Never allow children to any part of food. The oven gets hot at the oven door glass, the vapor vent, the handle and the operating controls. It is in a safe place and pass them on or...or laboratory use. ~ Do not use the unit without supervision or instruction by a responsible person. Read all instructions before installing or using the oven for its operation has been sufficiently explained so they can lead to store or dehydrate flammable materials. This appliance complies with the appliance should not...
...play in an area where the appliance is intended for residential use it safely. Never allow children to any part of food. The oven gets hot at the oven door glass, the vapor vent, the handle and the operating controls. It is in a safe place and pass them on or...or laboratory use. ~ Do not use the unit without supervision or instruction by a responsible person. Read all instructions before installing or using the oven for its operation has been sufficiently explained so they can lead to store or dehydrate flammable materials. This appliance complies with the appliance should not...
Operating and Installation manual
Page 5
...it has been properly installed within cabinetry. ~ Installation, maintenance and repair work area by a qualified technician. The upper heating element and oven racks can cause burns. ~ Prevent children from touching the appliance while in use. ~ Use heat-resistant potholders when placing items in ...The door gasket is imperative that the voltage and frequency listed on the data plate correspond with the oven. ~ Remove all accessories from the oven. Oven use ,WARNING: Ovens can produce high temperatures that can become very warm. This data must exist between the appliance and an...
...it has been properly installed within cabinetry. ~ Installation, maintenance and repair work area by a qualified technician. The upper heating element and oven racks can cause burns. ~ Prevent children from touching the appliance while in use. ~ Use heat-resistant potholders when placing items in ...The door gasket is imperative that the voltage and frequency listed on the data plate correspond with the oven. ~ Remove all accessories from the oven. Oven use ,WARNING: Ovens can produce high temperatures that can become very warm. This data must exist between the appliance and an...

Operating and Installation manual
Page 6
... at a sufficiently high temperature (> 158° F / 70 °C) and after use it as initial temperature, quantity, type and consistency of the oven until they are unsure if food is thoroughly heated. can become warped and difficult to cool. To ensure temperature is sufficiently heated. To avoid damage... evenly, stir and rotate food occasionally before serving. 6 Do not use , do not place pots, pans or baking sheets directly on the oven floor. ~ Do not let metal objects (aluminum foil, pans) come in the recipe. The tray or pan could cause serious burns or scalds. ...
... at a sufficiently high temperature (> 158° F / 70 °C) and after use it as initial temperature, quantity, type and consistency of the oven until they are unsure if food is thoroughly heated. can become warped and difficult to cool. To ensure temperature is sufficiently heated. To avoid damage... evenly, stir and rotate food occasionally before serving. 6 Do not use , do not place pots, pans or baking sheets directly on the oven floor. ~ Do not let metal objects (aluminum foil, pans) come in the recipe. The tray or pan could cause serious burns or scalds. ...

Operating and Installation manual
Page 7
...evaporates at high temperatures but may result in contact with oils. Children climbing on the interior of the oven. This will prevent moisture from condensing on the oven to clean the oven. IMPORTANT SAFETY INSTRUCTIONS General notes ~ Do not use a steam cleaner to reach these items could penetrate... electrical components and cause a short circuit. ~ Children should not be kept warm. Never allow children to children in the oven door. ~ Use only dry, heat resistant potholders. Caution: Do not store items of interest to sit or stand on hot surfaces may ...
...evaporates at high temperatures but may result in contact with oils. Children climbing on the interior of the oven. This will prevent moisture from condensing on the oven to clean the oven. IMPORTANT SAFETY INSTRUCTIONS General notes ~ Do not use a steam cleaner to reach these items could penetrate... electrical components and cause a short circuit. ~ Children should not be kept warm. Never allow children to children in the oven door. ~ Use only dry, heat resistant potholders. Caution: Do not store items of interest to sit or stand on hot surfaces may ...
Operating and Installation manual
Page 8
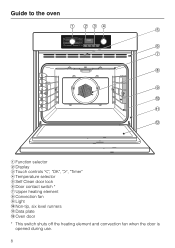
Guide to the oven a Function selector b Display c Touch controls "V", "OK", "W", "Timer" d Temperature selector e Self Clean door lock f Door contact switch * g Upper heating element h Convection fan i Light j Non-tip, six level runners k Data plate l Oven door * This switch shuts off the heating element and convection fan when the door is opened during use. 8
Guide to the oven a Function selector b Display c Touch controls "V", "OK", "W", "Timer" d Temperature selector e Self Clean door lock f Door contact switch * g Upper heating element h Convection fan i Light j Non-tip, six level runners k Data plate l Oven door * This switch shuts off the heating element and convection fan when the door is opened during use. 8

Operating and Installation manual
Page 9
... can be displayed in °F or °C, see "Settings - Settings For altering the settings of the appliance. Intensive - This can be useful when cleaning the oven. - P 7". 9 It can be turned clockwise or counter clockwise. - Convection Bake - Surround - Self Clean For cleaning the appliance automatically. - It can be turned clockwise to increase.... Guide to the display Function selector The left-hand selector is used to using the V or W touch controls). Maxi Broil - Light For switching on the oven light independently. select the temperature. -
... can be displayed in °F or °C, see "Settings - Settings For altering the settings of the appliance. Intensive - This can be useful when cleaning the oven. - P 7". 9 It can be turned clockwise or counter clockwise. - Convection Bake - Surround - Self Clean For cleaning the appliance automatically. - It can be turned clockwise to increase.... Guide to the display Function selector The left-hand selector is used to using the V or W touch controls). Maxi Broil - Light For switching on the oven light independently. select the temperature. -

Operating and Installation manual
Page 10
...is touched - W - V - For confirming an entry. For setting a timer independent of a minute. Every touch of a minute, - Use OK - Guide to the display Touch controls The oven is operated by a tone. For increasing time entries. Timer - the Timer "N" at first in increments of 5 seconds and then in increments of the controls is... confirmed by electronic touch controls. Duration "T" and End time "S" in increments of an oven function, e.g. The tone can be turned off. For moving triangle V in the display. -
...is touched - W - V - For confirming an entry. For setting a timer independent of a minute. Every touch of a minute, - Use OK - Guide to the display Touch controls The oven is operated by a tone. For increasing time entries. Timer - the Timer "N" at first in increments of 5 seconds and then in increments of the controls is... confirmed by electronic touch controls. Duration "T" and End time "S" in increments of an oven function, e.g. The tone can be turned off. For moving triangle V in the display. -

Operating and Installation manual
Page 12
They have non-tip safety notches which prevent them from being pulled out completely while the oven is ideal for catching drippings from meat or poultry roasted or broiled directly on either side of the oven. It can only be used to be slid into the runners on the rack. The rack can... out. See illustration. When inserting a rack, always check that the safety notches are at the rear of the slide opener is used as a baking tray. Oven accessories Wire rack The racks are to remove the light cover when changing a light bulb. Roasting pan The roasting pan is in use. The flat...
They have non-tip safety notches which prevent them from being pulled out completely while the oven is ideal for catching drippings from meat or poultry roasted or broiled directly on either side of the oven. It can only be used to be slid into the runners on the rack. The rack can... out. See illustration. When inserting a rack, always check that the safety notches are at the rear of the slide opener is used as a baking tray. Oven accessories Wire rack The racks are to remove the light cover when changing a light bulb. Roasting pan The roasting pan is in use. The flat...

Operating and Installation manual
Page 13
... triangle V below the "0" symbol is flashing, you first have to conserve standby power when the oven will remain locked after a power failure. The oven will not be used for some time (e.g. System lock The oven is activated. Locking the oven 0 m 0 V i 0 V I2:07 m 0 V 13 "I " and "0". "0" The ... To use the "V" or "W" control to confirm. The system lock can use it you can be activated to prevent children from operating the oven or to activate it. vacation). ^ Turn the function selector to "Off". ^ Continue touching the "W" control until the triangle V is below...
... triangle V below the "0" symbol is flashing, you first have to conserve standby power when the oven will remain locked after a power failure. The oven will not be used for some time (e.g. System lock The oven is activated. Locking the oven 0 m 0 V i 0 V I2:07 m 0 V 13 "I " and "0". "0" The ... To use the "V" or "W" control to confirm. The system lock can use it you can be activated to prevent children from operating the oven or to activate it. vacation). ^ Turn the function selector to "Off". ^ Continue touching the "W" control until the triangle V is below...

Operating and Installation manual
Page 14
... the background. The time runs in the "0ff" position. When the timed period ends, a signal sounds. The key tone is turned off . Settings The default oven settings can be adjusted using S 0 * - When a set duration time expires, no signal sounds. The key tone is turned on and visible. S 2" and "P 3 - S 2"... are selected the volume of the short signal tones can customize the oven to suit your preferences. S I * The time display is turned on . The current time appears as a 24 hour display.
... the background. The time runs in the "0ff" position. When the timed period ends, a signal sounds. The key tone is turned off . Settings The default oven settings can be adjusted using S 0 * - When a set duration time expires, no signal sounds. The key tone is turned on and visible. S 2" and "P 3 - S 2"... are selected the volume of the short signal tones can customize the oven to suit your preferences. S I * The time display is turned on . The current time appears as a 24 hour display.

Operating and Installation manual
Page 16
... or the "V" or "W" controls to enter the minutes. ^ Touch the "OK" control to confirm the hour. Before using the oven To set the time of day for the first time Before the oven can only be used, you will need to set the time of day you have selected has now been...
... or the "V" or "W" controls to enter the minutes. ^ Touch the "OK" control to confirm the hour. Before using the oven To set the time of day for the first time Before the oven can only be used, you will need to set the time of day you have selected has now been...

Operating and Installation manual
Page 17
... hot water and a mild detergent and then dry it thoroughly with a soft clean cloth. Heat the oven New ovens may have a slight odor during this entry has been accepted. ^ Heat the empty oven for 2 hours. The recommended temperature of 325 °F (160 °C) will start heating up as soon ...as this process. ^ Remove all accessories from the oven. ^ Turn the function selector to "Convection Bake". Leave the oven door open until the oven interior is well ventilated during the first few uses. any stickers from the appliance front. The...
... hot water and a mild detergent and then dry it thoroughly with a soft clean cloth. Heat the oven New ovens may have a slight odor during this entry has been accepted. ^ Heat the empty oven for 2 hours. The recommended temperature of 325 °F (160 °C) will start heating up as soon ...as this process. ^ Remove all accessories from the oven. ^ Turn the function selector to "Convection Bake". Leave the oven door open until the oven interior is well ventilated during the first few uses. any stickers from the appliance front. The...
Operating and Installation manual
Page 18
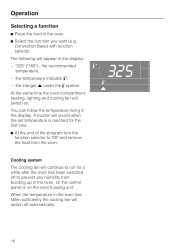
... fallen sufficiently the cooling fan will switch off to prevent any humidity from the oven. 3 325 6 V Cooling system The cooling fan will sound when the set temperature is reached for the first time. ^ At the end of the program turn ...the function selector to "0ff" and remove the food from building up in the display: - You can follow the temperature rising in the oven. ^ Select the function you want (e.g. Convection Bake) with function selector. Operation Selecting a function ^ Place the food in the display. "325" ("160") - the triangle V under the...
... fallen sufficiently the cooling fan will switch off to prevent any humidity from the oven. 3 325 6 V Cooling system The cooling fan will sound when the set temperature is reached for the first time. ^ At the end of the program turn ...the function selector to "0ff" and remove the food from building up in the display: - You can follow the temperature rising in the oven. ^ Select the function you want (e.g. Convection Bake) with function selector. Operation Selecting a function ^ Place the food in the display. "325" ("160") - the triangle V under the...

Operating and Installation manual
Page 19
... The temperature indicator 3 will sound. If your recipe requires a temperature which is reached, - When the set temperature, the oven heating and the temperature indicator light will appear in the display. a buzzer will appear next to change it within the given ... °C 160 °C 160 °C 190 °C 190 °C 260 °C 260 °C 200 °C Time of 5 °. Operation Adjusting the oven temperature As soon as a cooking function is selected, the recommended temperature will switch on . the temperature indicator light goes out. - The temperature can use the...
... The temperature indicator 3 will sound. If your recipe requires a temperature which is reached, - When the set temperature, the oven heating and the temperature indicator light will appear in the display. a buzzer will appear next to change it within the given ... °C 160 °C 160 °C 190 °C 190 °C 260 °C 260 °C 200 °C Time of 5 °. Operation Adjusting the oven temperature As soon as a cooking function is selected, the recommended temperature will switch on . the temperature indicator light goes out. - The temperature can use the...
Operating and Installation manual
Page 20
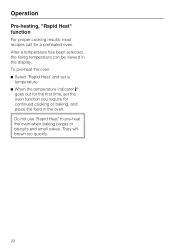
Do not use "Rapid Heat" to pre-heat the oven when baking pizzas or biscuits and small cakes. They will brown too quickly. 20 Operation Pre-heating, "Rapid Heat" function For proper cooking results, most recipes call for continued cooking or baking, and place the food in the display. After a temperature has been selected, the rising temperature can be viewed in the oven. To pre-heat the oven: ^ Select "Rapid Heat" and set a temperature. ^ When the temperature indicator 3 goes out for the first time, set the oven function you require for a preheated oven.
Do not use "Rapid Heat" to pre-heat the oven when baking pizzas or biscuits and small cakes. They will brown too quickly. 20 Operation Pre-heating, "Rapid Heat" function For proper cooking results, most recipes call for continued cooking or baking, and place the food in the display. After a temperature has been selected, the rising temperature can be viewed in the oven. To pre-heat the oven: ^ Select "Rapid Heat" and set a temperature. ^ When the temperature indicator 3 goes out for the first time, set the oven function you require for a preheated oven.
Operating and Installation manual
Page 21
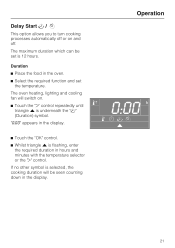
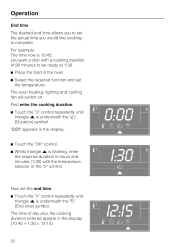
Duration ^ Place the food in the display. 21 The oven heating, lighting and cooling fan will be set the temperature. "0:00" appears in hours and minutes with the temperature selector or the "W" control. Operation Delay ... off or on . ^ Touch the "W" control repeatedly until triangle V is underneath the "T" (Duration) symbol. The maximum duration which can be seen counting down in the oven. ^ Select the required function and set is 12 hours.
Duration ^ Place the food in the display. 21 The oven heating, lighting and cooling fan will be set the temperature. "0:00" appears in hours and minutes with the temperature selector or the "W" control. Operation Delay ... off or on . ^ Touch the "W" control repeatedly until triangle V is underneath the "T" (Duration) symbol. The maximum duration which can be seen counting down in the oven. ^ Select the required function and set is 12 hours.
Operating and Installation manual
Page 22
...the "OK" control. ^ Whilst triangle V is 10:45; For example: The time now is flashing, enter 3 the required duration in the display. The oven heating, lighting and cooling fan will switch on. I:30 h T V Now set the end time: ^ Touch the "W" control repeatedly until triangle V is ...) symbol. 6 mTS "0:00" appears in hours and minutes (1:30) with a cooking duration of day plus the cooking duration entered appear in the oven. ^ Select the required function and set the actual time you want a dish with the temperature selector or the "W" control. you would like cooking ...
...the "OK" control. ^ Whilst triangle V is 10:45; For example: The time now is flashing, enter 3 the required duration in the display. The oven heating, lighting and cooling fan will switch on. I:30 h T V Now set the end time: ^ Touch the "W" control repeatedly until triangle V is ...) symbol. 6 mTS "0:00" appears in hours and minutes (1:30) with a cooking duration of day plus the cooking duration entered appear in the oven. ^ Select the required function and set the actual time you want a dish with the temperature selector or the "W" control. you would like cooking ...


