
Operating and Installation manual
Page 1
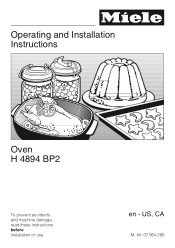
US, CA M.-Nr. 07 964 290 en - Operating and Installation Instructions Oven H 4894 BP2 To prevent accidents and machine damage, read these instructions before installation or use.
US, CA M.-Nr. 07 964 290 en - Operating and Installation Instructions Oven H 4894 BP2 To prevent accidents and machine damage, read these instructions before installation or use.
Operating and Installation manual
Page 2
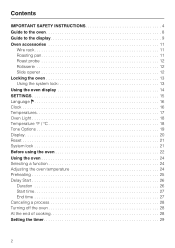
... Wire rack 11 Roasting pan 11 Roast probe 12 Rotisserie 12 Slide opener 12 Locking the oven 13 Using the system lock 13 Using the oven display 14 SETTINGS 15 Language J 16 Clock 16 Temperatures 17 Oven Light 18 Temperature °F / °C 18 Tone Options 19 Display 20 Reset 21 System ...lock 21 Before using the oven 22 Using the oven 24 Selecting a function 24 Adjusting the oven temperature 24 Preheating 25 Delay Start 26 Duration 26 Start time 27 End time 27 Canceling a process 28 Turning off the oven 28 At the end of cooking 28 Setting the ...
... Wire rack 11 Roasting pan 11 Roast probe 12 Rotisserie 12 Slide opener 12 Locking the oven 13 Using the system lock 13 Using the oven display 14 SETTINGS 15 Language J 16 Clock 16 Temperatures 17 Oven Light 18 Temperature °F / °C 18 Tone Options 19 Display 20 Reset 21 System ...lock 21 Before using the oven 22 Using the oven 24 Selecting a function 24 Adjusting the oven temperature 24 Preheating 25 Delay Start 26 Duration 26 Start time 27 End time 27 Canceling a process 28 Turning off the oven 28 At the end of cooking 28 Setting the ...

Operating and Installation manual
Page 3
... FAVORITES 53 SABBATH 54 DEHYDRATE 55 PROOF 56 DEFROST 57 Defrosting tips 57 Cleaning and care 58 Front of appliance 58 PerfectClean 59 Removing the oven door 61 Removing the runners 62 Lowering the upper heating element 63 Self Cleaning 64 Changing the light bulb 66 Frequently asked questions 68 Technical... environment 74 Disposal of the packing materials 74 Disposal of an old appliance 74 Electrical connection 75 Appliance and Cut-out Dimensions 76 Installing the oven 77 3
... FAVORITES 53 SABBATH 54 DEHYDRATE 55 PROOF 56 DEFROST 57 Defrosting tips 57 Cleaning and care 58 Front of appliance 58 PerfectClean 59 Removing the oven door 61 Removing the runners 62 Lowering the upper heating element 63 Self Cleaning 64 Changing the light bulb 66 Frequently asked questions 68 Technical... environment 74 Disposal of the packing materials 74 Disposal of an old appliance 74 Electrical connection 75 Appliance and Cut-out Dimensions 76 Installing the oven 77 3
Operating and Installation manual
Page 4
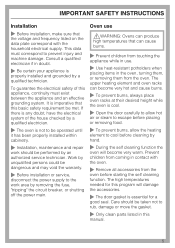
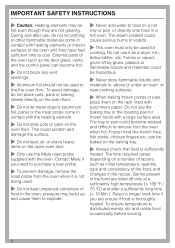
...any part of the appliance. ~ Children should not use the unit without supervision or instruction by a responsible person. The oven gets hot at the oven door glass, the vapor vent, the handle and the operating controls. Keep these operating instructions in operation. IMPORTANT SAFETY INSTRUCTIONS...intended for domestic use only: cooking, baking, roasting, broiling, defrosting and heating of food. Read all instructions before installing or using the oven for the first time. Improper use . It is in use of burns. 4 Children ~ Children should not be able to recognize potential...
...any part of the appliance. ~ Children should not use the unit without supervision or instruction by a responsible person. The oven gets hot at the oven door glass, the vapor vent, the handle and the operating controls. Keep these operating instructions in operation. IMPORTANT SAFETY INSTRUCTIONS...intended for domestic use only: cooking, baking, roasting, broiling, defrosting and heating of food. Read all instructions before installing or using the oven for the first time. Improper use . It is in use of burns. 4 Children ~ Children should not be able to recognize potential...
Operating and Installation manual
Page 5
...IMPORTANT SAFETY INSTRUCTIONS Installation ~ Before installation, make sure that the voltage and frequency listed on the data plate correspond with the oven. ~ Remove all accessories from the oven. Work by unqualified persons could be performed by removing the fuse, "tripping" the circuit breaker, or shutting off the power ...main. Oven use . ~ Use heat-resistant potholders when placing items in doubt. ~ Be certain your appliance is cool. ~ Open the door carefully...
...IMPORTANT SAFETY INSTRUCTIONS Installation ~ Before installation, make sure that the voltage and frequency listed on the data plate correspond with the oven. ~ Remove all accessories from the oven. Work by unqualified persons could be performed by removing the fuse, "tripping" the circuit breaker, or shutting off the power ...main. Oven use . ~ Use heat-resistant potholders when placing items in doubt. ~ Be certain your appliance is cool. ~ Open the door carefully...
Operating and Installation manual
Page 6
... not let metal objects (aluminum foil, pans) or the meat probe come in contact with the oven. Do not use the Miele roast probe supplied with heating elements or interior surfaces of the oven until they are killed off by glues, plastics or flammable liquids and materials could scratch and damage the...panel can be baked on the open oven door. ~ Only use the baking tray or the roasting pan for cooking. Fumes or vapors given off only at a sufficiently high temperature (> 158 °F / 70 °C) and after a sufficiently long time (> 10 Min.). Contact Miele if you are unsure if food ...
... not let metal objects (aluminum foil, pans) or the meat probe come in contact with the oven. Do not use the Miele roast probe supplied with heating elements or interior surfaces of the oven until they are killed off by glues, plastics or flammable liquids and materials could scratch and damage the...panel can be baked on the open oven door. ~ Only use the baking tray or the roasting pan for cooking. Fumes or vapors given off only at a sufficiently high temperature (> 158 °F / 70 °C) and after a sufficiently long time (> 10 Min.). Contact Miele if you are unsure if food ...
Operating and Installation manual
Page 7
..., heat resistant potholders. Do not let potholders come in contact with a properly rated dry chemical or foam fire extinguisher. ~ Be aware of the oven. ~ Be careful when using alcoholic beverages like rum, whiskey, wine etc. IMPORTANT SAFETY INSTRUCTIONS General notes ~ Do not use a steam cleaner to... sit or stand on any part of the oven. This will prevent moisture from condensing on the interior of loose fitting or hanging garments while operating the cooktop, they are a fire hazard ...
..., heat resistant potholders. Do not let potholders come in contact with a properly rated dry chemical or foam fire extinguisher. ~ Be aware of the oven. ~ Be careful when using alcoholic beverages like rum, whiskey, wine etc. IMPORTANT SAFETY INSTRUCTIONS General notes ~ Do not use a steam cleaner to... sit or stand on any part of the oven. This will prevent moisture from condensing on the interior of loose fitting or hanging garments while operating the cooktop, they are a fire hazard ...

Operating and Installation manual
Page 8
Guide to the oven a Control panel b SELF CLEAN door lock c Door contact switch * d Upper heating element e Rotisserie motors f Light g Roast probe socket 8 h Convection fan i Non-tip, six-level runners j Oven door k Data plate * This switch shuts off the heating element and convection fan when the door is opened during use.
Guide to the oven a Control panel b SELF CLEAN door lock c Door contact switch * d Upper heating element e Rotisserie motors f Light g Roast probe socket 8 h Convection fan i Non-tip, six-level runners j Oven door k Data plate * This switch shuts off the heating element and convection fan when the door is opened during use.
Operating and Installation manual
Page 9
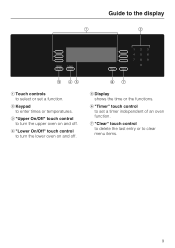
d "Lower On/Off" touch control to enter times or temperatures. e Display shows the time or the functions. b Keypad to turn the upper oven on and off . f "Timer" touch control to turn the lower oven on and off . c "Upper On/Off" touch control to set a function. Guide to the display a Touch controls to clear menu items. 9 g "Clear" touch control to delete the last entry or to select or set a timer independent of an oven function.
d "Lower On/Off" touch control to enter times or temperatures. e Display shows the time or the functions. b Keypad to turn the upper oven on and off . f "Timer" touch control to turn the lower oven on and off . c "Upper On/Off" touch control to set a function. Guide to the display a Touch controls to clear menu items. 9 g "Clear" touch control to delete the last entry or to select or set a timer independent of an oven function.

Operating and Installation manual
Page 10
Guide to the ( * SURROUND 325°F lower oven settings. 10 BROIL... ) FAVORITES... ) more ) * LOWER ( BAKE... ( ROAST... ( MASTER CHEF... BROIL... ) FAVORITES... ) more ) When both ovens are in use, the display will split to indicate the status of 8:25 each oven. ( # CONVECTION BAKE 325°F The "#" arrow points to the settings of the upper oven, the "*" arrow to the display The "Upper On/Off" touch control, displays: The "Lower On/Off" touch control, displays: # UPPER ( BAKE... ( ROAST... ( MASTER CHEF...
Guide to the ( * SURROUND 325°F lower oven settings. 10 BROIL... ) FAVORITES... ) more ) * LOWER ( BAKE... ( ROAST... ( MASTER CHEF... BROIL... ) FAVORITES... ) more ) When both ovens are in use, the display will split to indicate the status of 8:25 each oven. ( # CONVECTION BAKE 325°F The "#" arrow points to the settings of the upper oven, the "*" arrow to the display The "Upper On/Off" touch control, displays: The "Lower On/Off" touch control, displays: # UPPER ( BAKE... ( ROAST... ( MASTER CHEF...
Operating and Installation manual
Page 11
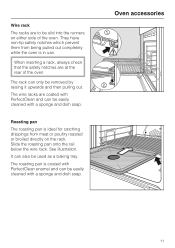
...PerfectClean and can be used as a baking tray. Roasting pan The roasting pan is ideal for catching drippings from being pulled out completely while the oven is coated with PerfectClean enamel and can be easily cleaned with a sponge and dish soap. It can only be removed by raising it upwards and... then pulling out. Oven accessories 11 They have non-tip safety notches which prevent them from meat or poultry roasted or broiled directly on either side of the...
...PerfectClean and can be used as a baking tray. Roasting pan The roasting pan is ideal for catching drippings from being pulled out completely while the oven is coated with PerfectClean enamel and can be easily cleaned with a sponge and dish soap. It can only be removed by raising it upwards and... then pulling out. Oven accessories 11 They have non-tip safety notches which prevent them from meat or poultry roasted or broiled directly on either side of the...
Operating and Installation manual
Page 12
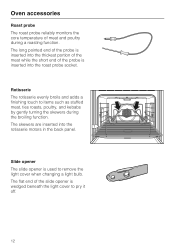
Oven accessories Roast probe The roast probe reliably monitors the core temperature of the slide opener is wedged beneath the light cover to pry it off. ...
Oven accessories Roast probe The roast probe reliably monitors the core temperature of the slide opener is wedged beneath the light cover to pry it off. ...
Operating and Installation manual
Page 13
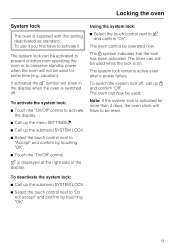
...LOCK. ^ Select the touch control next to "Accept" and confirm by touching "OK". 13 The oven can be used . Note: If the system lock is displayed at the right side of the ... next to activate the display. ^ Call up the menu SETTINGS J. ^ Call up $ and confirm "Off". The oven cannot be reset. The $ symbol indicates that the lock has been activated. To activate the system lock: ^ Touch ... by touching "OK". ^ Touch the "On/Off" control. ) is activated for more than 4 days, the oven clock will not be used while the lock is on. The system lock can now be used for some time ...
...LOCK. ^ Select the touch control next to "Accept" and confirm by touching "OK". 13 The oven can be used . Note: If the system lock is displayed at the right side of the ... next to activate the display. ^ Call up the menu SETTINGS J. ^ Call up $ and confirm "Off". The oven cannot be reset. The $ symbol indicates that the lock has been activated. To activate the system lock: ^ Touch ... by touching "OK". ^ Touch the "On/Off" control. ) is activated for more than 4 days, the oven clock will not be used while the lock is on. The system lock can now be used for some time ...

Operating and Installation manual
Page 14
... arrow next to each displayed function points to its corresponding control. ^ Touch the "On/Off" control to assist in the selection of functions. Using the oven display This oven uses soft key technology and an LCD display to activate the display. To select a function, touch the control next to the desired function.
... arrow next to each displayed function points to its corresponding control. ^ Touch the "On/Off" control to assist in the selection of functions. Using the oven display This oven uses soft key technology and an LCD display to activate the display. To select a function, touch the control next to the desired function.
Operating and Installation manual
Page 15
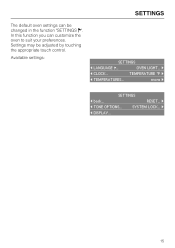
OVEN LIGHT... ) ( CLOCK... RESET... ) ( TONE OPTIONS... Available settings: SETTINGS ( LANGUAGE J... TEMPERATURE °F ) ( TEMPERATURES... more ) SETTINGS ( back... SYSTEM LOCK... ) ( DISPLAY... 15 Settings may be changed in the function "SETTINGS J". SETTINGS The default oven settings can customize the oven to suit your preferences. In this function you can be adjusted by touching the appropriate touch control.
OVEN LIGHT... ) ( CLOCK... RESET... ) ( TONE OPTIONS... Available settings: SETTINGS ( LANGUAGE J... TEMPERATURE °F ) ( TEMPERATURES... more ) SETTINGS ( back... SYSTEM LOCK... ) ( DISPLAY... 15 Settings may be changed in the function "SETTINGS J". SETTINGS The default oven settings can customize the oven to suit your preferences. In this function you can be adjusted by touching the appropriate touch control.
Operating and Installation manual
Page 16
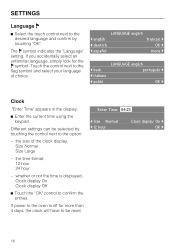
... ( italiano ( polski LANGUAGE english português ) OK ) Clock "Enter Time" appears in the display. ^ Enter the current time using the keypad. If power to the oven is displayed, Clock display On Clock display Off ^ Touch the "OK" control to confirm the entries.
... ( italiano ( polski LANGUAGE english português ) OK ) Clock "Enter Time" appears in the display. ^ Enter the current time using the keypad. If power to the oven is displayed, Clock display On Clock display Off ^ Touch the "OK" control to confirm the entries.
Operating and Installation manual
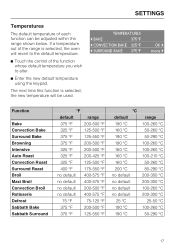
Page 17
... the function whose default temperature you wish to alter. ^ Enter the new default temperature using the keypad. The next time this function is selected, the oven will be adjusted within the range shown below. TEMPERATURES ( BAKE 375°F ( CONVECTION BAKE 325°F ( SURROUND BAKE 375°F OK ) more ) Function Bake Convection...
... the function whose default temperature you wish to alter. ^ Enter the new default temperature using the keypad. The next time this function is selected, the oven will be adjusted within the range shown below. TEMPERATURES ( BAKE 375°F ( CONVECTION BAKE 325°F ( SURROUND BAKE 375°F OK ) more ) Function Bake Convection...
Operating and Installation manual
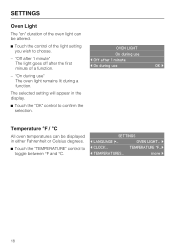
Page 18
... Celsius degrees. ^ Touch the "TEMPERATURE" control to toggle between °F and °C. OVEN LIGHT... ) ( CLOCK... "Off after 1 minute" The light goes off after 1 minute ( On during use " The oven light remains lit during use OK ) Temperature °F / °C All oven temperatures can be displayed in the display. ^ Touch the "OK" control to confirm...
... Celsius degrees. ^ Touch the "TEMPERATURE" control to toggle between °F and °C. OVEN LIGHT... ) ( CLOCK... "Off after 1 minute" The light goes off after 1 minute ( On during use " The oven light remains lit during use OK ) Temperature °F / °C All oven temperatures can be displayed in the display. ^ Touch the "OK" control to confirm...
Operating and Installation manual
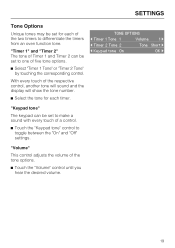
Page 19
... will show the tone number. ^ Select the tone for each timer. SETTINGS Tone Options Unique tones may be set to differentiate the timers from an oven function tone. TONE OPTIONS ( Timer 1 Tone 1 Volume 1) ( Timer 2 Tone 2 Tone Short ) ( Keypad tone On OK ) "Keypad tone" The keypad can be set for each of...
... will show the tone number. ^ Select the tone for each timer. SETTINGS Tone Options Unique tones may be set to differentiate the timers from an oven function tone. TONE OPTIONS ( Timer 1 Tone 1 Volume 1) ( Timer 2 Tone 2 Tone Short ) ( Keypad tone On OK ) "Keypad tone" The keypad can be set for each of...
Operating and Installation manual
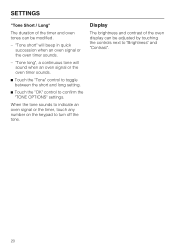
Page 20
Display The brightness and contrast of the timer and oven tones can be modified. - "Tone long", a continuous tone will beep in quick succession when an oven signal or the oven timer sounds. - When the tone sounds to indicate an oven signal or the timer, touch any number on the keypad to confirm the... "TONE OPTIONS" settings. "Tone short" will sound when an oven signal or the oven timer sounds. ^ Touch the "Tone" control to toggle between the short and long setting. ^ Touch the "OK" control to turn off the tone. SETTINGS...
Display The brightness and contrast of the timer and oven tones can be modified. - "Tone long", a continuous tone will beep in quick succession when an oven signal or the oven timer sounds. - When the tone sounds to indicate an oven signal or the timer, touch any number on the keypad to confirm the... "TONE OPTIONS" settings. "Tone short" will sound when an oven signal or the oven timer sounds. ^ Touch the "Tone" control to toggle between the short and long setting. ^ Touch the "OK" control to turn off the tone. SETTINGS...


