
Product Manual
Page 2
... Control panel ...19 Sensor buttons...20 Touch display ...22 Symbols ...23 Basic operation ...24 Features ...26 Model numbers ...26 Data plate ...26 Items included...26 Standard and optional accessories 26 Glass Tray ...27 Wire rack with non-tip safety notches 27 Speed Oven controls 30 Safety features ...30 System lock 30 Safety cut-out 30 Cooling fan...31 PerfectClean treated surfaces 31 Before using for the first time 32 General settings ...32 Heating...
... Control panel ...19 Sensor buttons...20 Touch display ...22 Symbols ...23 Basic operation ...24 Features ...26 Model numbers ...26 Data plate ...26 Items included...26 Standard and optional accessories 26 Glass Tray ...27 Wire rack with non-tip safety notches 27 Speed Oven controls 30 Safety features ...30 System lock 30 Safety cut-out 30 Cooling fan...31 PerfectClean treated surfaces 31 Before using for the first time 32 General settings ...32 Heating...

Product Manual
Page 8
... be installed and connected in compliance with the installation instructions. Installation, repair and maintenance work by unauthorized persons could be injured. Burn Hazard - Do not operate a damaged appliance. Operating a damaged appliance can result in microwave leakage and present a hazard to children in cabinets above an oven. Do not use . IMPORTANT SAFETY INSTRUCTIONS Children Children should be performed by a Miele authorized service technician...
... be installed and connected in compliance with the installation instructions. Installation, repair and maintenance work by unauthorized persons could be injured. Burn Hazard - Do not operate a damaged appliance. Operating a damaged appliance can result in microwave leakage and present a hazard to children in cabinets above an oven. Do not use . IMPORTANT SAFETY INSTRUCTIONS Children Children should be performed by a Miele authorized service technician...

Product Manual
Page 10
... placing food in or removing food, or when making adjustments in food poisoning or sickness. 10 IMPORTANT SAFETY INSTRUCTIONS Defective components should be sure that the air flow is not impaired (e.g. Depending on the mode selected, you could burn yourself on the heating elements, oven interior, cooked food or oven accessories. During and after cooking. Also be replaced by other sources nearby...
... placing food in or removing food, or when making adjustments in food poisoning or sickness. 10 IMPORTANT SAFETY INSTRUCTIONS Defective components should be sure that the air flow is not impaired (e.g. Depending on the mode selected, you could burn yourself on the heating elements, oven interior, cooked food or oven accessories. During and after cooking. Also be replaced by other sources nearby...

Product Manual
Page 12
... not use the oven to recommended broiling times when using modes without microwave power. Never use "). 12 Use Convection Bake for drying flowers or herbs. Be sure you keep to heat the room. Using Microwave or Microwave combination modes with hollow knobs or handles are often considerably shorter when cooking, reheating and defrosting than when using the Broil mode. Do not open the Speed Oven door if smoke occurs inside the appliance. Excessively long cooking times...
... not use the oven to recommended broiling times when using modes without microwave power. Never use "). 12 Use Convection Bake for drying flowers or herbs. Be sure you keep to heat the room. Using Microwave or Microwave combination modes with hollow knobs or handles are often considerably shorter when cooking, reheating and defrosting than when using the Broil mode. Do not open the Speed Oven door if smoke occurs inside the appliance. Excessively long cooking times...

Product Manual
Page 13
... heat to the lowest setting and leave the oven on the selected mode. The control panel, the countertop or the cabinetry can be damaged when using Microwave . When using single-use containers, make sure they are suitable for use in microwave ovens (See "Containers suitable for microwave use - Follow the manufacturer's instructions on automatically and dissipate the moisture. 13 Instead set the temperature to keep food in the oven warm...
... heat to the lowest setting and leave the oven on the selected mode. The control panel, the countertop or the cabinetry can be damaged when using Microwave . When using single-use containers, make sure they are suitable for use in microwave ovens (See "Containers suitable for microwave use - Follow the manufacturer's instructions on automatically and dissipate the moisture. 13 Instead set the temperature to keep food in the oven warm...

Product Manual
Page 16
... could penetrate electrical components and cause a short circuit. Only clean parts listed in contact with the heating element. Make certain that the power cords of the food. Do not use to measure the temperature of small appliances do not come in these are not suitable for use with very high temperatures and break very easily Do not use the oven to heat up heating pads...
... could penetrate electrical components and cause a short circuit. Only clean parts listed in contact with the heating element. Make certain that the power cords of the food. Do not use to measure the temperature of small appliances do not come in these are not suitable for use with very high temperatures and break very easily Do not use the oven to heat up heating pads...

Product Manual
Page 31
... air before venting it out into the kitchen through vents located between the appliance door and the control panel. Do not use ceramic knives as these surfaces. Food and soiling from baking and roasting can be easily removed from the oven cavity with a sponge. The cooling fan will turn itself off automatically after a cooking process to prevent moisture building up in the "Cleaning and Care" section of this manual...
... air before venting it out into the kitchen through vents located between the appliance door and the control panel. Do not use ceramic knives as these surfaces. Food and soiling from baking and roasting can be easily removed from the oven cavity with a sponge. The cooling fan will turn itself off automatically after a cooking process to prevent moisture building up in the "Cleaning and Care" section of this manual...
Product Manual
Page 32
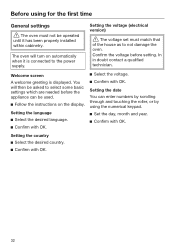
... and year. Confirm with OK. Confirm the voltage before the appliance can enter numbers by scrolling through and touching the roller, or by using for the first time General settings The oven must match that of the house as to the power supply. Setting the date You can be operated until it is displayed. You will turn on the...
... and year. Confirm with OK. Confirm the voltage before the appliance can enter numbers by scrolling through and touching the roller, or by using for the first time General settings The oven must match that of the house as to the power supply. Setting the date You can be operated until it is displayed. You will turn on the...

Product Manual
Page 34
... appear. Select Operating Modes . Select Convection Bake The recommended temperature is completely dry. 34 Leave the oven door open until the oven interior is displayed 320 °F (160°C). The oven heating, lighting and cooling fan will turn on.The oven heating, lighting and cooling fan will turn on.The oven heating, lighting and cooling fan will eliminate the odor. Allow the oven to cool before cleaning. Turn on the oven. Select ...
... appear. Select Operating Modes . Select Convection Bake The recommended temperature is completely dry. 34 Leave the oven door open until the oven interior is displayed 320 °F (160°C). The oven heating, lighting and cooling fan will turn on.The oven heating, lighting and cooling fan will turn on.The oven heating, lighting and cooling fan will eliminate the odor. Allow the oven to cool before cleaning. Turn on the oven. Select ...
Product Manual
Page 42
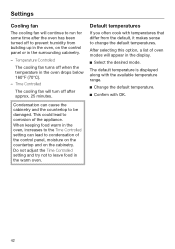
... control panel or in the oven drops below 160°F (70°C). - After selecting this option, a list of the appliance. Do not adjust the Time Controlled setting and try not to leave food in the display. Select the desired mode. Settings Cooling fan The cooling fan will continue to run for some time after approx. 25 minutes. Temperature Controlled The cooling fan turns off to corrosion of oven modes...
... control panel or in the oven drops below 160°F (70°C). - After selecting this option, a list of the appliance. Do not adjust the Time Controlled setting and try not to leave food in the display. Select the desired mode. Settings Cooling fan The cooling fan will continue to run for some time after approx. 25 minutes. Temperature Controlled The cooling fan turns off to corrosion of oven modes...

Product Manual
Page 62
.... Lower temperatures can be turned on the selected settings, e.g. On for a wide variety of cooking. It can be used for 15 seconds the oven interior lighting turns off depends on again at any accessories from the oven that is not using microwave power, the heat in the display. If the door is opened during a program that you do not open the door during a program. Display - The cooling fan or hot air fan (depending...
.... Lower temperatures can be turned on the selected settings, e.g. On for a wide variety of cooking. It can be used for 15 seconds the oven interior lighting turns off depends on again at any accessories from the oven that is not using microwave power, the heat in the display. If the door is opened during a program that you do not open the door during a program. Display - The cooling fan or hot air fan (depending...
Product Manual
Page 74
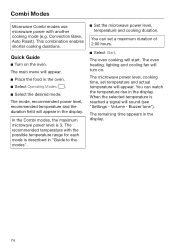
..., cooking time, set a maximum duration of 2:00 hours. Select Start. Buzzer tone"). Convection Bake, Auto Roast). The mode, recommended power level, recommended temperature and the duration field will start. Volume - Combi Modes Microwave Combi modes use microwave power with the possible temperature range for each mode is described in "Guide to the modes". Set the microwave power level, temperature and cooking duration. This combination enables shorter cooking durations. When the selected temperature is 3. The oven cooking will appear in the display...
..., cooking time, set a maximum duration of 2:00 hours. Select Start. Buzzer tone"). Convection Bake, Auto Roast). The mode, recommended power level, recommended temperature and the duration field will start. Volume - Combi Modes Microwave Combi modes use microwave power with the possible temperature range for each mode is described in "Guide to the modes". Set the microwave power level, temperature and cooking duration. This combination enables shorter cooking durations. When the selected temperature is 3. The oven cooking will appear in the display...

Product Manual
Page 94
... door. Slow Roasting Using the Slow Roasting function Use the glass tray with the wire oven rack placed on top of it engage. 94 Volume Buzzer tone"). The Browning / Broiling element will appear in the center of the meat. For more information see Settings - Danger of Burns! Insert the plug of burns! If the meat is not cooked to insert, remove or turn the food, or when adjusting the oven...
... door. Slow Roasting Using the Slow Roasting function Use the glass tray with the wire oven rack placed on top of it engage. 94 Volume Buzzer tone"). The Browning / Broiling element will appear in the center of the meat. For more information see Settings - Danger of Burns! Insert the plug of burns! If the meat is not cooked to insert, remove or turn the food, or when adjusting the oven...

Product Manual
Page 122
... roast probe, it must be ordered from Miele. A replacement roast probe can be faulty. If Microwave (Solo) is being used, the cooling fan will not heat up . The system lock is On. You can be set. If the door is opened . 122 The oven can unlock the oven to start a cooking program by the oven. Check whether the roast probe is correctly plugged into the socket. The power supply was operated...
... roast probe, it must be ordered from Miele. A replacement roast probe can be faulty. If Microwave (Solo) is being used, the cooling fan will not heat up . The system lock is On. You can be set. If the door is opened . 122 The oven can unlock the oven to start a cooking program by the oven. Check whether the roast probe is correctly plugged into the socket. The power supply was operated...
Product Manual
Page 123
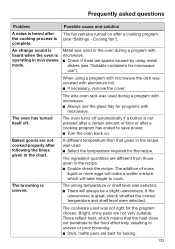
... power. Turn the oven back on after a certain amount of more liquid or more eggs will always be a slight unevenness. If the unevenness is operating in the chart. The cookware used . Select the temperature required for programs with alumimum foil. If necessary, remove the cover. Bright, shiny pans are not cooked properly after following the times given in microwave mode. The wire oven rack...
... power. Turn the oven back on after a certain amount of more liquid or more eggs will always be a slight unevenness. If the unevenness is operating in the chart. The cookware used . Select the temperature required for programs with alumimum foil. If necessary, remove the cover. Bright, shiny pans are not cooked properly after following the times given in microwave mode. The wire oven rack...
Product Manual
Page 125
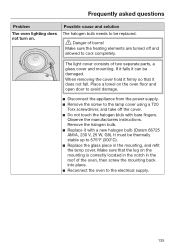
... instructions. Frequently asked questions Problem The oven lighting does not turn on the oven floor and open door to avoid damage. Disconnect the appliance from the power supply. Remove the screw to the lamp cover using a T20 Torx screwdriver, and take off and allowed to 575°F (300°C). Replace the glass piece in the roof of the oven, then screw the mounting...
... instructions. Frequently asked questions Problem The oven lighting does not turn on the oven floor and open door to avoid damage. Disconnect the appliance from the power supply. Remove the screw to the lamp cover using a T20 Torx screwdriver, and take off and allowed to 575°F (300°C). Replace the glass piece in the roof of the oven, then screw the mounting...
Product Manual
Page 128
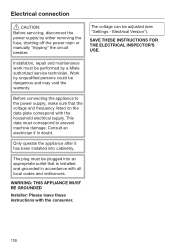
... these instructions with the household electrical supply. Work by unqualified persons could be adjusted (see "Settings - Installation, repair and maintenance work must be plugged into cabinetry. This data must be performed by either removing the fuse, shutting off the power main or manually "tripping" the circuit breaker. Only operate the appliance after it has been installed into an appropriate outlet that the voltage and frequency listed on the data plate...
... these instructions with the household electrical supply. Work by unqualified persons could be adjusted (see "Settings - Installation, repair and maintenance work must be plugged into cabinetry. This data must be performed by either removing the fuse, shutting off the power main or manually "tripping" the circuit breaker. Only operate the appliance after it has been installed into an appropriate outlet that the voltage and frequency listed on the data plate...
Product Manual
Page 129
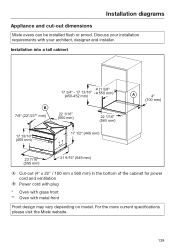
... 7/16" (595 mm) 21 9/16" (549 mm) Cut-out (4" x 22" / 100 mm x 560 mm) in the bottom of the cabinet for power cord and ventilation Power cord with plug * Oven with glass front ** Oven with your architect, designer and installer. Installation diagrams Appliance and cut-out dimensions Miele ovens can be installed flush or proud. Discuss your installation requirements with metal front Front design may vary depending on...
... 7/16" (595 mm) 21 9/16" (549 mm) Cut-out (4" x 22" / 100 mm x 560 mm) in the bottom of the cabinet for power cord and ventilation Power cord with plug * Oven with glass front ** Oven with your architect, designer and installer. Installation diagrams Appliance and cut-out dimensions Miele ovens can be installed flush or proud. Discuss your installation requirements with metal front Front design may vary depending on...
Product Manual
Page 130
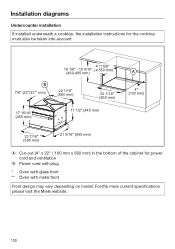
For the more current specifications please visit the Miele website. 130 Installation diagrams Undercounter installation If installed underneath a cooktop, the installation instructions for power cord and ventilation Power cord with plug * Oven with glass front ** Oven with metal front Front design may vary depending on model. B 7/8" (22*/23** mm) 17 15/16" (455 mm) 21 5/8" 18 1/8" - ...17 1/2" (445 mm) A 4" (100 mm) 23 7/16" (595 mm) 21 9/16" (549 mm) Cut-out (4" x 22" / 100 mm x 560 mm) in the bottom of the cabinet for the cooktop must also be taken into account.
For the more current specifications please visit the Miele website. 130 Installation diagrams Undercounter installation If installed underneath a cooktop, the installation instructions for power cord and ventilation Power cord with plug * Oven with glass front ** Oven with metal front Front design may vary depending on model. B 7/8" (22*/23** mm) 17 15/16" (455 mm) 21 5/8" 18 1/8" - ...17 1/2" (445 mm) A 4" (100 mm) 23 7/16" (595 mm) 21 9/16" (549 mm) Cut-out (4" x 22" / 100 mm x 560 mm) in the bottom of the cabinet for the cooktop must also be taken into account.
Product Manual
Page 131
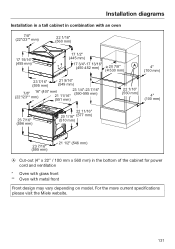
Installation diagrams Installation in a tall cabinet in combination with an oven 7/8" (22*/23** mm) 22 1/16" (560 mm) 17 15/16" (455 mm) 17 1/2" (445 mm) 17 3/4"-17 13/16" (450-452 mm) 20 7/8" ( 530 mm) A 4" (... 11/16" 20 1/16" (577 mm) (510 mm) 23 7/16" (595 mm) 21 1/2" (546 mm) Cut-out (4" x 22" / 100 mm x 560 mm) in the bottom of the cabinet for power cord and ventilation * Oven with glass front ** Oven with metal front Front design may vary depending on model. For the more current specifications please visit the Miele website. 131
Installation diagrams Installation in a tall cabinet in combination with an oven 7/8" (22*/23** mm) 22 1/16" (560 mm) 17 15/16" (455 mm) 17 1/2" (445 mm) 17 3/4"-17 13/16" (450-452 mm) 20 7/8" ( 530 mm) A 4" (... 11/16" 20 1/16" (577 mm) (510 mm) 23 7/16" (595 mm) 21 1/2" (546 mm) Cut-out (4" x 22" / 100 mm x 560 mm) in the bottom of the cabinet for power cord and ventilation * Oven with glass front ** Oven with metal front Front design may vary depending on model. For the more current specifications please visit the Miele website. 131


