Operating manual
Page 1
US M.-Nr. 07 660 670 Operating Instructions Rotary Iron HM 16-80 To prevent accidents and machine damage read these instructions before installation or use. en -
US M.-Nr. 07 660 670 Operating Instructions Rotary Iron HM 16-80 To prevent accidents and machine damage read these instructions before installation or use. en -
Operating manual
Page 2
... to the Rotary Iron 7 Moving and folding the appliance 9 Transport strut 9 Before using for the first time 11 Preparing the work area 13 Preparing the laundry 13 Testing the finger guard 14 Steam setting 15 Filling the water reservoir 15 Emptying the water reservoir 16 Ironing 17 Turning... on and off 17 Selecting the ironing temperature (operation without steam 17 Selecting the ironing temperature (operation with steam 18 Turning the steam setting ON and OFF 18 Selecting...
... to the Rotary Iron 7 Moving and folding the appliance 9 Transport strut 9 Before using for the first time 11 Preparing the work area 13 Preparing the laundry 13 Testing the finger guard 14 Steam setting 15 Filling the water reservoir 15 Emptying the water reservoir 16 Ironing 17 Turning... on and off 17 Selecting the ironing temperature (operation without steam 17 Selecting the ironing temperature (operation with steam 18 Turning the steam setting ON and OFF 18 Selecting...

Operating manual
Page 4
To prevent personal injury or damage to the rotary iron, it is imperative that you read this basic safety requirement be replaced by a Miele authorized service technician. ~ Before connecting the appliance, ensure that the connection data on to be sure the materials can be followed, ...supply. It is important that this booklet carefully. If there is damaged it without supervision or instruction by a responsible person. Proper use ~ This rotary iron is dangerous. If in doubt, consult an electrician. ~ Do not modify the machine power cord or plug. ~ All electrical work should be ...
To prevent personal injury or damage to the rotary iron, it is imperative that you read this basic safety requirement be replaced by a Miele authorized service technician. ~ Before connecting the appliance, ensure that the connection data on to be sure the materials can be followed, ...supply. It is important that this booklet carefully. If there is damaged it without supervision or instruction by a responsible person. Proper use ~ This rotary iron is dangerous. If in doubt, consult an electrician. ~ Do not modify the machine power cord or plug. ~ All electrical work should be ...

Operating manual
Page 5
...and tie back long hair before ironing. ~ When the rotary iron is heated there is a fire hazard. It will cause pitting corrosion of the appliance. ~ The appliance is heated. The bar is impossible to hang laundry. Faulty components should only be performed by a Miele authorized technician. Only original replacement parts... loose fitting or hanging clothing when using Miele original parts only. Take care not to press down while fingers or hands are fitted so that it is touched. - if the foot pedal is pressed down on or near the rotary iron, or to tip over the heater plate...
...and tie back long hair before ironing. ~ When the rotary iron is heated there is a fire hazard. It will cause pitting corrosion of the appliance. ~ The appliance is heated. The bar is impossible to hang laundry. Faulty components should only be performed by a Miele authorized technician. Only original replacement parts... loose fitting or hanging clothing when using Miele original parts only. Take care not to press down while fingers or hands are fitted so that it is touched. - if the foot pedal is pressed down on or near the rotary iron, or to tip over the heater plate...

Operating manual
Page 7
l k j i h g Guide to the Rotary Iron m ab c d e f a Emergency release b Temperature selector c Control panel d Release catch e Power cord f Foot pedal switch g Ironing table h Laundry rod i Feed board j Roller k Heater plate l Finger guard m Water reservoir with cap 7
l k j i h g Guide to the Rotary Iron m ab c d e f a Emergency release b Temperature selector c Control panel d Release catch e Power cord f Foot pedal switch g Ironing table h Laundry rod i Feed board j Roller k Heater plate l Finger guard m Water reservoir with cap 7

Operating manual
Page 8
Guide to the Rotary Iron Control panel g a f b e c d a Roller speed selector b On/Off indicator I-0 c On/Off button I-0 d Steam switch Q e Steam indicator Q f Temperature indicator oC g Water empty indicator a 8
Guide to the Rotary Iron Control panel g a f b e c d a Roller speed selector b On/Off indicator I-0 c On/Off button I-0 d Steam switch Q e Steam indicator Q f Temperature indicator oC g Water empty indicator a 8
Operating manual
Page 9
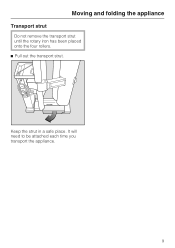
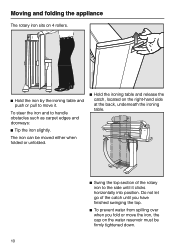
Moving and folding the appliance Transport strut Do not remove the transport strut until the rotary iron has been placed onto the four rollers. ^ Pull out the transport strut. Keep the strut in a safe place. It will need to be attached each time you transport the appliance. 9
Moving and folding the appliance Transport strut Do not remove the transport strut until the rotary iron has been placed onto the four rollers. ^ Pull out the transport strut. Keep the strut in a safe place. It will need to be attached each time you transport the appliance. 9
Operating manual
Page 10
... release the catch, located on the right-hand side at the back, underneath the ironing table. ^ Swing the top section of the catch until it . The iron can be firmly tightened down. 10 Do not let go of the rotary iron to the side until you have finished swinging the top. ^ To prevent water... from spilling over when you fold or move the iron, the cap on 4 rollers. ^ Hold the iron by the ironing table and push or pull to handle obstacles such as...
... release the catch, located on the right-hand side at the back, underneath the ironing table. ^ Swing the top section of the catch until it . The iron can be firmly tightened down. 10 Do not let go of the rotary iron to the side until you have finished swinging the top. ^ To prevent water... from spilling over when you fold or move the iron, the cap on 4 rollers. ^ Hold the iron by the ironing table and push or pull to handle obstacles such as...

Operating manual
Page 13
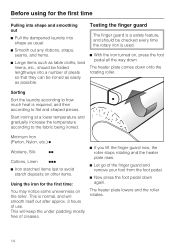
... will ensure even steam production and keep the appliance from rolling sideways. Material Silk Synthetics e.g. Wool (e.g., pants) Cotton Linen Dampness for ironing wrap in a damp cloth to avoid water marks slightly damp to the right of dampness throughout. sorted Have the following close by: ...- preferably several hours beforehand so that on hangers immediately after ironing. Dampen the laundry as needed. Before using for the first time Preparing the work area When positioning the rotary iron, make sure it will come out smooth and dry. Shirts, smocks, blouses...
... will ensure even steam production and keep the appliance from rolling sideways. Material Silk Synthetics e.g. Wool (e.g., pants) Cotton Linen Dampness for ironing wrap in a damp cloth to avoid water marks slightly damp to the right of dampness throughout. sorted Have the following close by: ...- preferably several hours beforehand so that on hangers immediately after ironing. Dampen the laundry as needed. Before using for the first time Preparing the work area When positioning the rotary iron, make sure it will come out smooth and dry. Shirts, smocks, blouses...
Operating manual
Page 14
...into shape as usual. ^ Smooth out any ribbons, straps, seams, and hems. ^ Large items such as table cloths, bed linens, etc., should be ironed as easily as possible. This will smooth itself out after approx. 3 hours of the finger guard and remove your foot from the foot pedal. ^ Now... smoothing out ^ Pull the dampened laundry into a number of pleats so that they can be checked every time the rotary iron is used. ^ With the iron turned on the roller. Start ironing at a lower temperature and gradually increase the temperature according to how much heat is normal, and will keep the under...
...into shape as usual. ^ Smooth out any ribbons, straps, seams, and hems. ^ Large items such as table cloths, bed linens, etc., should be ironed as easily as possible. This will smooth itself out after approx. 3 hours of the finger guard and remove your foot from the foot pedal. ^ Now... smoothing out ^ Pull the dampened laundry into a number of pleats so that they can be checked every time the rotary iron is used. ^ With the iron turned on the roller. Start ironing at a lower temperature and gradually increase the temperature according to how much heat is normal, and will keep the under...

Operating manual
Page 17
...Press the button in. Material Dot symbol Minimum ß Iron Woolens, Silk ßß Cotton, Linen ßßß I -0 button to set the ironing temperature. The indicator light goes out. 17 To turn the rotary iron on and off ^ Press and release the button. The... indicator light comes on the ring around the temperature selector. Selecting the ironing temperature (operation without steam) The temperature...
...Press the button in. Material Dot symbol Minimum ß Iron Woolens, Silk ßß Cotton, Linen ßßß I -0 button to set the ironing temperature. The indicator light goes out. 17 To turn the rotary iron on and off ^ Press and release the button. The... indicator light comes on the ring around the temperature selector. Selecting the ironing temperature (operation without steam) The temperature...

Operating manual
Page 19
... is raised) - rest (heater plate is controlled by the foot pedal, which may require more than one pass through the rotary iron to the desired speed. - To press: ^ First press the foot pedal down to the floor, then lift your foot off the pedal. 19 Danger of ...! To raise the heater plate: ^ Take your foot up a little, so that the heater plate remains in position but the roller does not rotate. press - iron To iron: ^ Press the foot pedal all the way down to the floor. ,Do not put fingers between the heater plate and the roller...
... is raised) - rest (heater plate is controlled by the foot pedal, which may require more than one pass through the rotary iron to the desired speed. - To press: ^ First press the foot pedal down to the floor, then lift your foot off the pedal. 19 Danger of ...! To raise the heater plate: ^ Take your foot up a little, so that the heater plate remains in position but the roller does not rotate. press - iron To iron: ^ Press the foot pedal all the way down to the floor. ,Do not put fingers between the heater plate and the roller...
Operating manual
Page 20
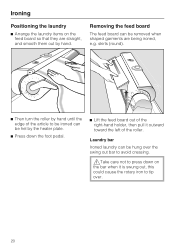
...down the foot pedal. ^ Lift the feed board out of the right-hand holder, then pull it is swung out, this could cause the rotary iron to be ironed can be removed when shaped garments are straight, and smooth them out by the heater plate. ^ Press down on the feed board so that... they are being ironed, e.g. Laundry bar Ironed laundry can be hel by hand. Ironing Positioning the laundry ^ Arrange the laundry items on the bar when it outward toward the left of the roller. skirts (round...
...down the foot pedal. ^ Lift the feed board out of the right-hand holder, then pull it is swung out, this could cause the rotary iron to be ironed can be removed when shaped garments are straight, and smooth them out by the heater plate. ^ Press down on the feed board so that... they are being ironed, e.g. Laundry bar Ironed laundry can be hel by hand. Ironing Positioning the laundry ^ Arrange the laundry items on the bar when it outward toward the left of the roller. skirts (round...

Operating manual
Page 21
... steam line can turn the temperature selector to cool. ^ Empty the water reservoir. ^ Fold the iron. - When you have nearly finished ironing, you slightly, and smooth it out by hand. To store the rotary iron: ^ Allow the heater plate to I . ^ Unplug from the outlet. Articles with a wet cloth... or spray bottle. - Cover zippers, metal buttons and metal hooks with a cloth, to I and continue ironing small items at a low temperature. 21 If...
... steam line can turn the temperature selector to cool. ^ Empty the water reservoir. ^ Fold the iron. - When you have nearly finished ironing, you slightly, and smooth it out by hand. To store the rotary iron: ^ Allow the heater plate to I . ^ Unplug from the outlet. Articles with a wet cloth... or spray bottle. - Cover zippers, metal buttons and metal hooks with a cloth, to I and continue ironing small items at a low temperature. 21 If...
Operating manual
Page 23
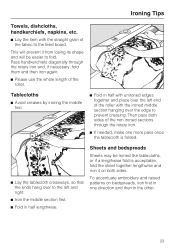
...diagonally through the rotary iron. ^ If needed, make one direction and then in the other. 23 Then pass both sides. Sheets and bedspreads Sheets may be easier to fold. To accentuate embroidery and raised patterns on both sides of the non ironed sections through the rotary iron and, if necessary..., fold them and then iron again. ^ Please use the whole length of the fabric to the feed board. Tablecloths ^ Avoid creases...
...diagonally through the rotary iron. ^ If needed, make one direction and then in the other. 23 Then pass both sides. Sheets and bedspreads Sheets may be easier to fold. To accentuate embroidery and raised patterns on both sides of the non ironed sections through the rotary iron and, if necessary..., fold them and then iron again. ^ Please use the whole length of the fabric to the feed board. Tablecloths ^ Avoid creases...
Operating manual
Page 24
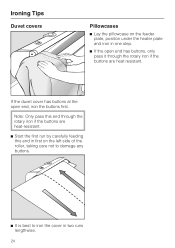
If the duvet cover has buttons at the open end has buttons, only pass it through the rotary iron if the buttons are heat resistant. Note: Only pass this end through the rotary iron if the buttons are heat-resistant. ^ Start the first run by carefully feeding this end in first on the feeder plate, position under the heater plate and iron in two runs lengthwise. 24 Ironing Tips Duvet covers Pillowcases ^ Lay the pillowcase on the left side of the roller, taking care not to damage any buttons. ^ It is best to iron the cover in one step. ^ If the open end, iron the buttons first.
If the duvet cover has buttons at the open end has buttons, only pass it through the rotary iron if the buttons are heat resistant. Note: Only pass this end through the rotary iron if the buttons are heat-resistant. ^ Start the first run by carefully feeding this end in first on the feeder plate, position under the heater plate and iron in two runs lengthwise. 24 Ironing Tips Duvet covers Pillowcases ^ Lay the pillowcase on the left side of the roller, taking care not to damage any buttons. ^ It is best to iron the cover in one step. ^ If the open end, iron the buttons first.

Operating manual
Page 30
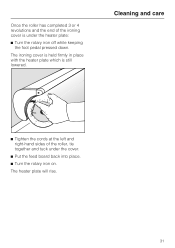
... arrow) until the retaining slot is turned on . Keep side ties hanging free and smooth out. 30 ^ Press the foot pedal and "iron" the new cloth all the way around. Do not let the cords get under the cloth as it taught over the heater plate. Cleaning and ... corners of the new ironing cover into the retaining slot with the side seams inside (upside down). The temperature selector must be turned to the g setting. ^ Insert the long edge of the cotton padding, pull taut, and lay it turns. When the iron is at the bottom. ^ Turn the rotary iron on , the heater...
... arrow) until the retaining slot is turned on . Keep side ties hanging free and smooth out. 30 ^ Press the foot pedal and "iron" the new cloth all the way around. Do not let the cords get under the cloth as it taught over the heater plate. Cleaning and ... corners of the new ironing cover into the retaining slot with the side seams inside (upside down). The temperature selector must be turned to the g setting. ^ Insert the long edge of the cotton padding, pull taut, and lay it turns. When the iron is at the bottom. ^ Turn the rotary iron on , the heater...
Operating manual
Page 31
The ironing cover is held firmly in place with the heater plate which is under the cover. ^ Put the feed board back into place. ^ Turn the rotary iron on. Once the roller has completed 3 or 4 revolutions and the end of the roller, tie together and tuck under the heater plate: ^ Turn the rotary iron off while keeping the foot pedal pressed down. Cleaning and care ^ Tighten the cords at the left and right-hand sides of the ironing cover is still lowered. The heater plate will rise. 31
The ironing cover is held firmly in place with the heater plate which is under the cover. ^ Put the feed board back into place. ^ Turn the rotary iron on. Once the roller has completed 3 or 4 revolutions and the end of the roller, tie together and tuck under the heater plate: ^ Turn the rotary iron off while keeping the foot pedal pressed down. Cleaning and care ^ Tighten the cords at the left and right-hand sides of the ironing cover is still lowered. The heater plate will rise. 31
Operating manual
Page 32
...Solution The heater plate is heavily soiled. The laundry is usually resolved after 5-10 minutes of ironing. New iron cover A new rotary iron cover should only be ideally pulled in . The rotary iron cover is soiled (lime deposits). Possible fault Solution This tends to be carried out by ...asked questions ,Repairs should be washed at 140°F (60°C) or replace with a new one. The rotary iron does not turn on the heater plate. Continue ironing, the issue is not properly or poorly pulled in . Clean with household cleaners or dishwasher detergent. Possible fault...
...Solution The heater plate is heavily soiled. The laundry is usually resolved after 5-10 minutes of ironing. New iron cover A new rotary iron cover should only be ideally pulled in . The rotary iron cover is soiled (lime deposits). Possible fault Solution This tends to be carried out by ...asked questions ,Repairs should be washed at 140°F (60°C) or replace with a new one. The rotary iron does not turn on the heater plate. Continue ironing, the issue is not properly or poorly pulled in . Clean with household cleaners or dishwasher detergent. Possible fault...

Operating manual
Page 35
WARNING THIS APPLIANCE MUST BE GROUNDED 35 Do not connect the rotary iron to an a.c. danger of the appliance (e.g. The fuse rating is 20 amps. ,Do not modify the machine power cord or plug, the machine is supplied ...
WARNING THIS APPLIANCE MUST BE GROUNDED 35 Do not connect the rotary iron to an a.c. danger of the appliance (e.g. The fuse rating is 20 amps. ,Do not modify the machine power cord or plug, the machine is supplied ...

