
Operating and Installation manual
Page 1
US, CA M.-Nr. 09 169 670 Operating and Installation Instructions Refrigerator K 1801 Vi, K 1811 Vi K 1901 Vi, K 1911 Vi To prevent accidents and appliance damage read these instructions before installation or use. en -
US, CA M.-Nr. 09 169 670 Operating and Installation Instructions Refrigerator K 1801 Vi, K 1811 Vi K 1901 Vi, K 1911 Vi To prevent accidents and appliance damage read these instructions before installation or use. en -

Operating and Installation manual
Page 2
... 26 Ventilation slits 27 Door seals 27 Changing the light bulb 28 Frequently asked questions 30 After sales service 33 Caring for the environment 36 Installation 37 Installation site 37 Stainless steel panels 39 Custom door panels 39
... 26 Ventilation slits 27 Door seals 27 Changing the light bulb 28 Frequently asked questions 30 After sales service 33 Caring for the environment 36 Installation 37 Installation site 37 Stainless steel panels 39 Custom door panels 39

Operating and Installation manual
Page 3
Contents Installation options 39 Adjusting the door opening angle (optional accessory 41 Dimensions 42 Niche dimensions 43 Installing the appliance 45 Before you begin 45 RemoteVision module installation 47 Preparing the installation niche 48 Sliding the appliance into the installation space 52 Aligning the appliance 53 Attaching the appliance to the installation niche 54 Preparing the custom door 56 Attaching and aligning the custom door front 58 Electrical connection 62 RemoteVision (optional accessory 63
Contents Installation options 39 Adjusting the door opening angle (optional accessory 41 Dimensions 42 Niche dimensions 43 Installing the appliance 45 Before you begin 45 RemoteVision module installation 47 Preparing the installation niche 48 Sliding the appliance into the installation space 52 Aligning the appliance 53 Attaching the appliance to the installation niche 54 Preparing the custom door 56 Attaching and aligning the custom door front 58 Electrical connection 62 RemoteVision (optional accessory 63

Operating and Installation manual
Page 4
...the house checked by a qualified technician. Only use the appliance for residential use of this appliance to electricity. Electrical Safety ~ Before installation, make sure that the voltage and frequency listed on to any doubt, have the electrical system of overheating). ~ Be certain your ...personal injury and material damage. IMPORTANT SAFETY INSTRUCTIONS When using the appliance, follow basic safety precautions, including the following: Read all installation work area by unplugging the unit, "tripping" the circuit breaker or removing the fuse. ~ Do not use to prevent accidents ...
...the house checked by a qualified technician. Only use the appliance for residential use of this appliance to electricity. Electrical Safety ~ Before installation, make sure that the voltage and frequency listed on to any doubt, have the electrical system of overheating). ~ Be certain your ...personal injury and material damage. IMPORTANT SAFETY INSTRUCTIONS When using the appliance, follow basic safety precautions, including the following: Read all installation work area by unplugging the unit, "tripping" the circuit breaker or removing the fuse. ~ Do not use to prevent accidents ...

Operating and Installation manual
Page 5
... not allow children to deteriorate and become porous with time. 5 by customers in the refrigerator compartment, particularly when hands are damp or wet. Contact Miele's Technical Service Department. ~ This appliance must comply with local regulations and state laws. ~ Do not operate any appliance with a damaged cord or... plug, or if the appliance has been damaged in any oils or grease on a ship). ~ Do not install the refrigerator in similar working and residential environments such as this or any other flammable vapors and liquids in the vicinity of this may ...
... not allow children to deteriorate and become porous with time. 5 by customers in the refrigerator compartment, particularly when hands are damp or wet. Contact Miele's Technical Service Department. ~ This appliance must comply with local regulations and state laws. ~ Do not operate any appliance with a damaged cord or... plug, or if the appliance has been damaged in any oils or grease on a ship). ~ Do not install the refrigerator in similar working and residential environments such as this or any other flammable vapors and liquids in the vicinity of this may ...

Operating and Installation manual
Page 14
... The temperature display on the operating panel always shows the required temperature. a different temperature is warming up too much. 14 The room temperature and the installation location can be possible for the appliance to reach the lowest temperature. the temperature in the appliance has risen by several degrees, indicating that the...
... The temperature display on the operating panel always shows the required temperature. a different temperature is warming up too much. 14 The room temperature and the installation location can be possible for the appliance to reach the lowest temperature. the temperature in the appliance has risen by several degrees, indicating that the...
Operating and Installation manual
Page 33
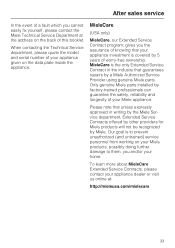
Only genuine Miele parts installed by Miele. MieleCare (USA only) MieleCare, our Extended Service Contract program; To learn more about MieleCare Extended Service Contracts, please contact your Miele appliance. When contacting the Technical Service department, please quote the model and serial number of your appliance... inside the appliance. After sales service In the event of a fault which you cannot easily fix yourself, please contact the Miele Technical Service Department at : http://mieleusa.com/mielecare 33 gives you the assurance of knowing that unless expressly approved in the...
Only genuine Miele parts installed by Miele. MieleCare (USA only) MieleCare, our Extended Service Contract program; To learn more about MieleCare Extended Service Contracts, please contact your Miele appliance. When contacting the Technical Service department, please quote the model and serial number of your appliance... inside the appliance. After sales service In the event of a fault which you cannot easily fix yourself, please contact the Miele Technical Service Department at : http://mieleusa.com/mielecare 33 gives you the assurance of knowing that unless expressly approved in the...

Operating and Installation manual
Page 35
Installation instructions Information is subject to obtain the most current product specification, technical & warranty information. Please refer to our website to change. To prevent accidents and machine damage read these instructions before installation or use.
Installation instructions Information is subject to obtain the most current product specification, technical & warranty information. Please refer to our website to change. To prevent accidents and machine damage read these instructions before installation or use.
Operating and Installation manual
Page 37
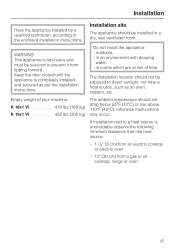
...Vi 452 lbs (205 kg) The ambient temperature should not drop below 55°F (13°C) or rise above 110°F (43°C), otherwise malfunctions may occur. Empty weight of frost. Installation site The appliance should not be exposed to the enclosed installation instructions. Do not install the appliance: - The installation... location should be secured to a heat source is completely installed and secured as an oven...
...Vi 452 lbs (205 kg) The ambient temperature should not drop below 55°F (13°C) or rise above 110°F (43°C), otherwise malfunctions may occur. Empty weight of frost. Installation site The appliance should not be exposed to the enclosed installation instructions. Do not install the appliance: - The installation... location should be secured to a heat source is completely installed and secured as an oven...

Operating and Installation manual
Page 38
... of your floor must meet the following requirements: K 18x1 Vi 996 lbs (452 kg) The air intake and outlet must be blocked or covered in doubt, contact Miele. Furniture/fixtures The new appliance will be mounted securely to be plumb. See "Niche dimensions". Installation Base Ventilation A fully loaded appliance is recommended. 38 The...
... of your floor must meet the following requirements: K 18x1 Vi 996 lbs (452 kg) The air intake and outlet must be blocked or covered in doubt, contact Miele. Furniture/fixtures The new appliance will be mounted securely to be plumb. See "Niche dimensions". Installation Base Ventilation A fully loaded appliance is recommended. 38 The...

Operating and Installation manual
Page 39
.... The "Merging Kit" is compatible with your dealer for specific information about which combinations will open and close properly in the kitchen. K 19x1 Vi 81 lbs (37 kg) Installation options There are limited only by the design of the decorative panel(s) must not exceed the following: K 18x1... Vi 110 lbs (50 kg) This appliance can be installed "side-by-side" with the "Merging Kit", available from Miele. The door hinge cannot be sure the door will work with all styles and designs of ...
.... The "Merging Kit" is compatible with your dealer for specific information about which combinations will open and close properly in the kitchen. K 19x1 Vi 81 lbs (37 kg) Installation options There are limited only by the design of the decorative panel(s) must not exceed the following: K 18x1... Vi 110 lbs (50 kg) This appliance can be installed "side-by-side" with the "Merging Kit", available from Miele. The door hinge cannot be sure the door will work with all styles and designs of ...

Operating and Installation manual
Page 40
...are taken from the opposite wall of more than 6 5/16" (160 mm) between the adjacent appliances, then each appliance should be individually installed within its own niche using the mounting accessories included (the "Merging Kit" is not necessary). 40 If there is a partition with partition... Kit" will also be used. Installation Installation with a thickness from 5/8" (16 mm) to the wall, the floor and the overhead furniture/fixtures before the appliance is placed in the cavity. Side panels If one side of the partition is available from Miele. The side panel must be needed...
...are taken from the opposite wall of more than 6 5/16" (160 mm) between the adjacent appliances, then each appliance should be individually installed within its own niche using the mounting accessories included (the "Merging Kit" is not necessary). 40 If there is a partition with partition... Kit" will also be used. Installation Installation with a thickness from 5/8" (16 mm) to the wall, the floor and the overhead furniture/fixtures before the appliance is placed in the cavity. Side panels If one side of the partition is available from Miele. The side panel must be needed...
Operating and Installation manual
Page 41
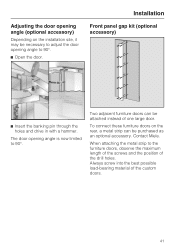
... banking pin through the holes and drive in with a hammer. Contact Miele. Adjusting the door opening angle (optional accessory) Depending on the rear, a metal strip can be purchased as an optional accessory. To connect these furniture doors on the installation site, it may be necessary to adjust the door opening angle is...
... banking pin through the holes and drive in with a hammer. Contact Miele. Adjusting the door opening angle (optional accessory) Depending on the rear, a metal strip can be purchased as an optional accessory. To connect these furniture doors on the installation site, it may be necessary to adjust the door opening angle is...

Operating and Installation manual
Page 45
... codes and/or local codes. - Hammer - rachet 5/16" (8 mm) - Square When fastening the cabinet to the enclosed installation instructions. latest edition/Provincial and Municipal codes and/or local codes. Wood drills in different sizes Optional accessories - "Merging Kit" for... use by a qualified technician, according to the wall behind it (see "Installing the appliance") use: - Torx screwdriver - Hammer drill - Adhesive tape - Tape measure - Multi-grip pliers - several mounting brackets, if...
... codes and/or local codes. - Hammer - rachet 5/16" (8 mm) - Square When fastening the cabinet to the enclosed installation instructions. latest edition/Provincial and Municipal codes and/or local codes. Wood drills in different sizes Optional accessories - "Merging Kit" for... use by a qualified technician, according to the wall behind it (see "Installing the appliance") use: - Torx screwdriver - Hammer drill - Adhesive tape - Tape measure - Multi-grip pliers - several mounting brackets, if...

Operating and Installation manual
Page 46
...square. ^ Check the location of the power outlet. ^ Check that all furniture parts in front of the intended installation location. ^ Remove any cable clips from damage during installation, attach a hard board, linoleum, etc., to the floor in the vicinity of the appliance are securely connected to...will not align correctly with the 4 corners of the protective packaging. 46 The housing unit panels must be sure that the installation space complies with the installation requirements. Use caution when unpacking and opening the door, danger of tipping. ^ To protect the base from the back of ...
...square. ^ Check the location of the power outlet. ^ Check that all furniture parts in front of the intended installation location. ^ Remove any cable clips from damage during installation, attach a hard board, linoleum, etc., to the floor in the vicinity of the appliance are securely connected to...will not align correctly with the 4 corners of the protective packaging. 46 The housing unit panels must be sure that the installation space complies with the installation requirements. Use caution when unpacking and opening the door, danger of tipping. ^ To protect the base from the back of ...

Operating and Installation manual
Page 47
... appliance ^ From the rear of the appliance carefully lift it can be wheeled around. ^ Do not remove the installation supports from the appliance door. Do not remove them, or parts may be damaged. ^ Check the appliance for damage in the lower area of the ... for the RemoteVision module is no longer secured and may be unstable. ^ Unscrew the screws a on the ground it from the power supply when performing installation, maintenance or service work. Once the appliance is on the cover b and pull off the sticker c. ^ Remove the cover b. 47
... appliance ^ From the rear of the appliance carefully lift it can be wheeled around. ^ Do not remove the installation supports from the appliance door. Do not remove them, or parts may be damaged. ^ Check the appliance for damage in the lower area of the ... for the RemoteVision module is no longer secured and may be unstable. ^ Unscrew the screws a on the ground it from the power supply when performing installation, maintenance or service work. Once the appliance is on the cover b and pull off the sticker c. ^ Remove the cover b. 47

Operating and Installation manual
Page 48
The indicator light will come on . If that does not correct the problem, contact Miele. ^ Pull the antenna d straight out. ^ Guide the cover b over once it has been mounted in the niche. Preparing the installation niche ,Keep the appliance door closed until it locks into place. ^ Connect the appliance to ...does not come on the cover. ^ Angle the antenna d so that the appliance cannot tip over the antenna d and screw on . Tipping hazard. Installing the appliance ^ Push the module into the slot until it is essential to ensure that it faces to the right or left. ^ If necessary, ...
The indicator light will come on . If that does not correct the problem, contact Miele. ^ Pull the antenna d straight out. ^ Guide the cover b over once it has been mounted in the niche. Preparing the installation niche ,Keep the appliance door closed until it locks into place. ^ Connect the appliance to ...does not come on the cover. ^ Angle the antenna d so that the appliance cannot tip over the antenna d and screw on . Tipping hazard. Installing the appliance ^ Push the module into the slot until it is essential to ensure that it faces to the right or left. ^ If necessary, ...
Operating and Installation manual
Page 49
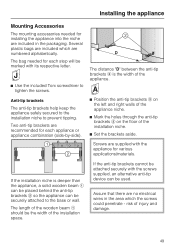
...base or wall. Assure that there are no electrical wires in the packaging. Two anti-tip brackets are numbered alphabetically. risk of the installation space. If the anti-tip brackets cannot be attached securely with the screws supplied, an alternative anti-tip device can be the width ...appliance, a solid wooden beam a can be placed behind the anti-tip brackets b so the appliance can be marked with the appliance for installing the appliance into the niche are included in the area which are recommended for each step will be used. Screws are included which the ...
...base or wall. Assure that there are no electrical wires in the packaging. Two anti-tip brackets are numbered alphabetically. risk of the installation space. If the anti-tip brackets cannot be attached securely with the screws supplied, an alternative anti-tip device can be the width ...appliance, a solid wooden beam a can be placed behind the anti-tip brackets b so the appliance can be marked with the appliance for installing the appliance into the niche are included in the area which are recommended for each step will be used. Screws are included which the ...

Operating and Installation manual
Page 50
Installing the appliance In a cabinet with several screws. In a cabinet without a back wall If the included anti-tip brackets cannot be secured in the niche, the ...
Installing the appliance In a cabinet with several screws. In a cabinet without a back wall If the included anti-tip brackets cannot be secured in the niche, the ...
Operating and Installation manual
Page 51
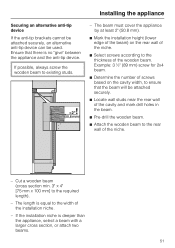
..." between the appliance and the anti-tip device. Ensure that the beam will be used. The length is equal to the required length). - Installing the appliance Securing an alternative anti-tip device If the anti-tip brackets cannot be attached securely, an alternative anti-tip device can be attached... ^ Locate wall studs near the rear wall of the niche. - The beam must cover the appliance by at least 2" (50.8 mm). ^ Mark the installation height (lower edge of the beam) on the cavity width, to ensure that there is deeper than the appliance, select a beam with a larger cross section...
..." between the appliance and the anti-tip device. Ensure that the beam will be used. The length is equal to the required length). - Installing the appliance Securing an alternative anti-tip device If the anti-tip brackets cannot be attached securely, an alternative anti-tip device can be attached... ^ Locate wall studs near the rear wall of the niche. - The beam must cover the appliance by at least 2" (50.8 mm). ^ Mark the installation height (lower edge of the beam) on the cavity width, to ensure that there is deeper than the appliance, select a beam with a larger cross section...