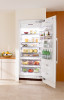
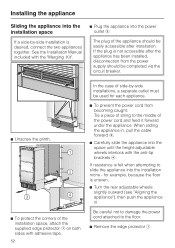
Operating and Installation manual
Page 4
... correspond with current safety requirements. This data must exist between the appliance and an effective grounding system. To guarantee the electrical safety of this Operating manual. If there is properly installed and grounded by a qualified technician. Improper use an extension cord to connect this basic safety requirement be met. IMPORTANT SAFETY...
Operating and Installation manual
Page 10
... can now: - The selected sensor button appears yellow and depending on the zone selected, additional sensor buttons will now see the corresponding sections in the manual. ^ Touch the access button "p" so it turns white. For additional information, see the sensor buttons for the three appliance zones. ^ To de-select a zone touch...
Operating and Installation manual
Page 11
... mode ^ Touch the access button "p" so it turns yellow. ^ Touch the sensor button for the refrigerator so it turns yellow. ^ Note the position of this manual. The function possibilities are described in the display. ^ Touch the access button "p" to confirm. 11 Only the access button "p" is visible. ^ Place one finger on...
Operating and Installation manual
Page 52
... cord from becoming caught: Tie a piece of string to the middle of the power cord and feed it forward under the appliance. See the Installation Manual included with the anti-tip brackets d. If resistance is desired, connect the two appliances together. When sliding the appliance in . Installing the appliance Sliding the...
Operating and Installation manual
Page 63
... Be sure your appliance and our monitoring center. Cable or DSL modem - Wording and instructions may vary. 63 RemoteVision (optional accessory) Miele's RemoteVision Wi-Fi technology creates a 'virtual link' between your wireless system meets the following requirements - Windows XP® or newer operating... system, Mac® OS X 10.3 or higher - If a fault occurs, Miele's client service center will be notified and contact you, or another trusted individual identified on set-up and installation of the RemoteVision module...
Operating and Installation manual
Page 64
.... ^ Place one finger on the following appears in the display. ^ Use the Y or X buttons to the "Network options" section of the XKM 2000 Installation Instruction manual. ^ Press and hold (the X button will not be visible). ^ While holding the X button down the X button, press the access button "p" once. You have left the...
Side by Side Merging Kit Installation Manual
Page 3
... mat must be secured to be attached together. KWT 16x1 Vi Side-by -side installation of injury or damage to each other (without partition Before you begin Please read all instructions in this manual, as well as the manual which accompanied your machine, before installation and use. Installing the heating mat will help...