
Product Manual
Page 2
... refrigerator efficiently 20 Using the freezer efficiently 21 Freezing food 21 Defrosting 22 Cooling drinks quickly 22 SuperCool 23 Ice cube maker 24 Automatic defrost 25 Adjusting the interior fittings 26 Moving the shelves 26 Floating drawer 26 Removing the storage shelf from above the drawer 28 Ice cube container 29 Small freezer basket 29 Cleaning and care 30 Cleaning the interior and accessories 31 Humidity filters 32 Ventilation slits 32 Door seals 32 Changing the light bulb...
... refrigerator efficiently 20 Using the freezer efficiently 21 Freezing food 21 Defrosting 22 Cooling drinks quickly 22 SuperCool 23 Ice cube maker 24 Automatic defrost 25 Adjusting the interior fittings 26 Moving the shelves 26 Floating drawer 26 Removing the storage shelf from above the drawer 28 Ice cube container 29 Small freezer basket 29 Cleaning and care 30 Cleaning the interior and accessories 31 Humidity filters 32 Ventilation slits 32 Door seals 32 Changing the light bulb...
Product Manual
Page 3
Contents Water filter 35 Water filter change indicator 35 Exchanging the water filter 36 Confirming the filter change 37 Using an external water filter 37 Lead free certificate 40 Frequently asked questions 41 Noises 48 After sales service 49 Warranty 49 Caring for the environment 52 Installation 53 Climate Range 53 Installation site 53 Stainless steel panels 56 Custom door panels 56 Installation options 56 Adjusting the door opening angle (optional accessory 58 Dimensions 59 Installing the appliance 63 Before you begin 63...
Contents Water filter 35 Water filter change indicator 35 Exchanging the water filter 36 Confirming the filter change 37 Using an external water filter 37 Lead free certificate 40 Frequently asked questions 41 Noises 48 After sales service 49 Warranty 49 Caring for the environment 52 Installation 53 Climate Range 53 Installation site 53 Stainless steel panels 56 Custom door panels 56 Installation options 56 Adjusting the door opening angle (optional accessory 58 Dimensions 59 Installing the appliance 63 Before you begin 63...
Product Manual
Page 4
... household electrical supply. Keep these operating instructions in a safe place and pass them on the data plate correspond with current safety requirements. Electrical Safety ~ Before installation, make sure that this basic safety requirement be met. If there is properly installed and grounded by a qualified electrician. ~ Only connect power to the appliance when all instructions before installation and use the appliance for residential use an extension cord...
... household electrical supply. Keep these operating instructions in a safe place and pass them on the data plate correspond with current safety requirements. Electrical Safety ~ Before installation, make sure that this basic safety requirement be met. If there is properly installed and grounded by a qualified electrician. ~ Only connect power to the appliance when all instructions before installation and use the appliance for residential use an extension cord...
Product Manual
Page 5
... to a hot water supply. ~ In refrigerators with an automatic ice maker, avoid contact with the moving parts of the ejector mechanism, or with the heating element located on the automatic ice making mechanism while the refrigerator is plugged in the door hinge area. 5 the filter alone is intended for commercial use in domestic households and in similar working and residential environments such as this may void the warranty. ~ Installation must...
... to a hot water supply. ~ In refrigerators with an automatic ice maker, avoid contact with the moving parts of the ejector mechanism, or with the heating element located on the automatic ice making mechanism while the refrigerator is plugged in the door hinge area. 5 the filter alone is intended for commercial use in domestic households and in similar working and residential environments such as this may void the warranty. ~ Installation must...
Product Manual
Page 6
...the plastic parts or which could damage electrical components and cause a short circuit. These will damage the surface, causing it to lose its soil resistant protective coating. ~ The high-quality surface coating of the appliance door is in operation, do not touch the cold surfaces ...to health. ~ Do not use any other appliance. ~ Do not deactivate the water filter display. ~ Do not use gasoline or other types of adhesive on the door seal, as these extremely cold surfaces. ~ Do not refreeze frozen foods which have thawed completely. ~ Do not handle frozen food or ice with time. ~ Do not...
...the plastic parts or which could damage electrical components and cause a short circuit. These will damage the surface, causing it to lose its soil resistant protective coating. ~ The high-quality surface coating of the appliance door is in operation, do not touch the cold surfaces ...to health. ~ Do not use any other appliance. ~ Do not deactivate the water filter display. ~ Do not use gasoline or other types of adhesive on the door seal, as these extremely cold surfaces. ~ Do not refreeze frozen foods which have thawed completely. ~ Do not handle frozen food or ice with time. ~ Do not...

Product Manual
Page 10
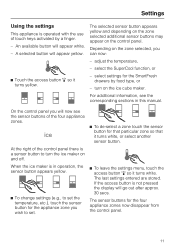
... the main switch. The main switch is located on , the appliance begins cooling. The access button will affect the functioning of the appliance. ^ Turn the appliance On/Off with a soft cloth. If the appliance was transported or laid horizontally for any food in the control panel. All zones are reached. ,Turning off together. The preset temperatures (factory default settings) are open, the interior lights come...
... the main switch. The main switch is located on , the appliance begins cooling. The access button will affect the functioning of the appliance. ^ Turn the appliance On/Off with a soft cloth. If the appliance was transported or laid horizontally for any food in the control panel. All zones are reached. ,Turning off together. The preset temperatures (factory default settings) are open, the interior lights come...
Product Manual
Page 11
... buttons of touch keys activated by food type, or - When the ice maker is not pressed the display will appear white. - adjust the temperature, - select settings for that particular zone so that it turns white, or select another sensor button. If the access button is in this manual. Settings Using the settings This appliance is a sensor button to set. ^ To leave the settings menu, touch the access button "p" so it turns yellow. - On the control panel...
... buttons of touch keys activated by food type, or - When the ice maker is not pressed the display will appear white. - adjust the temperature, - select settings for that particular zone so that it turns white, or select another sensor button. If the access button is in this manual. Settings Using the settings This appliance is a sensor button to set. ^ To leave the settings menu, touch the access button "p" so it turns yellow. - On the control panel...
Product Manual
Page 13
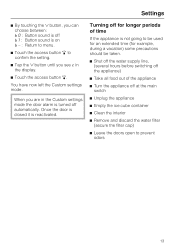
..., (several hours before switching off the appliance) ^ Take all food out of time If the appliance is turned off at the main switch ^ Unplug the appliance ^ Empty the ice cube container ^ Clean the interior ^ Remove and discard the water filter (secure the filter cap) ^ Leave the doors open to confirm the setting. ^ Tap the X button until you see ; When you are in the display. ^ Touch the access button "p".
..., (several hours before switching off the appliance) ^ Take all food out of time If the appliance is turned off at the main switch ^ Unplug the appliance ^ Empty the ice cube container ^ Clean the interior ^ Remove and discard the water filter (secure the filter cap) ^ Leave the doors open to confirm the setting. ^ Tap the X button until you see ; When you are in the display. ^ Touch the access button "p".
Product Manual
Page 17
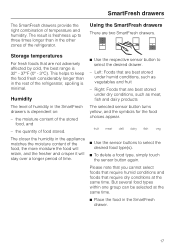
... moisture content of food stored. The result is minimal. Left: Foods that are not adversely affected by cold, the best range is dependent on: - SmartFresh drawers The SmartFresh drawers provide the right combination of time. ^ Use the sensor buttons to select the desired food type(s). ^ To delete a food type, simply touch the sensor button again. Storage temperatures For fresh foods that require dry conditions at the...
... moisture content of food stored. The result is minimal. Left: Foods that are not adversely affected by cold, the best range is dependent on: - SmartFresh drawers The SmartFresh drawers provide the right combination of time. ^ Use the sensor buttons to select the desired food type(s). ^ To delete a food type, simply touch the sensor button again. Storage temperatures For fresh foods that require dry conditions at the...
Product Manual
Page 25
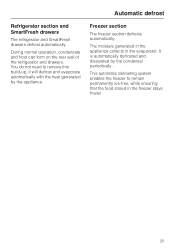
... to remain permanently ice-free, while ensuring that the food stored in the evaporator. The moisture generated in the appliance collects in the freezer stays frozen. 25 During normal operation, condensate and frost can form on the rear wall of the refrigerator and drawers. Freezer section The freezer section defrosts automatically. Automatic defrost Refrigerator section and SmartFresh drawers The refrigerator and SmartFresh drawers...
... to remain permanently ice-free, while ensuring that the food stored in the evaporator. The moisture generated in the appliance collects in the freezer stays frozen. 25 During normal operation, condensate and frost can form on the rear wall of the refrigerator and drawers. Freezer section The freezer section defrosts automatically. Automatic defrost Refrigerator section and SmartFresh drawers The refrigerator and SmartFresh drawers...

Product Manual
Page 26
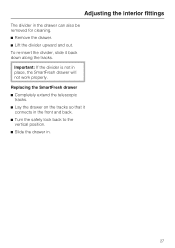
.... ^ Make sure the shelf is slightly above the mountings. On the hinged-side of the door is a safety lock, which must be turned to a horizontal position before the drawer can be removed. ^ To replace the drawer slide it passes over the catches and remove. ^ Open the drawer. They can be pulled in along the rails. ^ Using a suitable object, e.g., coin, turn the safety lock to...
.... ^ Make sure the shelf is slightly above the mountings. On the hinged-side of the door is a safety lock, which must be turned to a horizontal position before the drawer can be removed. ^ To replace the drawer slide it passes over the catches and remove. ^ Open the drawer. They can be pulled in along the rails. ^ Using a suitable object, e.g., coin, turn the safety lock to...
Product Manual
Page 27
To re-insert the divider, slide it connects in the front and back. ^ Turn the safety lock back to the vertical position. ^ Slide the drawer in. 27 Adjusting the interior fittings The divider in place, the SmartFresh drawer will not work properly. Important: If the divider is not in the drawer can also be removed for cleaning. ^ Remove the drawer. ^ Lift the divider upward and out. Replacing the SmartFresh drawer ^ Completely extend the telescopic tracks. ^ Lay the drawer on the tracks so that it back down along the tracks.
To re-insert the divider, slide it connects in the front and back. ^ Turn the safety lock back to the vertical position. ^ Slide the drawer in. 27 Adjusting the interior fittings The divider in place, the SmartFresh drawer will not work properly. Important: If the divider is not in the drawer can also be removed for cleaning. ^ Remove the drawer. ^ Lift the divider upward and out. Replacing the SmartFresh drawer ^ Completely extend the telescopic tracks. ^ Lay the drawer on the tracks so that it back down along the tracks.
Product Manual
Page 29
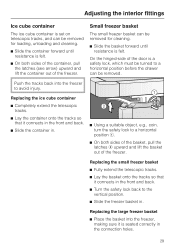
... container out of the freezer. Push the tracks back into the freezer, making sure it connects in the front and back. ^ Slide the container in the connection holes. 29 Small freezer basket The small freezer basket can be removed. Adjusting the interior fittings Ice cube container The ice cube container is set on telescopic tracks, and can be removed for cleaning. ^ Slide the basket forward until resistance is...
... container out of the freezer. Push the tracks back into the freezer, making sure it connects in the front and back. ^ Slide the container in the connection holes. 29 Small freezer basket The small freezer basket can be removed. Adjusting the interior fittings Ice cube container The ice cube container is set on telescopic tracks, and can be removed for cleaning. ^ Slide the basket forward until resistance is...
Product Manual
Page 30
... of warm water and liquid dish soap to clean the exterior. Only use cleaning agents containing abrasive substances such as they can cause damage to clean this appliance. The data plate located inside the appliance must not be used to clean this appliance. It contains information which is required in the event of electrical shock, disconnect the appliance from the power supply by shutting...
... of warm water and liquid dish soap to clean the exterior. Only use cleaning agents containing abrasive substances such as they can cause damage to clean this appliance. The data plate located inside the appliance must not be used to clean this appliance. It contains information which is required in the event of electrical shock, disconnect the appliance from the power supply by shutting...
Product Manual
Page 31
.... The main switch is located on the right side underneath the control panel. ^ Unplug the power cord. ^ Remove any food from the appliance and store it in a dishwasher. ^ Clean the appliance as pot scrubbers; Aluminum is not cleaned away promptly. Do not use stainless steel cleaners; Cleaning the interior and accessories Use a mild solution of warm water and liquid dish soap. ^ Use the main switch to turn the appliance off...
.... The main switch is located on the right side underneath the control panel. ^ Unplug the power cord. ^ Remove any food from the appliance and store it in a dishwasher. ^ Clean the appliance as pot scrubbers; Aluminum is not cleaned away promptly. Do not use stainless steel cleaners; Cleaning the interior and accessories Use a mild solution of warm water and liquid dish soap. ^ Use the main switch to turn the appliance off...
Product Manual
Page 32
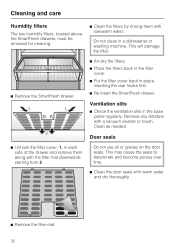
... in the base panel regularly. This may cause the seals to deteriorate and become porous over time. ^ Clean the door seals with a vacuum cleaner or brush. Door seals ^ Unhook the filter cover, 1. Remove any dirt/dust with warm water and dry thoroughly. ^ Remove the filter mat. 32 Cleaning and care Humidity filters The two humidity filters, located above the SmartFresh drawers, must be removed for cleaning. ^ Clean the filters by rinsing them...
... in the base panel regularly. This may cause the seals to deteriorate and become porous over time. ^ Clean the door seals with a vacuum cleaner or brush. Door seals ^ Unhook the filter cover, 1. Remove any dirt/dust with warm water and dry thoroughly. ^ Remove the filter mat. 32 Cleaning and care Humidity filters The two humidity filters, located above the SmartFresh drawers, must be removed for cleaning. ^ Clean the filters by rinsing them...
Product Manual
Page 45
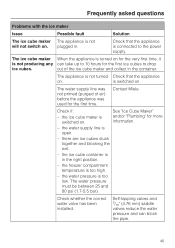
... must be between 25 and 80 psi (1.7-5.5 bar). The ice cube maker When the appliance is turned on for the first ice cubes to the power supply. The water supply line was not primed (purged of the ice cube maker and collect in the right position. - the freezer compartment temperature is open. - Self-tapping valves and 3/16" (4.76 mm) saddle valves...
... must be between 25 and 80 psi (1.7-5.5 bar). The ice cube maker When the appliance is turned on for the first ice cubes to the power supply. The water supply line was not primed (purged of the ice cube maker and collect in the right position. - the freezer compartment temperature is open. - Self-tapping valves and 3/16" (4.76 mm) saddle valves...
Product Manual
Page 73
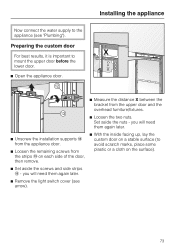
... again later. ^ Remove the light switch cover (see "Plumbing"). Set aside the nuts - you will need them again later. ^ With the inside facing up, lay the custom door on a stable surface (to avoid scratch marks, place some plastic or a cloth on each side of the door, then remove. ^ Set aside the screws and side strips m - Preparing the custom door For best results, it...
... again later. ^ Remove the light switch cover (see "Plumbing"). Set aside the nuts - you will need them again later. ^ With the inside facing up, lay the custom door on a stable surface (to avoid scratch marks, place some plastic or a cloth on each side of the door, then remove. ^ Set aside the screws and side strips m - Preparing the custom door For best results, it...

Product Manual
Page 80
... be replaced only Original Miele Spare parts are suitable for use pipe extenders. Disconnect the appliance from the electrical power supply before connecting the water lines to country requirements for connection to the water supply. It is only suitable for drinking water. - The appliance is recommended to place the shut-off the water supply before connecting it to the cold water supply. - Contact Miele. 80...
... be replaced only Original Miele Spare parts are suitable for use pipe extenders. Disconnect the appliance from the electrical power supply before connecting the water lines to country requirements for connection to the water supply. It is only suitable for drinking water. - The appliance is recommended to place the shut-off the water supply before connecting it to the cold water supply. - Contact Miele. 80...
Product Manual
Page 83
... to the household wiring or power supply, this appliance to whether the appliance has been properly grounded, have the appliance checked by an extension cord. Do not use an adapter. - If any changes are any doubt as to the power supply, please consult a licensed electrician or call the Miele Technical Service. Installation, repairs and other work must be dangerous. The appliance requires a 3-wire receptacle. Plug into...
... to the household wiring or power supply, this appliance to whether the appliance has been properly grounded, have the appliance checked by an extension cord. Do not use an adapter. - If any changes are any doubt as to the power supply, please consult a licensed electrician or call the Miele Technical Service. Installation, repairs and other work must be dangerous. The appliance requires a 3-wire receptacle. Plug into...

