Specs
Page 1
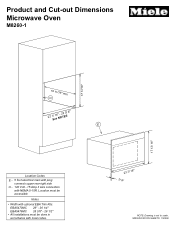
SPECIFICATION SHEETS 150306 Location must be accessible Notes • Width with optional EBA Trim Kits: EBA5470MC 26" - 26 1/4" EBA5476MC 28 3/8" - 28 1/2" • All installations must be done in accordance with NEMA 5-15R. Product and Cut-out Dimensions Microwave Oven M8260-1 17 11/16" 17 13/ 16" 19 11/16" min. O 22 1S/ e1e6"N-O2T2E3S/ 8" E Location Codes E - 5 foot electrical main with plug connects upper rear right side O - 120 Volt - 15 Amp 3 wire connection with local codes. 23 7/ 16" 7/ 8" NOTE: Drawing is not to scale.
SPECIFICATION SHEETS 150306 Location must be accessible Notes • Width with optional EBA Trim Kits: EBA5470MC 26" - 26 1/4" EBA5476MC 28 3/8" - 28 1/2" • All installations must be done in accordance with NEMA 5-15R. Product and Cut-out Dimensions Microwave Oven M8260-1 17 11/16" 17 13/ 16" 19 11/16" min. O 22 1S/ e1e6"N-O2T2E3S/ 8" E Location Codes E - 5 foot electrical main with plug connects upper rear right side O - 120 Volt - 15 Amp 3 wire connection with local codes. 23 7/ 16" 7/ 8" NOTE: Drawing is not to scale.
Product Manual
Page 1
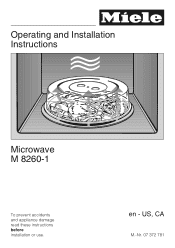
US, CA M.-Nr. 07 372 781 en - Operating and Installation Instructions Microwave M 8260-1 To prevent accidents and appliance damage read these instructions before installation or use.
US, CA M.-Nr. 07 372 781 en - Operating and Installation Instructions Microwave M 8260-1 To prevent accidents and appliance damage read these instructions before installation or use.
Product Manual
Page 2
Contents IMPORTANT SAFETY INSTRUCTIONS 4 Guide to the microwave 9 Included accessories 9 Control panel 10 Before the first use 11 Selecting cookware 12 Clock display 16 Setting the time of day 16 Changing the time ...
Contents IMPORTANT SAFETY INSTRUCTIONS 4 Guide to the microwave 9 Included accessories 9 Control panel 10 Before the first use 11 Selecting cookware 12 Clock display 16 Setting the time of day 16 Changing the time ...
Product Manual
Page 3
Contents Cleaning and Care 32 Microwave interior and inside of the door 32 Appliance front 33 Accessories 33 Frequently asked questions 34 Technical Service 37 Installation instructions 39 Caring for the environment 40 Disposal of the packing materials 40 Disposal of an old appliance 40 Electrical connection 41 Installation 42 Building-in dimensions 42 3
Contents Cleaning and Care 32 Microwave interior and inside of the door 32 Appliance front 33 Accessories 33 Frequently asked questions 34 Technical Service 37 Installation instructions 39 Caring for the environment 40 Disposal of the packing materials 40 Disposal of an old appliance 40 Electrical connection 41 Installation 42 Building-in dimensions 42 3
Product Manual
Page 4
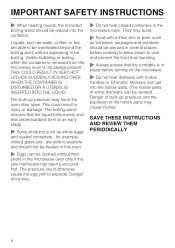
... the appliance should not use . iv) Do not use only. Read and follow the specific, "PRECAUTIONS TO AVOID POSSIBLE EXPOSURE TO EXCESSIVE MICROWAVE ENERGY" in the "IMPORTANT SAFETY INSTRUCTIONS" section of this manual. ~ To reduce the risk of the appliance can lead to store or ...dehydrate flammable materials. iii) If materials inside the oven to excessive microwave energy: Read all instructions before placing bag in oven. This appliance is a fire hazard. ~ Persons who lack physical, sensory or mental abilities...
... the appliance should not use . iv) Do not use only. Read and follow the specific, "PRECAUTIONS TO AVOID POSSIBLE EXPOSURE TO EXCESSIVE MICROWAVE ENERGY" in the "IMPORTANT SAFETY INSTRUCTIONS" section of this manual. ~ To reduce the risk of the appliance can lead to store or ...dehydrate flammable materials. iii) If materials inside the oven to excessive microwave energy: Read all instructions before placing bag in oven. This appliance is a fire hazard. ~ Persons who lack physical, sensory or mental abilities...
Product Manual
Page 6
.... It is particularly important that the oven door closes properly and that of traditional food preparation methods. Due to electricity. Contact Miele's Technical Service Department. ~ Do not use the appliance for cooking, heating and defrosting food in harmful exposure to heat the room... soil or cleaner residue to the: (1) door (bent), (2) hinges and latches (broken or loosened), (3) door seals and sealing surfaces. Extensive microwaving could ignite, even once removed from heated surfaces. ~ Do not let the cord hang over the edge of electric shock! Fire hazard. ~...
.... It is particularly important that the oven door closes properly and that of traditional food preparation methods. Due to electricity. Contact Miele's Technical Service Department. ~ Do not use the appliance for cooking, heating and defrosting food in harmful exposure to heat the room... soil or cleaner residue to the: (1) door (bent), (2) hinges and latches (broken or loosened), (3) door seals and sealing surfaces. Extensive microwaving could ignite, even once removed from heated surfaces. ~ Do not let the cord hang over the edge of electric shock! Fire hazard. ~...
Product Manual
Page 7
... detergents applied with metal coverings or residues. Switch the appliance off by the plate temperature. Danger of aluminum foil which reflects the microwaves. plastic, paper or other flammable materials. ~ Do not use thermometers containing mercury or liquids, they are not suitable for high ...non-temperature safe dishware, wooden dishware, metal clips, wire twist ties, food containers with a sponge or soft cloth. ~ Do not operate the microwave empty. Remove the nipple or lid before serving heated baby food. ~ Use a food thermometer to ignite. ~ Before serving food allow a ...
... detergents applied with metal coverings or residues. Switch the appliance off by the plate temperature. Danger of aluminum foil which reflects the microwaves. plastic, paper or other flammable materials. ~ Do not use thermometers containing mercury or liquids, they are not suitable for high ...non-temperature safe dishware, wooden dishware, metal clips, wire twist ties, food containers with a sponge or soft cloth. ~ Do not operate the microwave empty. Remove the nipple or lid before serving heated baby food. ~ Use a food thermometer to ignite. ~ Before serving food allow a ...
Product Manual
Page 8
... INSERTED INTO THE LIQUID. Danger of some dishware can be cooked without appearing to vent and prevent the food from the microwave oven is in place before turning on the microwave. ~ Do not heat dishware with a thick skin or peel, such as tomatoes, sausages and potatoes should be pierced... in the microwave oven only if the yolk membrane has been punctured first. The pressure could result in the microwave oven. Visible bubbling or boiling when the container is removed from bursting. ~ Always ensure that ...
... INSERTED INTO THE LIQUID. Danger of some dishware can be cooked without appearing to vent and prevent the food from the microwave oven is in place before turning on the microwave. ~ Do not heat dishware with a thick skin or peel, such as tomatoes, sausages and potatoes should be pierced... in the microwave oven only if the yolk membrane has been punctured first. The pressure could result in the microwave oven. Visible bubbling or boiling when the container is removed from bursting. ~ Always ensure that ...

Product Manual
Page 9
Boiling wand When heating liquids, the provided boiling wand should be placed into the container. Guide to the microwave a Microwave door b Door lock c Control panel d Turntable e Cover f Boiling wand Included accessories Cover The cover prevents food from drying out, shortens and evens out the cooking process, and prevents soiling of the liquid. 9 It helps in even boiling of the microwave interior.
Boiling wand When heating liquids, the provided boiling wand should be placed into the container. Guide to the microwave a Microwave door b Door lock c Control panel d Turntable e Cover f Boiling wand Included accessories Cover The cover prevents food from drying out, shortens and evens out the cooking process, and prevents soiling of the liquid. 9 It helps in even boiling of the microwave interior.
Product Manual
Page 10
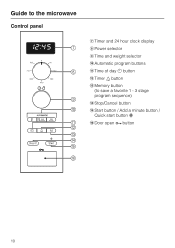
Guide to the microwave Control panel g Timer and 24 hour clock display h Power selector i Time and weight selector j Automatic program buttons k Time of day m button l Timer l button m Memory button (to save a favorite 1 - 3 stage program sequence) n Stop/Cancel button o Start button / Add a minute button / Quick start button c p Door open a button 10
Guide to the microwave Control panel g Timer and 24 hour clock display h Power selector i Time and weight selector j Automatic program buttons k Time of day m button l Timer l button m Memory button (to save a favorite 1 - 3 stage program sequence) n Stop/Cancel button o Start button / Add a minute button / Quick start button c p Door open a button 10

Product Manual
Page 11
... sit unpacked for any visible damage. Be sure not to the frame behind the door (as shown). It is particularly important that the microwave door closes properly and that there is no damage to the: (1) door (bent), (2) hinges and latches (broken or loosened), (3) door ...seals and sealing surfaces. ^ Clean the interior of the microwave and all protective packaging and foil from the inside the microwave. ^ Stick the included short instructions to block the vents. 11 Do not remove the protective film from the appliance. ...
... sit unpacked for any visible damage. Be sure not to the frame behind the door (as shown). It is particularly important that the microwave door closes properly and that there is no damage to the: (1) door (bent), (2) hinges and latches (broken or loosened), (3) door ...seals and sealing surfaces. ^ Clean the interior of the microwave and all protective packaging and foil from the inside the microwave. ^ Stick the included short instructions to block the vents. 11 Do not remove the protective film from the appliance. ...
Product Manual
Page 12
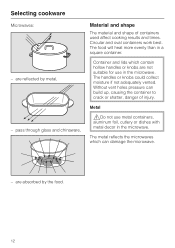
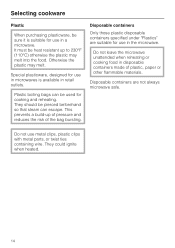
Circular and oval containers work best. Without vent holes pressure can damage the microwave. - Metal ,Do not use in the microwave. The food will heat more evenly than in the microwave. Selecting cookware Microwaves: - pass through glass and chinaware, Material and shape The material and shape of ... containers used affect cooking results and times. The handles or knobs could collect moisture if not adequately vented. The metal reflects the microwaves which contain hollow handles or knobs are reflected by the food. 12 are absorbed by metal, - are not suitable for use...
Circular and oval containers work best. Without vent holes pressure can damage the microwave. - Metal ,Do not use in the microwave. The food will heat more evenly than in the microwave. Selecting cookware Microwaves: - pass through glass and chinaware, Material and shape The material and shape of ... containers used affect cooking results and times. The handles or knobs could collect moisture if not adequately vented. The metal reflects the microwaves which contain hollow handles or knobs are reflected by the food. 12 are absorbed by metal, - are not suitable for use...
Product Manual
Page 13
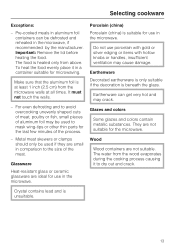
... that the aluminum foil is at all times. Earthenware Decorated earthenware is only suitable if the decoration is unsuitable. 13 The food is suitable for microwaving. To heat the food evenly place it to the size of the meat. Earthenware can be defrosted and reheated in a container suitable for use in... ventilation may be used to avoid overcooking unevenly shaped cuts of meat, poultry or fish, small pieces of the process. - Do not use in the microwave. Crystal contains lead and is beneath the glaze. For even defrosting and to mask wing-tips or other thin parts for the...
... that the aluminum foil is at all times. Earthenware Decorated earthenware is only suitable if the decoration is unsuitable. 13 The food is suitable for microwaving. To heat the food evenly place it to the size of the meat. Earthenware can be defrosted and reheated in a container suitable for use in... ventilation may be used to avoid overcooking unevenly shaped cuts of meat, poultry or fish, small pieces of the process. - Do not use in the microwave. Crystal contains lead and is beneath the glaze. For even defrosting and to mask wing-tips or other thin parts for the...
Product Manual
Page 14
.... Disposable containers are suitable for use in disposable containers made of the bag bursting. Do not leave the microwave unattended when reheating or cooking food in the microwave. It must be heat resistant up of pressure and reduces the risk of plastic, paper or other flammable ...materials. Special plasticware, designed for use in microwaves is suitable for cooking and reheating. Selecting cookware Plastic When purchasing plasticware, be sure it is available in retail outlets. They should ...
.... Disposable containers are suitable for use in disposable containers made of the bag bursting. Do not leave the microwave unattended when reheating or cooking food in the microwave. It must be heat resistant up of pressure and reduces the risk of plastic, paper or other flammable ...materials. Special plasticware, designed for use in microwaves is suitable for cooking and reheating. Selecting cookware Plastic When purchasing plasticware, be sure it is available in retail outlets. They should ...
Product Manual
Page 15
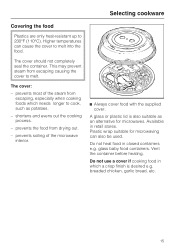
... soiling of the steam from escaping, especially when cooking foods which a crisp finish is also suitable as potatoes. - Plastic wrap suitable for microwaves. The cover: - glass baby food containers. breaded chicken, garlic bread, etc. 15 The cover should not completely seal the container. This...;F (110°C). Selecting cookware Covering the food Plastics are only heat-resistant up to cook, such as an alternative for microwaving can cause the cover to melt. shortens and evens out the cooking process. - Available in closed containers e.g. Higher temperatures can also...
... soiling of the steam from escaping, especially when cooking foods which a crisp finish is also suitable as potatoes. - Plastic wrap suitable for microwaves. The cover: - glass baby food containers. breaded chicken, garlic bread, etc. 15 The cover should not completely seal the container. This...;F (110°C). Selecting cookware Covering the food Plastics are only heat-resistant up to cook, such as an alternative for microwaving can cause the cover to melt. shortens and evens out the cooking process. - Available in closed containers e.g. Higher temperatures can also...

Product Manual
Page 16
... time of day ^ Connect the appliance to the electrical supply. 12:00 and the m symbol will begin counting upwards until the time is set. The microwave can be operated as the microwave is connected to the electrical supply the clock will flash in the display.
... time of day ^ Connect the appliance to the electrical supply. 12:00 and the m symbol will begin counting upwards until the time is set. The microwave can be operated as the microwave is connected to the electrical supply the clock will flash in the display.

Product Manual
Page 17
... Use Opening the door ^ Press "a" to restart the interrupted cooking program. As soon as a program is not larger than the turntable Do not use the microwave without the turntable in use, opening the door will begin to choose the desired power level The h symbol lights up and 0:00 flashes in the... middle of the microwave on the turntable. Closing the door ^ Push the door shut. ^ Press the "Start" button to open the door. A higher number indicates increased power. 17...
... Use Opening the door ^ Press "a" to restart the interrupted cooking program. As soon as a program is not larger than the turntable Do not use the microwave without the turntable in use, opening the door will begin to choose the desired power level The h symbol lights up and 0:00 flashes in the... middle of the microwave on the turntable. Closing the door ^ Push the door shut. ^ Press the "Start" button to open the door. A higher number indicates increased power. 17...
Product Manual
Page 18
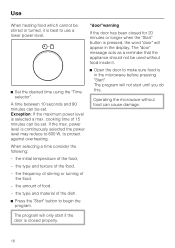
...time between 10 seconds and 90 minutes can be set . Exception: If the maximum power level is best to use a lower power level. Operating the microwave without food inside it is selected a max. the initial temperature of the food. - "door"warning If the door has been closed properly. 18 When...as a reminder that the appliance should not be used without food can be set . cooking time of food. - The program will appear in the microwave before pressing "Start". Use When heating food which cannot be stirred or turned, it . ^ Set the desired time using the "Time selector". the...
...time between 10 seconds and 90 minutes can be set . Exception: If the maximum power level is best to use a lower power level. Operating the microwave without food inside it is selected a max. the initial temperature of the food. - "door"warning If the door has been closed properly. 18 When...as a reminder that the appliance should not be used without food can be set . cooking time of food. - The program will appear in the microwave before pressing "Start". Use When heating food which cannot be stirred or turned, it . ^ Set the desired time using the "Time selector". the...
Product Manual
Page 19
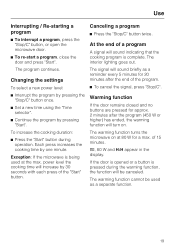
... a program ^ Press the "Stop/C" button twice. Use Interrupting / Re-starting a program ^ To interrupt a program, press the "Stop/C" button, or open the microwave door. ^ To re-start a program, close the door and press "Start". The interior lighting goes out. h, 80 W and H:H appear in the display. power... level the cooking time will turn on at the max. Exception: If the microwave is complete. The warming function turns the microwave on . At the end of the program. ^ To cancel the signal, press "Stop/C". Warming function If the door ...
... a program ^ Press the "Stop/C" button twice. Use Interrupting / Re-starting a program ^ To interrupt a program, press the "Stop/C" button, or open the microwave door. ^ To re-start a program, close the door and press "Start". The interior lighting goes out. h, 80 W and H:H appear in the display. power... level the cooking time will turn on at the max. Exception: If the microwave is complete. The warming function turns the microwave on . At the end of the program. ^ To cancel the signal, press "Stop/C". Warming function If the door ...
Product Manual
Page 20
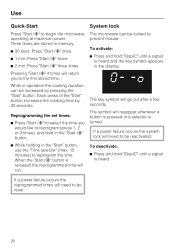
... time. When the "Start /c" button is turned. Reprogramming the set times: ^ Press "Start /c" to select the time you to be reset. 20 System lock The microwave can be locked to reprogram (press 1, 2 or 3 times), and hold in the "Start /c" button. ^ While holding in memory: ^ 30 secs: Press "Start /c" once ^ 1 min: Press...-Start Press "Start /c" to reprogram the time. Three times are stored in the "Start" button, use the "Time selector" (max. 15 minutes) to begin the microwave operating at maximum power.
... time. When the "Start /c" button is turned. Reprogramming the set times: ^ Press "Start /c" to select the time you to be reset. 20 System lock The microwave can be locked to reprogram (press 1, 2 or 3 times), and hold in the "Start /c" button. ^ While holding in memory: ^ 30 secs: Press "Start /c" once ^ 1 min: Press...-Start Press "Start /c" to reprogram the time. Three times are stored in the "Start" button, use the "Time selector" (max. 15 minutes) to begin the microwave operating at maximum power.
