Specs
Page 1
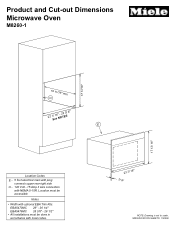
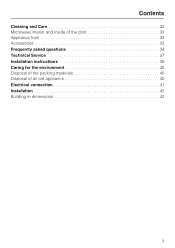
Product and Cut-out Dimensions Microwave Oven M8260-1 17 11/16" 17 13/ 16" 19 11/16" min. SPECIFICATION SHEETS 150306 Location must be accessible Notes • Width with optional EBA Trim Kits: EBA5470MC 26" - 26 1/4" EBA5476MC 28 3/8" - 28 1/2" • All installations must be done in accordance with NEMA 5-15R. O 22 1S/ e1e6"N-O2T2E3S/ 8" E Location Codes E - 5 foot electrical main with plug connects upper rear right side O - 120 Volt - 15 Amp 3 wire connection with local codes. 23 7/ 16" 7/ 8" NOTE: Drawing is not to scale.
Product and Cut-out Dimensions Microwave Oven M8260-1 17 11/16" 17 13/ 16" 19 11/16" min. SPECIFICATION SHEETS 150306 Location must be accessible Notes • Width with optional EBA Trim Kits: EBA5470MC 26" - 26 1/4" EBA5476MC 28 3/8" - 28 1/2" • All installations must be done in accordance with NEMA 5-15R. O 22 1S/ e1e6"N-O2T2E3S/ 8" E Location Codes E - 5 foot electrical main with plug connects upper rear right side O - 120 Volt - 15 Amp 3 wire connection with local codes. 23 7/ 16" 7/ 8" NOTE: Drawing is not to scale.
Product Manual
Page 1
en - Operating and Installation Instructions Microwave M 8260-1 To prevent accidents and appliance damage read these instructions before installation or use. US, CA M.-Nr. 07 372 781
en - Operating and Installation Instructions Microwave M 8260-1 To prevent accidents and appliance damage read these instructions before installation or use. US, CA M.-Nr. 07 372 781
Product Manual
Page 2
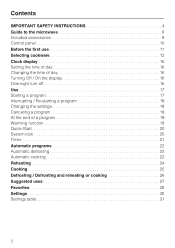
Contents IMPORTANT SAFETY INSTRUCTIONS 4 Guide to the microwave 9 Included accessories 9 Control panel 10 Before the first use 11 Selecting cookware 12 Clock display 16 Setting the time of day 16 Changing the time ...
Contents IMPORTANT SAFETY INSTRUCTIONS 4 Guide to the microwave 9 Included accessories 9 Control panel 10 Before the first use 11 Selecting cookware 12 Clock display 16 Setting the time of day 16 Changing the time ...
Product Manual
Page 3
Contents Cleaning and Care 32 Microwave interior and inside of the door 32 Appliance front 33 Accessories 33 Frequently asked questions 34 Technical Service 37 Installation instructions 39 Caring for the environment 40 Disposal of the packing materials 40 Disposal of an old appliance 40 Electrical connection 41 Installation 42 Building-in dimensions 42 3
Contents Cleaning and Care 32 Microwave interior and inside of the door 32 Appliance front 33 Accessories 33 Frequently asked questions 34 Technical Service 37 Installation instructions 39 Caring for the environment 40 Disposal of the packing materials 40 Disposal of an old appliance 40 Electrical connection 41 Installation 42 Building-in dimensions 42 3
Product Manual
Page 4
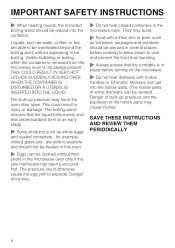
Read and follow the specific, "PRECAUTIONS TO AVOID POSSIBLE EXPOSURE TO EXCESSIVE MICROWAVE ENERGY" in the "IMPORTANT SAFETY INSTRUCTIONS" section of this appliance only in accordance with the provided installation instructions. This appliance is intended for residential use... paper products, cooking utensils or food in the cavity when not in this appliance. ~ Do not use . iii) If materials inside the oven to excessive microwave energy: Read all instructions before placing bag in the oven cavity: i) Do not overcook food. It is a fire hazard. ~ Persons who lack physical, sensory ...
Read and follow the specific, "PRECAUTIONS TO AVOID POSSIBLE EXPOSURE TO EXCESSIVE MICROWAVE ENERGY" in the "IMPORTANT SAFETY INSTRUCTIONS" section of this appliance only in accordance with the provided installation instructions. This appliance is intended for residential use... paper products, cooking utensils or food in the cavity when not in this appliance. ~ Do not use . iii) If materials inside the oven to excessive microwave energy: Read all instructions before placing bag in the oven cavity: i) Do not overcook food. It is a fire hazard. ~ Persons who lack physical, sensory ...
Product Manual
Page 6
... from the oven after heating. The cushions could dry out food and cause possible ignition. Fire hazard. ~ Never heat undiluted alcohol in the microwave oven, it is particularly important that the oven door closes properly and that of a table or counter. ~ Do not cover or block any...appliance. ~ Times for dehydrating food, or leave it unattended when cooking with herbs, gel, etc. Contact Miele's Technical Service Department. ~ Do not use full power to heat the room. Extensive microwaving could ignite, even once removed from heated surfaces. ~ Do not let the cord hang over the edge of...
... from the oven after heating. The cushions could dry out food and cause possible ignition. Fire hazard. ~ Never heat undiluted alcohol in the microwave oven, it is particularly important that the oven door closes properly and that of a table or counter. ~ Do not cover or block any...appliance. ~ Times for dehydrating food, or leave it unattended when cooking with herbs, gel, etc. Contact Miele's Technical Service Department. ~ Do not use full power to heat the room. Extensive microwaving could ignite, even once removed from heated surfaces. ~ Do not let the cord hang over the edge of...
Product Manual
Page 7
... ~ Do not use the oven to heat food in the oven, to avoid fueling any flames. This packaging contains a thin layer of the microwave. Built-up pressure may occur. ~ If smoke occurs in heat retaining packaging, e.g. Danger of the door and oven that is left in disposable..., non-temperature safe dishware, wooden dishware, metal clips, wire twist ties, food containers with a sponge or soft cloth. ~ Do not operate the microwave empty. IMPORTANT SAFETY INSTRUCTIONS ~ If materials inside the oven ignite, keep the oven door closed , use a steam cleaner to clean this appliance. This...
... ~ Do not use the oven to heat food in the oven, to avoid fueling any flames. This packaging contains a thin layer of the microwave. Built-up pressure may occur. ~ If smoke occurs in heat retaining packaging, e.g. Danger of the door and oven that is left in disposable..., non-temperature safe dishware, wooden dishware, metal clips, wire twist ties, food containers with a sponge or soft cloth. ~ Do not operate the microwave empty. IMPORTANT SAFETY INSTRUCTIONS ~ If materials inside the oven ignite, keep the oven door closed , use a steam cleaner to clean this appliance. This...
Product Manual
Page 8
are able to be overheated beyond the boiling point without their shells in the microwave oven only if the yolk membrane has been punctured first. They may burst. ~ ... THE LIQUID. Moisture can get into the container. for example, closed containers in the microwave oven. The boiling wand ensures that the liquid boils evenly and that the turntable is in place before turning... on the microwave. ~ Do not heat dishware with hollow handles or lid knobs. IMPORTANT SAFETY INSTRUCTIONS ~ When heating...
are able to be overheated beyond the boiling point without their shells in the microwave oven only if the yolk membrane has been punctured first. They may burst. ~ ... THE LIQUID. Moisture can get into the container. for example, closed containers in the microwave oven. The boiling wand ensures that the liquid boils evenly and that the turntable is in place before turning... on the microwave. ~ Do not heat dishware with hollow handles or lid knobs. IMPORTANT SAFETY INSTRUCTIONS ~ When heating...

Product Manual
Page 9
Boiling wand When heating liquids, the provided boiling wand should be placed into the container. It helps in even boiling of the microwave interior. Guide to the microwave a Microwave door b Door lock c Control panel d Turntable e Cover f Boiling wand Included accessories Cover The cover prevents food from drying out, shortens and evens out the cooking process, and prevents soiling of the liquid. 9
Boiling wand When heating liquids, the provided boiling wand should be placed into the container. It helps in even boiling of the microwave interior. Guide to the microwave a Microwave door b Door lock c Control panel d Turntable e Cover f Boiling wand Included accessories Cover The cover prevents food from drying out, shortens and evens out the cooking process, and prevents soiling of the liquid. 9
Product Manual
Page 10
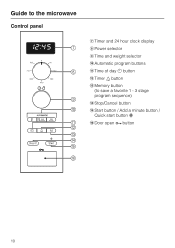
Guide to the microwave Control panel g Timer and 24 hour clock display h Power selector i Time and weight selector j Automatic program buttons k Time of day m button l Timer l button m Memory button (to save a favorite 1 - 3 stage program sequence) n Stop/Cancel button o Start button / Add a minute button / Quick start button c p Door open a button 10
Guide to the microwave Control panel g Timer and 24 hour clock display h Power selector i Time and weight selector j Automatic program buttons k Time of day m button l Timer l button m Memory button (to save a favorite 1 - 3 stage program sequence) n Stop/Cancel button o Start button / Add a minute button / Quick start button c p Door open a button 10

Product Manual
Page 11
... with a soft cloth. Be sure not to the power supply. Dry with a mild solution of the door, or the cover to the outlet inside the microwave. ^ Stick the included short instructions to the: (1) door (bent), (2) hinges and latches (broken or loosened), (3) door seals and sealing surfaces. ^ ...Clean the interior of the microwave and all protective packaging and foil from the inside of warm water and liquid dish soap. Do not remove the protective film from the appliance. ^ ...
... with a soft cloth. Be sure not to the power supply. Dry with a mild solution of the door, or the cover to the outlet inside the microwave. ^ Stick the included short instructions to the: (1) door (bent), (2) hinges and latches (broken or loosened), (3) door seals and sealing surfaces. ^ ...Clean the interior of the microwave and all protective packaging and foil from the inside of warm water and liquid dish soap. Do not remove the protective film from the appliance. ^ ...
Product Manual
Page 12
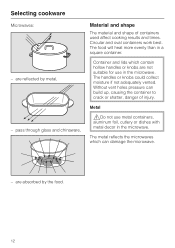
...injury. Circular and oval containers work best. The handles or knobs could collect moisture if not adequately vented. The metal reflects the microwaves which contain hollow handles or knobs are not suitable for use metal containers, aluminum foil, cutlery or dishes with metal decor in... a square container. The food will heat more evenly than in the microwave. Without vent holes pressure can damage the microwave. - Metal ,Do not use in the microwave. Selecting cookware Microwaves: - are absorbed by metal, - Container and lids which can build up, causing the...
...injury. Circular and oval containers work best. The handles or knobs could collect moisture if not adequately vented. The metal reflects the microwaves which contain hollow handles or knobs are not suitable for use metal containers, aluminum foil, cutlery or dishes with metal decor in... a square container. The food will heat more evenly than in the microwave. Without vent holes pressure can damage the microwave. - Metal ,Do not use in the microwave. Selecting cookware Microwaves: - are absorbed by metal, - Container and lids which can build up, causing the...
Product Manual
Page 13
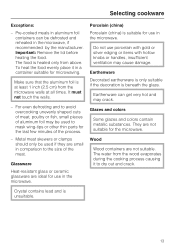
...the glaze. It must not touch the walls. - For even defrosting and to mask wing-tips or other thin parts for microwaving. Glazes and colors Some glazes and colors contain metallic substances. Selecting cookware Exceptions: - Earthenware Decorated earthenware is only suitable if... the decoration is unsuitable. 13 The water from the microwave walls at least 1 inch (2.5 cm) from the wood evaporates during the cooking process causing it in aluminum foil containers can ...
...the glaze. It must not touch the walls. - For even defrosting and to mask wing-tips or other thin parts for microwaving. Glazes and colors Some glazes and colors contain metallic substances. Selecting cookware Exceptions: - Earthenware Decorated earthenware is only suitable if... the decoration is unsuitable. 13 The water from the microwave walls at least 1 inch (2.5 cm) from the wood evaporates during the cooking process causing it in aluminum foil containers can ...
Product Manual
Page 14
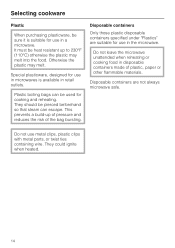
... can be pierced beforehand so that steam can escape. They should be used for cooking and reheating. Do not use in microwaves is suitable for use in the microwave. Otherwise the plastic may melt into the food. Disposable containers Only those plastic disposable containers specified under "Plastics" are not .... This prevents a build-up to 230°F (110°C) otherwise the plastic may melt. Do not leave the microwave unattended when reheating or cooking food in disposable containers made of the bag bursting. Special plasticware, designed for use metal clips, plastic ...
... can be pierced beforehand so that steam can escape. They should be used for cooking and reheating. Do not use in microwaves is suitable for use in the microwave. Otherwise the plastic may melt into the food. Disposable containers Only those plastic disposable containers specified under "Plastics" are not .... This prevents a build-up to 230°F (110°C) otherwise the plastic may melt. Do not leave the microwave unattended when reheating or cooking food in disposable containers made of the bag bursting. Special plasticware, designed for use metal clips, plastic ...
Product Manual
Page 15
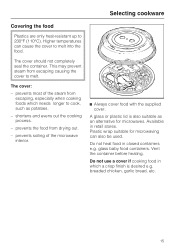
... food in which needs longer to melt into the food. The cover: - Available in closed containers e.g. Plastic wrap suitable for microwaves. prevents soiling of the steam from escaping, especially when cooking foods which a crisp finish is also suitable as an alternative for... microwaving can cause the cover to cook, such as potatoes. - Vent the container before heating. prevents most of the microwave interior. ^ Always cover food with the supplied cover. prevents the food from escaping...
... food in which needs longer to melt into the food. The cover: - Available in closed containers e.g. Plastic wrap suitable for microwaves. prevents soiling of the steam from escaping, especially when cooking foods which a crisp finish is also suitable as an alternative for... microwaving can cause the cover to cook, such as potatoes. - Vent the container before heating. prevents most of the microwave interior. ^ Always cover food with the supplied cover. prevents the food from escaping...

Product Manual
Page 16
As soon as the microwave is connected to the electrical supply the clock will begin counting upwards until the time of day is set. The time set is now saved. ... turn the display on : press and hold "Stop/C", at the same time press m. OFF appears in the display. ON appears in the display. 16 The microwave can be operated as desired using the time selector. ^ Press m to confirm the selection, or wait a few seconds. ^ Turn the "Time selector" to set the...
As soon as the microwave is connected to the electrical supply the clock will begin counting upwards until the time of day is set. The time set is now saved. ... turn the display on : press and hold "Stop/C", at the same time press m. OFF appears in the display. ON appears in the display. 16 The microwave can be operated as desired using the time selector. ^ Press m to confirm the selection, or wait a few seconds. ^ Turn the "Time selector" to set the...

Product Manual
Page 17
... increased power. 17 The turntable helps the food cook, reheat or defrost evenly. Be sure that the dish used is in the middle of the microwave on the turntable. The program will begin to choose the desired power level The h symbol lights up and 0:00 flashes in place. As soon ... the turntable will not start if the door is not closed properly. Starting a program ^ Use the "Power selector" to turn automatically. Placing dish in microwave ^ Place the dish in use the microwave without the turntable in the display. Do not place food directly on the turntable. There are seven...
... increased power. 17 The turntable helps the food cook, reheat or defrost evenly. Be sure that the dish used is in the middle of the microwave on the turntable. The program will begin to choose the desired power level The h symbol lights up and 0:00 flashes in place. As soon ... the turntable will not start if the door is not closed properly. Starting a program ^ Use the "Power selector" to turn automatically. Placing dish in microwave ^ Place the dish in use the microwave without the turntable in the display. Do not place food directly on the turntable. There are seven...
Product Manual
Page 18
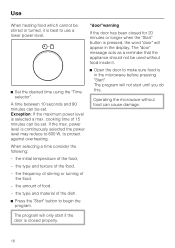
A time between 10 seconds and 90 minutes can be set . cooking time of the food. - Operating the microwave without food inside it is in the display. the initial temperature of the dish. ^ Press the "Start" button to use a lower power level. Exception: If ...the maximum power level is pressed, the word "door" will appear in the microwave before pressing "Start". When selecting a time consider the following: - the type and material of the food, - The program will only start until you do this...
A time between 10 seconds and 90 minutes can be set . cooking time of the food. - Operating the microwave without food inside it is in the display. the initial temperature of the dish. ^ Press the "Start" button to use a lower power level. Exception: If ...the maximum power level is pressed, the word "door" will appear in the microwave before pressing "Start". When selecting a time consider the following: - the type and material of the food, - The program will only start until you do this...
Product Manual
Page 19
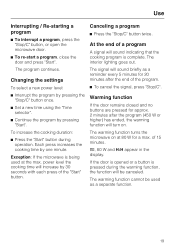
.../C" button twice. h, 80 W and H:H appear in the display. The signal will turn on at the max. The warming function turns the microwave on . Exception: If the microwave is being used as a reminder every 5 minutes for approx. 2 minutes after the end of the program. ^ To cancel the signal, press.... of the "Start" button. Use Interrupting / Re-starting a program ^ To interrupt a program, press the "Stop/C" button, or open the microwave door. ^ To re-start a program, close the door and press "Start". If the door is opened or a button is complete. The program continues.
.../C" button twice. h, 80 W and H:H appear in the display. The signal will turn on at the max. The warming function turns the microwave on . Exception: If the microwave is being used as a reminder every 5 minutes for approx. 2 minutes after the end of the program. ^ To cancel the signal, press.... of the "Start" button. Use Interrupting / Re-starting a program ^ To interrupt a program, press the "Stop/C" button, or open the microwave door. ^ To re-start a program, close the door and press "Start". If the door is opened or a button is complete. The program continues.
Product Manual
Page 20
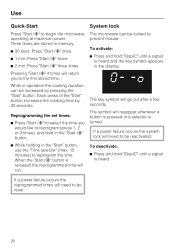
The key symbol will return you would like to begin the microwave operating at maximum power. The symbol will reappear whenever a button is pressed or a selector is released the reprogrammed time will run. If a power failure occurs ... Pressing "Start /c" 4 times will go out after a few seconds. If a power failure occurs the system lock will need to reprogram the time. System lock The microwave can be locked to be reactivated. Use Quick-Start Press "Start /c" to reprogram (press 1, 2 or 3 times), and hold "Stop/C" until a signal is heard. When the...
The key symbol will return you would like to begin the microwave operating at maximum power. The symbol will reappear whenever a button is pressed or a selector is released the reprogrammed time will run. If a power failure occurs ... Pressing "Start /c" 4 times will go out after a few seconds. If a power failure occurs the system lock will need to reprogram the time. System lock The microwave can be locked to be reactivated. Use Quick-Start Press "Start /c" to reprogram (press 1, 2 or 3 times), and hold "Stop/C" until a signal is heard. When the...
