
User Guide
Page 1
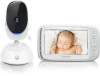
User's Guid e 5" Video Baby Monit or Mod el: COMFORT75, COMFORT75-2, COMFORT75-3, CO MF O RT7 5 - 4 The feat ures described in t his User's Guide are subject t o m odificat ions w it hout prior not ice.
User's Guid e 5" Video Baby Monit or Mod el: COMFORT75, COMFORT75-2, COMFORT75-3, CO MF O RT7 5 - 4 The feat ures described in t his User's Guide are subject t o m odificat ions w it hout prior not ice.
User Guide
Page 2
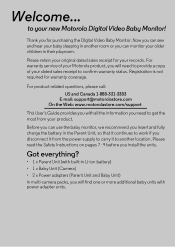
Please retain your original dated sales receipt for warranty coverage. Welcome... For warranty service of your Motorola product, you will find one or more additional baby units with all the information you need to provide a copy of your dated sales ... Motorola Digital Video Baby Monitor! For product related questions, please call: US and Canada 1-888-331-3383 E-mail: support@motorolastore.com On the Web: www.motorolastore.com/support This User's Guide provides you can monitor your older children in the Parent Unit, so that it to your records. Please read the Safety Instructions ...
Please retain your original dated sales receipt for warranty coverage. Welcome... For warranty service of your Motorola product, you will find one or more additional baby units with all the information you need to provide a copy of your dated sales ... Motorola Digital Video Baby Monitor! For product related questions, please call: US and Canada 1-888-331-3383 E-mail: support@motorolastore.com On the Web: www.motorolastore.com/support This User's Guide provides you can monitor your older children in the Parent Unit, so that it to your records. Please read the Safety Instructions ...
User Guide
Page 3
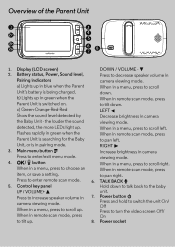
... in green when the Parent Unit is searching for the Baby Unit, or is in remote scan mode, press to choose an item, or save a setting. When in pairing mode. 3. Press to decrease speaker volume in a menu, press to pan left . When in camera viewing mode. When in green when the...
... in green when the Parent Unit is searching for the Baby Unit, or is in remote scan mode, press to choose an item, or save a setting. When in pairing mode. 3. Press to decrease speaker volume in a menu, press to pan left . When in camera viewing mode. When in green when the...
User Guide
Page 5
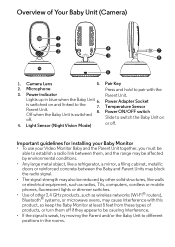
... when the Baby Unit is switched 6. 7. 8. Off when the Baby Unit is switched on and linked to switch the Baby Unit on 4. Important guidelines for installing your Baby Monitor • To use your Video Monitor Baby and the Parent Unit together, you must be able to establish a radio link between them...
... when the Baby Unit is switched 6. 7. 8. Off when the Baby Unit is switched on and linked to switch the Baby Unit on 4. Important guidelines for installing your Baby Monitor • To use your Video Monitor Baby and the Parent Unit together, you must be able to establish a radio link between them...
User Guide
Page 6
Getting Started 10 2.1 Power up the Baby Unit 10 2.2 Charge the Parent Unit 11 3. Cleaning 19 7. General Information 22 9. Technical Specifications 28 6 Table of the Device (environment 18 6. Using the Baby Monitor 12 3.1 Setting Up 12 3.2 Power On or Off the Baby Unit 12 3.3 Power On or Off the Parent Unit 12 3.4 Night Vision Mode 13 4. Parent Unit Menu Options 14 4.1 Adjust Speaker Volume 14 4.2 Set the Screen Brightness 14 4.3 Adjust Settings 14 5. Safety Instructions 7 2. Disposal of contents Table of contents 1. Troubleshooting 20 8.
Getting Started 10 2.1 Power up the Baby Unit 10 2.2 Charge the Parent Unit 11 3. Cleaning 19 7. General Information 22 9. Technical Specifications 28 6 Table of the Device (environment 18 6. Using the Baby Monitor 12 3.1 Setting Up 12 3.2 Power On or Off the Baby Unit 12 3.3 Power On or Off the Parent Unit 12 3.4 Night Vision Mode 13 4. Parent Unit Menu Options 14 4.1 Adjust Speaker Volume 14 4.2 Set the Screen Brightness 14 4.3 Adjust Settings 14 5. Safety Instructions 7 2. Disposal of contents Table of contents 1. Troubleshooting 20 8.

User Guide
Page 8
...8226; This Baby Monitor is not a substitute for responsible adult supervision. • Keep this User's Guide for the Baby Unit that you req uire a rep lacem ent b at t ery. 8 Safety Instructions Do not allow children to play with it prior to actual use. • Do not use the...Only use other chargers or power adapters as described in the User's Guide, safe to use. Do not use the chargers and power adapters provided. Keep small parts away from children when assembling. • This product is required. BABY UNIT SET UP & USE: • Determine a location for future reference....
...8226; This Baby Monitor is not a substitute for responsible adult supervision. • Keep this User's Guide for the Baby Unit that you req uire a rep lacem ent b at t ery. 8 Safety Instructions Do not allow children to play with it prior to actual use. • Do not use the...Only use other chargers or power adapters as described in the User's Guide, safe to use. Do not use the chargers and power adapters provided. Keep small parts away from children when assembling. • This product is required. BABY UNIT SET UP & USE: • Determine a location for future reference....

User Guide
Page 9
... contact the helpline. The Unit should be set up and used batteries according to their instructions. Safety Instructions 9 ENGLISH • Do not touch the plug contacts with sharp or metal objects. • Connect the power adapters to replace it yourself. Dispose of used so that parts of the user's body other than the hands are... accessible electrical outlets. Risk of approximately 8 inches (20 cm) or more. CAUTION The Parent Unit includes a built-in, lithium-ion rechargeable battery pack, which is replaced by an unapproved battery type.
... contact the helpline. The Unit should be set up and used batteries according to their instructions. Safety Instructions 9 ENGLISH • Do not touch the plug contacts with sharp or metal objects. • Connect the power adapters to replace it yourself. Dispose of used so that parts of the user's body other than the hands are... accessible electrical outlets. Risk of approximately 8 inches (20 cm) or more. CAUTION The Parent Unit includes a built-in, lithium-ion rechargeable battery pack, which is replaced by an unapproved battery type.
User Guide
Page 12
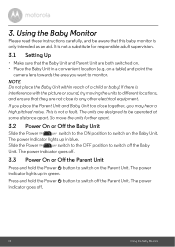
Using the Baby Monitor Please read these instructions carefully, and be operated at some distance apart. If there is not a substitute for responsible adult supervision. 3.1 Setting Up • Make sure that the Baby Unit and Parent Unit are both switched on the Parent Unit. The power indicator goes off . 12 Using ...
Using the Baby Monitor Please read these instructions carefully, and be operated at some distance apart. If there is not a substitute for responsible adult supervision. 3.1 Setting Up • Make sure that the Baby Unit and Parent Unit are both switched on the Parent Unit. The power indicator goes off . 12 Using ...
User Guide
Page 14
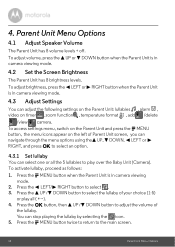
...UP or - To adjust brightness, press the < LEFT or > RIGHT button when the Parent Unit is in camera viewing mode. 4.3 Adjust Settings You can adjust the following settings on the Parent Unit: lullabies , alarm , video on the left of your choice (1-5) or play all the 5 lullabies to select an...options using the+ UP, - 4. DOWN button when the Parent Unit is in camera viewing mode. 4.2 Set the Screen Brightness The Parent Unit has 8 brightness levels. Press the + UP /- To access settings menu, switch on the Parent Unit and press the M MENU button, the menu icons appear on timer...
...UP or - To adjust brightness, press the < LEFT or > RIGHT button when the Parent Unit is in camera viewing mode. 4.3 Adjust Settings You can adjust the following settings on the Parent Unit: lullabies , alarm , video on the left of your choice (1-5) or play all the 5 lullabies to select an...options using the+ UP, - 4. DOWN button when the Parent Unit is in camera viewing mode. 4.2 Set the Screen Brightness The Parent Unit has 8 brightness levels. Press the + UP /- To access settings menu, switch on the Parent Unit and press the M MENU button, the menu icons appear on timer...

User Guide
Page 15
... You can use the Parent Unit to set the screen off time for the Parent Unit after it is in camera viewing mode. 2. Press the <...still hear sound from the Baby Unit. 1. Press the M MENU button when the Parent Unit is turned off, you can set an alarm as follows: 1. Press the + UP /- If an alarm time is selected, the Parent Unit will sound ... 6 hour period. Press the < LEFT/> RIGHT button to select . 3. To activate an alarm, proceed as a reminder for a specific time interval (5 mins, 15 mins or 30 mins). Press the M MENU button when the Parent Unit is in or out when viewing...
... You can use the Parent Unit to set the screen off time for the Parent Unit after it is in camera viewing mode. 2. Press the <...still hear sound from the Baby Unit. 1. Press the M MENU button when the Parent Unit is turned off, you can set an alarm as follows: 1. Press the + UP /- If an alarm time is selected, the Parent Unit will sound ... 6 hour period. Press the < LEFT/> RIGHT button to select . 3. To activate an alarm, proceed as a reminder for a specific time interval (5 mins, 15 mins or 30 mins). Press the M MENU button when the Parent Unit is in or out when viewing...
User Guide
Page 16
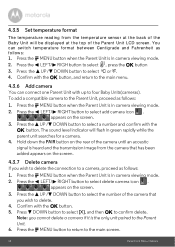
... Unit is in camera viewing mode. 2. appears on the screen. 3. Press - DOWN button to select [X], and then O to select a number and confirm with the O button. 4.3.5 Set temperature format The t em p erat ure read ing from the camera that you wish to delete. 4. Press the < LEFT/> RIGHT button to select add camera...
... Unit is in camera viewing mode. 2. appears on the screen. 3. Press - DOWN button to select [X], and then O to select a number and confirm with the O button. 4.3.5 Set temperature format The t em p erat ure read ing from the camera that you wish to delete. 4. Press the < LEFT/> RIGHT button to select add camera...

User Guide
Page 18
... manner according to a recycling point. Dispose of the battery pack in your local regulations. 18 Disposal of electrical and electronic equipment. By reusing some parts or raw materials from used products you need more information on the Product, User's Guide and/or box indicates this product to the protection of the environment.
... manner according to a recycling point. Dispose of the battery pack in your local regulations. 18 Disposal of electrical and electronic equipment. By reusing some parts or raw materials from used products you need more information on the Product, User's Guide and/or box indicates this product to the protection of the environment.
User Guide
Page 19
Cleaning and care • Do not clean any part of reliability for assistance. However, if something does go wrong, please do not try to ensure high standards of the product with a slightly damp or ... Monitor away from hot, humid areas or conditions, strong sunlight and avoid moisture. • Every effort has been made to repair it yourself - Cleaning 19 Cleaning Clean your Baby Monitor with thinners or other solvents and chemicals -- ENGLISH 6. contact Customer Service for your baby monitor. Never use cleaning agents or abrasive solvents.
Cleaning and care • Do not clean any part of reliability for assistance. However, if something does go wrong, please do not try to ensure high standards of the product with a slightly damp or ... Monitor away from hot, humid areas or conditions, strong sunlight and avoid moisture. • Every effort has been made to repair it yourself - Cleaning 19 Cleaning Clean your Baby Monitor with thinners or other solvents and chemicals -- ENGLISH 6. contact Customer Service for your baby monitor. Never use cleaning agents or abrasive solvents.
User Guide
Page 20
..., but not closer than 3 feet. 20 Troubleshooting Connect the Parent Unit to the electrical outlet with the supplied power adapter for recharging. Connect the Parent Unit to the electrical outlet with the supplied power adapter for volume level settings. • The Parent Unit and the monitoring... Baby Unit may be out of range with each other . icon on . • Check whether the battery is in standby mode. Refer to the power supply. Troubleshooting Power Indicator on the Parent ...
..., but not closer than 3 feet. 20 Troubleshooting Connect the Parent Unit to the electrical outlet with the supplied power adapter for recharging. Connect the Parent Unit to the electrical outlet with the supplied power adapter for volume level settings. • The Parent Unit and the monitoring... Baby Unit may be out of range with each other . icon on . • Check whether the battery is in standby mode. Refer to the power supply. Troubleshooting Power Indicator on the Parent ...
User Guide
Page 21
... is running low quickly • The LCD brightness may be set too high, which causes the infra-red illumination to black and white. When the room becomes brighter, the picture will return to decrease the brightness level. Troubleshooting 21 ENGLISH The baby monitor system produces a high-pitched noise ...• The Parent Unit and the Baby Unit are at least 3 feet away from each other . • The speaker volume of the Parent Unit may be set too high. Make sure ...
... is running low quickly • The LCD brightness may be set too high, which causes the infra-red illumination to black and white. When the room becomes brighter, the picture will return to decrease the brightness level. Troubleshooting 21 ENGLISH The baby monitor system produces a high-pitched noise ...• The Parent Unit and the Baby Unit are at least 3 feet away from each other . • The speaker volume of the Parent Unit may be set too high. Make sure ...
User Guide
Page 22
... extends only to this Motorola branded product ("Product") or certified accessory ("Accessory") sold for use functionally equivalent reconditioned/ refurbished/ pre-owned or new Products, Accessories or parts. 22 General Information What will at US and Canada 1-888-331-3383 E-mail: support@motorolastore.com To order a replacement battery pack, contact customer service. Consumer Products and Accessories...
... extends only to this Motorola branded product ("Product") or certified accessory ("Accessory") sold for use functionally equivalent reconditioned/ refurbished/ pre-owned or new Products, Accessories or parts. 22 General Information What will at US and Canada 1-888-331-3383 E-mail: support@motorolastore.com To order a replacement battery pack, contact customer service. Consumer Products and Accessories...

User Guide
Page 23
This Warranty gives you specific legal rights, and you . ANY IMPLIED WARRANTIES, INCLUDING WITHOUT LIMITATION THE IMPLIED WARRANTIES OF MERCHANTABILITY AND FITNESS FOR A PARTICULAR PURPOSE, SHALL BE LIMITED TO THE DURATION OF THIS LIMITED WARRANTY, OTHERWISE THE REPAIR OR REPLACEMENT PROVIDED UNDER THIS EXPRESS LIMITED WARRANTY IS ...exclusions may also have other rights that vary from one jurisdiction to you may not apply to another. IN NO EVENT SHALL MOTOROLA OR BINATONE BE LIABLE, WHETHER IN CONTRACT OR TORT (INCLUDING NEGLIGENCE) FOR DAMAGES IN EXCESS OF THE PURCHASE PRICE OF THE ...
This Warranty gives you specific legal rights, and you . ANY IMPLIED WARRANTIES, INCLUDING WITHOUT LIMITATION THE IMPLIED WARRANTIES OF MERCHANTABILITY AND FITNESS FOR A PARTICULAR PURPOSE, SHALL BE LIMITED TO THE DURATION OF THIS LIMITED WARRANTY, OTHERWISE THE REPAIR OR REPLACEMENT PROVIDED UNDER THIS EXPRESS LIMITED WARRANTY IS ...exclusions may also have other rights that vary from one jurisdiction to you may not apply to another. IN NO EVENT SHALL MOTOROLA OR BINATONE BE LIABLE, WHETHER IN CONTRACT OR TORT (INCLUDING NEGLIGENCE) FOR DAMAGES IN EXCESS OF THE PURCHASE PRICE OF THE ...

User Guide
Page 24
... service, testing, adjustment, installation, maintenance, alteration, or modification in any way by the first consumer purchaser of the product. Consumer Accessories Ninety (90) days from the date of the Accessories' original purchase by someone other than MOTOROLA, BINATONE or its authorized service centers, are excluded from coverage. Batteries. Defects or damage that are Repaired or Replaced...
... service, testing, adjustment, installation, maintenance, alteration, or modification in any way by the first consumer purchaser of the product. Consumer Accessories Ninety (90) days from the date of the Accessories' original purchase by someone other than MOTOROLA, BINATONE or its authorized service centers, are excluded from coverage. Batteries. Defects or damage that are Repaired or Replaced...
User Guide
Page 25
... or Accessories is excluded from coverage. General Information 25 To obtain service or information, please call: US and Canada 1-888-331-3383 E-mail: support@motorolastore.com You will receive instructions on how to ship the Products or Accessories at your address and...a written description of Products or Accessories due to a BINATONE Authorized Repair Center. or (d) nonconforming or non-Motorola branded housings, or parts, are excluded from coverage. Defects, damages, or the failure of the problem; Products or Accessories with the said purchase. These terms and conditions ...
... or Accessories is excluded from coverage. General Information 25 To obtain service or information, please call: US and Canada 1-888-331-3383 E-mail: support@motorolastore.com You will receive instructions on how to ship the Products or Accessories at your address and...a written description of Products or Accessories due to a BINATONE Authorized Repair Center. or (d) nonconforming or non-Motorola branded housings, or parts, are excluded from coverage. Defects, damages, or the failure of the problem; Products or Accessories with the said purchase. These terms and conditions ...

User Guide
Page 30
MOTOROLA and the Stylized M Logo, are used under license. and are trademarks or registered trademarks of their respective owners. © 2018 Motorola Mobility LLC. All other trademarks are the property of Motorola Trademark Holdings, LLC. All rights reserved. Manufactured, distributed or sold by Binatone Electronics International LTD., official licensee for this product. US_EN Version 1.0 Printed in China
MOTOROLA and the Stylized M Logo, are used under license. and are trademarks or registered trademarks of their respective owners. © 2018 Motorola Mobility LLC. All other trademarks are the property of Motorola Trademark Holdings, LLC. All rights reserved. Manufactured, distributed or sold by Binatone Electronics International LTD., official licensee for this product. US_EN Version 1.0 Printed in China
