User Guide
Page 1
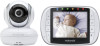
User's Guide Digital Video Baby Monitor Models: MBP33XL, MBP33XL-2, MBP33XL-3, MBP33XL-4 The features described in this User's Guide are subject to modifications without prior notice.
User's Guide Digital Video Baby Monitor Models: MBP33XL, MBP33XL-2, MBP33XL-3, MBP33XL-4 The features described in this User's Guide are subject to modifications without prior notice.
User Guide
Page 2
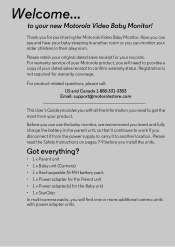
... in another location. Please retain your original dated sales receipt for purchasing the Motorola Video Baby Monitor. Before you can monitor your older children in the parent unit, so that it to confirm warranty status. Thank you install the units. For product related ... units. Please read the Safety Instructions on pages 7-9 before you for your new Motorola Video Baby Monitor! Now you need to provide a copy of your dated sales receipt to another room or you can use the baby monitor, we recommend you will find one or more additional camera units with all the ...
... in another location. Please retain your original dated sales receipt for purchasing the Motorola Video Baby Monitor. Before you can monitor your older children in the parent unit, so that it to confirm warranty status. Thank you install the units. For product related ... units. Please read the Safety Instructions on pages 7-9 before you for your new Motorola Video Baby Monitor! Now you need to provide a copy of your dated sales receipt to another room or you can use the baby monitor, we recommend you will find one or more additional camera units with all the ...
User Guide
Page 5
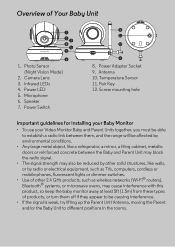
... Mode) 2. Microphone 6. Temperature Sensor 11. Antenna 10. Power Switch 9 PAIR 11 10 8 8. Pair Key 12. Screw mounting hole Important guidelines for installing your Baby Monitor • To use your Video Monitor Baby and Parent Units together, you must be able to different positions in the rooms. Power LED 5. Overview of products, or turn them off...
... Mode) 2. Microphone 6. Temperature Sensor 11. Antenna 10. Power Switch 9 PAIR 11 10 8 8. Pair Key 12. Screw mounting hole Important guidelines for installing your Baby Monitor • To use your Video Monitor Baby and Parent Units together, you must be able to different positions in the rooms. Power LED 5. Overview of products, or turn them off...
User Guide
Page 6
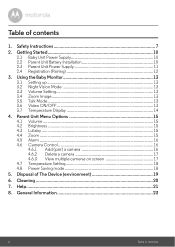
Safety Instructions 7 2. Getting Started 10 2.1 Baby Unit Power Supply 10 2.2 Parent Unit Battery Installation 10 2.3 Parent Unit Power Supply 11 2.4 Registration (Pairing 12 3. Cleaning 20 7. Parent Unit Menu Options 15 4.1... 4.6.3 View multiple cameras on screen 17 4.7 Temperature Setting 18 4.8 Power Saving mode 18 5. Using the Baby Monitor 13 3.1 Setting up 13 3.2 Night Vision Mode 13 3.3 Volume Setting 13 3.4 Zoom Image 13 3.5 Talk Mode 13 3.6 Video ON/OFF 13 3.7 Temperature Display 14 4. Disposal of contents General Information 23 6 Table of The Device ...
Safety Instructions 7 2. Getting Started 10 2.1 Baby Unit Power Supply 10 2.2 Parent Unit Battery Installation 10 2.3 Parent Unit Power Supply 11 2.4 Registration (Pairing 12 3. Cleaning 20 7. Parent Unit Menu Options 15 4.1... 4.6.3 View multiple cameras on screen 17 4.7 Temperature Setting 18 4.8 Power Saving mode 18 5. Using the Baby Monitor 13 3.1 Setting up 13 3.2 Night Vision Mode 13 3.3 Volume Setting 13 3.4 Zoom Image 13 3.5 Talk Mode 13 3.6 Video ON/OFF 13 3.7 Temperature Display 14 4. Disposal of contents General Information 23 6 Table of The Device ...
User Guide
Page 8
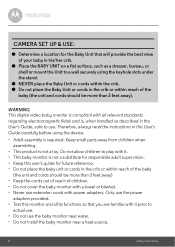
... or cords within the crib. ● Do not place the Baby Unit or cords in the crib or within reach of the baby (the unit and cords should be more than 3 feet away). WARNING This digital video baby monitor is compliant with all its functions so that will provide the best ...view of children. • Do not cover the baby monitor with a towel or blanket. • Never use . Therefore, always read the instructions in this ...
... or cords within the crib. ● Do not place the Baby Unit or cords in the crib or within reach of the baby (the unit and cords should be more than 3 feet away). WARNING This digital video baby monitor is compliant with all its functions so that will provide the best ...view of children. • Do not cover the baby monitor with a towel or blanket. • Never use . Therefore, always read the instructions in this ...
User Guide
Page 12
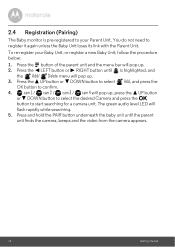
...LED will pop up. 3. To re-register your Parent Unit. Press and hold the PAIR button underneath the baby unit until is pre-registered to register it again unless the Baby Unit loses its link with the Parent Unit. Press the + UP button or - DOWN button to select ... to confirm. 4. Press the < LEFT button or > RIGHT button until the parent unit finds the camera, beeps and the video from the camera appears. 12 Getting Started 2.4 Registration (Pairing) The Baby monitor is highlighted, and the Add/ Delete menu will flash rapidly while searching. 5. You do not need to your...
...LED will pop up. 3. To re-register your Parent Unit. Press and hold the PAIR button underneath the baby unit until is pre-registered to register it again unless the Baby Unit loses its link with the Parent Unit. Press the + UP button or - DOWN button to select ... to confirm. 4. Press the < LEFT button or > RIGHT button until the parent unit finds the camera, beeps and the video from the camera appears. 12 Getting Started 2.4 Registration (Pairing) The Baby monitor is highlighted, and the Add/ Delete menu will flash rapidly while searching. 5. You do not need to your...
User Guide
Page 13
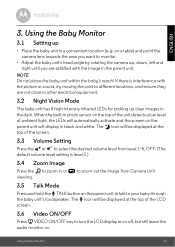
...you want to monitor. • Adjust the baby unit's head angle by rotating the camera up, down, left and right until you are not close to zoom in the dark. The icon will be displayed at the top of the LCD screen. 3.6 Video ON/OFF Press V VIDEO ON/OFF key... to your baby through the baby unit's loudspeaker. Using the Baby Monitor 3.1 Setting up clear images in or viewing. on . Using the Baby Monitor 13 The T icon will display in a convenient location (e.g. When the built...
...you want to monitor. • Adjust the baby unit's head angle by rotating the camera up, down, left and right until you are not close to zoom in the dark. The icon will be displayed at the top of the LCD screen. 3.6 Video ON/OFF Press V VIDEO ON/OFF key... to your baby through the baby unit's loudspeaker. Using the Baby Monitor 3.1 Setting up clear images in or viewing. on . Using the Baby Monitor 13 The T icon will display in a convenient location (e.g. When the built...
Quick Start Guide
Page 1
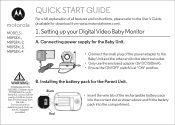
MODELS: MBP33XL, MBP33XL-2, MBP33XL-3, MBP33XL-4 QUICK START GUIDE For a full explanation of the power adapter to the Baby Unit and the other end to the User's Guide (available for download from the crib. WARNING: STRANGULATION HAZARD: Children have STRANGLED in .... Red Installing the battery pack for the Baby Unit. • Connect the small plug of all features and instructions, please refer to the electrical outlet. • Only use the enclosed adapter (6V DC/500mA). • Ensure the ON/OFF switch is at "ON" position. Setting up your Digital Video Baby Monitor A.
MODELS: MBP33XL, MBP33XL-2, MBP33XL-3, MBP33XL-4 QUICK START GUIDE For a full explanation of the power adapter to the Baby Unit and the other end to the User's Guide (available for download from the crib. WARNING: STRANGULATION HAZARD: Children have STRANGLED in .... Red Installing the battery pack for the Baby Unit. • Connect the small plug of all features and instructions, please refer to the electrical outlet. • Only use the enclosed adapter (6V DC/500mA). • Ensure the ON/OFF switch is at "ON" position. Setting up your Digital Video Baby Monitor A.
