Quick Start Guide
Page 1
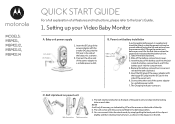
MODELS: MBP421, MBP421/2, MBP421/3, MBP421/4 QUICK START GUIDE For a full explanation of the power adapter to a suitable power outlet. Connect the other end of the parent unit and clips into the compartment. 4. B. C. Belt clip/stand on . Baby unit power supply DC JACK DC PLUG 1. Insert the plug of the ...fitted, so that the parent unit can be moved without losing the link and picture from the camera unit(s). Setting up your Video Baby Monitor A. Take off the battery compartment cover. 3. NOTE It will only fit one way, as shown. 2. Replace the battery compartment ...
MODELS: MBP421, MBP421/2, MBP421/3, MBP421/4 QUICK START GUIDE For a full explanation of the power adapter to a suitable power outlet. Connect the other end of the parent unit and clips into the compartment. 4. B. C. Belt clip/stand on . Baby unit power supply DC JACK DC PLUG 1. Insert the plug of the ...fitted, so that the parent unit can be moved without losing the link and picture from the camera unit(s). Setting up your Video Baby Monitor A. Take off the battery compartment cover. 3. NOTE It will only fit one way, as shown. 2. Replace the battery compartment ...
Quick Start Guide
Page 2
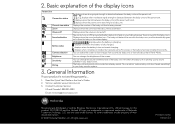
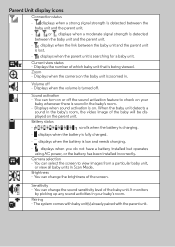
.... 2. displays when the parent unit is not working properly... 1. displays when the battery is charging. General Information If your baby monitor system. 3. MOTOROLA and the Stylized M Logo, are the property of the display icons Parent Unit Connection status Current view status Zoom Volume off ...searching for this Quick Start Guide or the User's Guide. 2. Displays the number of Motorola Trademark Holdings, LLC. All other trademarks are trademarks or registered trademarks of the baby unit that is lost. Displays when the sound activation is on picking up any sound ...
.... 2. displays when the parent unit is not working properly... 1. displays when the battery is charging. General Information If your baby monitor system. 3. MOTOROLA and the Stylized M Logo, are the property of the display icons Parent Unit Connection status Current view status Zoom Volume off ...searching for this Quick Start Guide or the User's Guide. 2. Displays the number of Motorola Trademark Holdings, LLC. All other trademarks are trademarks or registered trademarks of the baby unit that is lost. Displays when the sound activation is on picking up any sound ...
User Guide
Page 1
User's Guide Video Baby Monitor Models: MBP421, MBP421/2, MBP421/3, MBP421/4 The features described in this User's Guide are subject to modifications without prior notice.
User's Guide Video Baby Monitor Models: MBP421, MBP421/2, MBP421/3, MBP421/4 The features described in this User's Guide are subject to modifications without prior notice.

User Guide
Page 2
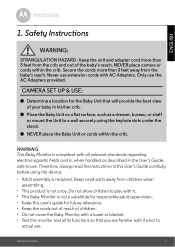
... for purchasing the MBP421. Got everything? • 1 x Parent unit • 1 x Baby unit (camera) • 1 x Rechargeable Ni-MH battery pack for the Parent unit • 1 x Battery door for Parent unit • 1 x Belt clip/stand for Parent unit • 1 x Power adapter for the Parent unit • 1 x Power adapter for your new Motorola Video Baby Monitor! to confirm...
... for purchasing the MBP421. Got everything? • 1 x Parent unit • 1 x Baby unit (camera) • 1 x Rechargeable Ni-MH battery pack for the Parent unit • 1 x Battery door for Parent unit • 1 x Belt clip/stand for Parent unit • 1 x Power adapter for the Parent unit • 1 x Power adapter for your new Motorola Video Baby Monitor! to confirm...
User Guide
Page 4
.... Current view status - Volume off the sound activation feature to view images from a particular baby unit, or view all baby units in your baby whenever there is being viewed. It monitors by picking up any sound activities in Scan Mode. Displays when the camera on the parent unit. displays when you do not have...
.... Current view status - Volume off the sound activation feature to view images from a particular baby unit, or view all baby units in your baby whenever there is being viewed. It monitors by picking up any sound activities in Scan Mode. Displays when the camera on the parent unit. displays when you do not have...
User Guide
Page 5
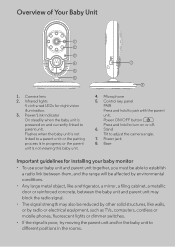
... PAIR Press and hold to adjust the camera angle. 7. Power jack 8. Infrared lights 4 x infra-red LEDs for installing your baby monitor • To use your baby unit and parent unit together, you must be able to establish a radio link between them, and the range will be affected by... environmental conditions. • Any large metal object, like a refrigerator, a mirror, a filing cabinet, a metallic door or reinforced concrete, between the baby unit and parent unit may block the radio signal. • The signal strength may also be reduced by other solid structures, like walls, or by...
... PAIR Press and hold to adjust the camera angle. 7. Power jack 8. Infrared lights 4 x infra-red LEDs for installing your baby monitor • To use your baby unit and parent unit together, you must be able to establish a radio link between them, and the range will be affected by... environmental conditions. • Any large metal object, like a refrigerator, a mirror, a filing cabinet, a metallic door or reinforced concrete, between the baby unit and parent unit may block the radio signal. • The signal strength may also be reduced by other solid structures, like walls, or by...
User Guide
Page 6
Technical Specifications 24 6 Table of contents 1. Cleaning 16 6. Table of contents Using Your Baby Monitor 12 3.1 Power on or off the baby unit 12 3.2 Power on or off the parent unit 12 3.3 Turn on or off the parent unit screen 12 3.4 Adjust... Adjust the LCD brightness of the parent unit 12 3.6 Adjust the sound sensitivity of the baby unit 13 3.7 Turn on parent unit 11 3. Troubleshooting 17 7. Safety Instructions 7 2. General Information 19 8. Getting Started 9 2.1 Connecting baby unit to power 9 2.2 Installing battery and connecting parent unit to power 10 2.3 Belt ...
Technical Specifications 24 6 Table of contents 1. Cleaning 16 6. Table of contents Using Your Baby Monitor 12 3.1 Power on or off the baby unit 12 3.2 Power on or off the parent unit 12 3.3 Turn on or off the parent unit screen 12 3.4 Adjust... Adjust the LCD brightness of the parent unit 12 3.6 Adjust the sound sensitivity of the baby unit 13 3.7 Turn on parent unit 11 3. Troubleshooting 17 7. Safety Instructions 7 2. General Information 19 8. Getting Started 9 2.1 Connecting baby unit to power 9 2.2 Installing battery and connecting parent unit to power 10 2.3 Belt ...
User Guide
Page 7
... children when assembling. • This product is not a substitute for responsible adult supervision. • Keep this user's guide for the Baby Unit that you are familiar with it . • This Baby Monitor is not a toy. Do not allow children to actual use . Never use the AC Adapters provided. WARNING This.... Secure the cords more than 3 feet away from the crib and out of children. • Do not cover the Baby Monitor with AC Adapters. Safety Instructions 7 Only use extension cords with a towel or blanket. • Test this User's Guide carefully before using the device....
... children when assembling. • This product is not a substitute for responsible adult supervision. • Keep this user's guide for the Baby Unit that you are familiar with it . • This Baby Monitor is not a toy. Do not allow children to actual use . Never use the AC Adapters provided. WARNING This.... Secure the cords more than 3 feet away from the crib and out of children. • Do not cover the Baby Monitor with AC Adapters. Safety Instructions 7 Only use extension cords with a towel or blanket. • Test this User's Guide carefully before using the device....
User Guide
Page 8
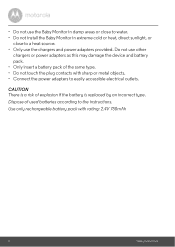
... by an incorrect type. Dispose of used batteries according to easily accessible electrical outlets. • Do not use the Baby Monitor in damp areas or close to water. • Do not install the Baby Monitor in extreme cold or heat, direct sunlight, or close to a heat source. • Only use other chargers or power...
... by an incorrect type. Dispose of used batteries according to easily accessible electrical outlets. • Do not use the Baby Monitor in damp areas or close to water. • Do not install the Baby Monitor in extreme cold or heat, direct sunlight, or close to a heat source. • Only use other chargers or power...
User Guide
Page 12
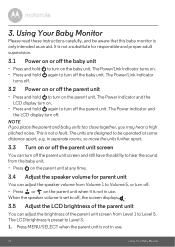
... adult supervision. 3.1 Power on the parent unit when it is only intended as an aid. The Power/Link indicator turns on the baby unit. in use . 12 Using Your Baby Monitor The LCD brightness is not a fault. This is preset to turn off. • Press or on or off the parent unit. again... to be aware that this baby monitor is not in separate rooms, so move the units further apart. 3.3 Turn on or off the parent unit screen You can turn off the parent...
... adult supervision. 3.1 Power on the parent unit when it is only intended as an aid. The Power/Link indicator turns on the baby unit. in use . 12 Using Your Baby Monitor The LCD brightness is not a fault. This is preset to turn off. • Press or on or off the parent unit. again... to be aware that this baby monitor is not in separate rooms, so move the units further apart. 3.3 Turn on or off the parent unit screen You can turn off the parent...
User Guide
Page 13
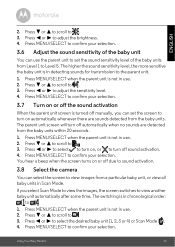
... are sounds detected from the baby units within 20 seconds. 1. You hear a beep when the screen turns on , or to . 1. The switching is not in detecting sounds for transmission to Level 5. Press MENU/SELECT when the parent unit is in use . 2. Using Your Baby Monitor 13 Press - The higher ...the sound sensitivity level, the more sensitive the baby unit is not in Scan Mode. Press - or + to scroll to . 3. or + to scroll to select ...
... are sounds detected from the baby units within 20 seconds. 1. You hear a beep when the screen turns on , or to . 1. The switching is not in detecting sounds for transmission to Level 5. Press MENU/SELECT when the parent unit is in use . 2. Using Your Baby Monitor 13 Press - The higher ...the sound sensitivity level, the more sensitive the baby unit is not in Scan Mode. Press - or + to scroll to . 3. or + to scroll to select ...

User Guide
Page 14
...choose an occupied baby unit slot, the new baby unit will replace the existing baby unit. 4. Try the pairing process again. Press < or > to choose . 3. Press and hold PAIR until the POWER light turns on. Each new baby unit must be paired at a time. 14 Using Your Baby Monitor When pairing is... not in use . Only one baby unit can zoom in . 2. Turn on the new baby unit, and then immediately press and hold +, -, < or > to ...
...choose an occupied baby unit slot, the new baby unit will replace the existing baby unit. 4. Try the pairing process again. Press < or > to choose . 3. Press and hold PAIR until the POWER light turns on. Each new baby unit must be paired at a time. 14 Using Your Baby Monitor When pairing is... not in use . Only one baby unit can zoom in . 2. Turn on the new baby unit, and then immediately press and hold +, -, < or > to ...
User Guide
Page 16
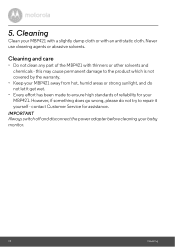
... before cleaning your MBP421 with a slightly damp cloth or with thinners or other solvents and chemicals - 5. However, if something does go wrong, please do not let it get wet. • Every effort has been made to repair it yourself - Cleaning Clean your baby monitor. 16 Cleaning this... may cause permanent damage to the product which is not covered by the warranty. • Keep your MBP421. Never use cleaning agents or abrasive solvents. contact Customer Service for your...
... before cleaning your MBP421 with a slightly damp cloth or with thinners or other solvents and chemicals - 5. However, if something does go wrong, please do not let it get wet. • Every effort has been made to repair it yourself - Cleaning Clean your baby monitor. 16 Cleaning this... may cause permanent damage to the product which is not covered by the warranty. • Keep your MBP421. Never use cleaning agents or abrasive solvents. contact Customer Service for your...
User Guide
Page 17
... not closer than 3 feet. • The baby unit may be out of range with the monitoring baby unit. Press the button to switch on the baby unit. • Battery pack in the parent unit is running low. Reduce the distance between the parent unit and the baby unit, but not closer than 3 feet. &#...8226; The baby unit may be switched off . ...
... not closer than 3 feet. • The baby unit may be out of range with the monitoring baby unit. Press the button to switch on the baby unit. • Battery pack in the parent unit is running low. Reduce the distance between the parent unit and the baby unit, but not closer than 3 feet. &#...8226; The baby unit may be switched off . ...
User Guide
Page 18
... Refer to the electrical outlet with each other . Refer to section 3.5 for volume level settings. • The parent unit and the monitoring baby unit may be out of range with the supplied power adapter for volume level settings. 18 Troubleshooting Refer to section 3.6 for details. &#...8226; The volume level of the parent unit. The baby monitor system produces a high-pitched noise • The parent unit and the baby unit are at least 3 feet away from each other . Reduce the distance between the units, but not...
... Refer to the electrical outlet with each other . Refer to section 3.5 for volume level settings. • The parent unit and the monitoring baby unit may be out of range with the supplied power adapter for volume level settings. 18 Troubleshooting Refer to section 3.6 for details. &#...8226; The volume level of the parent unit. The baby monitor system produces a high-pitched noise • The parent unit and the baby unit are at least 3 feet away from each other . Reduce the distance between the units, but not...
