User Guide
Page 2
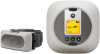
...on page 26 is not required for your original dated sales receipt for purchasing the Motorola WIRELESSFENCE25. Got everything? • 1 x Pet Collar Unit and Nylon Collar Strap • 1 x Wireless Fence Unit • 1 x Power Adapter (For Pet Collar Unit) • 1 x Power Adapter (For Wireless Fence Unit) •...and Ground Plug • 50 x Training Flags • 1 x Test Light for Collar Contacts • 2 Pairs of your dated sales receipt to your records. The purpose of your Motorola product, you for your new WIRELESS FENCE FOR HOME AND TRAVEL Thank you will provide ...
...on page 26 is not required for your original dated sales receipt for purchasing the Motorola WIRELESSFENCE25. Got everything? • 1 x Pet Collar Unit and Nylon Collar Strap • 1 x Wireless Fence Unit • 1 x Power Adapter (For Pet Collar Unit) • 1 x Power Adapter (For Wireless Fence Unit) •...and Ground Plug • 50 x Training Flags • 1 x Test Light for Collar Contacts • 2 Pairs of your dated sales receipt to your records. The purpose of your Motorola product, you for your new WIRELESS FENCE FOR HOME AND TRAVEL Thank you will provide ...

User Guide
Page 3
... battery is powered on and flashes slowly during standby. Lights up in blue when charging. The unit vibrates twice and the indicator LED goes off. 3. Collar Contacts 4. Speaker Press and hold to turn the unit On. Charging/Battery low LED Lights up in green for 3 seconds when the unit is low...
... battery is powered on and flashes slowly during standby. Lights up in blue when charging. The unit vibrates twice and the indicator LED goes off. 3. Collar Contacts 4. Speaker Press and hold to turn the unit On. Charging/Battery low LED Lights up in green for 3 seconds when the unit is low...

User Guide
Page 5
Displays when Fencing mode is emitting static correction (Level 0 to the Pet Collar Unit. Displays when the Pet Collar Unit is activated. Alert indication on the Pet Collar Unit. Battery level on Collar 2 (battery low, out of the Wireless Fence Unit against the Pet Collar Unit. Select to PAIR collar. Battery level on the Wireless Fence Unit RF signal strength of range, etc). Select to REMOVE collar. When 0 is displayed, only tone and vibration alerts are sent to 15). Pet Collar Number. Symbols on the Wireless Fence Unit. Displays when you enter Menu mode.
Displays when Fencing mode is emitting static correction (Level 0 to the Pet Collar Unit. Displays when the Pet Collar Unit is activated. Alert indication on the Pet Collar Unit. Battery level on Collar 2 (battery low, out of the Wireless Fence Unit against the Pet Collar Unit. Select to PAIR collar. Battery level on the Wireless Fence Unit RF signal strength of range, etc). Select to REMOVE collar. When 0 is displayed, only tone and vibration alerts are sent to 15). Pet Collar Number. Symbols on the Wireless Fence Unit. Displays when you enter Menu mode.

User Guide
Page 6
... until it backs away from the boundary zone. If the fit is too tight, it will not be able to get two fingers between the collar strap and your dog. Choose the appropriate length for your dog's neck for signs of irritation. If the fit is too loose, the Pet... as a visual aid for your dog, especially during the training stage. It should not be marked with Training Flags as this might pull the Collar Contacts too tight against your dog's neck. See a veterinarian if the condition persists. If there is completely healed. Important guidelines when using the Wireless Fence ...
... until it backs away from the boundary zone. If the fit is too tight, it will not be able to get two fingers between the collar strap and your dog. Choose the appropriate length for your dog's neck for signs of irritation. If the fit is too loose, the Pet... as a visual aid for your dog, especially during the training stage. It should not be marked with Training Flags as this might pull the Collar Contacts too tight against your dog's neck. See a veterinarian if the condition persists. If there is completely healed. Important guidelines when using the Wireless Fence ...
User Guide
Page 7
...Fence Unit 14 2.5 Attach the Adjustable Strap to the Pet Collar Unit 14 2.6 Charging the Pet Collar Unit 15 2.7 Fit the Pet Collar Unit on your Dog's Neck 16 2.8 Trim Away Excess Strap Length 17 2.9 Change Collar Contacts on your Wireless Fence Unit 23 5.3 Set Static ...32 6.7 Training - DAY 1 27 6.4 Training - DAYS 14 - 21 32 7. DAYS 5 - 7 31 6.6 Training - Using the Pet Collar Unit 20 3.1 Powering On/Off the Pet Collar Unit 20 3.2 Pairing the Pet Collar Unit with the Wireless Fence Unit 20 4. Setting Up an Invisible Boundary Zone 23 5.1 What You'll Need 23...
...Fence Unit 14 2.5 Attach the Adjustable Strap to the Pet Collar Unit 14 2.6 Charging the Pet Collar Unit 15 2.7 Fit the Pet Collar Unit on your Dog's Neck 16 2.8 Trim Away Excess Strap Length 17 2.9 Change Collar Contacts on your Wireless Fence Unit 23 5.3 Set Static ...32 6.7 Training - DAY 1 27 6.4 Training - DAYS 14 - 21 32 7. DAYS 5 - 7 31 6.6 Training - Using the Pet Collar Unit 20 3.1 Powering On/Off the Pet Collar Unit 20 3.2 Pairing the Pet Collar Unit with the Wireless Fence Unit 20 4. Setting Up an Invisible Boundary Zone 23 5.1 What You'll Need 23...

User Guide
Page 9
...guarantee that this User's Guide. Keep your dog on a leash at all times during the training process, until your pet is found on the Pet Collar Unit with a soft damp cloth weekly. Always read the instructions in this product will successfully contain all dogs in all other electrical devices out of...The system is prone to chewing, we strongly recommend you have completely convinced yourself of your dog's neck area daily for signs of the Pet Collar Unit on healthy, non-aggressive dogs when used as a training tool to the infinite number of your dog's neck area and the...
...guarantee that this User's Guide. Keep your dog on a leash at all times during the training process, until your pet is found on the Pet Collar Unit with a soft damp cloth weekly. Always read the instructions in this product will successfully contain all dogs in all other electrical devices out of...The system is prone to chewing, we strongly recommend you have completely convinced yourself of your dog's neck area daily for signs of the Pet Collar Unit on healthy, non-aggressive dogs when used as a training tool to the infinite number of your dog's neck area and the...
User Guide
Page 11
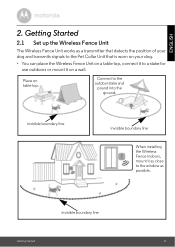
... up the Wireless Fence Unit The Wireless Fence Unit works as a transmitter that detects the position of your dog and transmits signals to the Pet Collar Unit that is worn on your dog. • You can place the Wireless Fence Unit on a table top, connect it to a stake for use outdoors...
... up the Wireless Fence Unit The Wireless Fence Unit works as a transmitter that detects the position of your dog and transmits signals to the Pet Collar Unit that is worn on your dog. • You can place the Wireless Fence Unit on a table top, connect it to a stake for use outdoors...
User Guide
Page 14
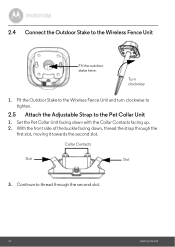
Fit the Outdoor Stake to the Wireless Fence Unit and turn clockwise to tighten. 2.5 Attach the Adjustable Strap to the Wireless Fence Unit Fit the outdoor stake here. Set the Pet Collar Unit facing down , thread the strap through the second slot. 14 Getting Started With the front side of the buckle facing down with the Collar Contacts facing up. 2. 2.4 Connect the Outdoor Stake to the Pet Collar Unit 1. Turn clockwise 1. Collar Contacts Slot Slot 3. Continue to thread through the first slot, moving it towards the second slot.
Fit the Outdoor Stake to the Wireless Fence Unit and turn clockwise to tighten. 2.5 Attach the Adjustable Strap to the Wireless Fence Unit Fit the outdoor stake here. Set the Pet Collar Unit facing down , thread the strap through the second slot. 14 Getting Started With the front side of the buckle facing down with the Collar Contacts facing up. 2. 2.4 Connect the Outdoor Stake to the Pet Collar Unit 1. Turn clockwise 1. Collar Contacts Slot Slot 3. Continue to thread through the first slot, moving it towards the second slot.

User Guide
Page 15
... life, press and hold POWER KEY to 48 hours, depending on how often you use it is low. Getting Started 15 ENGLISH 2.6 Charging the Pet Collar Unit 1. supplied with the product) to indicate charging. The battery pack will flash in red when battery is not in blue to the Pet... Collar Unit and the other end into the electrical outlet. 2. The Power LED will take approximately 5 hours to charge.The average battery life per charge is ...
... life, press and hold POWER KEY to 48 hours, depending on how often you use it is low. Getting Started 15 ENGLISH 2.6 Charging the Pet Collar Unit 1. supplied with the product) to indicate charging. The battery pack will flash in red when battery is not in blue to the Pet... Collar Unit and the other end into the electrical outlet. 2. The Power LED will take approximately 5 hours to charge.The average battery life per charge is ...
User Guide
Page 16
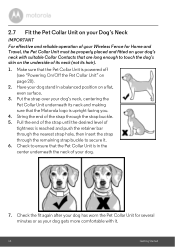
... on a flat, even surface. 3. Have your dog's neck, centering the Pet Collar Unit underneath its hair). 1. Check to ensure that are long enough to secure it . 16 Getting Started Make sure that the Motorola logo is reached and push the retainer bar through the nearest strap hole, then insert... the strap through the strap buckle. 5. 2.7 Fit the Pet Collar Unit on your Dog's Neck IMPORTANT For effective and reliable operation ...
... on a flat, even surface. 3. Have your dog's neck, centering the Pet Collar Unit underneath its hair). 1. Check to ensure that are long enough to secure it . 16 Getting Started Make sure that the Motorola logo is reached and push the retainer bar through the nearest strap hole, then insert... the strap through the strap buckle. 5. 2.7 Fit the Pet Collar Unit on your Dog's Neck IMPORTANT For effective and reliable operation ...

User Guide
Page 17
... want to allow for growth especially when your dog is young or may want to trim away some of your dog's hair where the Pet Collar Unit makes contact with the skin to rotate around the neck. PLEASE USE CAUTION. To seal the end of the excess nylon strap. 1. Remove the... Pet Collar Unit from a candle flame or lighter until the edge melts away. Getting Started 17 It should fit snugly on your dog and trim away excess...
... want to allow for growth especially when your dog is young or may want to trim away some of your dog's hair where the Pet Collar Unit makes contact with the skin to rotate around the neck. PLEASE USE CAUTION. To seal the end of the excess nylon strap. 1. Remove the... Pet Collar Unit from a candle flame or lighter until the edge melts away. Getting Started 17 It should fit snugly on your dog and trim away excess...

User Guide
Page 18
... counter-clockwise to tighten them. 4. Twist clockwise to tighten them . Choose the appropriate length for Home and Travel are Collar Contacts in three different lengths (short, medium and long) that deliver static correction to loosen it. 3. Using your fingers or with the help of the ... clockwise with your fingers to loosen and remove them securely as shown below. Included with your Wireless Fence for your dog. Make sure that the Collar Contacts are securely fastened. If your dog has dense coats or undercoats, use one of the longer...
... counter-clockwise to tighten them. 4. Twist clockwise to tighten them . Choose the appropriate length for Home and Travel are Collar Contacts in three different lengths (short, medium and long) that deliver static correction to loosen it. 3. Using your fingers or with the help of the ... clockwise with your fingers to loosen and remove them securely as shown below. Included with your Wireless Fence for your dog. Make sure that the Collar Contacts are securely fastened. If your dog has dense coats or undercoats, use one of the longer...

User Guide
Page 19
.... 1. The unit vibrates once and the Power LED lights up in green for proper collar fit and that there is powered on the Pet Collar Unit to higher levels. Fit the Test Light Contacts over the Collar Contacts on . ENGLISH 2.10 Using the Test Light IMPORTANT If your dog does not appear to... dog's neck level and walk towards the boundary zone. Press and hold POWER KEY on . If the Test Light does not flash, charge the Pet Collar Unit and re-test. You can use the Test Light that the Wireless Fence Unit is good skin contact where the...
.... 1. The unit vibrates once and the Power LED lights up in green for proper collar fit and that there is powered on the Pet Collar Unit to higher levels. Fit the Test Light Contacts over the Collar Contacts on . ENGLISH 2.10 Using the Test Light IMPORTANT If your dog does not appear to... dog's neck level and walk towards the boundary zone. Press and hold POWER KEY on . If the Test Light does not flash, charge the Pet Collar Unit and re-test. You can use the Test Light that the Wireless Fence Unit is good skin contact where the...

User Guide
Page 20
... do not need to start pairing. Press and hold POWER KEY on the Pet Collar Unit to pair them again, or pair a new Pet Collar Unit, follow the procedures below: 1. To pair them again unless the Pet Collar Unit loses its link with each other once they are already paired. To power off... (see "Powering On/Off the Wireless Fence Unit" on page 21 and "Powering On/Off the Pet Collar Unit" on the Pet Collar Unit. Using the Pet Collar Unit 3.1 Powering On/Off the Pet Collar Unit To power on, press and hold POWER KEY on page 20). 2. The unit vibrates once and the Power...
... do not need to start pairing. Press and hold POWER KEY on the Pet Collar Unit to pair them again, or pair a new Pet Collar Unit, follow the procedures below: 1. To pair them again unless the Pet Collar Unit loses its link with each other once they are already paired. To power off... (see "Powering On/Off the Wireless Fence Unit" on page 21 and "Powering On/Off the Pet Collar Unit" on the Pet Collar Unit. Using the Pet Collar Unit 3.1 Powering On/Off the Pet Collar Unit To power on, press and hold POWER KEY on page 20). 2. The unit vibrates once and the Power...
User Guide
Page 21
...of correction or press to 15). 4.5 Deliver Static Correction 1. on the Wireless Fence Unit until is 15. 3. Press or to select a Pet Collar Unit (1 or 2) to which you wish to the current level of correction is displayed. Using the Wireless Fence Unit 21 Using the Wireless Fence...on , short press POWER KEY Unit until is selected. 4.3 Turn Fencing Mode On or Off To fencing mode turn on or off . indicates that collar number 2 is displayed. 2. The number corresponding to transmit fencing signals. The Indicator LED on the Wireless Fence Unit. 2. If this is on the...
...of correction or press to 15). 4.5 Deliver Static Correction 1. on the Wireless Fence Unit until is 15. 3. Press or to select a Pet Collar Unit (1 or 2) to which you wish to the current level of correction is displayed. Using the Wireless Fence Unit 21 Using the Wireless Fence...on , short press POWER KEY Unit until is selected. 4.3 Turn Fencing Mode On or Off To fencing mode turn on or off . indicates that collar number 2 is displayed. 2. The number corresponding to transmit fencing signals. The Indicator LED on the Wireless Fence Unit. 2. If this is on the...
User Guide
Page 23
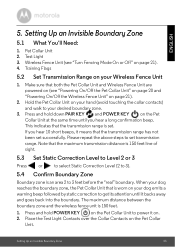
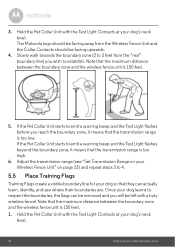
... or 3 Press or to select Static Correction Level (2 to 3). 5.4 Confirm Boundary Zone Boundary zone is set. Press and hold POWER KEY on the Pet Collar Unit to get its attention until you hear 10 short beeps, it means that the transmission range has not been set transmission range. Note that... on your dog emits a warning beep followed by static correction to power it backs away and goes back into the boundary. ENGLISH 5. Hold the Pet Collar Unit on . 2. Setting Up an Invisible Boundary Zone 5.1 What You'll Need: 1. Make sure that is 150 feet. 1. Place the Test Light ...
... or 3 Press or to select Static Correction Level (2 to 3). 5.4 Confirm Boundary Zone Boundary zone is set. Press and hold POWER KEY on the Pet Collar Unit to get its attention until you hear 10 short beeps, it means that the transmission range has not been set transmission range. Note that... on your dog emits a warning beep followed by static correction to power it backs away and goes back into the boundary. ENGLISH 5. Hold the Pet Collar Unit on . 2. Setting Up an Invisible Boundary Zone 5.1 What You'll Need: 1. Make sure that is 150 feet. 1. Place the Test Light ...
User Guide
Page 24
...removed and you wish to 3 feet from the Wireless Fence Unit and the Collar Contacts should be left with a truly wireless fence! Hold the Pet Collar Unit with the Test Light Contacts at your dog's neck level. 24 Setting...Test Light Contacts at your dog so that the transmission range is 150 feet. 1. If the Pet Collar Unit starts to 4. 5.5 Place Training Flags Training Flags create a visible boundary line for your dog... boundary zone and the wireless fence unit is too low. The Motorola logo should be facing away from the "real" boundary line) you will be facing upwards. 4.
...removed and you wish to 3 feet from the Wireless Fence Unit and the Collar Contacts should be left with a truly wireless fence! Hold the Pet Collar Unit with the Test Light Contacts at your dog's neck level. 24 Setting...Test Light Contacts at your dog so that the transmission range is 150 feet. 1. If the Pet Collar Unit starts to 4. 5.5 Place Training Flags Training Flags create a visible boundary line for your dog... boundary zone and the wireless fence unit is too low. The Motorola logo should be facing away from the "real" boundary line) you will be facing upwards. 4.
User Guide
Page 25
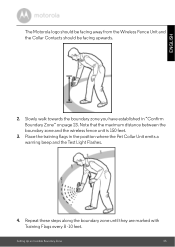
Place the training flags in "Confirm Boundary Zone" on page 23. ENGLISH The Motorola logo should be facing away from the Wireless Fence Unit and the Collar Contacts should be facing upwards. 2. Setting Up an Invisible Boundary Zone 25 Slowly walk towards the boundary zone you have ...established in the position where the Pet Collar Unit emits a warning beep and the Test Light Flashes. 4. Repeat these steps along the boundary zone until they are marked with Training Flags...
Place the training flags in "Confirm Boundary Zone" on page 23. ENGLISH The Motorola logo should be facing away from the Wireless Fence Unit and the Collar Contacts should be facing upwards. 2. Setting Up an Invisible Boundary Zone 25 Slowly walk towards the boundary zone you have ...established in the position where the Pet Collar Unit emits a warning beep and the Test Light Flashes. 4. Repeat these steps along the boundary zone until they are marked with Training Flags...

User Guide
Page 26
... dog, however much of this time will be spent closely supervising its activity and reaction to the invisible boundary. • Remove the Pet Collar Unit after each training session and be sure to keep your dog confined or restrained during the training process. • For best results, ...regardless of how quickly your dog on a leash connected to a leather or nylon collar. To get the most from areas including gardens, furniture, trash, counters, and more, your new Wireless Fence for your dog. You can't determine ...
... dog, however much of this time will be spent closely supervising its activity and reaction to the invisible boundary. • Remove the Pet Collar Unit after each training session and be sure to keep your dog confined or restrained during the training process. • For best results, ...regardless of how quickly your dog on a leash connected to a leather or nylon collar. To get the most from areas including gardens, furniture, trash, counters, and more, your new Wireless Fence for your dog. You can't determine ...

User Guide
Page 27
... boundary and good things happen whenever it is to teach your dog that your dog hears the warning beep only, without adding pressure to the Collar Contacts on page 21). 2. Training Program 27 Get some tasty treats or your dog's favorite toy. Put a separate... collar on your dog's neck above the Pet Collar Unit, without being subject to any static correction (see "Set the Static Correction Level" on it goes outside the boundary. ENGLISH 6.2 Training Tips • Do ...
... boundary and good things happen whenever it is to teach your dog that your dog hears the warning beep only, without adding pressure to the Collar Contacts on page 21). 2. Training Program 27 Get some tasty treats or your dog's favorite toy. Put a separate... collar on your dog's neck above the Pet Collar Unit, without being subject to any static correction (see "Set the Static Correction Level" on it goes outside the boundary. ENGLISH 6.2 Training Tips • Do ...